DIY Mother’s Day Sign

Hello friends! It’s Barbara from Chase the Star, and today I’m happy to share another simple DIY project. Mother’s Day is almost here and Moms love it when we make them gifts, right? Well they did when we were kids, so why not continue the tradition?

DIY Mother’s Day Gift

[pinit]

DIY-Mothers-Day-Gift-via-Chase-the-Star-for-Saved-By-Love-Creations-bibleverse-proverbs31-

[pinit]

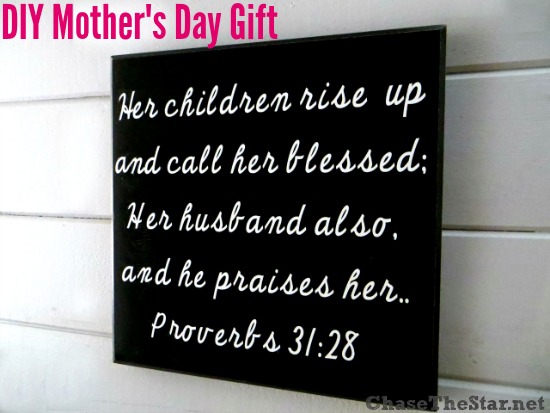
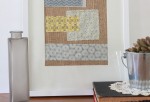
I love Proverbs 31 and I think verse 28 is perfect for mothers as a reminder of how much she should be cherished and appreciated! Of course it would make a great DIY project, so I headed to the thrift store and picked up this picture:

DIY Mother's Day Gift..update a thrift store picture! via Chase the Star for Saved By Love Creations

It’s the perfect size and the back already has a hanger!

How to DIY a Sign

Materials:

Second hand sign (thrift store, garage sale, etc.)

Sanding block

Spray paint

Die Cut Machine (I used the Cricut Explore)

Adhesive vinyl / Transfer paper

Step 1: This picture is actually a sticker, so I wet the whole thing and peeled it off with a scraper. After it was dry I went over it with a sanding block.

IMG_4464

Step 2: Spray it in the color of your choice; I went with gloss black.

IMG_4468

Step 3: Create the verse on the cutting machine, cut it out, and adhere it to the painted wood (for instructions on how to do that click here). Instead of peeling the lettering and painting, I just kept the white vinyl on there.

IMG_4469

Step 4: Go over the whole piece with the sanding block, carefully! This step is optional but it will reduce some of the gloss (if you used gloss paint) and give it an overall ‘worn’ look.

Since the hardware is already on, all you have to do is wrap it up in pretty paper and give it to the Mom in your life!

DIY Mother's Day Gift Proverbs 3128 via Chase the Star

Play around with the fonts on your machine and choose the one that you like the best. I wanted my sign to be simple, so I went with cursive. I think I will make a few more so I can pass them out to friends, back to the thrift store I go!

For more creative DIY ideas stop by Chase the Star, and follow me on Facebook, Google+, Pinterest, and Instagram!

See you next time!

New Signature

More SBLC Mother’s Day DIY Inspiration!

Over 60 Mother’s Day Gifts to make for Less than $10!!

60+ DIY Mothers Day Gifts for under $10

Make Geometric Modern Jewelry With Balsa Wood

Wooden jewelrymaking Tutorial @savedbyloves


Have you ever wondered what you could do with balsa wood?  I mean besides kid school projects?  I inherited a stack of the stuff and it has been stowed away for years, waiting for me to be struck with inspiration.  I saw these cool, modern DIY jewelry pieces from Infinity Blend and now I can’t wait to get started!  You don’t have to have special power tools with this wood, just a craft knife and tiny screw driver you would use on your eyeglasses.

[pinit]

Make DIY Jewelry With Balsa Wood @savedbyloves

[pinit]

Click on the image above for the full tutorial, or go HERE:

How to make handmade wooden jewelry with simple tools

Be sure and thank Maria for sharing with SBLC!

Be sure and check out our other jewelry tutorials here at Saved By Love Creations!

Powered by CGView

Make a DIY Terrarium Necklace

[pinit]DIY Terrarium Necklace Tutorial using Tim Holtz Corked Cloche @savedbyloves[pinit]

This tiny little treasure is easy to make and takes just minutes.  I found a new to me product from Tim Holtz called Corked Domes and knew immediately that I would be making a terrarium pendant with them.  There is glass drilling required, but do not fear.  You can do it, no problem.  I will help you and you will be a pro in no time.  I am warning you now that I used fake plants to make my terrarium.  You can use live plants.  It is way hipper if they are alive, but I have a tendency not to water things, so I went plastic.  If you are honest and you don’t have a PhD in succulentology, you’ve gotta give me that they look like the real deal.

SUPPLIES:

Rotary tool (I use Bead Landing Rotary Tool

Diamond Drill Bits

Tim Holtz Corked Domes

Small container of water and lint free towel

Hot glue/glue gun or Flora Bond if using live plants

Necklace Tutorial

Moss, small stones, mushrooms and whatever you want in your dome

Succulents (live or fake) – I got my fake succulents at Michael’s

20 Gauge copper wire or eye pin

Round Nose jewelry pliers

Flat nose jewelry pliers

Needle nose pliers

 Flush wire cutters

Chain or cord for hanging your pendant

DIY Terrarium Necklace

TUTORIAL:

First you need to drill a hole in the top of your dome for a place to insert wire for hanging the pendant.  Follow the detailed instructions I showed you in this tutorial:  Mason Jar Chimes Tutorial and Drilling in Glass.

NOTE:  These glass domes are very thin.  I tried drilling the hole using my dremel and shattered the first dome I attempted.  I like the rotary tool used in the tutorial linked above because it is way fewer RPMs than my dremel and it has adjustable speed.  Many people swear by their Dremels for drilling glass.  I find my rotary tool way easier and I have success 99% of the time with it.

Make a pendant bail

Either use an eye pin (pictured) or cut a lenght of wire about 4 inches and create a loop in one end with your round nose pliers.

How to Wire Wrap

Insert wire through Dome hole so that loop is on inside, then use flat nose pliers to bend wire to 90° about 1/8-1/4 inch above where it exits the top of the dome.

Jewelry Making Tutorial Terrarium Necklace

Use round nose pliers to grab the a few mm past the bend.  With your free hand, grab the wire end and wrap wire around the pliers to form a loop.  (That gunk on the round nose pliers is Tool Magic – it coats your jewelry making tools so they don’t leave scratches and dents in soft wire).

Handmade Jewelry Tutorial Saved By Love Creations

Wrap the remaining wire starting at the base of the loop down to the top of the dome.  Trim off excess wire with flush cutters and tuck in the end with needle nose pliers.  Now you have your wire bail for hanging your pendant!

Necklace Tutorial

Lay out your goodies and start gluing things into place on the cork.  Flora Bond works with live plants and won’t kill them!  I used hot glue since mine are artificial.

How to make your own jewelry

Once you have everything in place, add the dome and string your chain.  You are now super cool…

How to make a Terrarium Necklace

These would be cute as keychains too.  If you go crazy and your junk won’t fit in the dome, just tear some off and patch up any glue spots showing with moss.  Play around until you are satisfied with how it looks.

Remember last year when I showed you how to make bigger terrariums?

How about our 50+ DIY Terrariums and Creative Planters?

Upcycle a Glass Bottle Into a Lamp

[pinit]

How to make a lamp from a bottle @savedbyloves with @modpodgerocks adhesive stencils @plaidcrafts

[pinit]

If you have ever thought it would be too hard to turn a bottle into a lamp, I am here to change your mind about that.  Not just any lamp, mind you, but a sparkly, polka-dot spangled, fabulous lamp thanks to Mod Podge Rocks adhesive stencils from Amy Anderson and Plaid Crafts!  Read on to see how you can make your very own in less than an hour.  It is true.

SUPPLIES:

Mod Podge Rocks Adhesive Stencils @plaidcrafts

Glass Bottle

Mod Podge Rocks Adhesive Stencils (Polka Dot Pattern)

Mod Podge Gloss Finish

Foam Spouncer

Podgeable Glitters

GE Bottle Lamp Kit

Lamp Shade

Light Bulb

Drill and 1/2 inch Diamond Hole Drill Bit

Lint free towel and rubbing alcohol

Dust mask

Protective Gloves

Protective Eyewear

Container of water with a a soaked towel or rag

TUTORIAL:

How to Drill A Hole In a Glass Bottle

Wearing gloves, mask and protective eyewear, drill a hole in the bottle where you want the cord to exit your finished lamp (in the back near the bottom).  You will be using a 1/2 inch hole saw diamond bit.

Come in at an angle to start the notch in the glass, then you will be able to come in at a 90 degree angle to continue drilling.

How to Drill in Glass Bottle

Here I am drilling at 90°.  You can see the dust from the glass being drilled.  About every 2o seconds of drilling, take the rag from the water and drip it onto the drilled area and the drill bit to cool things down and get rid of the glass dust.

* Some people do the entire thing in water, but I have found that to be inconvenient to pull off with just one person.

*Don’t press on the drill.  Let the drill bit do the work or you risk breaking the glass.  Don’t forget to cool things off with water.  Again, the glass will break if things get to hot.

How to Drill hole in a Glass Bottle

Here you can see the hole is complete, and the glass circle cut out is now inside the bottle (on the left).  Clean away the debris.

Stenciling on Glass

Clean the glass well with rubbing alcohol and a lint free towel before stenciling.  Once it is dry, place stencil and apply Mod Podge Gloss generously with a foam spouncer.

How to Paint Glass

Apply Podgeable Glitter immediately after applying Mod Podge.  Remove stencil and let dry!

Bottle Lamp Kit Tutorial

I picked up this kit at Walmart for I think $6.

How to make a bottle lamp

It comes with 3 different sized adapters for various bottle opening sizes.  It turned out that all of them were to small for my bottle, so I dug through my stash and found a big cork that fit perfectly.

Drill a hole in bottle cork

I found a drill bit just smaller than the threaded rod I needed to insert in the cork and drilled a hole for the rod.

How to make a lamp

I inserted the rod and assembled the lamp according to the instructions, running the wire through the hole drilled in the back of the bottle.

Upcycle Glass Bottles

I found a burlap lampshade at Walmart as well.  For this kit, you need one attaches at the base of the bulb (the lamp kit doesn’t come with a harp attachment).  Mine was $8.  I added a burlap flower to finish, and I am in love with my new lamp.

Recycled Bottled Art

These stencils are so easy to use!  They give great lines and come in 6 hip designs.  Head to Michael’s to grab your own, or visit Plaid Online.

Here are more awesome projects using Mod Podge Rock Stencils.  Enjoy!!

Upcycle Craft How to Make a Mason Jar Candle

[pinit]

How to Make a Mason Jar Candle

[pinit]

Last week I shared this DIY Mason Jar Chimes tutorial and I bet you were left wondering what was to come of the bottom part of the jar.  Since I cut the jar just above the “Perfect Mason” lettering, I thought it would be so cute as a candle.  Turns out I was right, don’t you think?!  Read on to see how to upcycle a mason jar into one of your very own,  These would also be great as part of your DIY wedding decor, or as gifts!

SUPPLIES:

DIY Mason Jar Candle

Beeswax

Soy wicks on metal tabs

Double sided adhesive

Melting Pot

Mason Jar bottom (see tutorial:  How to cut mason jars)

Bamboo Skewer or pencil

Clips

Scissors

Lint free cloth

Soap and water or glass cleaner

TUTORIAL:

Melt wax per instructions.  I used my Ranger melting pot, which was not really the best plan on earth since I could only melt a little bit of wax at a time, but that is what I did.

DIY Candles Mason Jar Decor

Mason Jar Crafts @savedbyloves

While that is melting, prepare container and wick. Clean container well and dry with a lint free cloth.  Adhere wick tab to double sided adhesive, and stick other side into container.  I used two wicks since the jar is big.  Three might have been even better.  That is yet to be seen.

How to Make a Mason Jar Candle Upcycle

Wrap excess wick around dowel rod, centered so that wicks are straight up and down.  Use clips to secure in place.

Recycled Craft Make a Mason Jar Candle

Pour in wax until container is as full as you would like.  Let sit overnight, trim wicks and enjoy!


Make a Mason Jar Candle @savedbyloves

I just love my candle, and the smell of beeswax is wonderful.  This is my first time tackling candle making.  Do you make candles?  Do you have any tips and tricks to share?

Sea Glass Jewelry; How to Drill Holes in Sea Glass

[pinit]How to Drill Holes in Sea Glass @savedbyloves[pinit]

I have been playing with sea glass that I bought in Florida a couple of years back, and I finally had some success with drilling holes for jewelry.  I had to break several pieces with my Dremel before getting the hang of it.  You don’t have to have a drill press to do this.  I actually find it easier to hold the drill in my hand so I can feel the pressure I am exerting.

Sea Glass Pendant DIY

This video from Marc Horne describes the technique I used for my pieces pictured.


To wire wrap your pieces like I did, visit this DIY Dichroic Fused Glass Pendant I shared with you previously.

How to Drill Holes in Sea Glass

Do you make sea glass jewelry?  What is your preferred drilling method?

Retro Style Painted Shoe DIY

[pinit]

Painted-Retro-Shoes_thumb

[pinit]

Hi there! I’m excited to share this project with you today for a few reasons – a) it’s ‘wearable art’ and what’s more fun than wearing something you created, and b) it’s a great project for Spring.

I don’t think there’s one of us who isn’t ready for Spring, right?

Seriously. What a winter!

These shoes are a paint-in-an-afternoon project too. Which I happen to love. Instant gratification and all that.

Painted-Retro-Toms-A

You only need a few supplies –

  • white canvas slip-on’s. (I got mine at Walmart for under $6.)
  • Fresh Foliage paint by FolkArt
  • Deep Ocean Blue by Folk Art
  • Pink Melon (not pictured)
  • .500 Prisma pen (a fineline Sharpie will do just fine too)

optional: Krylon Matte Spray sealer

Painted-Retro-Toms-K

Start by penciling the shapes onto the shoes. Just randomly, maybe overlapping a few here and there.

There is no right or wrong to this.

Painted-Retro-Toms-B

If you’re uneasy about freehanding your shapes, you can cut some templates out of a manila file folder.

Painted-Retro-Toms-C

Then just trace around them.

I chose these ‘guitar pick’ shapes as the outline for some retro dandelions I saw online. But you could certainly paint any shapes you wanted.

Painted-Retro-Toms-D

Fill in the shapes, starting with one color. Then move on to the second color. This helps spread the colors around evenly, painting one color at a time.

I didn’t prep the shoes in any way, just painted right on top of them and it worked great. You could, however, basecoat the entire shoe first, if you wanted another color besides white.

Painted-Retro-Toms-E

After painting the blue and green, take the end of your paint brush, dip it into some paint and ‘dot’ randomly around the shoe.

This not only adds some extra interest, it also keeps you busy while the dandelions are drying.

Smile

Painted-Retro-Toms-F

Just for fun, add a third color of dots, like Pink Melon. A sunny yellow or bright orange would be cute too, or any other color that feels like Spring.

Painted-Retro-Toms-G

Once the paint has dried, it’s time to add some little lines and dots with your fine tip marker.

Painted-Retro-Toms-H

Just little lines with a little dot on the end to look like funky dandelions.

If there’s room, draw some stems for the dandelions too.

Painted-Retro-Toms-I

You can also draw a little swirl in the dots.

Painted-Retro-Toms-J

I just added a few swirls here and there.

Painted-Retro-Toms-2

The marker will dry very quickly and then you’ll have a fresh new pair of kicks for Spring!

Which, hopefully, will be here very, very soon!

One last thing – you can seal the shoes with Krylon Matte sealer, if you choose. I didn’t because acrylic paint is really pretty durable however the sealer would also make them much easier to clean.

Thanks so much for hanging out with me today. I’ll see you again next month with another fun paint project. In the meantime, please drop by Just Paint It and say hi. You can also find me on Facebook, Google+, Pinterest and Instagram too.

signature

The 50 Plus Best Scrap Fabric Project Tutorials

[pinit]

The 50+ Best Scrap Fabric Crafts @savedbyloves[pinit]

If you are anything like me, you have fabric scraps that are so beautiful and you just can part with them.  Well, what to do?  Today I am sharing the 50 best scrap fabric project tutorials my search revealed.  You can make anything from fabric scrap home decor to jewelry, shoes and more.  Many of these are great last minute gift ideas as well.  Happy scrap busting!


How to Print on Burlap with Free Spring Printable and DIY

[pinit]DIY how to print on Burlap with free Printable wall art @savedbyloves[pinit]

Hi there everyone!
I’m so happy to be back chattin’ with you!
Do you love the look of burlap prints?
If you do, this is your lucky day because I’m going to teach you how
to make your very own right in the comfort of your home!
Honestly, this whole project took me less than 15 minutes to make
and I absolutely adore it!

SUPPLIES:

-burlap
-card stock
-scissors
-home printer
-spray adhesive

TUTORIAL:

DIY Burlap Printable-Supplies Needed

You first step is to cut your burlap to the same size as your card stock.
Spray the card stock with your adhesive and then apply your burlap on top.
 Press down and make sure that there are no lose ends.
How to print on burlap
Now it’s time to insert the burlap into the printer.
You want to make sure the burlap in on the side that will be printed on.
For my printer, I placed it in upside down.
(Please ignore the dust on my printer. Dusting is not my favorite activity!)
if I had a flower

If you would like to print my quote, 
just right click on the image below and save to your computer.
Printing on burlap at home
Then it’s time to print your design or quote.
 I chose this quote because I thought it was beautiful
and I knew I had the perfect burlap accessory to go along with it. 🙂
Now sit back and watch your fabulous art appear.
Burlap home decor
Once it’s done printing some tutorials may tell you to remove the card stock.
But I won’t. Nope.
I am going to use the card stock to give my burlap some support for when I frame it.
I didn’t want my printable behind glass because I wanted to accessorize
with some pretty burlap flowers.
So I placed the burlap print in the frame first and placed the glass behind.
To add my flowers, I simply used my glue gun.
And that was it.
Can you believe how easy that is?
I know right. I better go stock up on ink because I am going to be
a burlap printing fool!  🙂
 Are you addicted to burlap like I am?

I hope you enjoyed this easy burlap craft. 
If you would like to see more of my projects or keep up with my latest updates,
follow me on FacebookPinterestTwitterGoogle+ or Instagram.


Want more?  Check out 50+ Burlap Crafts and Decor Ideas!

Burlap DIY Decor

Easy Dollar Store Craft – Rosette Framed Dry Erase Board

[pinit]Easy Dollar Store Rose Soap Framed DIY @savedbyloves
[pinit]

Last week I showed you a wreath and bouquet made from these pretty Dollar Tree rose soaps.  You get 9 in a package, and at the store where I live the packs are 2 for $1!  I am having a blast gluing these soaps to various things.  Today I will show you how I made this rosette framed dry erase board with them and a few basic supplies.  Wake up your sweetheart with a personalized message and breakfast in bed this Valentine’s Day!

How to Make a Dollar Store Rose Frame

SUPPLIES:

Dollar Store Craft Idea

Dry Erase Board from Dollar Store

Scrap foam board or cardboard large enough to frame the dry erase board

Utility knife

Straight edge and marker

Glue Gun

Dollar Tree rose soaps

TUTORIAL:

DIY Dry Erase Board

Measure and and mark frame dimensions on foam board using straight edge and marker.  I made mine 2 inches wide and the opening to fit the dry erase board (in this case 6×8 inches).  Cut out with utility knife.

DIY Dollar Store Craft

Apply a thin strip of hot glue around the dry erase board foam frame and place your new frame on top of that.

Make a Rosette Frame From Dollar Store Soaps

Simply glue the rosettes in place with a dot of hot glue.  I went with all white this time.  That way I can use it all year round, not just on Valentine’s Day.

How to Make a Dry Erase Board

The roses made the piece to heavy to hang on the fridge with the 2 magnets that came on the back.  I didn’t really mind since I plan to display mine on a shelf.  If you want to have it on your fridge, add more magnet strips to the back.  You can get rolls of adhesive backed magnet at most craft stores.

Make a Dollar Store Valentine's Day Dry Erase Board

If you want more Dollar Store Craft Ideas, visit our 50+ Dollar Store Craft Round-up:

50+ Dollar Store Crafts to Make @savedbyloves

Privacy Policy