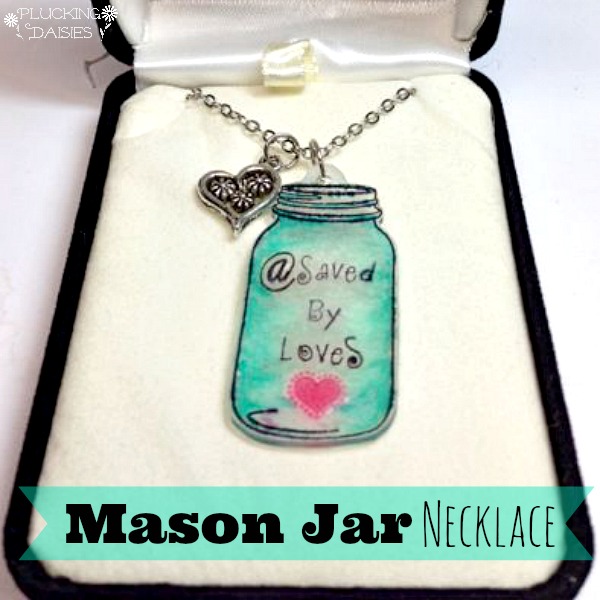
Hello SBLC friends! Amy here from Plucking Daisies to share a Shrink Plastic Mason Jar Necklace tutorial. Shrink Plastic isn’t just for kids anymore. You may feel like a kid again when working on Shrink Plastic projects (it is oh so fun) but the end results are all grown up! Grab your favorite stamps and pre-heat that toaster oven, we’re about to make some shrink plastic jewelry!
[pinit]
There are many ways to use shrink plastic for jewelry making. You can make necklaces, earrings, charm bracelets and more! Believe it or not, aside from stamping there are a variety of ways to apply images and add color to shrink plastic creations. For more info and inspiration check out my latest Shrink Plastic Charm Tutorial.
I created this Mason Jar Necklace for Johnnie when we attended SNAP! together this past April. We all know that Johnnie is the Mason Jar Maven after all.
I found this Mason Jar Stamp from Inkadinkadoo (available at Michael’s) and thought it would be perfect for a shrink plastic necklace.
How to make a Shrink Plastic Necklace
You can create your necklace with any stamp your heart desires! Be sure to check the size of your image as it will shrink down to 1/3 of its original size. Not into necklaces? No problem! How about a pair of earrings, a pin, or charms for a bracelet? Be creative and have fun…it’s pretty hard not to when Shrink Plastic is involved 🙂
Supplies:
- Shrink Plastic
- Copic Markers (or other)
- Favorite Stamps
- Archival Ink (Black)
- Embossing Powder (optional)
- Hole Punch
STEP 1: Start by stamping your images on Shrink Plastic in Archival ink. I used the Mason Jar Stamp (inkadinkadoo), Collections from the Journey Letters (7 Gypsies), and Fanciful Swirl Alphabet (Hero Arts)
*TIP* You can “Try on” different stamp combinations by stamping on a piece of cardstock and laying a sheet of shrink plastic over top to see how it looks.
STEP 2 (optional): Sprinkle embossing powder over stamped image. I like using Ranger Holographic embossing powder for a hint of sparkle and shine.
STEP 3: Color your image with Copic Markers. If you used embossing powder don’t worry if some of it rubs off during coloring. Just do your best to avoid it if you can.
Check out the link below for an awesome Mason Jar coloring tutorial by Sweet November Stamp designer Amy Young
http://www.youtube.com/watch?v=aV_fRE5zxi0
STEP 4: Use a hole punch to punch a hole at the top of your image or wherever you want it to hang. Cut your image out leaving a wide band around the punched hole to prevent breakage when you add jump rings.
STEP 5: Bake according to package directions. One thing I learned by actually READING the directions for once was that you can press down on your shrink plastic piece while it cools (15 sec) with a piece of paper to get it really flat. *Beware if you used embossing powder you will need to press very gently on the raised portions so you don’t pull them up.
How cute is this? An itty bitty Mason Jar charm complete with a Twitter handle. Saved by Love Creations is where it’s @ in my humble opinion.
STEP 6: Just add Jump rings, chain, and some cute toggle clasps and your Shrink Plastic Mason Jar Necklace is ready to wear!
If you are planning on creating one of these fun shrink plastic necklaces for a gift why not up-cycle an old jewelry box and embellish it with a few pretty bits and bobs from your stash? Have some extra charms you don’t know what to do with? Add them to your necklace. There’s nothing wrong with throwing on a little “extra charm”.
Hope you all have fun creating shrink plastic jewelry for gifts or for yourselves! I wear my shrink plastic charms with pride…and I’m sure Johnnie does too. See you all next time!
Have a charming day!
Amy*


