Easily Make Gorgeous Epoxy Clay Crystal Jewelry

How to Make Gorgeous Epoxy Clay Crystal Jewelry Square @savedbyloves

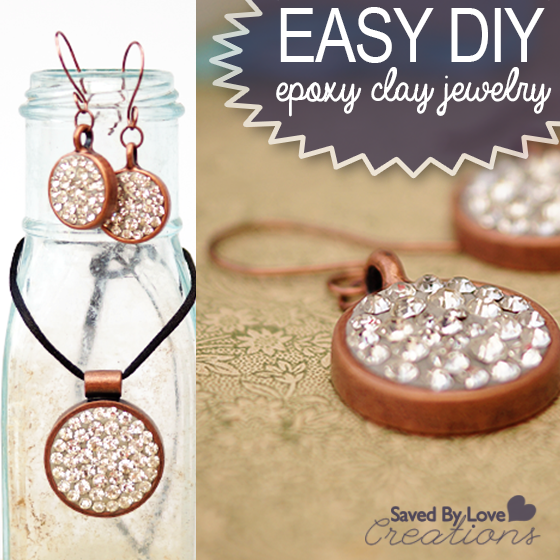
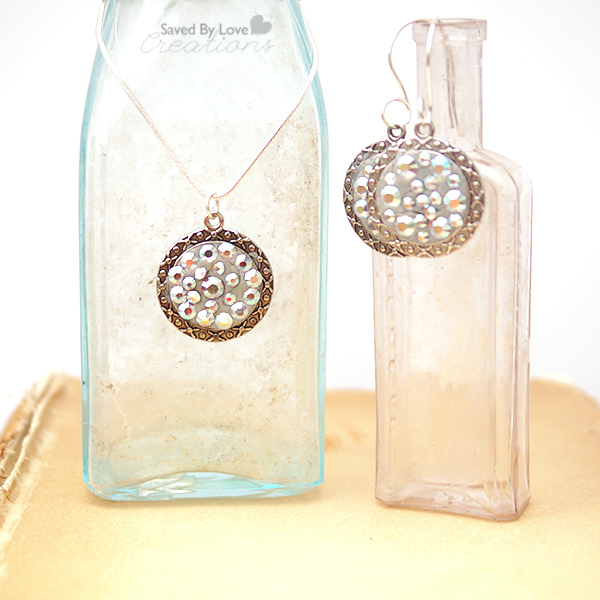
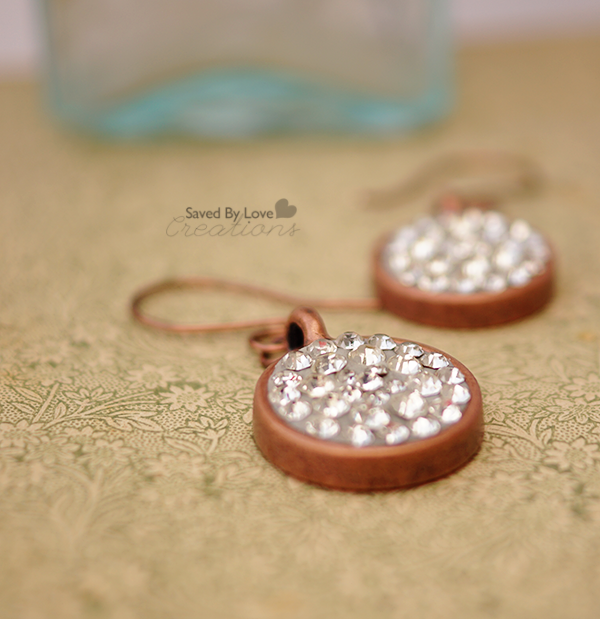
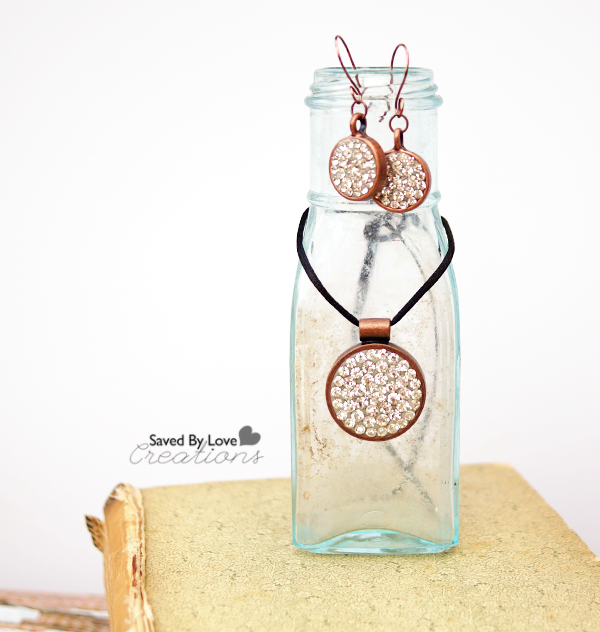
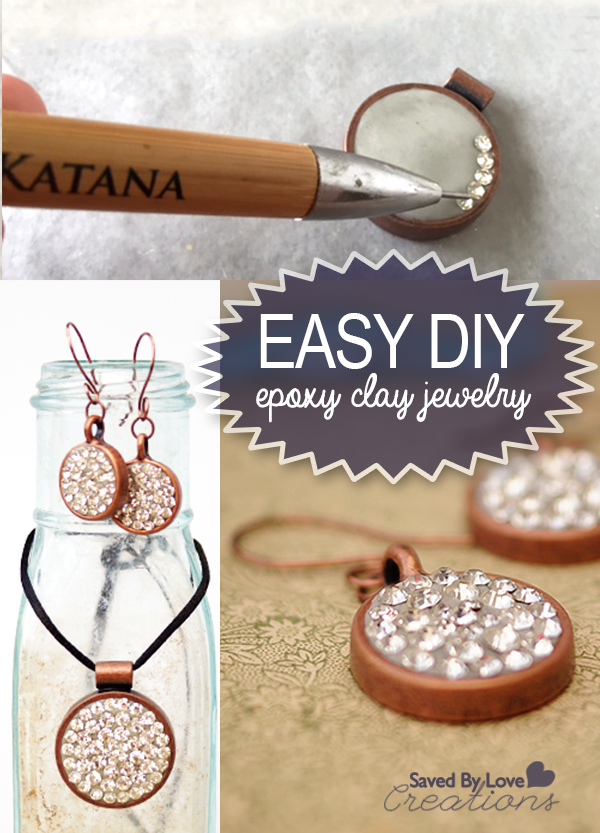
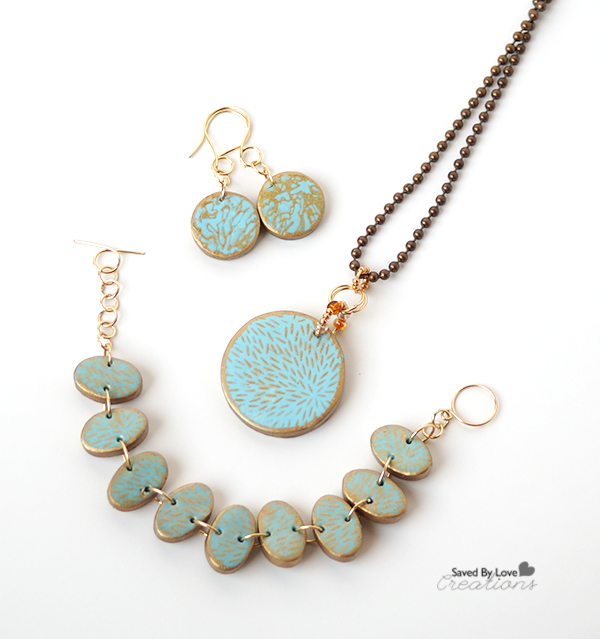
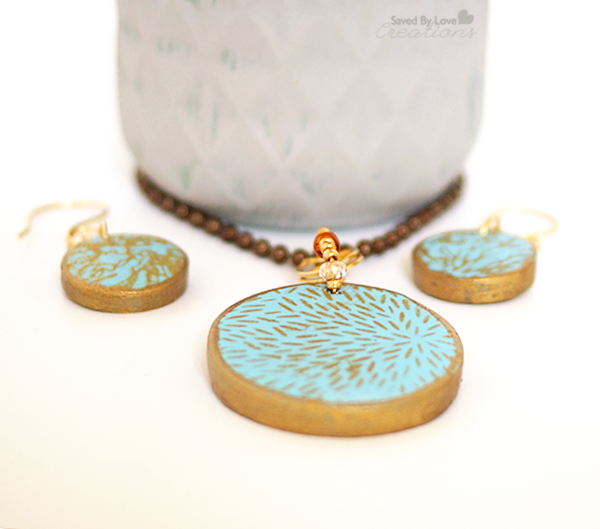
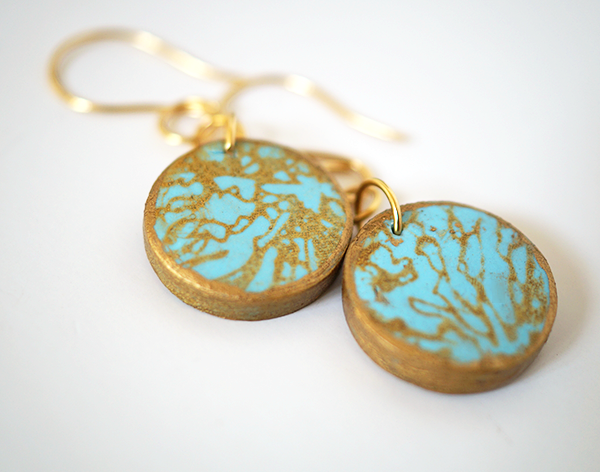
I went to CHA 2014 in Anaheim California, where epoxy clay jewelry was all the rage. I didn’t see what was so great about it, or why I would use it instead of polymer clay. It took me almost two years to get on board. Now I am a full fledge fanatic. The stuff is wonderful for embedding crystals and other small embellishments, since it is a strong adhesive. No glue is necessary, nor does it need to go in the oven. Once you mix the two parts, it starts to set and cures on its own without heat. Today I am sharing these gorgeous, blingy earring and pendant sets! My friend created hers and has zero experience with jewelry making or clay of any kind.  They came out beautifully, proving no prior knowledge is necessary!

DIY Easy Epoxy Clay Crystal Jewelry

SUPPLIES:

Supplies for Epoxy Clay Earrings

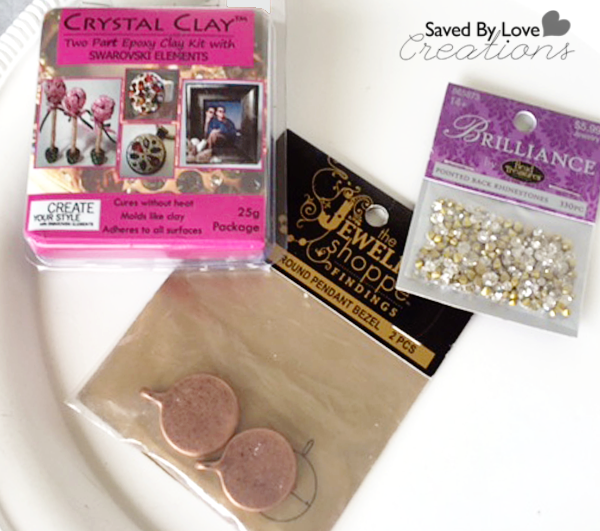
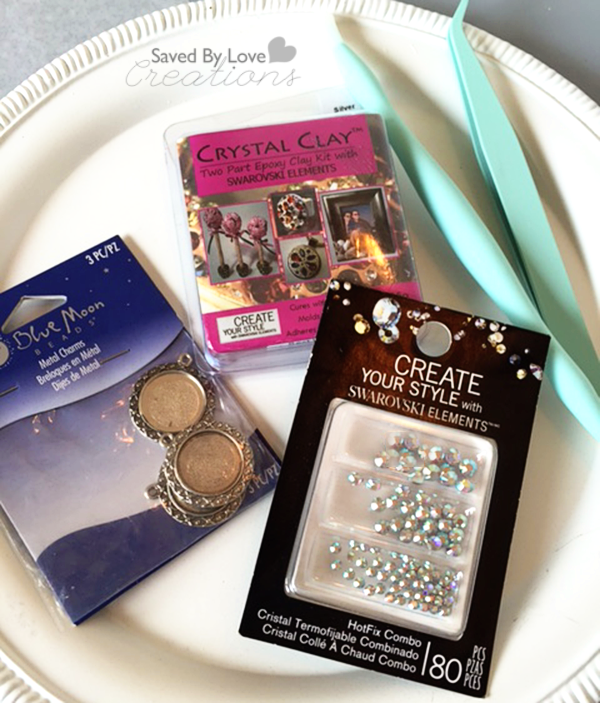
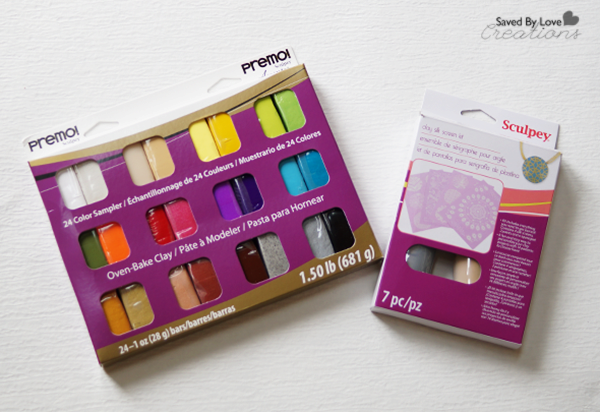
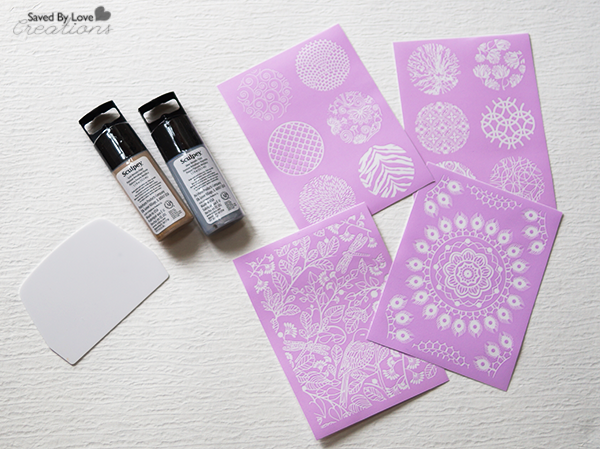
Epoxy Jewelry Clay (we used Silver Crystal Clay)

Beeswax coated toothpick (comes with Crystal Clay Kit) or my favorite tool for picking up small beads and embellishments, Crystal Katana

Crystal Chatons or flat backed Swarovski

Round Pendant Bezels

Ear wire or 20-22 gauge jewelry wire to create your own ear wire

Two pair flat nose jewelry pliers

Jump rings

Rattan cord or other necklace chain

Vinyl or latex protective gloves

INSTRUCTIONS:

Supplies for Epoxy Clay Jewelry

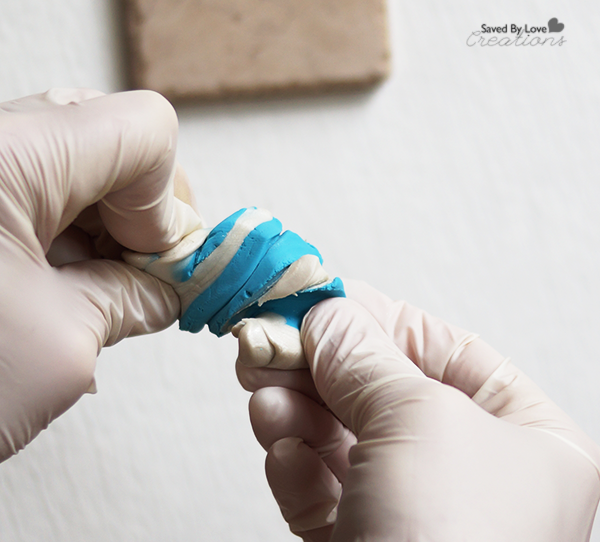
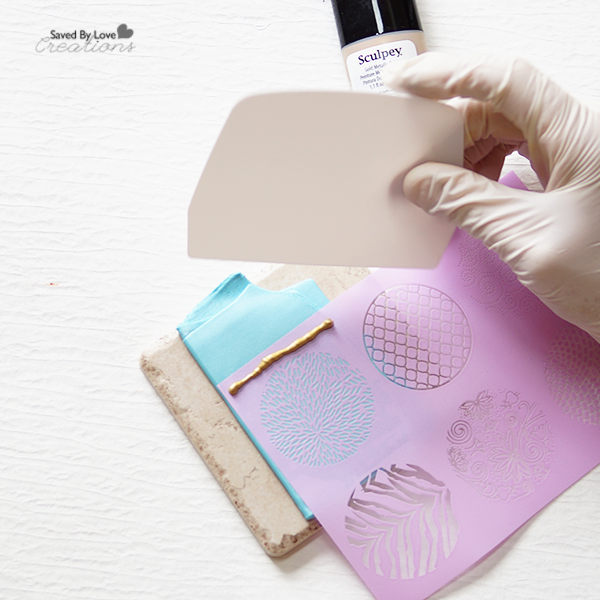
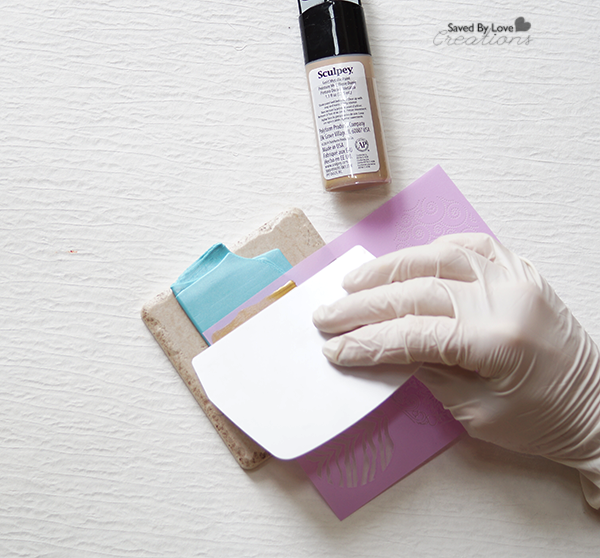
Mix clay according to instructions, equal parts of the two components and wearing gloves.

Embed Crystal Chatons into Epoxy Clay copy

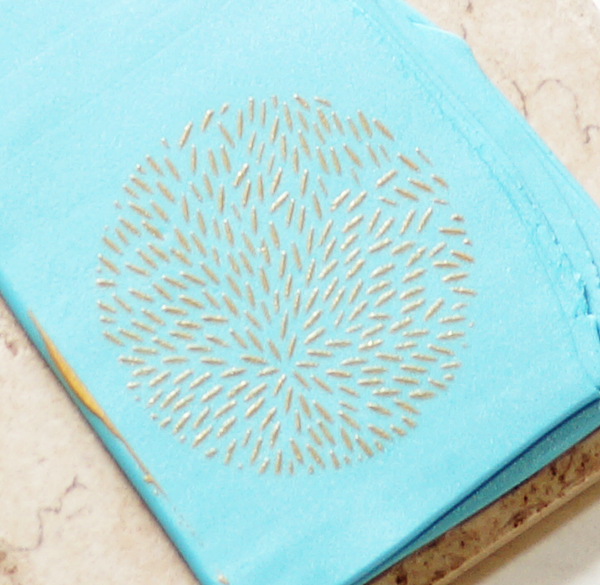
Fill bezel flush with top.

Embed Crystals into Epoxy Clay

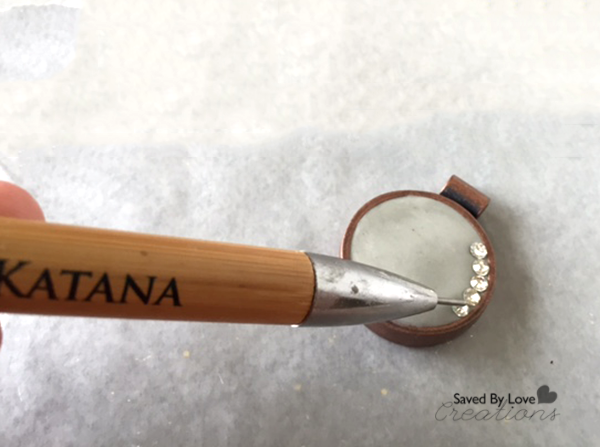
Add crystals in desired design with tool.

DIY Copper Crystal Epoxy Clay Earrings

Once cured (overnight) add ear wires with jewelry pliers and add chain or cord to pendant.

DIY Epoxy Clay Crystal Jewelry

Don’t they look so complicated, fancy and expensive?! Well, they aren’t. Your dog could probably make them.

DIY Easy Epoxy Clay Crystal Jewelry

I have gotten so many compliments already!

How to Make Gorgeous Epoxy Clay Crystal Jewelry @savedbyloves

Check out our other jewelry projects here:

Saved By Love Creations Jewelry Tutorials

Easy Silkscreen Polymer Clay Jewelry Tutorial #ScupleyProjects

[pinit]

How to Make Polymer Clay Jewelry[pinit]

I haven’t had my hands on clay for way too long.  The new Silkscreen Kit from Premo Clay was the perfect way to jump back into the medium.  If you haven’t experimented with polymer clay, stop reading this and go find some.  You will be amazed at the gorgeous pieces you can make right off the bat, from jewelry to home decor and more.  It is a medium that is very forgiving, versatile, and doesn’t require a bunch of expensive tools and equipment to get started.  Today I will show you how I made a lovely necklace, bracelet and pair of earrings that I kinda love a bunch.  You can make your own art jewelry with just a few simple supplies.  Let’s get started!

Premo Clay Jewelry Tutorial

SUPPLIES:

Polymer Clay Silkscreen Kit #SculpeyProjects

Premo Clay and Silkscreen Kit

Jump rings

2 Pairs of flat nose jewelry pliers

Toggle clasp

Earring findings

Necklace chain

Gold paint marker

Cookie cutters in circles and ovals

Bead reamer or toothpicks

Oven

Ceramic tile or flat baking pan dedicated to clay

Rolling pin or smooth bottle or glass

Protective gloves (these are optional but great for keeping clay fingerprint free)

TUTORIAL:

How to mix polymer clay colors

I began by mixing blue clay with pearly white to get my desired color.  Just twist the colors together as shown.  Continue twisting and kneading clay in your hands to mix the colors and warm/condition the clay.  Conditioning is essential when beginning any clay project.  It ensures the components of the clay are evenly distributed and the clay is soft and shapable.  This clay was super easy to condition.  I have worked with clay that is hard and brittle and takes forever to warm up, but this Premo was great!  Continue until the clay is the color and shade you want.

How to condition polymer clay

I used my Sculpey Clay Conditioning Machine to get a flat even sheet.  This costs about $20 and is well worth the investment if you are going to create with clay more than a couple of times.  You can also use a smooth glass, rolling pin or bottle to smooth the clay out on a bake-able surface.  I like to use tiles I pick up at Habitat Restore for a dime.  I have tons of them on hand for just this purpose.  Once the clay is rolled out, you don’t want to have to move it, as it will become distorted and uneven until it is baked and therefore hardened.  Having it on a surface you can just stick in the oven is super handy.

Premo Polymer Clay Silkscreen Kit #SculpeyProjects

The kit comes with silver metallic paint, gold metallic paint, 4 reusable screens (totaling 2 large single patterns and 12 mini patterns) and a squeegee.  Aren’t the designs so fun?!

How to silkscreen

Premo Polymer Clay Silkscreen Kit Jewelry Tutorial #SculpeyProjects

I choose my design, placed a thin line of gold paint, and used the squeegee to pull the color across the screen, lightly so as not to indent the clay.

How to Make Polymer Clay Silkscreen Jewelry

Here is what it looked like after the first try!  So easy and pretty.

TIP:  Make sure to immediately was the screen and squeegee so the paint doesn’t dry on them.  You want to reuse them for as long as possible!

How to Cut Shapes in Clay

TIP:  Spray armor-all onto the cookie cutter inner and outer edge so that the clay won’t stick to it and come up off the surface when you lift the cutter away after cutting.

Easy Free Polymer Clay Jewelry Tutorials

Choose an area and a cookie cutter and press it into the clay to cut shapes.  I used circles large and medium for the pendant an earrings.  For the bracelet I used a small oval cutter.

Pull the “scrap clay” away from the cut shapes and set aside.  You can recondition it and reuse it, even if it has paint on it.  Just mix it in by conditioning it with your hands or pasta machine.

How to attach clay pieces

To create holes for jump rings in your pieces, you can use a toothpick while the clay is still raw, or use a bead reamer or drill after baking the clay.  Manipulating the clay while raw always carries the risk of distorting it, so I usually wait until it is baked before creating holes.  For this project I went ahead and made the holes while the clay was raw since I was going for an organic, imperfect feel.

How to seal polymer clay

I baked my pieces at 260 for 45 minutes and let them cool.  I painted the edges and back with a gold paint marker and sealed the pieces with Matte Mod Podge after the paint dried.Polymer Clay Silkscreen Earrings DIY

I used 2o gauge gold wire to create jump rings, earring findings and a toggle clasp for my finished pieces.  You can save money and get a unique look to your pieces by making your own findings, or purchase pre made findings.

DIY Polymer Clay Easy Bracelet Tutorial

This new kit from Premo has ignited my clay jewelry flame once again!  I have made several more pieces that you will be seeing in the future.  I hope you are inspired to try some clay projects.  It is so easy, inexpensive and you will be amazed at the gorgeous projects you can make from the get go.

For more clay inspiration and product updates, follow Premo Clay on FacebookTwitterPinterest, and Instagram!


Disclosure: I received product and compensation from Polyform and Blueprint Social in exchange for my campaign.  All opinions are honest and mine, as always!

Check out what other bloggers have been up to using Premo Clay Jewelry Products!

Faux Pewter Polymer Clay Pendants

 DIY Faux Pewter pendants using polymer clay by Crafts Unleashed, featured @savedbyloves

[pinit]

Shaunte at Crafts Unleashed created these cool faux pewter pendants using polymer clay.  This is a great project for novice to experienced clayers.  If you have never used polymer clay before, and you like the idea of creating faux looks of all kinds, give it a shot.  It  is a medium that is inexpensive and easy to create with, right out of the package.  You don’t need expensive equipment, just an oven, some household tools and your hands.

Here are some of my favorite Polymer Clay  projects from SBLC.  Just click the thumbnail to see the tutorials.

These and more polymer clay tutorials can be found in our TUTORIALS PAGE!

DIY Woven Paracord Bracelets

woven paracord bracelets from Remarkably Domestic featured at savedbylovecreations.com

Check out these fun, simple to whip up, woven paracord bracelets from Remarkably Domestic!  I picked up some fun cord  last week at Lowe’s and this tutorial is the perfect project for it.  What great colors she chose, and the chunkiness is what a wrist needs for the fall.  Stay tuned for several Saved By Love Creations bracelet tutorials in the next week or two.  In the meantime, get your fix with our arm party roundup…

DIY: Polymer Clay Necklace Inspired by Anthropologie

Polymer Clay Bead Necklace Tutorial

If you have never used polymer clay, this is a great project to get your feet wet.  I love the stuff, and was inspired recently to create these necklaces by the popular Anthropologie ball beaded piece.  I added my own twist of ombre color gradation and bead size gradation.  I also went for a simple chain instead of a ribbon. The pearl finish was accomplished in one easy step that glazes creates the pearl effect, using Mod Podge Pearlized Glaze.

Polymer clay is a perfect medium to create reproducible color gradient beads.  You will see in the tutorial, I just rolled out white and blue (or corral for that version) to the same thickness in my pasta machine.  Then I used a cookie cutter to cut 5 triangles of the main color for the central bead.  The two adjacent beads are a mix of 3 main color and one white triangle.  The next is lighter and smaller still, using 2 triangles of main color and 1 of white.  You can use any recipe you want, just keep track of it, especially if you are making more than one of the bead in that size and color.  This will make more sense when you see pics!

Polymer Clay Gumball Necklace

Supplies:

Pasta machine

Baby wipes (clean hands between handling different colors of clay)

Polymer clay in color and white (I used Fimo Soft)

Cookie cutter

Tile or baking tray

Dremel or other drill

Drill press or rice bags

Mod Podge Pearl Glaze or finish of choice

toothpicks and Styrofoam

Antiqued gold metal chain or cording of choice

Tutorial:

Polymer Clay Necklace Tutorial

For drilling, hold beads steady vice or bags of rice.  Wear protective eye gear!

Anthro Inspired Polymer Clay Necklace

Polymer Clay Ombre Bracelet DIY

Grab some clay and create your own gumball ombre jewelry!

Sizzix Embossed Poly Clay Pendants

Sizzix embossed clay pendants

Today, I thought I would share some more polymer clay + Sizzix creations.  For this piece, I baked a very thin (6 on my pasta machine)  sheet of polymer clay (white fimo) for 45 min at 275°.    I let it cool, then embossed with Sizzix using  a Tim Holtz clock embossing folder.  Then I colored it with alcohol inks.  I cut a piece to fit the bezel, used Crafter’s Pick glue to adhere it into the bezel, and layered watch parts and the word on a transparency in resin (Lisa Pavelka Magic Glos).

Polymer Clay and Resin Jewelry

Here is another pendant I made using the same technique.

Polymer clay and resin jewelry

Much more to come with clay and Sizzix.

Polymer Clay & Resin Word Bracelet

Have you seen the polymer clay/Sizzix kick going on here at SBLC?  Well, I didn’t have a die to cut the exact circle I needed for these bracelet blanks, so I used a paper punch for a circle that fit perfectly.

You can easily make this beautiful custom word bracelet at home.  Here is how…

For this project you will need:

  • Polymer clay sheet at thickness of  7 (9 being thinnest), white, baked 45 min at 275
  • Alcohol inks in desired colors
  • Crafter’s pick glue
  • Circle punch to fit bracelet bezels (Epiphany Crafts 14 circle used here)
  • Letter stickers or rub ons
  • Magic glos resin

Instructions:

Polymer Clay Bracelet Tutorial

Polymer Clay Jewelry TutorialThat is it!


Stamped Polymer Clay Word Pendant

Stamped Polymer Clay Pendant

Today, I thought I would share with you another stamped polymer clay pendant.  I recently signed up with Cindy Lietz’s polymer clay library, and was reminded about how fun it is to make bezel pendants with clay.  The Polymer Clay Tutor video on stamped bezels inspired me to dive into these word pendants. If you are interested in developing your polymer clay skills, I cannot stress enough how wonderful, and under-priced, Cindy’s membership videos are.  I am not being compensated in anyway for saying so, I am just that excited about the tips, tricks and inspiration jam packed into each video I have watched so far.  Seriously, she is a fantastic teacher!!

Back to the pendants, I love how simple they are to create, and how each one comes out a little differently.

For this particular piece, I used the bezel from a pendant I scored for cents at a garage sale.  I took a hammer to it and rid it of its glass covered image so I was left with just the bezel.

Polymer Clay Word Pendant

Since the bezel was antiqued silver, I wanted to give the pendant an antique feel.  I mixed scrap clay to get the aqua you see in the final piece.  With my fingers, I mashed the clay into the bezel, and smoothed it out into its cabochon shape.  Once I was happy with the shape, I used metal stamps for the word “JOY”, and a clear cling butterfly stamp for the butterfly.  I used a stylus to add a little more texture randomly, then baked for 45 min at 275°.

TIPS:

  • Remove fingerprints in raw clay before baking by smoothing armor-all lightly over the area until prints are gone
  • Spritz stamp with armor-all or water before pressing into clay to prevent it from sticking

To finish, I used a mixture of glaze and black acrylic paint; painted the entire piece, then wiped away the glaze/paint mixture, leaving the black in the depressed areas.  When this dried, I sealed with 2 coats of sculpey satin glaze.  I love this stuff.  It is easy to apply, dries to a lovely finish, and is inexpensive.

Polymer Clay Pendant Tutorial

What do you think?  Don’t worry, I am still on my Sizzix kick.  Stay tuned!!

Polymer Clay Pendants {Inspired}

Polymer Clay Pendants

A recent beach vacation left me inspired to break out the polymer clay again, after a

long hiatus!  It happened when I walked upon a vendor on the pier, with beautiful

handmade polymer clay pendants, unlike any I had seen.  I asked her what

she used to color her pieces so vibrantly… acrylic paint!  Who knew?

I had actually never done that.  It is so obvious.  I have used mica

powders, pigment inks, copic markers, chalk… pretty much everything but

good ol’ acrylic paint.  The artist recommended

using toothpicks to apply the paint, so I came home and

gave it a shot…

All I did for these was condition white clay into a sheet, stamp on it, cut out

into various shapes with craft knife, then bake.  I painted them

after they cured.  For some of the lettering I ended up using

PITT artist pens.

Polymer Clay Pendants

These were fun and simple to make.  Etching in raw clay makes the artist in me all smiles.

Try it.  You will love it!

Polymer Clay Pendant Tutorial

Chevron Polymer Clay Pendant Tutorial


Chevron Clay Pendant
*ORIGNALLY POSTED AT MOD PODGE ROCKS*
Today, I will be showing you how to make a polymer clay chevron pendant (yes, the Target Missoni line has everything to do with the inspiration behind this project).  If you have never touched polymer clay, it is ok.  You can do this.  It is super easy, fast, and cheap, so let’s go…Chevron Clay Pendant

Supplies:

  • Polymer clay in a light enough color to make your transfer visible.  White clay shows the image the most true to color, but you can get interesting effects by using lightly colored clays as well.  Here, and in general I use FIMO soft.  It is easiest to work with, in my opinion.
  • Pasta machine, or acrylic roller or drinking glass to roll clay into uniform sheet
  • Small tile to bake clay
  • Mod Podge Dimensional Magic
  • Mister bottle with water
  • Pendant Bezel for the square pendant, Pendant bail for the round pendant
  • Cookie cutter in desired pendant shape
  • Craft knife or clay blade
  • Armor-All
  • Bake-able clay adhesive
  • Chevron images, here.  For this technique, the images must be using a laser jet.  A portion of these chevron prints are courtesy of Annie Howe.  Find more of her chevron designs in her Etsy shop!

Chevron Clay Pendant

Instructions:

  • Condition clay:  Polymer clay is composed of a bunch of particles that need to be “conditioned” before using, which is a fancy way of saying squished and rolled until they are mixed together evenly.  I roll the clay around in my hands, pulling twisting and mashing it together until it is soft enough to flatten using my clay dedicated pasta machine.  This is handy because it has 9 different numbered thicknesses, and for serious clayers, sometimes exact thickness is important.  For this project, just warm the clay up by kneading it in your hands for a couple of minutes, and roll into a thin sheet using an acrylic roller or drinking glass.
  • Working on a ceramic tile (these are great for clay because you can work right on them and they are safe to bake your clay on, so you don’t have to handle the raw piece anymore than necessary), lay your conditioned clay sheet flat and place your image face down on the clay.  Here I am using patty paper underneath the clay, which is also bake able.  I do this when I am baking several pieces on a big cookie sheet so I can just move the patty paper instead of touching the raw clay with my fingers.  Fingerprints have ruined one to many finished works, which is also the reason for the rubber gloves.  Burnish the image to get rid of any air bubbles between the image and the clay.

Chevron Clay Pendant

Chevron Clay Pendant

  • Spray a few squirts of water on the back of the image…

Polymer Clay Tutorial

  • Lightly run finger across wet image to remove paper backing.  You may want to re wet the paper to get it to roll off.  Water will not remove the ink, but too much pressure may do so and ruin the image.

Polymer Clay Image Transfer

Polymer Clay Image Transfer

  • For the bezel setting pendant, spray the bezel with Armor All.  This is a release agent, preventing the clay from sticking to the bezel.  Line the bezel up with the image and place it face down, pressing the back to create a impression in the clay.

Polymer Clay Image Transfer

Polymer Clay Image Transfer

  • Carefully lift the bezel, and cut along the square impression using a craft knife or clay blade.

Polymer Clay Image Transfer

  • Next, you can bake the square as is (275° for 20 min), remove from oven, let cool for 5 min, then glue it into the bezel using E6000 or you favorite strong hold craft glue.  I chose instead to bake the clay in the pendant bezel. It is metal, and withstands the low temp required to bake the clay, no problem.   This way, I know for sure it fits perfectly.  I use a dab of bake-able polymer clay adhesive to adhere the clay to the metal bezel.  If you don’t have this, and you still want to bake the clay in the bezel, you can do that.  Just pop the piece out of the bezel after it is baked and put a dab of E6000, or super glue, on the bezel before replacing the clay piece.

Polymer Clay Image TransferPolymer Clay Image Transfer

  • For the round pendant with no bezel, I folded the clay sheet in half to double its thickness, then cut out my image with a circle cookie cutter (don’t forget to spray the cutter with armor all so it won’t stick to the clay).  Bake the clay per package instructions.  You will have to glue a pendant bail to the finished piece to attach it to a necklace, or you could poke a hole through the pendant for wiring, like I show here.

Polymer Clay Pendant Tutorial

  • After Baking the round piece, I sanded the edges with 2000 grit wet to dry sandpaper to smooth it out, then inked around the chevron image with color box chalk ink to get the blue color you see in the finished pendant.  I love chalk inks with polymer clay!  They are so vibrant, and blend-able.

Polymer Clay Pendant Tutorial


  • FINISHING:  You can touch up any areas the image transfer didn’t take using a permanent marker before sealing with Mod Podge.  I use a baby wipe to get rid of any stray paper backing, then cover with Mod Podge dimensional magic.  Several thin coats are best, drying an hour or so in between.  Add to your favorite chain and that is it.  Here is another bezel setting piece I made using the printable provided…

Polymer Clay Chevron Pendant

Polymer Clay Chevron Pendant

This is a great project to keep in mind for handmade holiday gifting.  You can use family photos, pets, custom text, anything you can print on a laser jet. Thank you for reading.  I hope you enjoy.

Privacy Policy