Build an Armoire & Distress it With Chalk Paint

Knobs

Ana White Armoire Plan #woodworking @savedbyloves

DIY armoire woodworking plan from Ana White and how to distress with #chalkpaint #AnnieSloan[pinit]

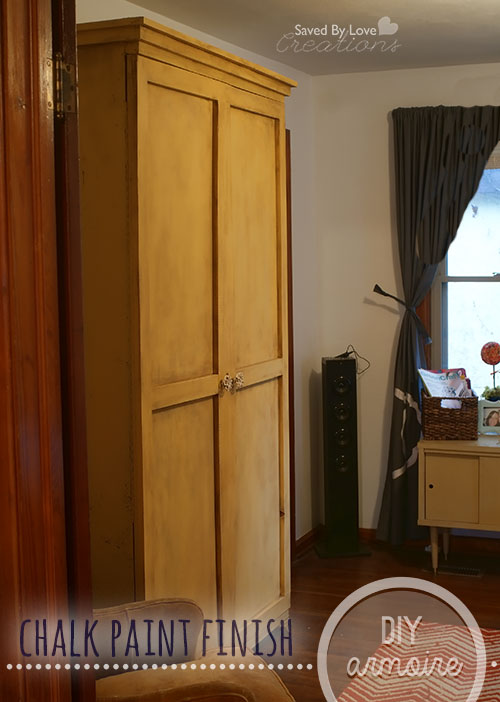
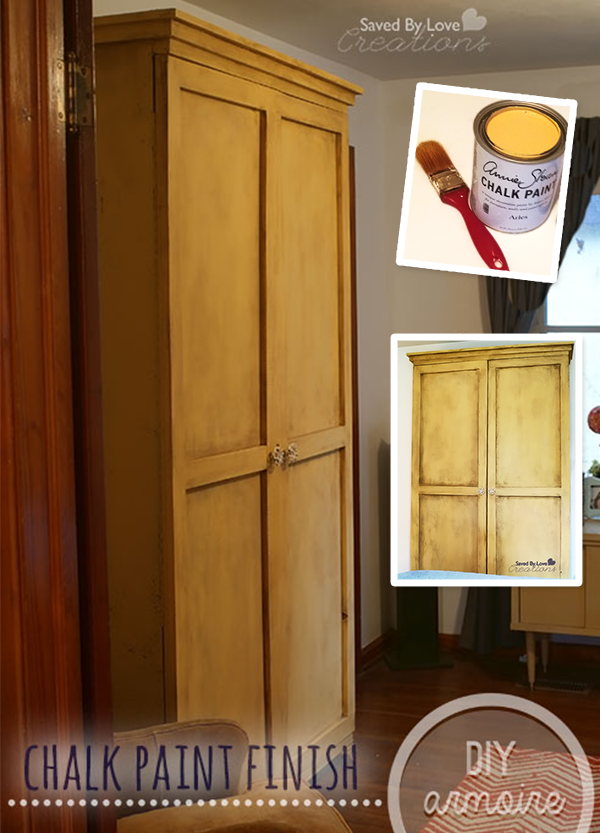
I am so excited about today’s project.  The closet situation in my new place is less than optimal (totally crappy).  In desperate need of a solution, I searched and landed on this simple armoire building plan from Ana White.  If you have been around here long, you know I am a big fan of Ana’s site.  She introduced me to woodworking and I have been covered in sawdust since that day.  This project was easy to follow.  I made some adjustments since I wanted it larger than the dimensions of the original plan, and I was improvising with salvaged wood I had on hand.

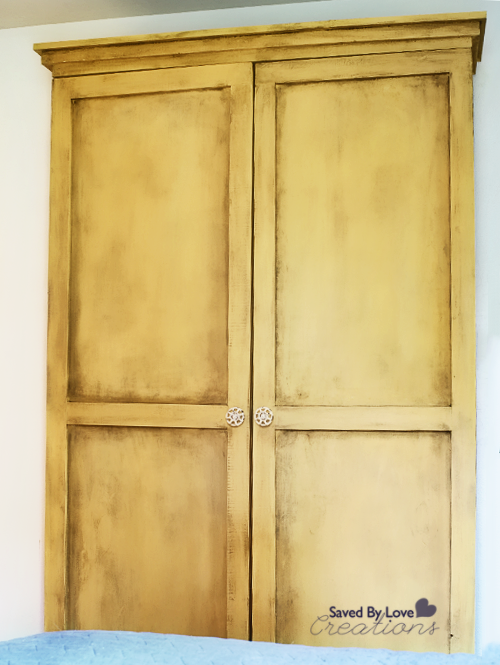
This was my first project using Annie Sloan chalk paint.  Don’t you love the color?!  It is called Arles, and I finished with Annie Sloan Clear Wax, then Dark Wax over the top of that.  Its a bit more “aged” than what I had planned.  Turns out a little of the dark wax goes quite far.  I will keep that in mind for my next project.   I still love it.  If you run into that, you can always paint over the wax.  It wasn’t that big of a deal to me in this case.  We all know I will be painting it a new color when I change my room decor anyway, right?

Annie Sloan Chalk Paint Arles

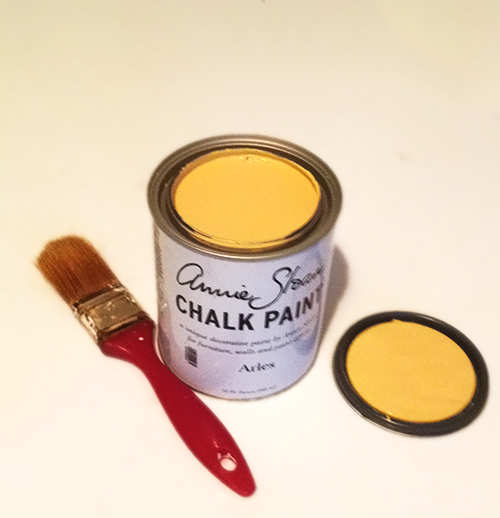
Here is the Annie Sloan paint.  Yum.

How to build an Armoire from salvaged wood

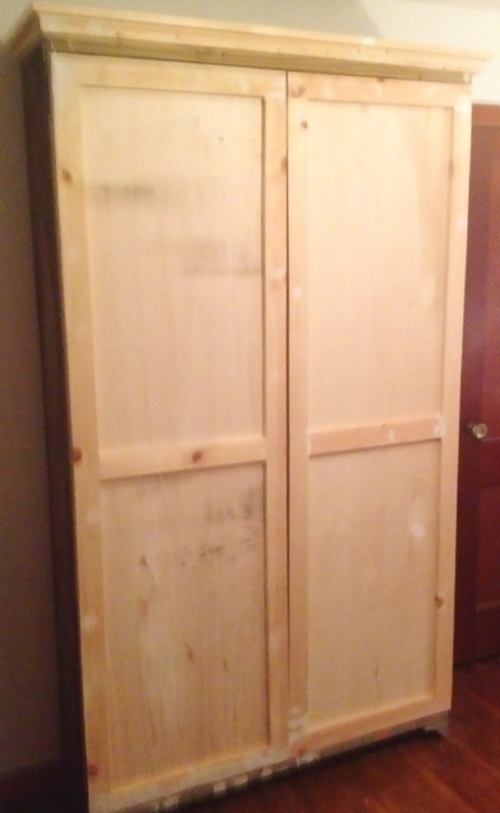
Sad quality iPhone shot of the armoire before painting.  Hard to get any shots of it really, because of the room size and… oh yeah, I made it huge.

Knobs

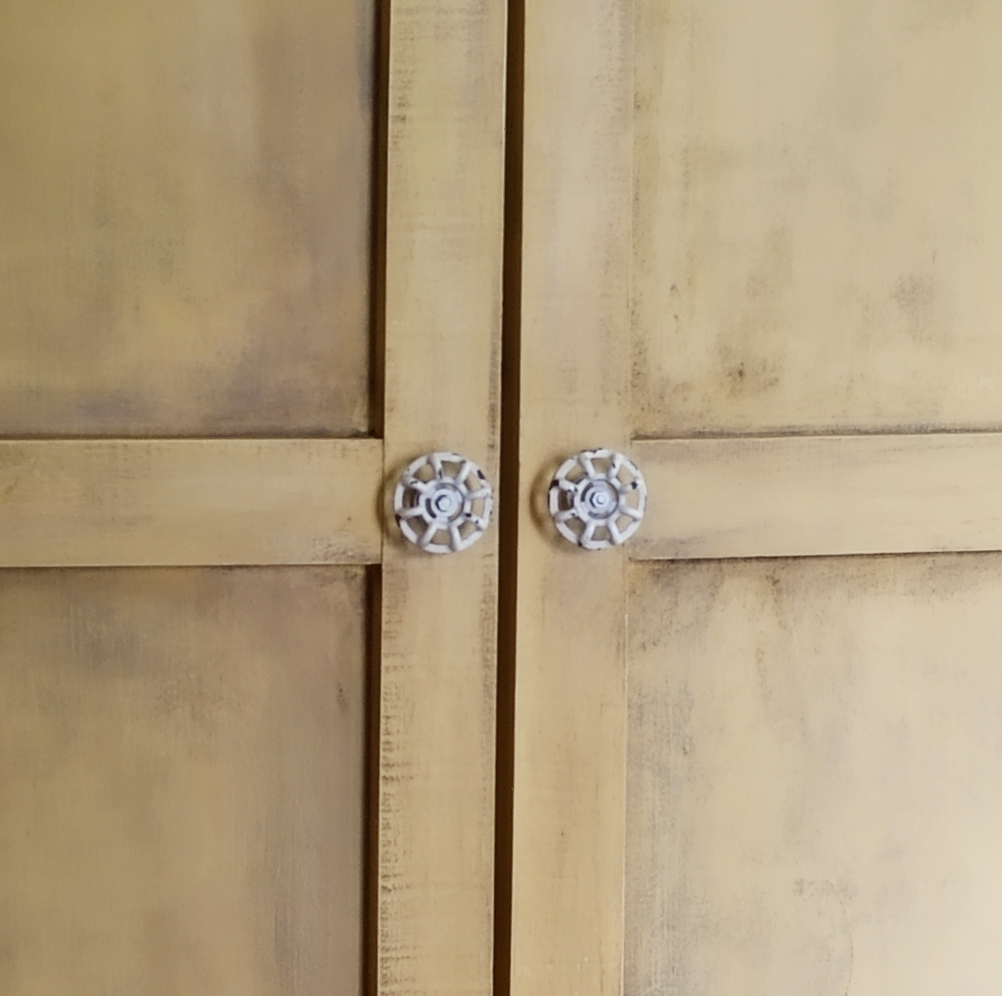
Did you check out the knobs I found at Hobby Lobby?  Perfect.

Pin

That’s it.  I love it.  Off to figure out what to build next.

Woodworking Project Gallery Page

Powered by CGView

Over 50 Things to Make from Repurposed Chair Parts

[pinit]

50+ Repurposed Chair Projects to make @savedbyloves #upcycle #furniture #DIY[pinit]

The abundance of curbside discarded chairs in my area has me looking for ways to repurpose old chairs and their parts.  Today’s post brings my favorite finds for DIY upcycling inpsiration.  I truly didn’t anticipate finding a wreath during my searching on this one, but it happened.  Not only that, but it’s pretty cool, I must say.  You will see chair back, legs, spindles, even entire chairs given new purpose in some seriously creative ways.  Enjoy!

Over 50 Awesome DIY Shelves to Make

over 50 cool DIY shelves to make @savedbyloves #woodworking #repurpose #reclaimed[pinit]

This week’s 50+ round-up is all about DIY shelves. It is amazing what you can use to create shelving, so think outside of the box and keep your eyes peeled while you are out there junking!


Revamp a Mirror into A Coat Rack for Your Entryway

[pinit]DIY Coat rack from Mirror #chalkpaint @savedbyloves[pinit]

With some scrap wood and chalk paint, you can revamp a junky thrift store mirror into this handy, distressed entryway coat rack.  This entire project was pulled off for less than $10!  I am always in need of more shelves for my pictures and knick knacks.  When I saw a similar mirror in Ana White’s book of woodworking projects for the home – “The Handbuilt Home”, I it called to mind a mirror I picked up at a garage sale for $2.

How to Revamp a Mirror

Ana White Wood Working Plan

This is the picture of Ana’s Version from the book.

How to Build a Mirror

All I did was use pallet wood scraps and cut 3 planks to fit the width of my mirror, using my mitre saw.  Two of the planks I placed perpendicular at the bottom and one horizontally at the top for a bonus shelf.  Using my scroll saw, I cut out the decorative shelf brackets for the top and bottom shelves.  To attach the shelving pieces to the mirror, I used my Kreg Jig for pocket holds, and wood glue.  The brackets I placed with my Ryobi Air Strike Nailer and wood glue.  I painted the mirror with Annie Sloan Paris Gray Chalk Paint and sealed with clear wax after sand distressing.  To finish, I added three coat hooks I picked up from the hardware store.

More of SBLC’s woodworking adventures:

Powered by CGView

Cutest DIY Pumpkin Decor

[pinit]diy pumpkin fall decor by Simply Kierste[pinit]

Why are pumpkins so cute?  Fall is my favorite time of year for so many things… running, fashion and – most of all – decorating.  You combine pumpkins with a project that utilizes scrap wood and twigs to create adorable, stripy, polka-dot decor that also happens to be my favorite color and… well… you are probably going to end up featured on my blog.  That is the case with this 4×4 striped and polka dot pumpkin DIY from Simply Kierste.  Do you not want to reach through your screen and scoop these up for your mantel?

Check out our other DIY fall decor ideas!


Powered by CGView

Build, Stain and Seal a Side Table in Less Than One Hour

[pinit]How to build a side table[pinit]

If you are looking for an easy, quick, mission style side table to build, you are going to love this project.  You can build, stain and seal this bad boy in under 1 hour, provide you stay focused, and use your Kreg jig and Minwax wood finishing cloths!  Even if you don’t have those things, you can build this pretty quickly.  For the plan details, visit Ana White’s Adirondack stool or side table free woodworking plan.

adirondack-stool-5

Ana painted hers.  I went with walnut Minwax Wood Finishing cloths.  I recommend staining the wood after you make your cuts and drill your pocket holes.  I did that for the top five pieces, but had already assemebled the rest of the table before deciding to stain.  I get a much better look with the finishing wipes when I don’t have to deal with corners and joints.  I end up with blotches, streaks and/or crevices I can’t get to at the joints.  I love that these wipes stain and seal all at once!  Work smarter – not harder, right?

DIY end table woodworking plan

How to make an end table

Check out our other woodworking projects:

Woodworking Project Gallery Page

Powered by CGView

Build Your Own Bathroom Storage

DIY Bathroom Storage Shelf from Shanty 2 Chic


If you have seen any of my wood working posts, you probably know that I love the Shanty 2 Chic girls.  They know their way around some power tools, and they come up with great, stylish, functional and DO-able projects to share with us.  In my new home, I am in desperate need of some bathroom storage, and their DIY bathroom shelf is calling my name.  I love how easy it is, and that it makes use of vertical space.

Bathroom storage

I am going to place mine where the birds now reside!  If you have never braved a building project, this one is a great one to start.

Check out my other woodworking projects for more ideas:

Powered by CGView

Wood Pallet Headboard DIY

Wood Pallet Headboard


If you read yesterday’s post, this wood pallet headboard project is no surprise to you!  I am so very excited about this.  I have never done anything like it, and I am plain proud.  There is a rustic, shabby look with an interesting texture for a unique feel, and a price tag that can’t be beat.  The inspritation came from the Sprig by Mia post I showed you previously, here.  Get ready for a quick, easy, cheap DIY headboard tutorial from a happy crafter.

Supplies:

  • Wooden shipping pallets; I nabbed mine from a dumpster behind a local home improvement store.  I grabbed 2 of them, as each one was 48 inches wide, and I needed 60 inches (the width of my queen size bed).
  • Saber saw or hand saw if you need to cut one of your pallets to get the exact size you want.
  • Krylon Dual Spray Paint Black Flat and White Flat
  • Wood Screws
  • Hammer
  • Krylon clear coat or sealant of your choiceDIY Headboard Ideas

Instructions:

  • Clean your pallets with hot water and let dry.
  • Determine your desired headboard width.  If one pallet is not wide enough, cut the needed width from the second pallet using a saber saw or hand saw.  See picture.  Loving some power tools…DIY Headboard Ideas

DIY Headboard Ideas


    • I used a three  pieces of board from the leftover segment of pallet to scab the two pallet pieces together, attaching them with wood screws.  In the Sprig post, she used 2x4s, which is great too.  I just didn’t want to go to the hardware store, and I wanted this to be all free (except for the spray paint later).  No pics of this.  I was too excited.  I drew it in to show you what I did…

Frugal Headboard Ideas


  • Flip it over and spray paint your base coat.  I did flat black Krylon Dual, which has primer built in and is amazing.  Such great coverage.  I let the black coat dry, then went over that with flat white Krylon Dual.  I also screwed three shelves from a previous  project along the top edge of the headboard to give a finished look and to have a ledge to decorate if I want.  Really I just did it because I was so thrilled that they fit perfectly along the width of the piece!DIY Headboard Tutorial


DIY Headboard Tutorial

DIY Headboard Tutorial

  • I distressed the edges by lightly sanding with medium grit sand paper to bring out the black base layer.  Then coat with finish of your choice.  I used Krylon clear coat (and no, they are not reimbursing me for this post)!

DIY Headboard Tutorial

That is all.  SO gratifying.  I just set it against the wall and put the bed in place.  What do you think, dear readers?

DIY Headboard Tutorial


Wood Pallet Headboard
I am linking to: Home Stories A to Z

Privacy Policy