Search Results for: upcycle

6 Recycled Roses: Make a Plastic Spoon Rose

Make a plastic spoon rose viat Cut Out & Keep, featured @savedbyloves

[pinit]

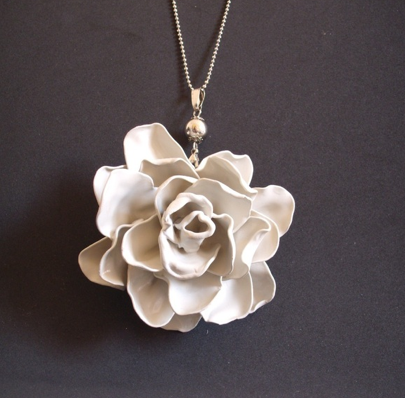
If I have learned anything about my sweet readers, it is that you love recycled crafts.  Here is a beautiful rose made from recycled plastic spoons that I spied over at Cut Out & Keep.  It is simply beautiful!   You could spray paint it your favorite color, or just leave it the color of your spoons.

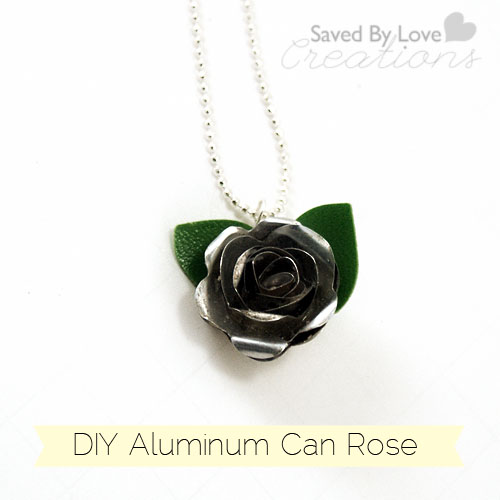
Making roses from trash is super gratifying.  Remember the aluminum can rose I showed you?  There is even a video!

Aluminum Can Rose Tutorial
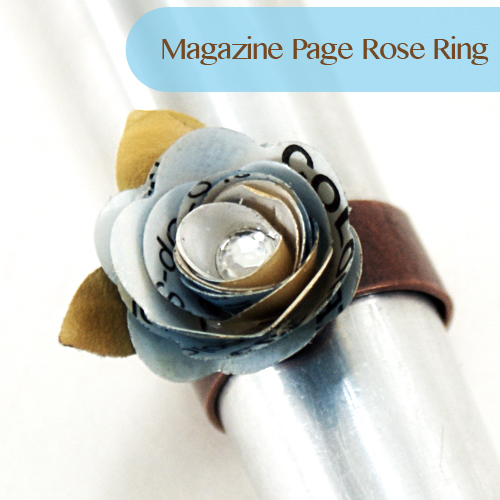
Let’s not forget the magazine page rose ring and bracelet;

Make a recycled magazine page ring

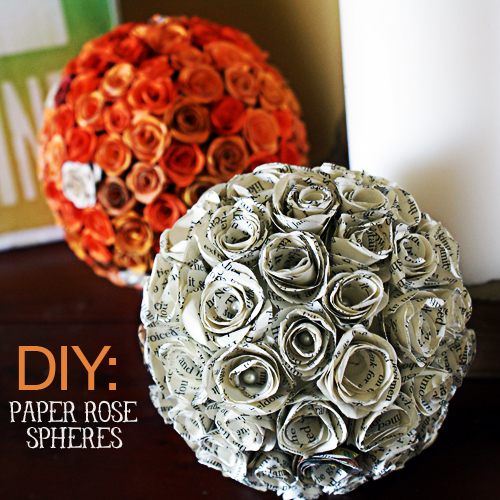
There was also the time I made a decorative rose sphere using old book pages;

Make roses from book pages

So you got a Keurig for Christmas and you don’t know what to do with all those coffee filters you no longer need.  There is a coffee filter rose project for that;

Make Coffee filter roses

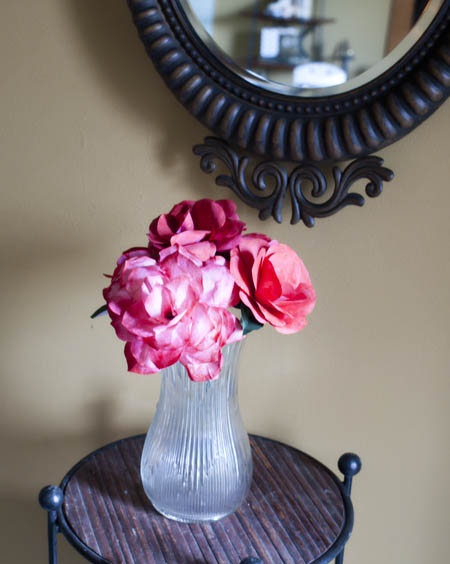
What are your favorite recycled rose projects?

50+ Ways to Repurpose Old Drawers

[pinit]

Over 50 projects to make from old drawers #upcycle #repurpose @savedbyloves

[pinit]

Don’t get rid of that old dresser just yet.  Did you know there are tons of  creative ways to repurpose old drawers?  I didn’t know there were that many, until I got started on this week’s 50+ roundup.  You will be amazed like I was!


Wood Pallet Mixed Media Art

[pinit]

Matt210CollageDIY mixed medial collage tutorial @savedbyloves[pinit]

This mixed media Christmas verse piece is made from recycled pallet wood, crepe paper circles, old sheet music, a wood tree, and upcycled soda can star.  It is so fun and challenging to see what you  can come up with from what you have in your stash.  With creative layering of paint, paper and ink, the possibilities are endless.

Matt210Art3

Here is how it went…

Supplies:

Acrylic paint in red, aqua, white

Paint brushes

Brayer

3D aluminum can or other star

White Gesso

Old sheet music

Matte gel medium or mod podge

Pencil

Pitt pen or other permanent black pen

Wooden tree silhouette

Adhesive dots

The “canvas” for my background came from this chevron pumpkin piece I showed you in the fall.  It is composed of pallet wood.

TUTORIAL:

I wanted to update it to Christmas, and decided to cover the chevron with a festive, snowy background for my tree.  The inspiration for this piece came from Claudine Hellmuth’s holiday layers card over at Ranger.com.

To start, I painted on a layer of Gesso.  I didn’t really care if the chevron peaked through, so I just did one layer.  Wben that dried, I used red fluid acrylic paint to lightly cover the gesso.  It is ok to leave parts white.  Not going for perfect here.

SONY DSC

When the red paint was dry, I added pieces of torn sheet music to the bottom to form a hill shape.  Apply matte gel (or Mod Podge) to paper and adhere to canvas.  Once in place, cover with layer of matte gel.

Matt210Art8

I stamped aqua acrylic paint randomly.

Matt210Art9

Once I was happy with the background, I painted on a thin layer of matte gel and let dry.  I used my sizzix Assymetric rings die to cut rings and circles from white crepe paper and adhered them onto the layered background to create snow.

Matt210Art10

Matt210Art11

When I had all the rings I wanted, I touched them up here and there with white acrylic paint, then coated the entire piece with matte gel and let dry.

Matt210Art12

When that dried, I painted a blue scalloped edge at the bottom, outlined it with black Pitt artist pen and covered the entire piece with one more layer of matte medium.

Matt21015

To create the tree, I painted green acrylic paint and doodled the verse with pencil  first.  I  went over the text with Pitt artist pen.  There will be a tutorial on how to do this in the future.  I adhered the completed tree with permanent glue dots.

The star was made with Sizzix 3D star die from a coke can.  I dipped it in Mod Podge and sprinkled glitter on and let dry.  Adhered it to tree with permanent glue dot.

Matt210Art4

I am a little bit in love with it.  It may be the last transformation of the pallet canvas.  It is ok.  There are more pallet pieces in my garage just waiting to be pieced together for the next piece.

DIY Holly Jolly Christmas Decor

Make a Holly Jolly #ChristmasDecor Sign #repurpose #Upcycle #papercraft @savedbyloves

[pinit]

This fun project only cost a few dollars, and is the perfect piece to top off our Christmas mantel.  I have been wanting to do something with a sign I grabbed from a garage sale for $1 over the summer.  With some spray paint, a stencil I made in Photoshop, and a holly/berry paper die cut, I was able to make this festive Christmas sign.

Supplies:

Krylon Banner Red

Krylon White

Gesso or primer

Paint Brush

Holly Jolly Stencil

Make a Holly Jolly #ChristmasDecor Sign #repurpose #Upcycle #papercraft @savedbyloves

Holly Berry die cut – I used this holly berry file from Eri Doodle Designs to cut the holly berry from card stock using cricut

Photo source: Eri Doodle Designs

 3D Foam mounting adhesive

Medium Grit sandpaper

Towel for cleaning and for drying

Newspaper

Masking tape

Make a Holly Jolly #ChristmasDecor Sign #repurpose #Upcycle #papercraft @savedbyloves

TUTORIAL:

Make a Holly Jolly #ChristmasDecor Sign #repurpose #Upcycle #papercraft @savedbyloves

Lightly sand your sign and wipe away debris with soapy water.  Dry with towel.

Make a Holly Jolly #ChristmasDecor Sign #repurpose #Upcycle #papercraft @savedbyloves

Apply gesso or primer.  I did 2 coats of gesso, drying completely between.  Let dry.

Make a Holly Jolly #ChristmasDecor Sign #repurpose #Upcycle #papercraft @savedbyloves

Spray with red paint and let dry.  While that is drying, cut out your stencil from clear contact paper or vinyl.  Contact paper is way cheaper.  It doesn’t have to be clear, I just prefer that so I can see where I am placing it better.  Any contact paper will do.  I used my cricut to cut out the letters, but you can print the text (file available for free download under supplies, above) and trace the letters onto your contact paper.

Place your stencil on the dry red sign and spray white.  Make sure the area you don’t want white is all blocked off with newspaper or tape.

Adhere your holly berry die cut cardstock and you are all done!

Make a Holly Jolly #ChristmasDecor Sign #repurpose #Upcycle #papercraft @savedbyloves

Make a Holly Jolly #ChristmasDecor Sign #repurpose #Upcycle #papercraft @savedbyloves

Make sure you check out our Christmas gift and decor 50+ roundups for more inspiriation:

50+ Things to Make From Wine Corks

[pinit]
50 plus #Crafts #DIY to make from #Upcycled #Recycled Wine Bottle Corks @savedbyloves

[pinit]

This week’s 50+ is all about wine bottle corks.  Did you know there are a ton of ways to repurpose corks?  I was surprised at all the different projects I encountered while compiling this round-up.  Between this and the wine bottle repurpose round-up from awhile back, no part of your wine purchase will go to waste!

50 plus #Crafts #DIY to make from #Upcycled #Recycled Wine Bottle Corks @savedbyloves

My friend Vivienne at The V Spot created a super cool piece of artwork, with a wine cork mat.  Go check out her detailed tutorial, and you are sure to see why her site is one of my very favorite places to be inspired.

50 plus #Crafts #DIY to make from #Upcycled #Recycled Wine Bottle Corks @savedbyloves

This trivet and coaster set from horizontally sliced wine corks would make a great Christmas gift set for the wine lover in your life.  Or anyone really.  I am not a wine person, and I would love to get this for Christmas.  Eco friendly, handmade and functional… yes please.

50 plus #Crafts #DIY to make from #Upcycled #Recycled Wine Bottle Corks @savedbyloves

Grab the kiddos and create some whimsical wine cork mushroom ornaments at Red Ted Art’s Blog.  These would be adorable on the Christmas tree, or as decor for a woodland creature themed party, don’t you think?  Anytime is a good time for cute mushrooms, I always say.

50 plus #Crafts #DIY to make from #Upcycled #Recycled Wine Bottle Corks @savedbyloves

Bespangled Jewelry put a unique twist on the DIY stamp, using wine corks for this mustache stamp tutorial.  I’ve seen potatoes, erasers and foam for DIY stamps, but this is a first for wine corks.  What a clever repurpose!

50 plus #Crafts #DIY to make from #Upcycled #Recycled Wine Bottle Corks @savedbyloves

At Simple City Style, I spied this wine cork placeholder.  I love the look, and while there is no tutorial, I think even the least crafty among us can crack this code.  Looks like you just cut what you want to be the bottom to create a flat surface.  Then make a slit across the top for the place card.

Check out these and several more cork upcycle projects and start hoarding those corks!


Make an Aluminum Can Poinsettia Wreath

[pinit]
How to Make A #Christmas #Wreath from #Recycled Cans #Upcycle #DIY @savedbyloves #Sizzix

[pinit]

Last week, I showed you this paper poinsettia wreath tutorial using a Sizzix flower petal die and card stock.  I decided to use the same die to create this aluminum can poinsettia wreath.  The “wreath form” is a stove top piece I picked up at my local Habitat for Humanity Restore, making this an all around eco-friendly holiday decoration.  Total project cost – about $1.

How to Make A #Christmas #Wreath from #Recycled Cans #Upcycle #DIY @savedbyloves #Sizzix

How to Make A #Christmas #Wreath from #Recycled Cans #Upcycle #DIY @savedbyloves #Sizzix

My Aluminum can rose video shows you how to cut the cans.  Be careful – they can be sharp when cut.

For creating the flowers using the die or template (provide in the following linked post), see the paper poinsettia wreath tutorial:
I use alcohol inks to color my poinsettia petala , like I showed you in my aluminum can leaf wreath tutorial.  To give each one some variation, I went over the petals with copic markers.  For the leaves, I used Martha Stewart Glitter paint.  I sealed my leaves with Mod Podge Pearl Spray Sealer.  I love the look of this sealer with the alcohol ink. 
How to Make A #Christmas #Wreath from #Recycled Cans #Upcycle #DIY @savedbyloves #Sizzix
To adhere the flowers to the circle stove part, I use Beacon Fabri-Tac.  This stuff rocks.  It is like hot glue in a bottle.  Dries strong and fast.
How to Make A #Christmas #Wreath from #Recycled Cans #Upcycle #DIY @savedbyloves #Sizzix
I finished the wreath off with a silver wire ribbon bow.  I love it against our off white door.  It was going to be a gift, but it just can’t leave that spot.  Sometimes that happens, right?!
Like aluminum can Christmas decor?  Check out our aluminum can angels:

Martha Stewart Holiday; Turn Glasses to Trees

[pinit]

#MarthaHolidayPaint #Upcycle Thrift Store Glasses to Whimsical #ChristmasDecor @savedbyloves

[pinit]

I had the fantastic opportunity to try out Plaid’s line of Martha Stewart paint and stencils to create a holiday project.  It wouldn’t be very me if I didn’t come up with an upcycle of some sort.  While out junkin’ with my girls, I spied some thrift store fluted champagne glasses for $0.50 each, and I saw whimsical Christmas trees.  See how Martha Stewart glass paint, stencils and supplies helped me in the transformation, and how to create your own holiday vignette.

#MarthaHolidayPaint #Upcycle Thrift Store Glasses to Whimsical #ChristmasDecor @savedbyloves

SUPPLIES:

#MarthaHolidayPaint #Upcycle Thrift Store Glasses to Whimsical #ChristmasDecor @savedbyloves

Martha Stewart Glass Paint; Holly Berry Red, Silver, Frost

Paint Daubers

Martha Stewart Adhesive Stencils Holiday Icons II

Rubbing alcohol and lint free cloth

Hack Saw or Acetone/Yarn

Ice

Hot water

Martha Stewart Crystal Ice

Sandpaper

Safety Glasses

TUTORIAL:

Clean the glasses and cut with either hacksaw, or using the acetone/yarn technique I showed you in this video.

If you go the hacksaw route, you will just score the glasses all the way around at the level you want the cut, then submerge in alternating hot and ice water until break occurs (as shown in the acetone glass cutting video)

#MarthaHolidayPaint #Upcycle Thrift Store Glasses to Whimsical #ChristmasDecor @savedbyloves

*I found the adhesive stencils to be super easy to use and to get a clean, crisp image with the paint daubers and glass paint.  If you are going to use the same stencil repeatedly, make sure to clean and dry the stencil between each use to avoid stray paint marks.

*The Crystal Ice Spray… awesome.  It is temporary, so you can spray it on windows for an icy look.  It is quite simple to use.  Sprays on clear, then starts to crystalize.  I ripped masking tape for a jagged edge, then sprayed over the masking tape stripes.  After about 5 minutes, I removed the masking tape and watched the crystals form.  This could be addictive.

Join me in following Plaid Crafts on Facebook, Twitter and Pinterest for tons of inspiration and crafty tidbits! See what my creative cohorts have done with their Martha Stewart products:


DISCLOSURE: I received product and payment via The Blueprint Social (www.theblueprintsocial.com) for this post, however, opinions are 100% my own.

Make Aluminum Can Angel Ornaments

[pinit]

AluminumCanAngels61

[pinit]

Make #Recycled Aluminum Can Angel Ornaments #ChristmasDecor #Upcycle @savedbyloves

 Need some great handmade Christmas gifts that won’t break the bank?  Today’s project is an adorable, virtually free Christmas ornament made from an aluminum can.  I was recently gifted a cute coke can angel, and of course had to hack it.  I came up with a template, which you can download and cut out to trace onto a can.  The smaller winged angel takes only one can, no glue, and is easy to make!  The version with the larger wings takes 2 cans, this Sizzix Angel Wings die, and super glue.

Make #Recycled Aluminum Can Angel Ornaments #ChristmasDecor #Upcycle @savedbyloves

SUPPLIES:

12 oz Soda Can
Large Beads for head
Seed Beads for Halo
Craft Wire 20 Gauge
Wire Cutter
Jewelry Pliers
Scissors for cutting Aluminum
Angel template
Sharpie
Craft knife
Needle Tool or Bead Reamer
Masking Tape (optional)

Tutorial:

Make #Recycled Aluminum Can Angel Ornaments #ChristmasDecor #Upcycle @savedbyloves

For the larger wings, Cut out the template without the wings, fold can into cone shape then super glue larger wings onto back of angel.

Make #Recycled Aluminum Can Angel Ornaments #ChristmasDecor #Upcycle @savedbyloves

To string your ornament for hanging on your tree, loop a piece of string through the halo and you are all set!

***As always, when cutting aluminum cans, be very careful.  They are not as sharp as I thought they would be when I first began working with them, but obviously they are sharper than paper.

Make #Recycled Aluminum Can Angel Ornaments #ChristmasDecor #Upcycle @savedbyloves

Make #Recycled Aluminum Can Angel Ornaments #ChristmasDecor #Upcycle @savedbyloves

For more projects to make from recycled cans, make sure you check out our 60+ Recycled Can projects roundup!  It will leave your recycling bin devoid of cans, and add to your upcycled handmade crafts for Christmas and year round gift giving.

50+ Projects to Make From Old Crates

[pinit]

50+ Ways to #Repurpose #Upcycle Old Crates @savedbyloves

[pinit]

This week’s 50+ brings you inspiration for putting old wooden crates to use.  It reminds me a lot of the 50+ wood pallet round-up, which isn’t surprising.  The major difference I see between the pallets and crates is that vintage crates can be pretty expensive, at least the ones I have seen.  Wood pallets, on the other hand, are abundant and usually free in these parts.  Lots of unique shelving and storage projects are included, along with some seriously outside of the box ideas.

Here are some of my favorites…

Much like the pallet round-up, Donna from Funky Junk Interiors dominates the vintage crate projects.  If you know Donna, you know that these wooden crate stairs scream Funky Junk Interiors.  While we are on the topic of FJI, lets get straight to my next favorite project from this list…

It is a super cool wooden crate toilet paper storage unit.  The rusty license plate tops it off perfectly.  What I wouldn’t give to let that girl loose in my house for a week of revamping, funky junk style.

Why not dispose of your empty wine crates by turning them into eco-chic, one of a kind flooring?  I would love this in my home!

3r_kitchen_cabinets from Apartment Therapy

Keep green living going in the kitchen with these repurposed wine crate cabinets spotted at Apartment Therapy.  There you will find the step by step how to!

This upcycled wooden crate coffee table on Etsy is making me drool.  At $200, I think it is time to hack, but if you can afford it, go for it.

On to the full roundup!


Guest Post: Jewelry Box Makeover

[pinit]

Today Barbara from Chase the star stopped by to share with us a cute jewelry box makeover.  I am a fan of trinket box updates, and this one is no exception.   It never ceases to amaze me what a huge difference can be made with a little paint!  See how Barbara took hers from drab to fab.  Take it away, Barbara!

Hello everyone, I’m Barbara from Chase the Star, where I write about my adventures in crafting, furniture makeovers, recipes, and more!  I’m thrilled to share my latest project, a jewelry box transformation, here at Saved by Love!

{Updating a Jewelry Box}

I found this old and slightly beat-up jewelry box at my local thrift store, it was on sale (oh yeah…second hand and on sale) so I just had to take it home and give it some much needed love.


I had so much fun making this little box over!  All sorts of ideas came to mind.  I envisioned it in a little girl’s room, or perhaps it would live with a sophisticated teen, or even a sit in a family room or entry way.  So many possibilities!  I decided in order to accommodate all of those scenarios, I’d paint it a pretty blue and white.

{Making It Pretty}

The jewelry box had lots of potential.  Although the stain was fading, and it had a few scratches and small chips, the inside lining was in tact, and the bones were great!  This made things easy because repairing and re-lining can take some time.  
Makeover a Jewelry Box @savedbyloves #upcycle

With a small Phillip’s screw driver, I removed the hinges, and the mini drawer pulls.  

The pulls and tiny screws with were sprayed a glossy white. In the meantime making sure to cover the inside lining (I used foil and painter’s tape to protect it), I sprayed primer over the entire piece.

Later, I added a coat of white spray (satin finish) to everything but the drawers. 
Then with a small foam brush I painted the drawers and rims of the top and bottom in a shade of blue I’d mixed together to paint a stool a few weeks back.

I added a light coat of polyurethane to seal my work. Once everything was dry I screwed the hinges and pulls back on to the piece. 


I’m loving the way this piece turned out!  It’s amazing how a little paint can make a world of difference!  
I’d love to see you over at Chase the Star!  Stop by and say ‘hello’, and check out some of my other projects such as my fabric lined mason jars, and metal file cabinet makeover!

You can also visit me here:


Thank you so much Johnnie for letting me share my fun Jewelry Box Transformation with your readers!   

Barbara @ Chase the Star

Privacy Policy