Search Results for: upcycle

Make a Mosaic Flower Pot

[pinit]
broken-china-flower-pot-beauty-text

[pinit]

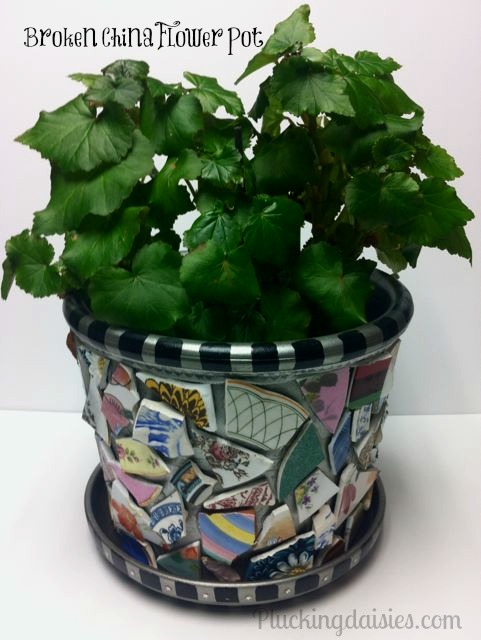
My talented friend Amy of Plucking Daisies is back with a wonderful, whimsical flower pot upcycle.  I love everything about it, but especially the hammer smashing of china plates.  How fun does that sound?!  See how she did it…

Hi there! So happy to be back at Saved by Love Creations! The last few times I was here I showed you how to make flowers. Today I’m going to show you how to make a fun container to put them in. The possibilities are endless with this project and it’s completely up to you how big you want to go with it. Do you have a bunch of mismatched dishes you don’t know what to do with? Well I have a solution for that! Get out your WORST China folks because we are about to break stuff! Opa!


How to Make a Broken China Flower Pot

First you are going to need a terra-cotta pot. Now is a great time to find them cheap. I got mine for a couple of bucks at Ocean State Job Lot. Spray paint your pot any color you like. Keep in mind that whatever color you choose is going to show through in spots after you add the broken china. I chose silver because I didn’t want the china pieces to get lost against a bold color.

Broken China Flower Pot | @PluckingDaisy #Planter #DIY #upcycle #tutorial

You will also need to grab some Mosaic Tile Adhesive (Mercantile) and some cheap plastic palette knives. Both of these items can be found at Michael’s and most craft stores.

Broken China Flower Pot | @PluckingDaisy #Planter #DIY #upcycle #tutorial

If you don’t have any spare china to break you will need to take a trip to the thrift store. Keep an eye out for bright-colored plates with bold and busy patterns. Stay away from dishes that have high ridges and deep curves these are much harder to adhere. The flatter the better!

*You can also use tile cutters to snip more even pieces if you like.

Breaking China:

To break your china simply place it in a towel and hit it with a rubber mallet or hammer a couple of times. *Don’t go crazy, china especially will break pretty easily and you don’t want your pieces to be too small.

Broken China Flower Pot | @PluckingDaisy #Planter #DIY #upcycle #tutorial

As you break your plates make sure you have some containers handy so you can arrange your broken china pieces by color. This will save you tons of time once you start adhering pieces to your flower-pot. I used a variety of plastic containers from my recycling bin.

Broken China Flower Pot | @PluckingDaisy #Planter #DIY #upcycle #tutorial

When working with the adhesive you will need to apply it to the back of your broken china and the spot on your flower-pot where you want it to go. Apply the adhesive like you would apply spreadable cheese to a cracker. You don’t want too much but you want enough to cover and form a strong bond.

*Keep some baby wipes handy to clean any wayward adhesive off of china pieces and fingers.

Lay your pot on its side and cover as much surface area as you can. Arranging the broken china pieces is a lot like putting together a puzzle. Experiment with different pieces before applying the adhesive to ensure a good fit! *You will need to let the adhesive dry overnight before moving on to the next section.

*Some of the sharp edges will stick out so just be careful when you pick up your pot.

Broken China Flower Pot | @PluckingDaisy #Planter #DIY #upcycle #tutorial

Once you have all of your broken china pieces adhered to your pot you can embellish the uncovered areas with paints, gems, or whatever you like! I used Martha Stewart Acrylic paints to create a checkered pattern on the top and bottom of my pot. I also used glossy accents to add tiny silver stars in between the black squares.

The fun doesn’t stop with flower pots for this technique. You can use broken china to make a mosaic on pretty much anything. Maybe around a mirror, or to upgrade the inside panel of a cabinet door. You can also use other materials for your mosaic like glass gems, stones, beads, or found objects. Like I said, the possibilities are endless!

I hope you enjoy making a broken china mosaic of your own….breaking plates and putting them back together in this way is quite enjoyable if I do say so myself 🙂

If you enjoyed this tutorial you can find more inspiring ideas and creative tutorials at Plucking Daisies!

You can also find me on Twitter | Facebook | Pinterest

Have a colorful day!

Amy*

Book Page Pumpkin Patch

Make book page pumpkins @savedbyloves #papercraft #pumpkin #Halloween #Fal #DIY #upcycle

[pinit]

Today I am sharing with you a great eco-friendly project for you fall decor, using old book pages or music sheets.  It came to mind when I ran across this paper sphere garland I shared with you last year…

The process is pretty quick and easy.  Here is how I did it.

Make book page pumpkins @savedbyloves #papercraft #pumpkin #Halloween #Fall #DIY #upcycle

SUPPLIES:

Book Pages

Pumpkin shape die, or paper punch, or template to trace onto pages and hand cut

Craft glue

Sticks

Raffia or Ribbon

TUTORIAL:

Cut pumpkin shapes with your die cutter or by hand.  I used 16-20 per 3D pumpkin. You could also use an oval shape if you don’t have a pumpkin die.

Fold down center and glue halves back to back like I showed you with the sphere garland:


When all of your 16 shapes are glued together, adhere the last and first pumpkins to complete the 3D pumpkin.  There will be a hole in the center for you to place a stick for the stem.  Add a line of glue along the stick to secure in place.  Embellish with raffia, ribbon, leaves, or beads as desired.

Make book page pumpkins @savedbyloves #papercraft #pumpkin #Halloween #Fall #DIY #upcycle

Make book page pumpkins @savedbyloves #papercraft #pumpkin #Halloween #Fall #DIY #upcycle

Make book page pumpkins @savedbyloves #papercraft #pumpkin #Halloween #Fall #DIY #upcycle

You could use them on your Thanksgiving table scape as place cards, or as part of a centerpiece.  Instead of a stick use wire & create a loop at the top of the stem.  Use the loop to thread your pumpkins on string for beautiful harvest garland.

50+ Things to Make From Paper Bags

50 plus things to make from recycled paper bags @savedbyloves #recycled #crafts #upcycle

 [pinit]

Did you know that we throw away enough paper per year to make a 12 foot wall spanning from California to New York?  60,000 trees would be saved if every U.S. household reused a paper grocery bag for just one shopping trip (source).  It is amazing that everyone pitching in by reusing just one bag would have such a huge impact.  Today’s round-up gives you 50+ creative uses for paper bags.  Some of them are familiar.  Some of them redefine what it means to think outside of the box!

50 plus things to make from recycled paper bags @savedbyloves #recycled #crafts #upcycle
Roben-Marie Smith created this beautiful brown paper bag ribbon that I need.  This would be the perfect project to gift the crafter on your list, or to give your gift wrapping a unique touch.
50 plus things to make from recycled paper bags @savedbyloves #recycled #crafts #upcycle
Are you kidding me with this brown paper bag flooring at Simon Says?  Who does that?  I would love to know where the inspiration originated, and how long that project took.  The tutorial is very brief, but maybe there is a more detailed one out there.  How cool!
50 plus things to make from recycled paper bags @savedbyloves #recycled #crafts #upcycle
Make an adorable Halloween candy bowl from paper bags and tissue paper.  The Long Thread walks you through this craft that the kids are sure to love.
50 plus things to make from recycled paper bags @savedbyloves #recycled #crafts #upcycle
Take advantage of seasonal graphic shopping bags to create festive recycled paper Christmas stockings with Rock Scissor Paper.  What a cheap way to bring a unique, handmade touch to your holiday decor!
50 plus things to make from recycled paper bags @savedbyloves #recycled #crafts #upcycle
This is one of those “That is made from what?” projects.  Create these sweet and simple paper bag woven placemats with Free Kids Crafts.  They look like something I would have bought from Pier One back when I bought things instead of making them!

The list goes on…


50+ Ways to Reuse Old Sweaters

50plusOldSweaterProjects

Who knew that pile of old sweaters could be put to use in so many creative ways?  This week’s 50+ roundup brings plenty of inspiration for giving dead sweaters new life.  You will want to raid the closet, or the local thrift store after browsing these projects.

How about this J.Crew knock-off heart sweater by Ali at With an i.e.?  She knocked this project out of the park, and for far less than the $88 price tag on the J. Crew version.  What a simple and cute project for a Valentine’s Day outfit!  Fear not, sewing skills unnecessary.

J.Crew Knock off heart sweater

Need some boots to go with your new J.Crew inspired heart sweater?  Urban Threads has you covered with this old sweater to new boots tutorial.  Are you serious?  I never would have come up with this genius upcycle!

#Upcycle old sweater to boots and 50+ other projects to make from #recycled sweaters @savedbyloves #DIY

Now that you are all styled up, what about adding a splash of cozy to your home with this lovely throw made from recycled sweaters at Woman’s Day?  Go junkin’ for sweaters to coordinate with your home decor and you are all set.

Make a throw from #recycled sweaters, and 50+ more sweater upcycles @savedbyloves

At The Long Thread, you will learn how to create a thrifted sweater Christmas tree.  This project is simple and puts those ugly Christmas sweaters you thought you would actually wear in front of people to great use!

DIY Christmas Tree from #recycled sweaters, and 50+ more things to make from old sweaters @savedbyloves

This sweater covered planter project at Duo Fiberworks is just what I need to give myself a break from the neon planters I made over the summer.  So simple, and when I am in the mood for neon again, I can just take off the covers.

#Upcycle old sweater to planter cover and 50+ other projects to make from #recycled sweaters @savedbyloves #DIY

These are just a few of my favorites.  Enjoy the full 50+ collection below:


Black Licorice Wreath DIY

Make a #HalloweenDIY Wreath from Licorice and paint chips @savedbyloves

This project began as an idea I had to create a Halloween wreath from black jelly beans.  I couldn’t find any of those, and ust when I was about to abandon the plan, I spotted these little black licorice bites at the dollar store.  The rest of the story is pretty self explanatory.  I cut a wreath form from cardboard like I showed you in this fall wreath tutorial.

Make a #HalloweenDIY Wreath from Licorice and paint chips @savedbyloves

To adhere the licorice, I began, admittedly, with a hot glue gun.  Um…no.  That was not my smartest moment.  As you can imagine, the glue melted the candy, and no adherence occurred.  I then tried tacky glue, which also reacted with the candy and didn’t stick.  Finally, I went for super glue.  That did the trick!

Make a #HalloweenDIY #Wreath from Licorice and paint chips @savedbyloves

The flower I made from orange paint chips, using the Sizzix Create a Bow Die.  I used super glue to adhere it to the wreath.  The hanging mechanism is a fabric scrap I had left over from another project.

Make a #HalloweenDIY #Wreath from Licorice and paint chips @savedbyloves

I’m happy with my wreath, and at $4 total, it’s completely affordable.  What do you think?  Are there black jelly beans where you live?  I think those would have been easier to glue.

Book Page Origami Sphere

Book Page origami sphere featured @savedbyloves via Craft Foxes #PaperCrafts #Upcycle

There isn’t much I love more than paper crafting.  This project incorporates upcycling an old book.  It is doubly exciting.   It is a Kusudama sphere composed of 12 flowers that each contain 5 folded units.  There is a lot of folding that goes into this piece, so get comfy and head over to Crafty Foxes for the how to:  How to a Make Kusudama Sphere.

Make a Woven Belt Seat

Reuse old belts for a chair makeover at @savedbyloves #repurpose #upcycle #DIY

Just as I was finishing up last week’s 50+ Ways to reuse old belts, I walked upon a scene that is a DIY, trash-obsessed, upcycling blogger’s dream.  It was 2 chairs with a “take me” sign.  Immediately the woven belt covered chairs in the collection came to mind.  I snatched up my new finds and brought them straight home.  See how I refinished the one on the left, and made it a cute woven belt seat.

Reuse old belts for a chair makeover at @savedbyloves #repurpose #upcycle #DIY

To see 50+ Ways to Reuse Old Belts, click the thumbnail:

Reuse old belts for a chair makeover at @savedbyloves #repurpose #upcycle #DIY

SUPPLIES:

Old chair (FREE!!)

Painting or staining supplies

As I was applying the stain, I remembered why  I usually go with spray painting when I do a revamp.  Now that it is over, I am happy I refinished it.  I love the dark stain I used (Rustoleum Wood Stain in Kona)

Furniture tacks -$1.30 per pack  of 25 at Lowe’s; You will need 2 per belt needed to cover your chair

Old Belts – I have gathered these from various thrift stores and garage sales along the way.  I used mostly leather, but there is one fabric belt thrown in there too,  At Goodwill, old belts are $0.99.  Go on a half price day and get them for $0.50.  I used 18 belts for this project.  that will vary with the size of your chair and the width of your belts.

Hammer

Scissors that will cut leather

TUTORIAL:

Reuse old belts for a chair makeover at @savedbyloves #repurpose #upcycle #DIY

I LOVE it!  It is sturdy as can be too.  The bottom is ugly, but who cares, right?

Reuse old belts for a chair makeover at @savedbyloves #repurpose #upcycle #DIY

You can make this chair, no problem.  If you want to avoid the whole staining mess, just sand and spray paint your chair in a fun color.

Reuse old belts for a chair makeover at @savedbyloves #repurpose #upcycle #DIY

Reuse old belts for a chair makeover at @savedbyloves #repurpose #upcycle #DIY

Reuse old belts for a chair makeover at @savedbyloves #repurpose #upcycle #DIY

50+ Ways to Reuse Old Belts

50+Old Belt Projects to make at @savedbyloves savedbylovecreations.com #upcycle #repurpose

Got old belts just lying around, serving no purpose? This week, our 50+ roundup will give you plenty of ideas for repurposing them into useful, even stylish, handmade goods. We always try to limit our entries to projects with great tutorials. While there are many tutorials linked here, you will run into a couple of Etsy listings, and photo posts with no tutorial. That is because they were so cool that I couldn’t leave them out of the round-up. Use them as inspiration, and challenge yourself to derive the technique. Then you can share the process with us! Several of these are on my list to complete, beginning with the woven seat from belts! Enjoy, and as always, if you have a belt project we missed, send us the link so we can spread the word about your genius upcycle.


How to Make Fall Flowers

How to Make Fall Flowers @savedbyloves by Pluckingdaisies.com #Fall #Flowers #RangerInk #Tutorial

I am happy to have Amy from Plucking Daisies back today.  She has a knack for turning trash into treasure, and this project is a fantastic example of that.  Be ready to create this gorgeous fall flower bouquet from things you probably have at home already.  This would make a great centerpiece for the Thanksgiving table.  Who is ready for a great fall upcycle?

Hi all! Last time I was here at Saved by Love Creations I showed you how to make Paper flowers using punches. Today, I have an even easier method for making Fall Flowers to share with you. Remember the tissue paper flowers you made as a kid? We are going to use the same technique for making tissue flowers (pipe cleaners and all) to create beautiful fall flowers using items you probably have lying around the house.

Are you wondering what these fall flowers are made of? You may be surprised. To vary the color and texture (much like the color and texture found in nature at this time of year) I combined Dryer Sheets, Shower Curtain, Sheet Music, and Kraft Glassine to create the flowers for this arrangement.

If you haven’t used Kraft Glassine yet I urge you to try it. It’s available at most craft stores in the Tim Holtz section for only a few dollars. The great thing about Kraft Glassine is its durability and resistance to creative abuse. The more you beat it up the better it looks!


Kraft Glassine Flowers
1) Grab a few pieces of Kraft Glassine and ink them up with Alcohol Ink. *If you add some metallic mixative to your blending tool you will get a lovely gilded look. 2) Once the ink is dry crumple it up and then smooth it flat. 3) Cut pieces of Kraft Glassine in half (You will need at least 3 squares to form a flower). 4) Fold squares together accordion style. 5) Secure in center by wrapping the end of a pipe cleaner around. 6) Cut a rounded edge on both sides. (Tonic Scissors cut best). 7) Gently peel each layer up to form flower.
* Repeat Steps 3-7 for each style of flower

Dryer Sheet Flowers
Don’t throw those dryer sheets away! Harvest them to make these fun flowers. I sprayed my Dryer sheets with a fall inspired blend of Dylusions Spray inks to color them. Our Friend Laura from the Shed has another unique way to create Dryer Sheet Flowers here. The best part about these flowers is their laundry fresh scent 🙂
* Repeat Steps 3-7 (Above)

How to Make Fall Flowers | Pluckingdaisies.com #Fall #Flowers #RangerInk #Tutorial

Sheet Music Flowers
The sheet music flowers can be a bit tricky. Especially when working with vintage sheet music since it tends to tear easily. *Repeat the above steps from the previous flowers. When you have your ends cut apply Distress Ink (Vintage photo) to all the edges. To make the paper more pliable mist with Perfect Pearls Heirloom Gold. This will help to wick the Distress ink and age your flowers to perfection!
How to Make Fall Flowers | Pluckingdaisies.com #Fall #Flowers #RangerInk #Tutorial
Shower Curtain Flowers
I had an epiphany when changing out my shower curtain to cut a piece off and save it to “make something”. This resulted in some fun fall leaves and now Shower curtain flowers. You can also get this look by using a clear tablecloth. Check out my Shower Curtain Leaves tutorial for all the details on selecting Alcohol Inks in a fall color palette. *I gave my flowers a spritz of glitter spray for a touch of sparkle.
* Repeat Steps 3-7 (above)
How to Make Fall Flowers | Pluckingdaisies.com #Fall #Flowers #RangerInk #Tutorial
The flowers looked great but they needed a little something…like a center. It was bothering me that you could see the pipe cleaner in the center. To fix this problem I consulted my vintage button collection. (Do you ever really NEED an excuse to play with vintage buttons? ) Selecting buttons for your flower centers is half the fun. Try a few on for size, shape and texture. When you are satisfied grab your glue gun to adhere them.
*If you don’t have a stash of vintage buttons you can find an assortment called “Grandma’s Grab bag” in the sewing section at Michael’s. Just look for a bag with lots of brown to complement the fall colors.
How to Make Fall Flowers | Pluckingdaisies.com #Fall #Flowers #RangerInk #Tutorial
Now you will need a container to arrange all the lovely fall flowers you’ve created. I’m sure you may have one of these generic glass vases left over from a fresh flower arrangement. Not even a run through the dishwasher and a good scrubbing could remove the schmutz from the rim of this vase so it was time to up cycle it into something new!
After a coat of Krylon Glitterblast (Diamond Dust) it looks better than ever! *If you don’t have one of these vases lying around they can usually be found at the thrift store for $1 or $2. You could also use a large jar from the recycling bin.
How to Make Fall Flowers | Pluckingdaisies.com #Fall #Flowers #RangerInk #Tutorial
The freshly painted vase is lovely but it needs something to “Tie it all together.” I saved this gold grosgrain ribbon (probably from a Christmas gift from last year) and thought it was the perfect complement for the Fall Flower arrangement . To add a bit of whimsy and tie in with the sheet music flowers I stamped the ribbon with a sheet music stamp and Ranger Archival ink.
How to Make Fall Flowers @savedbyloves by Pluckingdaisies.com #Fall #Flowers #RangerInk #Tutorial
Move over 1-800-flowers! If you have a dryer full of laundry, a shower curtain that needs replacing, and a plain glass vase in your home you can create a beautiful Fall Flower arrangement that will last for seasons to come. All with flower making skills you learned in Kindergarten.
Hope your creativity is blossoming today!
Amy*

How to Make a Wood Pallet Desk

#WoodPallet #upcycle to desk at Thistlewood Farm #DIY #crafts

If I know anything about my readers, it is that you love repurposed pallet projects as much as I do.  Kari Anne at Thistlewood Farm has a pallet top desk upcycle that you don’t want to miss.  Like all her projects, this desk has a farmhouse feel that is inviting and warm.

For more wood pallet projects, click the thumbnail to our 50+ Wood Pallet Craft Round-up:

Privacy Policy