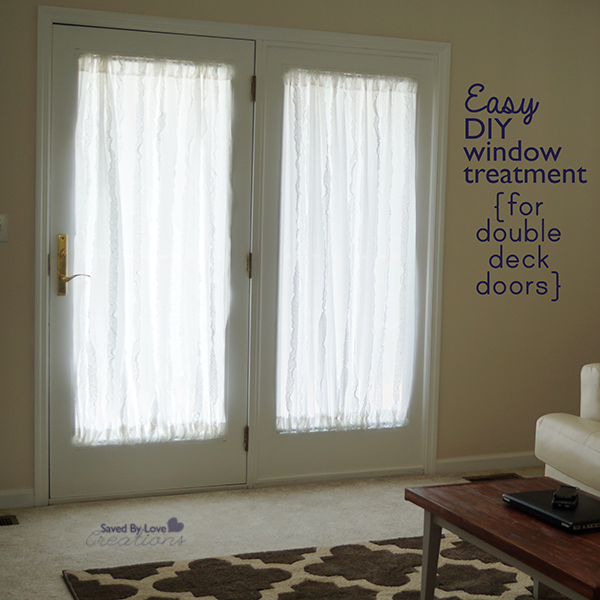
DIY Window Treatment for Double Deck Doors

[pinit]Window Treatment for Double Deck Doors[pinit]

If you have double deck glass doors, you may be wondering what kind of window treatment works and looks best with them.  I ran into the same dilemma in the living room of our new residence.  Hanging a rod above the door frame would leave me with curtains hanging in the way every time I opened the door.  That is why I decided whatever went up there needed to be contained within each door.  I ended up altering regular 84 inch curtains and using tension rods for the perfect solution.   Want to see how?

SUPPLIES:

Farmhouse Decor Window Treatments

Curtains about 2 times wider than the glass in  the door at least 3 inches longer than the glass

Tension rods that fit inside the window (I got 22-36 inch rods at Target for my 24.5 inch wide glass)

Sewing machine or liquid stitch or stitch witchery

Fabric scissors

Iron and ironing board

Measuring tape

Pencil or chalk for marking fabric

TUTORIAL:

Measure the length of the window and cut curtains to 3 inches longer than that length.

DIY Window Treatment

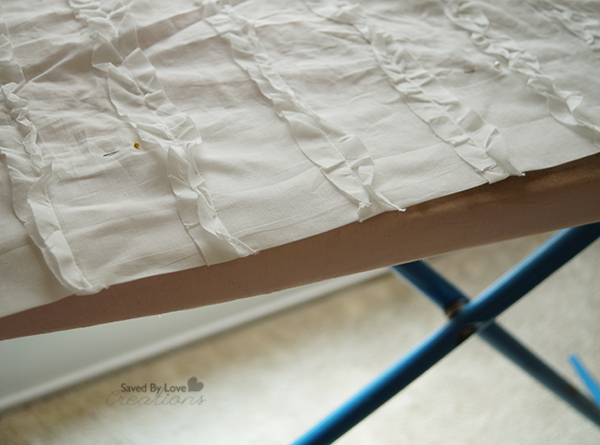
Fold 3 inches  from the bottom of the curtains back and iron to make a hem (the hem will be at the length of the glass).

Pin in place and sew all the way across the width of the curtain.  This doesn’t need to be perfect, or even close, since the curtains will be bunched up around the rod and the seam won’t be visible.

Ruffle Curtains

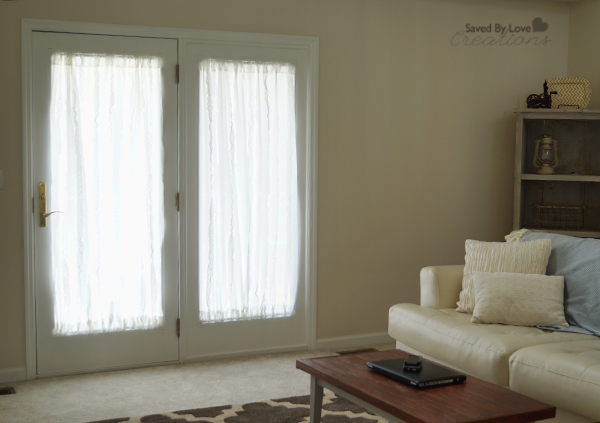
Hang with tension rods in the top and bottom and you are done!

TIPS:

If you don’t want to or can’t use a sewing machine, follow the instructions but use Liquid Stitch or Stitch Witchery to secure.

You can do this with a piece of fabric at least six inches longer than your glass by sewing a 3 inch seam at the top and bottom, instead of using curtains.  I just happened to have the curtains on hand.

For more ideas, visit our 50+ Curtains and Other DIY Window Treatments to Make:

DIY Tissue Paper Scripture Chalky Finish Wall Art

[pinit]DIY Chalk Paint Reclaimed Wood Scripture Art @savedbyloves[pinit]

On a recent trip to Michaels, I found Hazel and Ruby tissue paper that just had to come home with me.  It is big, comes in super cool prints and is perfect for decoupage projects.  I used it to make this scripture word art on reclaimed wood, with a stencil mask technique.  Today I will show you how to create your very own.  You can use the text provided in a downloadable file below, or bring your own verse to the game.  Let’s do this, want to?!

SUPPLIES:

Decoupage Home Decor

Hazel & Ruby Tissue Paper

Mod Podge

Paint Brush

Wood Surface

Chalky Finish Paint (I used color “Relic”)

Vinyl Sheets and Cricut or Adhesive Word Stencils

TUTORIAL:

Tissue Paper Decoupage Wall Art DIY

Apply a generous layer of Mod Podge to your wood surface.  I am using the back of the art I showed you several years ago here:

DIY Cheap Wall Art Faux Oil Painting

It was time to change this art to fit my new decor!

https://savedbylovecreations.com/2011/03/bird-faux-oil-painting-frugal-wall-art.html

Apply the tissue, smoothing out wrinkles with the palm of your hand.  This tissue didn’t really wrinkle, so that was pretty awesome! Apply another layer of Mod Podge to seal the tissue and cut or tear the excess paper from the edges.  I actually cut mine to fit the board before applying, so there wasn’t excess.  Either way is fine.  The edges don’t have to be perfect since you are painting over them in a future step!

Phillipians Bold

I used the jpg file to cut the text out of adhesive vinyl using my cricut and Sure Cuts Alot.  You are free to use this file as well.  Just right click the thumbnail to pull up the full resolution version and save to your computer.

DIY wall Decor

I applied the stencil to the tissue paper after letting the Mod Podge cure overnight.  I used Cricut transfer tape to transfer the vinyl words.  You can do this by hand, but the transfer tape makes the process way easier, faster and neater.

DIY Wood Sign

Next I painted over the entire surface with Chalky Finish Paint in “Relic”.

Cricut Home Decor Project Tutorial

I used tweezers to remove the letters before the paint dried completely.

DIY Scripture Sign

I sealed the piece with Clear Creme Wax to finish.

DIY Budget Friendly Wall Art

I am super happy with how it turned out!!

If you like this project, be sure to check out 50+ Scripture Art DIY Tutorials:

DIY Countertop Transformation With Rustoleum

[pinit]

Rustoleum Countertop Transformation Review @savedbyloves

[pinit]

If you have outdated laminate countertops and dream of granite, the look can be yours without breaking the bank!  We just revamped our country blue laminate countertops with Rustoleum’s Countertop Transformation Kit, and are thrilled with the outcome.  The process was super easy and far less expensive than replacing our existing surfaces.

DIY Countertops

The kits come with a DVD tutorial, giving detailed accounts of each step.

Sanding with included diamond sanding pad

We began by de-glossing the existing clean countertops by sanding them with the included diamond coated sanding pad.

Degloss countertop surface

Wiping away the debris from sanding and making sure all areas were de-glossed came next.  We weren’t sure what to do about the wood “lip” edging on our tops, since the video example showed a fully laminated top that curved over the edge smoothly.  We decided to sand and treat the edging like the rest of the countertop.  So glad we did.  It looks great!

Apply adhesive basecoat

How to make laminate countertops look like granite

Next we applied the adhesive base coat.   In our case it was black since we went with the Charcoal kit.

DIY Countertop Idea

Using the handy dispenser that came with the kit, we spread the flecks over the wet base coat and let that dry 12 hours.  This stuff was everywhere!  That is why it is important to tape off areas and use drop cloths.

How to cover old countertops

After 12 hours, we shop vacuumed the loose chips with a brush attachment.How to revamp countertops

We sanded the surface with the diamond coated sanding pad, being careful not to remove the base coat.  Included in the kit is an example of what your countertops should feel like when you have sanded enough.

DIY Countertops

Before applying the glossy top coat, we vacuumed away the sanding debris and wiped the countertops clean with a lint free clothFor the last part, we mixed the 2 part top coat together and applied with a brush and roller, per the instructions on the video.  This was a breeze.

We had to wait one week before being able to use our countertops, and it was totally worth it!

Our Countertop DIY Makeover

Faux Granite Countertops

 I love how the countertop edge goes all the way over instead of being edged with wood.  It looks way nicer.  I would recommend this kit for sure.  Such a huge difference!!

Stay tuned for the cabinet makeover that is soon to come.

Disclaimer:  I received the countertop kits for this project from Rustoleum.  That affected my review none whatsoever!  All opinions are mine and honest.

DIY Paper Hydrangeas

[pinit]

how to make paper hydrangeas[pinit]

What is better than a bouquet of fresh hydrangeas?  A bouquet of paper hydrangeas that don’t ever wilt!  Today I am sharing with you this easy, however time consuming, paper hydrangea tutorial.  I am going to be upfront here… this project to me way longer than I expected.  That said, it is a perfect way to keep creative while chilling in front of your favorite t.v. series.  I used a Sizzix die for my project, but Lia Griffith has a great Paper Hydrangea Printable Template and DIY that I featured at Printable Decor recently.

How to make paper flower bouquet

I used wonderful filter paper that I got from Materials for the Arts in Bloomington.  If you are a crafter/artist and don’t have a relationship with your local recycling center, you could be missing out big time!

imageI die cut the petals with my Sizzix Lilac Die and colored them with distress markers. For a watercolor effect I painted over the marker with a wet paintbrush. You could use watercolor or acrylics too.

image

I followed Lia’s tutorial linked above to assemble my flowers. Holy ninjas, that took forever. It was totally worth it though.
Papercrafting tutorial paper hydrangeas

For more paper flower tutorials and awesomeness, visit our 50+ DIY Paper Flowers Roundup;

Free Printable Vintage Camper Art

[pinit]

Free Vintage Camper Printable by Colleen @JustPaintIt @savedbyloves

[pinit]

Hi there, Saved By Love readers! This month I have a little different type of project to share with you and I hope you like it. I love crafting and I especially love sharing craft tutorials but I realized I hadn’t shared any of my artwork with you yet.

With Father’s Day coming up, along with summer vacations getting started, I thought you might enjoy a fun printable that I made from one of my watercolor paintings. I have links to the downloads at the bottom of the post, but first I wanted to show you some of the steps I go thru for a watercolor.

camper-sketch

I start with a sketch, of course.

No, that’s wrong. I actually start by gathering loads of visual references. Google makes it so easy now.

When I started painting in the ’90’s, I was a magazine ripper. I had binder after binder of cataloged photos. When I’d paint a mural at someone’s house, their wall would be covered with magazine photos, held up with blue painter’s tape. Now I just keep photos in folders on my computer. Much, much easier.

When it comes to sketching, there are lots of techniques and methods out there. (I think YouTube has quite a few.) I don’t know any, however. I pretty much eyeball everything. Good erasers are a must!

For drawings like this vintage camper, I sketch in pencil pretty lightly until I’m satisfied that everything is in proper relation to everything else. Then I’ll grab a ruler to draw the straight lines. When the pencil sketch looks about right, I go over the pencil markings with a black marker, usually a Prisma .03. I don’t use a ruler with the marker, however, because if the ruler isn’t lined up perfectly, the whole drawing is shot. That’s happened a couple of times.

I’d rather freehand the lines and have a few bumps here and there. It also adds to the ‘charm’ of a freehand illustration. There are so many great digital artists now, and I love their work, but there’s something pleasingly ‘organic’ to a handdrawn or handpainted piece. At least, I think so.

Another drawing tip I have is to turn the paper (or canvas) upside down and all around while sketching, both with pencil and the marker. This is particularly helpful for curves and circles. Although another reason to turn the sketch upside down is you’ll see imperfections more clearly and, therefore, can fix them.

Try turning your paper upside down the next time you draw something. You’ll be surprised at what you see!

Finally, after everything is inked in – and it has dried (!) – I erase all of the pencil markings. That’s important before the painting starts otherwise you’ll get some graphite smeared into the paint.

camper-watercolor

With the sketch inked in, it’s time to lay down the colors. I’m new to watercolors so bear with me if you’re a watercolorist because I don’t really have any idea what I’m doing. Although I am having a lot of fun with them!

I still need a lot of practice with highlighting and shading but for simple illustrations like this camper, I just add layers of color until I get the depth I want. If you haven’t painted with watercolors since . . . well, since you were a kid, then you ought to give them a whirl again. It’s a great medium and the results are beautiful without a huge time investment, for the most part.

camper-watercolor

Sometimes I’ll leave the painting right there and call it finished, just with the initial inked sketch and color over it.

camper-watercolor

But going back over everything with a marker again helps sharpen the details, I think.

Either way, you wind up with a cute little painting that you can turn into a fun printable.

Home Printable

Click the above photo or here to download this 8 x 10 printable.

I thought this might be nice for a Father’s Day gift or just keep it for yourself!

Home-Camper-blank

Click the above photo or here to download this 8 x 10 printable.

Or you can download this camper and add your own text with PicMonkey or any other photo editing program.

Ever since I started painting, (nearly 20 years now) my goal has been for people to use my art. Sure, if you want to hang it on a wall, that’s great too. But I always wanted my paintings to be on everyday items. Now, with sites like Zazzle, that’s possible!

I also noticed that some artists were making their own digital clipart. After some research, I jumped into that pool too and opened a shop on Etsy where all of my art will be available as downloads. Clip art is in the works and will be in the shop soon. Not only does this keep my prices down, it means that people can use my art to make their own creations, including their blogs and web sites. So exciting for me!

I hope you like these camper printables! And I hope you’ll use them for other creations, besides just printing. I’d love to see what you come up with!

I’ll be back at the end of June with another fun project. In the meantime, drop by Just Paint It for more paint projects. You can also find me on Facebook, Google+, Pinterest and Instagram too. And of course, I’d love for you to drop by my Etsy and Zazzle stores.

Before too long, this camper will be in both. Not yet though. Right now, it’s just for Saved By Love Creations readers.

Happy Summer!

Colleen

DIY Rustic Home Decor Wooden Cake Stand

wooden-cake-stand-tutorialThe look of wood in the home is something I enjoy having in my home. Especially since I live in an apartment it’s hard to do any change physically to the apartment but adding wood accents help make it homier. I’ve seen wooden cake / cupcake stand in magazines and I just needed to give it a try myself. I decided to go to my favorite place Home Depot and pick up a couple of things to make my rustic cupcake stands.

wooden-slice

I first got the wooden slice of wood from my local craft store. They always have different size woods at the craft store and I always like visiting time to time to find that once piece that is bigger than the rest.

wood-cupcake-stand-sealer (1)

I used sealer to make sure the wood will not dry out or get molding if food or water get on it. Also the sealer will darkened the wood just a little which I really liked.  I used the sealer all around wood slice.

wooden-stand-leg

I got a wooden leg from home depot and sealed it too. They have different varieties but do keep in mind to have something that will keep it balanced.

cupcake-wooden-stand

I attached the wooden leg with wood glue and let it set over night. And now you have your ever own rustic cake stand for you home. I used my cake stand to show off my mother’s day flowers which my little man got for me, he does have good taste.


Stay Crafty!

Make Wood Shims From Reclaimed Wood and Resurface a Coffee Table


[pinit]
Reclaimed Wood Coffee Table Revamp

[pinit]

What is better than revamping a garage sale find?  Revamping a $5 garage sale find that you got in 2006 a second time, that is what!  Today I am sharing how I did just that to create this reclaimed wood resurfaced, chalk painted coffee table.  I am super proud of this bad boy.  With some old deck wood I inherited when my mom demolished her deck and my table saw, I created wood shims, attached them to the table top, framed them in with the same deck wood, and stained them with Minwax Wood Finishing Cloths.  The result is exactly what I was going for, and I am loving it with the decor where it landed.  Wanna see how you can make your own?  Let’s do this!

Make a Coffee Table

TUTORIAL:

Paint your table base as desired.  I used gray chalk paint.

Rip thin “wood shims” from reclaimed wood with your table saw, or buy wood shims!

Resurface a table

Place your shims with excess stick over both edges.

Attach Wood Shims with Air Nailer

Use wood glue and Air Nailer to secure wood shims into place.

Mark straight edge and cut with Jigsaw

Draw straight edge and cut off excess wood with jigsaw.

Frame in and fill in gaps with wood putty

Frame in by measuring length and width of table and cutting wood at 45° with short edge the same length and width as your table.  Attach with glue and nail gun.  Fill in gaps and holes from nailer with stainable wood putty.

How to use orbital sander

When wood putty dries, sand with orbital sander to smooth out surface.

Minwax wood finishing cloths

If you have been around here long, you know I am a huge fan of Minwax Wood Finishing ClothsMinwax 30820 Wood Finishing Cloths, Natural Oak.  They are super awesome.  Stain and seal with just a swipe.  Here I used Natural Oak and went over that while still wet with Dark Mahogany for a custom color.

Reclaimed wood table tutorial

That is it!

The inspiration for this project came from the recent 50+ Wood Shim DIY Projects we shared:

Check it out for tons more inspiration!  Enjoy.

How to Chalk Paint on Fabric

Hello! It is me again, Vidya from Whats Ur Home Story. Has Spring been good to you? Surprisingly for the first time in many years my allergies are minimal, which is a huge relief. As a result I got to cross off many projects from my To Do List! Yay! †Have you noticed that sometimes it is the small projects that surprise you with how big of an impact they make? Today, I have one such makeover for you.

[pinit]

fabric-bin-makeover-with-chalk-paint @savedbyloves

[pinit]

In its past life this bin used to be “under the bed toy storage” in my daughter’s room.

fabric bin makeover

Yes, complete with pink and white stripes that my daughter used to love when she was 5. Not any more! As she has grown so has her tastes in decor. She is also at a stage where she doesn’t play with her old toys much; so we ended up donating most of it. This freed up the bins for using in the laundry room. But pink?

With the help from some left over chalk paint from a chair makeover and a stencil that I used for a throw pillow project I gave it a new lease of life!

laundry room redo

†When using chalk paint on fabric,

  • First mist the fabric thoroughly with water using a sprayer. The fabric should be damp but not completely wet.
  • Paint using a well loaded roller. Th fabric does soak up paint so you’d end up doing at least 3 coats.
  • Once the paint is dry position the stencil with a stencil adhesive on the flat side of the bin. With a sponge gently stencil with fabric paint.

fabric tote makeover

The project is very forgiving as you can easily go back and paint over any mistakes. For example, see the orange paint smudges next to the bird?

fix stencil mistakes

I just went over those with chalk paint and poof they were gone!

how to chalk paint fabric

Have you used chalk paint on fabric before? How did it go?

For more easy DIY ideas stop by†Whats Ur Home Story†or follow me via†Facebook,†Pinterest,†Twitter,†G+,†Instagram.

Washi Tape Coasters

Hello everyone! It’s Barbara from Chase the Star! In the warmer months I like to decorate in fun vibrant shades especially when entertaining, so I dug up an old set of inexpensive coasters and updated them with paint and washi tape to give them a new look for summer!

Washi Tape Coasters

[pinit]

https://savedbylovecreations.com/wp-content/uploads/2014/05/Washi-Tape-Coasters-via-Chase-the-Star-for-Saved-By-Love-Creations.jpg

[pinit]

This basic set of coasters have been with us for a few years, they’ve worked very well!

In order to give them a new look I gathered my materials:

Washi Tape (I used 4 rolls)

Acrylic paint

2 Foam applicator brushes

Exacto knife

Mod Podge (I used the “Dishwasher Safe” formula)

Paint, Mod Podge and Washi Tape to update coasters via Chase the Star for Saved By Love Creations

Step 1:

First things first, always start with a clean surface! I wiped the coasters and holder clean. Using one of the applicator brushes I gave the coasters a few coats of the paint. I went with ‘Vivid Orange’ by Folkart, it’s so bright–I love it!

Painting Coasters via Chase the Star for Saved By Love Creations

Step 2:

Next, I applied the washi tape in a repetetive pattern to the top and bottom of each coaster, and trimmed the excess off with the exacto knife.

Washi Tape Coasters for a new look via Chase the Star for Saved By Love Creations

Use paint and washi tape to update old coasters via Chase the Star for Saved By Love Creations

Step 3:

Lastly I added a couple of coats of Mod Podge to seal the Washi Tape in. I chose the ‘Dishwasher Safe’ formula because although I doubt I’ll run the coasters through the dishwasher, I’m sure they will get their fair share of moisture, after all, that’s their job!

I used the same process for the coaster holder.

Old Coaster set gets a new look via Chase the Star for Savved By Love Creations

I think this will make a great addition to my outdoor parties this summer!

Do you have an old set of coasters that can use a little love? If you don’t, you can pick some up at the thrift store, or any other discount store!

For more craft and DIY ideas stop by Chase the Star, and follow me on Facebook, Google+, Pinterest, and Instagram!

Have a great summer!

For more washi tape ideas, visit our 50+ Washi Tape Crafts to Make

New Signature

Dollar Store Craft DIY Mercury Glass Votive Holder From Martini Glass

[pinit]How to Make Mercury Glass Candle Holder[pinit]

I am excited to share with you this Dollar Store Craft, a lovely DIY mercury glass candle holder.  I made it from the stem of a dollar store martini glass and a dollar store candle holder!  Read on to see how I removed the stem and attached it to the holder, and how I created the mercury glass finish with Krylon Looking Glass Spray Paint.

SUPPLIES:

DIY Mercury Glass With Looking Glass Spray Paint

Dollar Store Martini Glass

Krylon Looking Glass Spray Paint

Martini Glass

Glass Cutter

Butane Micro Torch or candle and lighter

Bucket of cold water

Coarse sand paper or grinder with diamond bit for glass

E6000

TUTORIAL:

Make a score line around the stem of the martini glass at its top where the stem meets the upper part of the martini glass.

How to cut glass

Apply heat to score line and submerge in cold water to separate the stem at the score line like I showed you in this DIY Wine Bottle Rings tutorial.

Sand or grind top of separated stem to give a flat surface for gluing to the bottom of the glass candle holder.

Dollar Store Craft

Here is the glass I used to glue onto the stem of the martini glass.  I used E6000 on to attach two pieces, and placed the glued pieces against the wall for support while drying.  Let dry several hours before applying the mercury glass finish in the next steps!

DIY Mercury Glass Tutorial

Mercury Glass DIY

Pour Epson salt into the glass so that to about one inch from the bottom.  It is not important to be exact here.

 In a well ventilated area with protected work surface, spray looking glass paint inside of the glass at the rim. Make sure to follow instructions on label. You want to shake the can vigourously before using.

Shake the glass a snow globe (holding your hand over the top), so that the salt grabs the paint and drags it around. This will create the mercury glass look.

Repeat steps 5 and 6 a few more times, allowing each coat to dry for about 5 minutes before applying the next. Stop when are happy with the look!

Privacy Policy