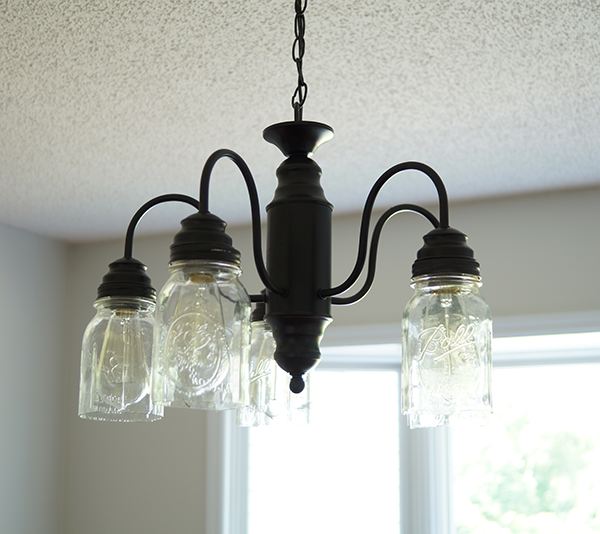
Spray Paint Mason Jar Chandelier Update

[pinit]DIY mason jar chandelier farmhouse style[pinit]

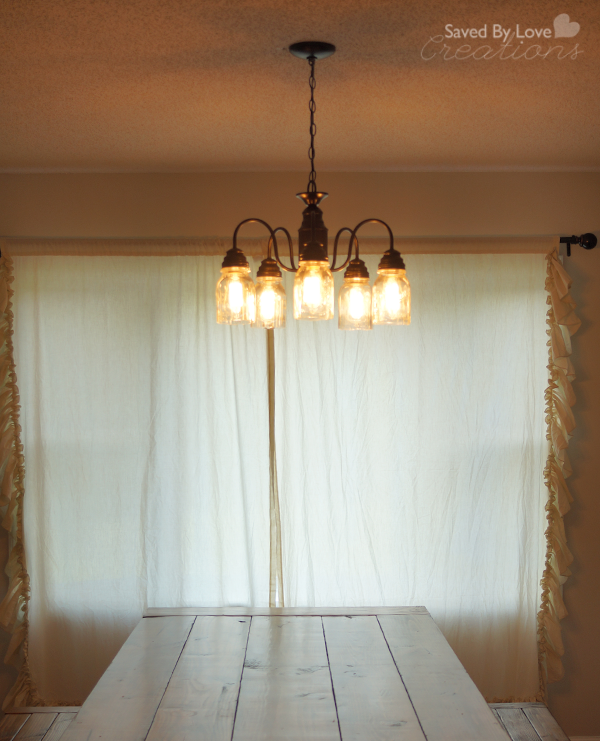
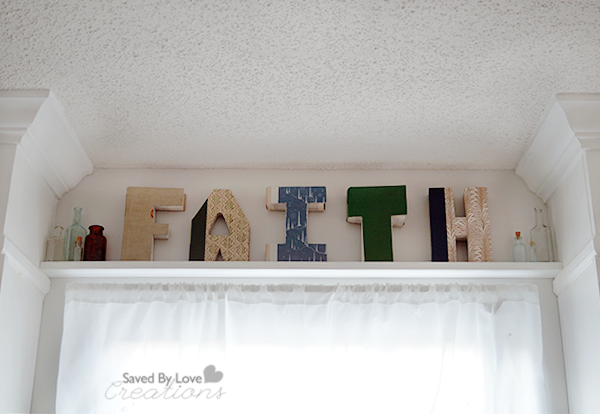
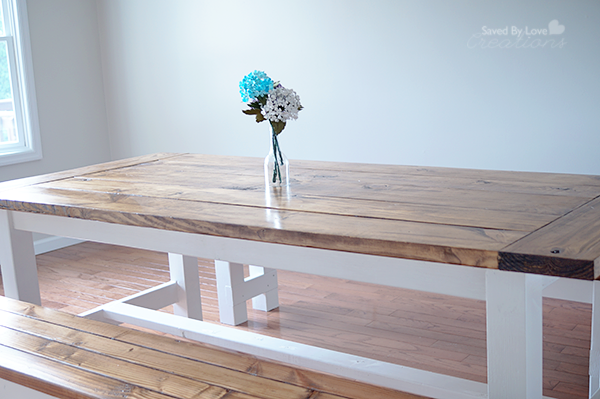
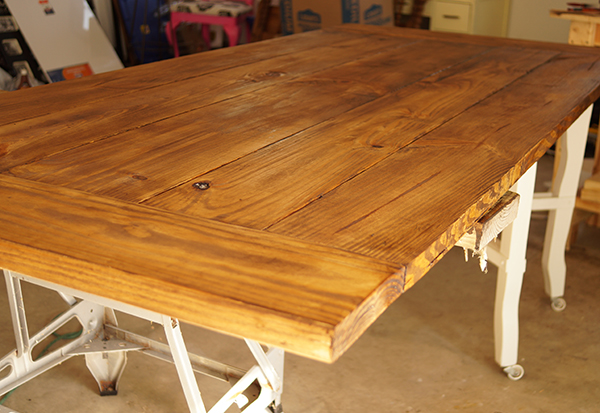
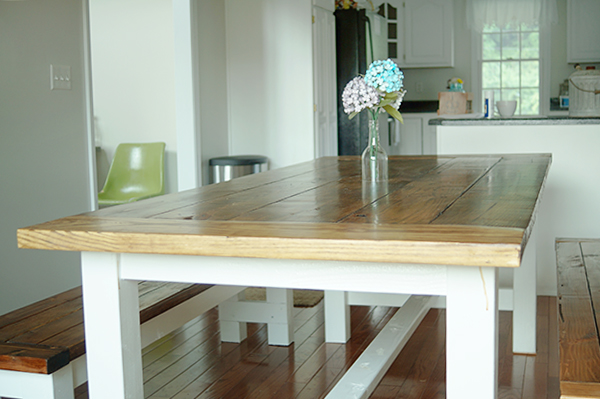
Do you have an outdated brass chandelier that makes you sad every time you look at it?  I did.  It was even worse hanging over that sweet DIY farmhouse table and benches I shared with you last week.  Finding a replacement for that light has been a priority since moving here, and it has happened!  Find out how I made this beautiful mason jar chandelier for $10!
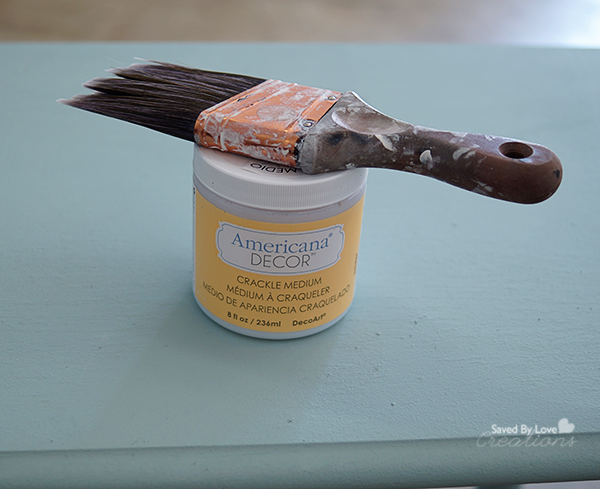
DIY Chandelier Update

SUPPLIES:

Chandelier

Cut mason jars (See How to Cut Mason Jars) with lids

The Original Style Vintage Bulb

Vintage Light Bulbs

Scissors for cutting metal (I use Tim Holtz Tonic)

Sharpie or other permanent marker

Krylon Dual Oil Rubbed Bronze

TUTORIAL:

Outdated brass chandelier

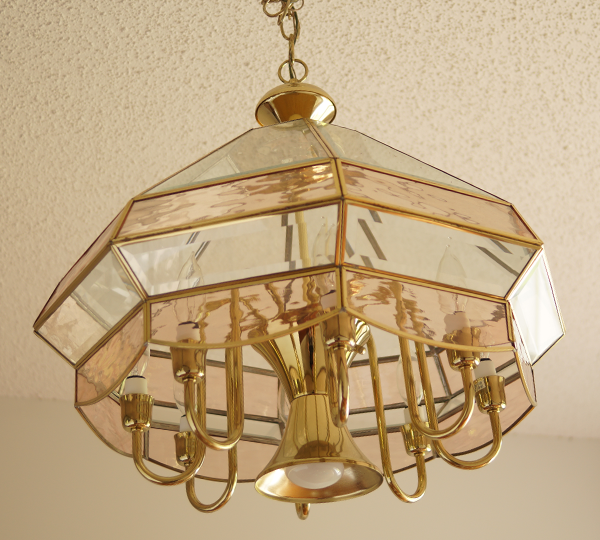
Just to show you what we are replacing!

Thrift Store Chandelier Update

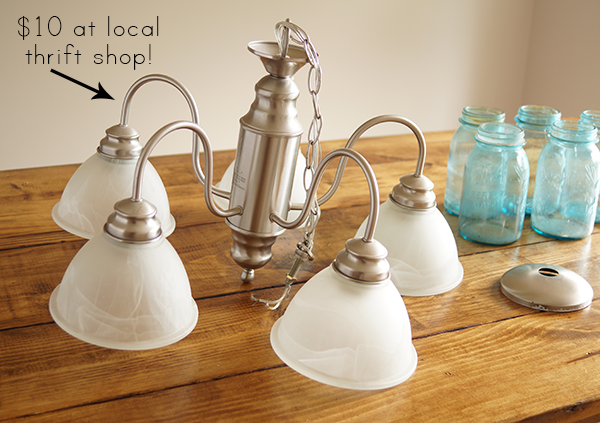
I found this guy for just $10!

How to make a mason jar chandelier

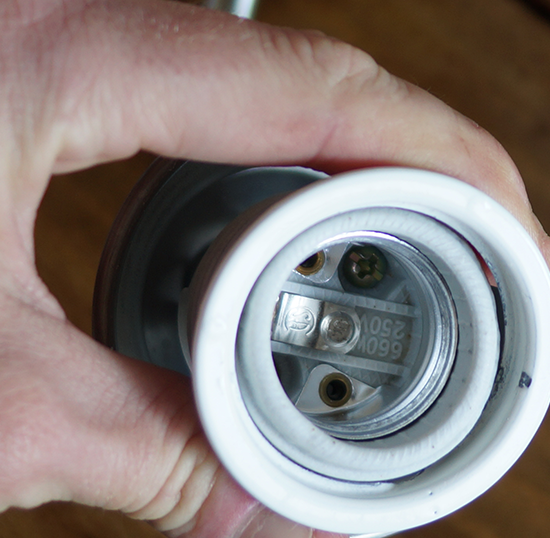
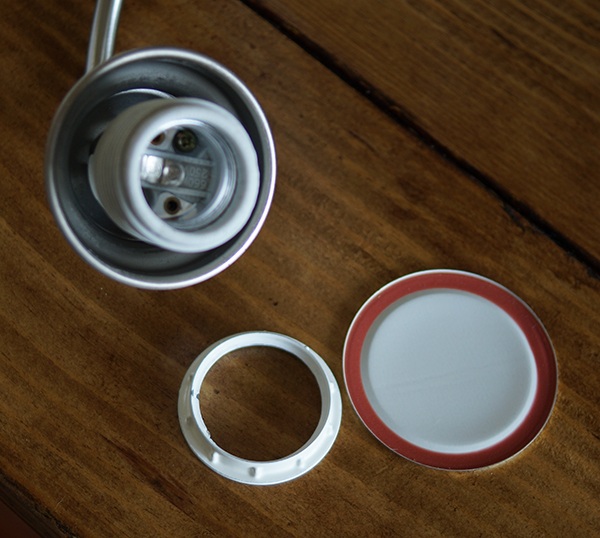
I removed the lamp shades that came with it and unscrewed this white circular piece.

How to make a mason jar light

How to make a chandelier
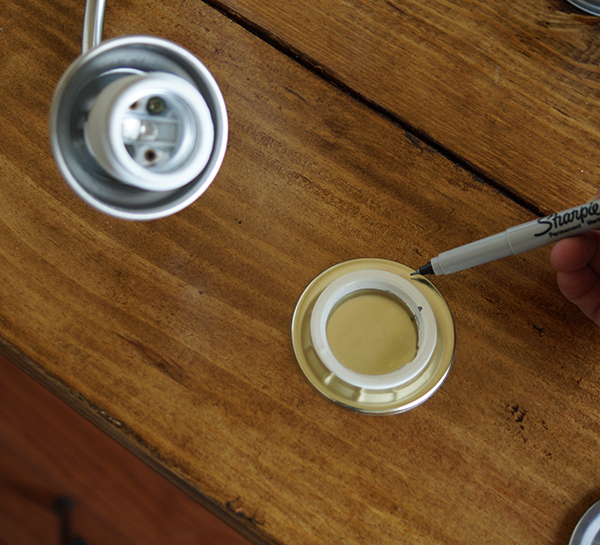
I used the white piece smaller side to trace for cutting a hole in the mason jar canning lid insert.

Cut a hole in mason jar lid

As you can see, this doesn’t have to be pretty.  It will be covered.  So long as it fits over the socket and the white piece will hold it in place.

Place cut lid on socket

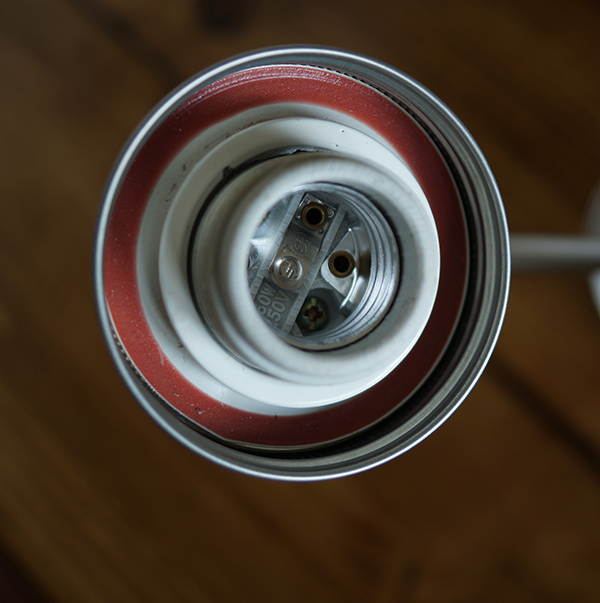
Here you can see the outer ring of the canning lid, then the inner part with the hole we cut and slid over the socket, then the white ring screwed back into place to hold it all together.

Spray Paint Krylon Dual Oil Rubbed Bronze

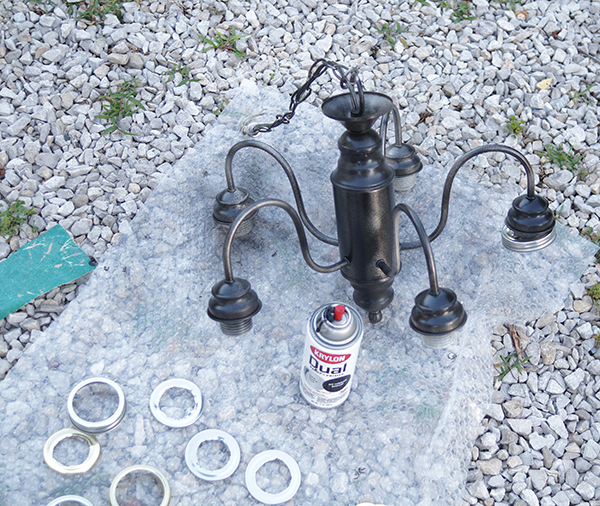
I started to spray without attaching the jar lids, but then realized that was just silly.  Attach everything except the jars and bulbs, then spray paint!  If you can suspend the chandelier somehow, to get the underneath side good, that is best.  We used a bungee cord and hung it in our garage (annoyed husband and suspended chandelier not pictured).  Let this dry overnight.

DIY mason jar light tutorial

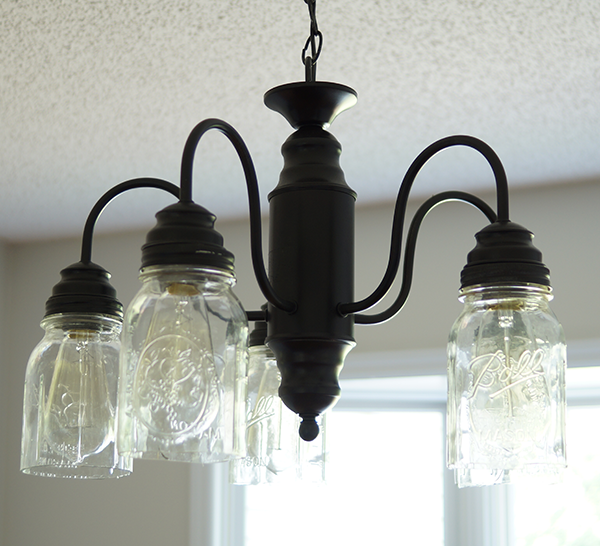
Now we just screw the cut jar onto the lid and insert the light bulbs!

Soooo much better, don’t you think?

Reclaimed Wood Display Shelf For Upcycled Old Book Letters

[pinit]5 minute DIY shelf from Pallet Wood @kregtoolcompany to display "FAITH" letters cut out from old books @savedbyloves.png[pinit]

I am obsessed with old books, well old things in general, but when I saw these words from old book letters I was sold!  There is a cute store in Nashville called Island Cowgirl that we stumbled upon while looking for Archeology Antiques.  The couple just opened the store 12 days before we wondered in, and they know how to do it!  Such rusty, wonderful upcycled home decor and jewelry filled the industrial space.  The prices were what got me.  See, I don’t usually buy handmade things because of the whole “I can make that for like 1/100th of the price tag” thing that happens in my brain.  Not so in this shop.  I left with my arms full, contemplating where I would display my new found treasures when I got home.

Things to make from old books

Did you happen to see my recent DIY Kitchen Cabinet Upgrade with Crown Molding and Chalky Paint post?  It was quite the transformation if I do say so myself.  The kitchen is coming along great, but there was this sad space between the regal cabinets above the window.  It has been begging me to decorate it.  Enter words made up of letters cut from old books.  Yes please!  I bought “Faith”.  Now, where would I put such a special accent?  That is when I decided to attach a narrow display shelf to those cabinets to fill the desolate space above the windows.  How to make a shelf using Kreg Jig

First, I ripped the pallet wood to about 2.5 inches with the table saw.  I used the miter saw to cut the wood to length for the space in between the cabinets.  I used my Kreg Jig to drill a pocket hole on each end for attaching to the cabinets.  If you haven’t used this tool, you are in for a treat.  I use it in nearly every woodworking project for joining pieces together.  The joins are super strong, and the jig takes out all of the guesswork.  I showed you how to use a Kreg Jig in this Easy DIY Pallet Sign Tutorial. Next I painted it using two coats of Deco Art Chalky Finish Paint in “Everlasting”, the same color I used on the cabinets.  A coat of wax sealed the deal, then I attached the shelf with 1.25 inch pocket hole screws.

Old Book Crafts

Wanna have a little fun?  

Guess how much I paid for “FAITH” from old books.  Leave your anser in the comments.  If you are right, I will send you an andvanced copy of my upcoming ebook, with 5 upcycled wine bottle home decor project tutorials you are going to love!

*By the way, if you want to make some yourself, check out this great tutorial from The Merry Thought; DIY Book Letters.  Pretty easy to do with a printer and a scroll saw. 

DIY Farmhouse Table and Bench Using Free Plans from Ana White

Farmhouse bench plan
How to build a farmhouse table and benches rustic decor woodworking plans @savedbylovesI have wanted to build a farmhouse table since I first started building a couple of years ago. Our new house I showed you in the recent Home Tour has just the spot for one, so we got busy woodworking and today I am sharing the fruit of our labor. Using free plans from Ana White, we built a lovely table and matching benches.  I have seen similar sets going for around $1200.  Ours cost under $200!  Building saves so much money, and is super gratifying.  If you are intimidated by power tools, I am here to tell you that you can overcome the fear, just like I did!

Minwax Wood Conditioner Gel Stain and Polyurethane

I built my table using Ana White’s free DIY Farmhouse Table Updated Pocket Hole Plan, and the benches using her Farmhouse Bench Plan.  As always her plans are amazing, and free!  This site is my go to for all things woodworking.  It is where I went to begin this journey, and as you can see in my Woodworking Project Gallery, I have built several of her lovely pieces!  Our house is becoming a hand-built home, one plan at a time.

We decided to stain the top and paint the base white.  Finishing each before attaching them together made things easier.  We did this for the benches too.

I used Minwax Pre Stain Wood Conditioner on the table tops before staining.  This evens out the surface of the wood and makes the stain take more evenly.  I kinda feel like a pro when I stain after conditioning!  The conditioner is easy to apply and one can is enough for several projects.  You just apply with a lint free cloth, let it soak in for about 5 minutes and wipe away any excess conditioner.  After 30 minutes, apply stain.

I used Minwax Gel Stain in Aged Oak.  This is my first time using it, and it is gorgeous!

Staining with Gel Stain

This is my first time using the Gel Stain.  I applied it with Minwax’s Staining Brush.  It is definitely less drippy/runny than the regular stain, but not as mess free as the Wood Finishing Cloths.  Those are still my favorite, and if I didn’t want to try the Aged Oak so badly, I would have used the cloths!  I am hooked and you will be too.  Find out why they are so magical here: DIY Reclaimed Wood Headboard.

After Staining

After the stain dried overnight, it was time to seal.  I used Minwax Polyurethane in Clear Satin.  I applied two coats, drying 4 hours between and sanding with 220 grit paper between coats as well.

For the legs, I primed and painted with white glossy latex paint we had leftover from painting out trim.  It took 2 coats.

DIY Farmhouse Table woodworking plan

I am completely in love with this set.  It took a couple of weeks to build all three pieces and finish them, but I was busy with several other projects at the same time.  If you were determined, you could do this in a weekend.

Have you braved power tools?  If not, I hope you are a little closer to taking the leap now.  It is so worth it!!

Upcycle Wine Bottles to Terrarium Wonderlands

Wine-Bottle-Terrarium-Photo 
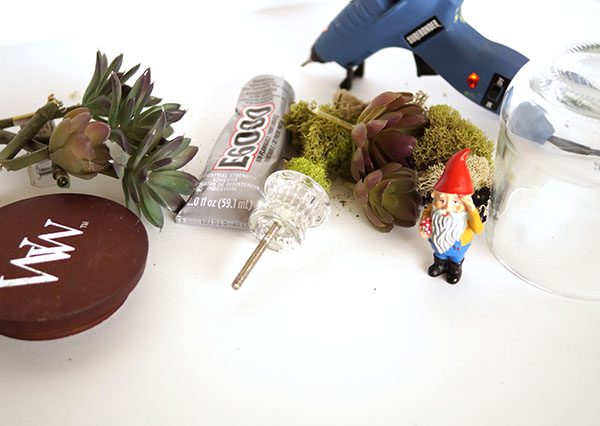
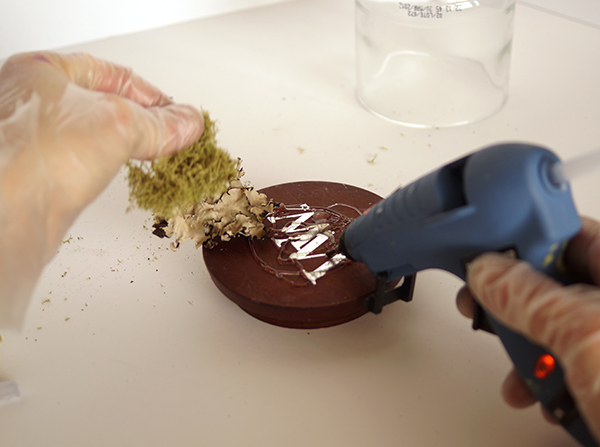
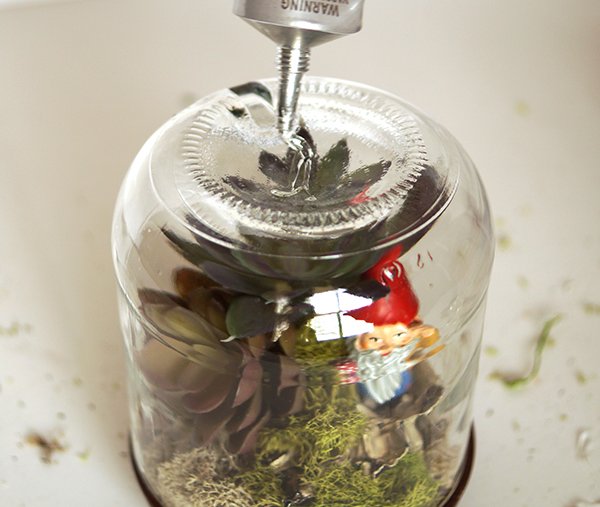
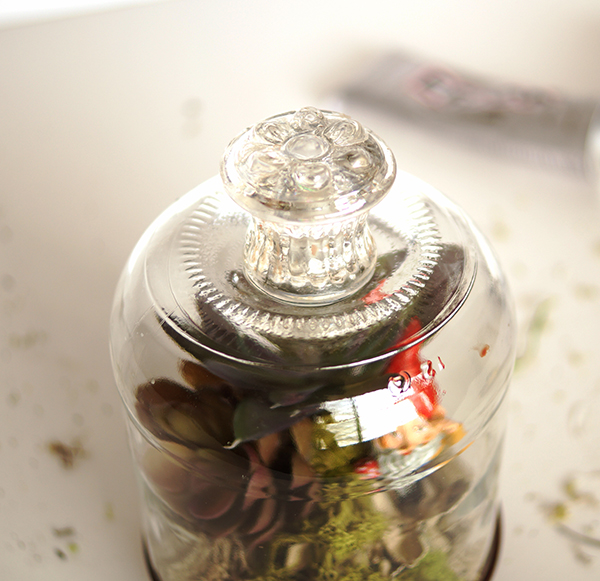
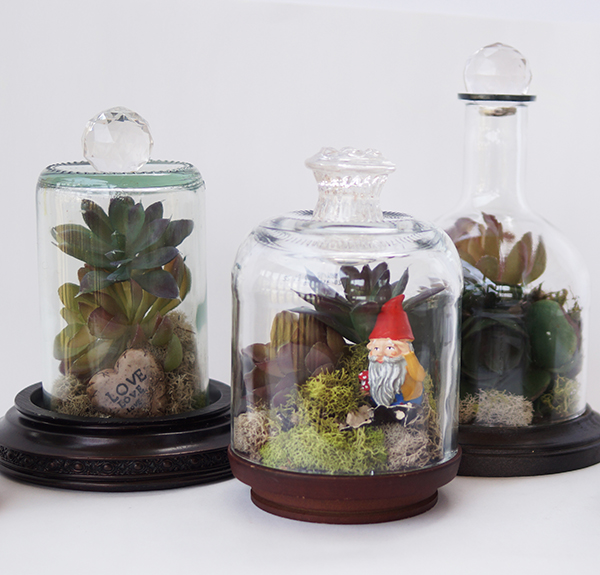
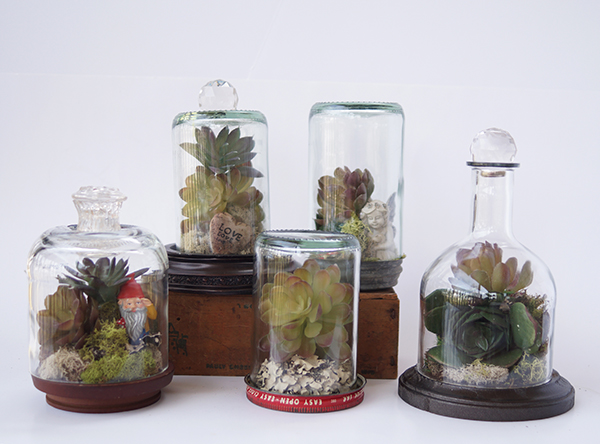
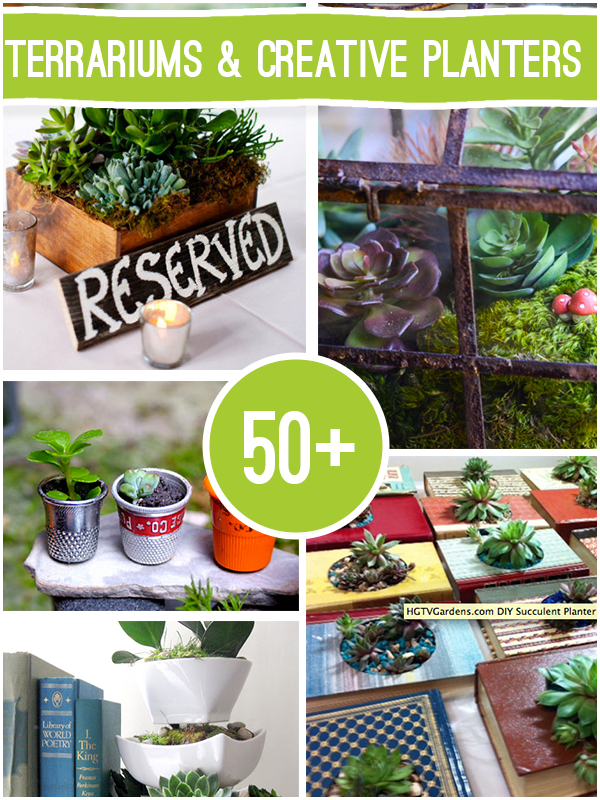
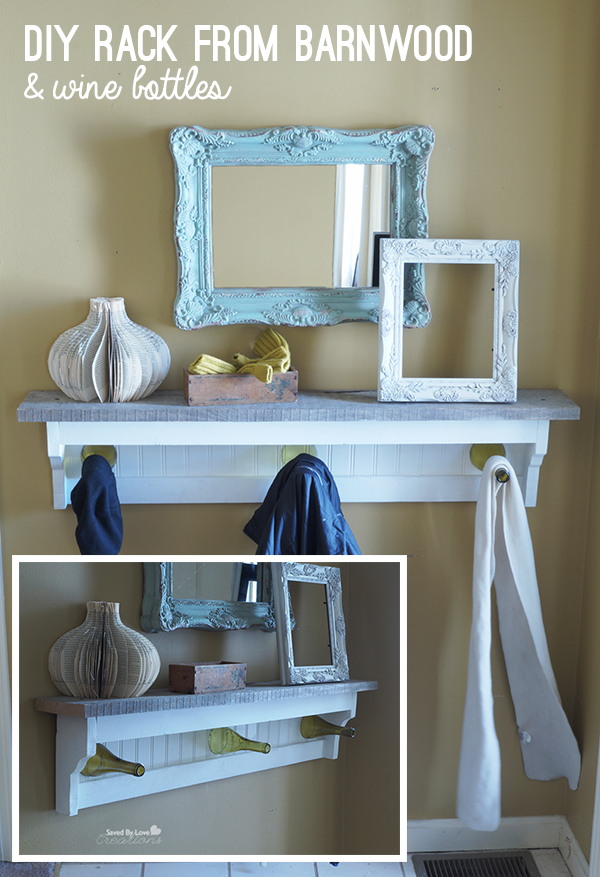
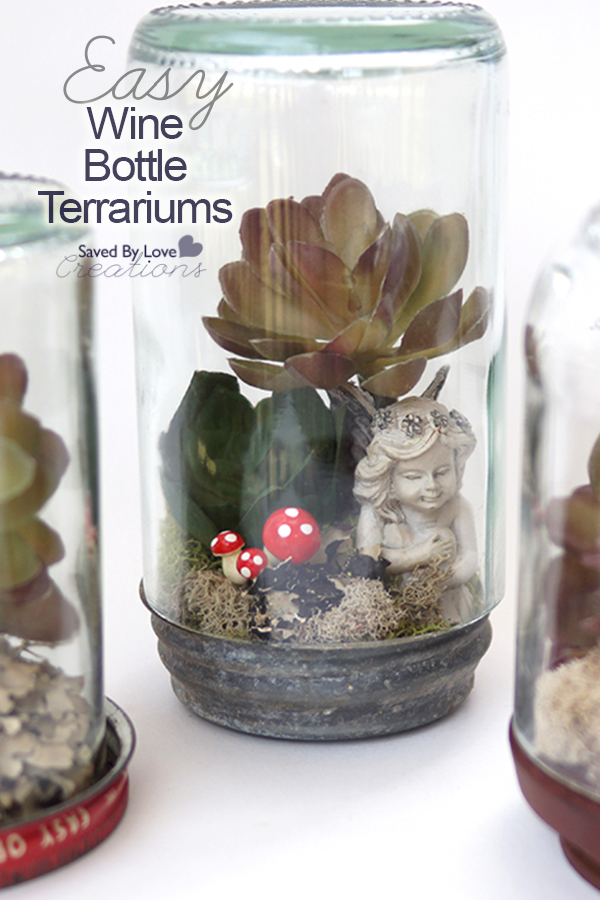
Do you love eco-friendly crafts?  How about succulent plants?  Combine the two by creating your own whimsical land of tiny garden fairies, mushrooms, moss and more with this DIY terrarium wine bottle world.  This project is simple is completed using artificial moss and succulents for those of us with less than a green thumb.  What great gifts, home décor and centerpieces for your woodland themed birthday party these would make!

SUPPLIES:

Wine Bottle Terrarium Photo 1


 -Cut wine bottles with varying heights (See How to Cut Wine Bottles)

Wine Bottle Terrarium Photo 2

-Artificial Moss

-Various artificial succulents

-Hot glue gun and sticks

-mini mushrooms, fairies and gnomes (found in most hobby stores for doll houses and miniature trains)

-Glass knobs or big glass prism or crystal beads

-E6000

-Latex or nylon gloves are optional

-Various round objects for the base of your wine bottle cloches; jar lids, candle lids, etc.

 TUTORIAL:

Wine Bottle Terrarium Photo 4

 Clean the surface of your cloche base and begin hot gluing your moss and filler.

Wine Bottle Terrarium Photo 3

 Build with layers, adding miniatures and succulents.

Wine Bottle Terrarium Photo 5

  When you are satisfied with your scene, place your cut wine bottle cloche top over the tiny world you created.  You can glue this if you would like.  I left mine removable so I could change things later.

 Wine Bottle Terrarium Photo 6

To add a special touch, use E6000 to glue a knob or glass bead to the top.

Wine Bottle Terrarium Photo 10

EXTRA TIPS

○ Cut the metal threading  off of antique flea market drawer pull using bolt cutters, for a flat surface you can glue onto the top of your cloche.

Wine Bottle Terrarium Photo 8

If you like this post, you don’t want to miss:

50+ Wine Bottle Crafts to Make 

50+DIY  Terrarium Projects to Make

New Home Tour + Renovation Plans and Exciting News

Saved By Love Creatiaans New Home TourWe jumped into our new place with immediate renovations, no time wasted.  It has been just about 2 months since we took possession and already, you have seen our DIY Countertop Makeover with Rustoleum’s Countertop Transformation Kit, as well as our DIY Kitchen Cabinet Upgrade.  We wanted to take the time today to show you around the house before continuing with our updating plans.  While house hunting, the biggest must haves on our list were land, wood shop space, studio space, and a couple of rooms for guests.  It will be easy to see how we landed where we did, provided you bring with you a DIY remodel vision.  Come with us as we go from a 1990’s country house to a vintage farmhouse style home, one budget minded project at a time!

Ariel View

Here is the aerial view.  You can see the large front and back yard, pond, outbuilding (yay for workshop with 60 Amp service, and ample wood storage).  There is even a running trail in the wooded area!

DIY Farmhouse Inspiration

Here we are from the back of the house.  That pond is delightful with a fountain feature and fully stocked.  Not that I plan to fish, but several friends and family members are excited about that aspect.  You wouldn’t believe the number of frogs hopping around there right now!

Outbuilding

The tools are in the right half of the outbuilding, which has a concrete floor and windows in the back.  The left hand side holds the tractor and all of the reclaimed wood I hoard!

Let’s go inside now…

foyer

Here we have the foyer.  The first thing we did, even before the kitchen, was paint the walls and trim.  Bye bye wood trim!!  Some of you will want to vomit at the thought of that.  I am a white trim girl, so white it is.

Living room and Dormers

Here is the living room from the sliding doors that go out onto the back deck.  The walls are no longer country blue.  We went Moderate White by Sherwinn Williams.

Living room ceiling

I loved the wood ceiling and window trim in the living room, so it stayed as is.  That light will be replaced with something less shiny brass and more awesome/vintage/farmhousey.

Living room to deck

Here is the view of the double deck doors from the living room.  I showed you a DIY Window Treatment for them no long ago.  You can also see the new paint on the walls and trim:

Living room

Like I said, I left the wood on the big window above the double doors, and on the ceiling.  No more deer head, if you were curious.

Kitchen2

You have seen the kitchen in the DIY countertops and DIY kitchen Cabinet Upgrade posts.

Kitchen

DIY Kitchen Cabinet Upgrade

It is now much brighter, fresher and along the lines of the farmhouse feel we want.  Stay tuned tomorrow for the farmhouse table and bench we built!

Master Bedroom

Here is the master bedroom.  Again, we have painted walls and trim, which you have yet to see!

Master Bath

Here is the master bathroom.  If the picture extended right, you would see a shower, toilet and walk-in closet.  It is a great space, but we have a lot of updating to do!  I would like to rip out the vanity and drawers to it’s left and go with something junkier.  Also, faux wood ceramic tiles are on my list!  That mirror and those lights are never going to make the cut either.

Living room and Dormers

Here you see the upper level from the living room.  I love the open concept and cathedral ceilings.  There are two mirror image bedroom dormers on either side of the upstairs, with a full bath in between them.Right Bedroom Guest bedroom left

As you can imagine, we will be painting our style all over these canvases!

Downstairs familyroom

DownstairsYou may be wondering where I will have my art and craft supplies!  This finished basement is huge!  There are three rooms for storage, two of which are office like, or potential extra bedrooms.  I have such big plans for this space.  It is amazing, aside from the drop ceiling tiles.  That is on the top of my list of “must go” features!

Downstaris office

I am working on an exciting DIY custom built-in storage from bookshelves in this room.  You will see more about that in August.

And now for more exciting news!!!  You are going to get double the inspiration.

two-bloggers-two-homes

My very talented friend Karen, a.k.a The Graphics Fairy, has also recently purchased a new home!  Follow the two of us as we share our DIY projects and home decor ideas in turning these houses into homes.

Tour Karen’s house in the suburbs HERE.

Karen and I are going to Haven Conference, and will be coming back to you next week with the latest in DIY products, projects and inspiration.  I, for one, am super excited.  Are you?!


DIY Kitchen Cabinet Upgrade With Paint and Crown Molding

[pinit]Upgrade Cabinet Makeover with DIY crown moulding and chalky finish @DecoArt_Inc @savedbyloves[pinit]

I am thrilled to be sharing our kitchen cabinet upgrade with you today, mainly because that means it is finished!  We moved into a house with, as you can see, outdated oak kitchen cabinets.  Maybe you were here before and saw our DIY countertop transformation with Rustoleum.  To continue the kitchen renovation, we took the cabinets up to the ceiling by boxing them in and adding crown molding to close the 12 inch gap between the ceiling and the tops of the cabinets.  We tied together the new wood and cabinets by painting them with Chalky Finish Americana Decor Paint.  It would have been fairly difficult to stain wood and crown moulding to match the current cabinets perfectly.  This is a great way to add a high end look to your kitchen for cheap, especially if you are going to paint your cabinets anyway.

DIY Kitchen upgrades

Here is what the cabinets looked like to start.  This was after revamping the countertops to cover that country blue laminate.

diy kitchen cabinets

To close the gap between the cabinet tops and the ceiling, we removed the trim on the cabinet tops with a pry bar.  We measured the dimensions of the cabinet tops and built 3 sided boxes from 1×12 boards to fit.  This was perfect for the 12 inch gap.  It left about a half inch (since 1×12 lumber is actually 0.75×11.5 inches… I know).  This was no problem since we knew we would be covering the gap with crown moulding later.  We used construction adhesive to adhere the boxes to the top of the cabinets.  We planned to nail trim to cover the seam where the cabinets met the box, which we would nail into both, adding extra security.

take cabinets to ceiling with crown moulding

Here you see the trim (we used pine mullion) and the crown moulding.  This was my first time cutting crown molding.  Save yourself a ton of wasted materials and heartache by visiting Sawdust Girl’s How to Cut Crown Molding Tutorial.  My little brain thought it would be as easy as cutting trim… ha!  Not the case.  Sandra didn’t touch on how to cut angles molding for angles that aren’t 90°…

tips for installing crown moulding

We ran into that fun conundrum as you see in the above photo.  There are charts on how to do this for every angle and every position on your saw.  We finally ended up using this Bench Dog Polymer Crown-Cut Crown Molding Cutting Jig I picked up from Amazon.  It was pretty helpful.  We the 2 odd angles above the glass window containing cabinet were 135°, so we set up our molding on the saw exactly like it would siton the cabinet, which was only possible to maintain for cutting with the use of the jig.  This is a process you are just going to have to go through in order to get to the good stuff!  Sandra points out that she has to go back to her templates every time, even though she does this often.  I found that to be the case everyday during this project!

DecoArt Americana Chalkyfinish Paint

Big thanks to DecoArt for providing the paint and wax for this project!  We used Americana Decor Chalky Finish in “Everlasting” to paint everything from the bottom of the cabinets up to and including the crown molding.  The best thing about using this paint was not having to sand or prime the cabinets!

kitchen makeover DIY

We started by taping over the hinges with painter’s tape and painting the cabinets without removing the doors.  This ended up in paint on the hardware anyway, so we decided to remove the doors for the rest of the cabinets.

How to Paint Kitchen Cabinets

All in all, we used 17 8 oz jars of the paint.  If you are going to go this route, make sure you have plenty of paint for your project before you start.  Waiting on more to come while you have no cabinet doors is less than fun.  Ask me how I know.

DIY Farmhouse Kitchen

Remember when I built the DIY Dog Feeding Station from Shipping Pallets?  It fits under the window in our new house like a glove!

Painting the cabinets took 4 coats.  We applied the clear wax and that was it.  We were without cabinet doors for 2 weeks while we continued moving into the house and painting cabinets as time would allow.

What do you think?  I love the high end look we achieved with little cost!

DIY Wine Bottle Craft Coat Rack

[pinit]

WIne Bottle Shelf Rack3


[pinit]
WIne Bottle Shelf Rack1


Scrap Wood Shelf With Wine Bottle Hooks

This project involves building a simple shelf from scrap wood and adding cut wine bottle tops to act as “hooks”.  It is perfect for the entryway or mudroom, as the ultimate upcycle and conversation piece.

MATERIALS

– Scrap wood in lengths and widths you want for your shelf

-One of the following; Table Saw, chop saw, miter saw, circular saw

-Jig saw

-Hammer

-Pencil

-Tape Measurer

-Wood Glue

-1 ½ inch finishing nails

-Medium grit sandpaper

 -Glass Cutting Supplies (see techniques page )

-Rubbing Alcohol

-Lint Free Cloth

-3 Wine Bottles

-E6000

-2 Sawtooth hangers

-Chalky finish paint or paint of your choice

-Sealant such as wax or polyurethane

DIRECTIONS

WIne Bottle Shelf Rack6

This was a project I made up as I went along, based on the scrap wood I had on hand.  You can adjust the plan according to your materials. For most of the cuts I used a table mount chop saw but a handheld circular saw would be fine to.

The only cut that isn’t a straight cut is the one used to cut the shelf brackets. For this I used a scroll saw:  I drew a shelf bracket shape sized to fit my shelf onto a piece of wood, cut out the bracket and traced it onto another piece of wood as a template for cutting out the second bracket.  This is covered in step 2.

1.  Cut board for shelf surface.  For this I used an old piece of barn wood I had that measured 1 X 6.5 by 55 inches. I cut it to one 46 inch long piece and one 9 inch long piece. The 46 inch piece will be for the top and the 9 inch piece will later be used to cut the two shelf brackets.

WIne Bottle Shelf Rack9

2.  Cut shelf rails. There are three of them (see pic). They are 1 x 3 inch boards cut to 40 inches in length.

WIne Bottle Shelf Rack7 

3.  Cut shelf brackets.  Taking the 9 inch long piece of the old barn wood from above ( 1 X 6.5 X 9 inch ) I free handed a pattern onto the board that looked somewhat decorative but had fairly simple curves. I included the drawing I used as a template.  Using the scroll saw I cut out the two identical shelf bracket pieces. Tracing one line for two pieces was easier than trying to make two identical individual pieces.

Sand all rough edges.  Medium grit sanding by hand or with an orbital sander will do.

*Clamping the two shelf brackets together while sanding them ensures that they will remain identical to one another.

WIne Bottle Shelf Rack8

5.  Using wood glue and 1 ½  inch finishing nails attach the shelf rails to the shelf bracket on the inside face (see pic). This made the over-all length of the shelf support unit 42 inches. (40 inch rails plus the thickness of the two 1 inch brackets).

6.  Mount the shelf support unit on the 46 inch top board, centering it along the length dimension ( 4 inch overhang on each end) and flush at the back edge of the top board.  Use 1.5 inch wood screws and wood glue to attach the top to the support rails.  Make sure to square the support unit as best you can before you attach to the top( a quick check to make sure the long diagonal measurements are equal will tell you).

7.  The last addition to the unit is for the back board. I used 1/8 inch hard board that has one side grooved. You can purchase a 4 x 4 ft piece that will be much easier to handle than a full 4 x 8.  I laid the shelf unit onto the board and traced the outline. I positioned the unit on the board so that the grooves run vertically.  Cut the back out using a jig saw, table saw or circular saw. The cut is hidden so just be sure to cut a little inside the line so that you don’t have any over-lap and you don’t see the back hanging over the edges. I attached using 1/2 brads and wood glue. Make another quick check of the diagonals to verify the square of the unit before you attach the back.

8.  Allow the glue to set for 24 hours and then caulk all the seams using standard white caulk.

9.  Sand any rough spots and paint.  I went with chalk paint in antique white for the entire shelf except for the top surface board.  I like the weathered wood with the chalk finish.

10.  Seal with Wax or desired sealant.  I applied clear wax with a lint free cloth.  Let cure per instructions before handling.

11.  Measure your shelf and mark with a pencil where your bottles will go so that they are evenly spaced.

WIne Bottle Shelf Rack10

12.  Attach cut wine bottles tops (see How to Cut Wine Bottles) by placing a generous amount of industrial strength glue such as E6000 around the cut rim where it will contact the shelf

13.  Attach a sawtooth hanger on the back with hammer, a couple of inches in from the edge of the shelf top.

WIne Bottle Shelf Rack2

Make a shelf from reclaimed wood and recycled wine bottles @savedbyloves

EXTRA TIPS

○ Power tools can be intimidating.  They don’t need to be though!  I started at ana-white.com and found everything I needed to know to be successful and safe.  You can too!

Check out craigslist for used tools, or see if your town has a makerspace where you can pay a small membership fee and have access to the tools you want to try.


Chalk Paint Map Decoupaged Table Revamp

[pinit]Furniture Flip Chalk Paint Table Old Map Decor @savedbyloves[pinit]

Today I am sharing another furniture flip! We will be taking a retro 50’s side table to a chalk painted, old map bearing, stylish addition to the master bedroom.  A little decoupaging and glitter blast add a special touch.  Let’s do it!

SUPPLIES:

Table Before Furniture Revamp

Old table

Mod Podge Satin Finish

Decoupage Map Paper from Martha Stewart or actual old maps

Foam Paint Brush

Pen or pencil

 Scissors

Chalky Finish Paint in desired color

Americana Clear Creme Wax

Krylon Gold Glitter Blast

Krylon Glitter Blast Clear Sealer

TUTORIAL:

Americana Chalky Finish Paint Projects

I lightly painted 2 coats of Americana Chalky Finish in Timeless, allowing 20 minutes to dry between each coat.

How to Decoupage Furniture

I removed the doors/hardware and outlined them onto my decoupage paper, then cut out the paper to size.

Decoupage a Table With Mod Podge and Map Paper

How to Decoupage a Table

Next I added a layer of Mod Podge to the door surface with a foam brush.

Decoupage Table Tutorial

I smoothed wrinkles out from the center with the palm of my hands.  A brayer would work too.  Then I added a uniform layer of Mod Podge to the top of the map paper to seal everything.

Krylon Glitter Blast

I sprayed the pulls on the door, and the shoes on the table legs with Krylon Gold Glitter Blast.

DIY Old Map Table

I applied a coat of Americana Decor Creme Wax in clear to the whole piece and replaced the glittery hardware once everything dried.

DIY Map Craft

I love our new side table.  Just the perfect colors and style for our decor.

I hope you are inspired to get chalky and decoupagey!

DIY Wedding Gift Art

Hello friends! It’s Barbara from Chase the Star, as always elated to be here!

It’s wedding season! Whether you’re planning a wedding or going as a guest, you can’t deny that new nuptials are all around us.

[pinit]

DIY-Wedding-Art-via-Chase-the-Star-for-Saved-By-Love-Creations-wedding-diyArt-DIYcraft-silver

[pinit]

Although I’m already happily married, I am about to celebrate a milestone anniversary, 10 wonderful years! So many weddings are DIY these days, and they look amazing! For all of the brides to be, I have a pretty and easy to make craft for your wedding decor, that can even be used in your home later on!

DIY Wedding Art

Here’s what you’ll need:

Wood plaque

Wood applique

Wood letters and ampersand

{I picked all of these up at Michael’s}

Glue gun/glue stick

Silver and white craft paint {or any color combination you like}

Make DIY Wedding Art or Gift 550px

DIY Wedding Art 550px

How to Make DIY Wedding Art:

Step 1:

Paint the wood pieces. I used silver on the plaque and letters, and white on the applique.

550px DIY Wedding Art

Step 2:

After all of the pieces have dried, glue the applique to the plaque with the glue gun. Then, glue the letters to the applique in the pattern you like.

Step 3 {Optional}:

Glue a 2 inch strand of jute or heavy string to the back of the plaque, or a saw-tooth hanger for easy hanging!

I bet this would be gorgeous in gold too! Any combination of colors to go with your wedding or home decor makes sense. I also love this idea to use as a family crest, or to give as a gift, there are tons of possibilities.

DIY Wedding Art via Chase the Star for Saved By Love Creations #wedding #diyArt #DIYcraft #silver

This will be up on my bedroom wall just in time for our big anniversary!

Check out my DIY Wedding round up for more ideas. For more crafts, recipes and home decor visit me at Chase the Star, and on Facebook, Google+, Pinterest, and Instagram!

Until next time friends!

New Signature

Side Table Flip Distressed With Chalk Paint

[pinit]Furniture Flip Chalk Paint Distressed Table DIY[pinit]

My mom gave me an outdated oak table that she was ready to let go.  I saw curves that would look fantastic with some chalk paint distressing, so that is what I did.  See how some paint, crackle medium, antiquing medium and a change in hardware went into this fun furniture flip.  As an aside, mom wants her table back now.  Should I charge her?!

How to paint furniture

I removed the hardware and painted a layer of Chalky Finish in “Vintage” as the base layer.

DecoArt Chalky Finish Paint

Once that dried, I painted a thick layer of crackle medium from the Chalky Finish line.  When that dried I painted a layer of Chalky Finish “Treasure”..

How to Distress Furniture

I rubbed away the top layer of paint on the edges in random places to show the base layer in a chippy paint kinda way.  For the drawer, I followed the same steps, using the Treasure as my base paint and Vintage as the top paint layer.

How to create an antique effect

I sealed the entire piece by brushing on Clear Creme Wax, followed by Aging wax.

Table Flip @DecoArt_Inc Distressing with Chalk Paint @savedbyloves #chalkyfinish

I am loving the transformation!  What do you think?  Have you used this paint?

Privacy Policy