DIY Scrap Wood Halloween Pumpkins

How to make scrap wood pumpkins with @savedbyloves
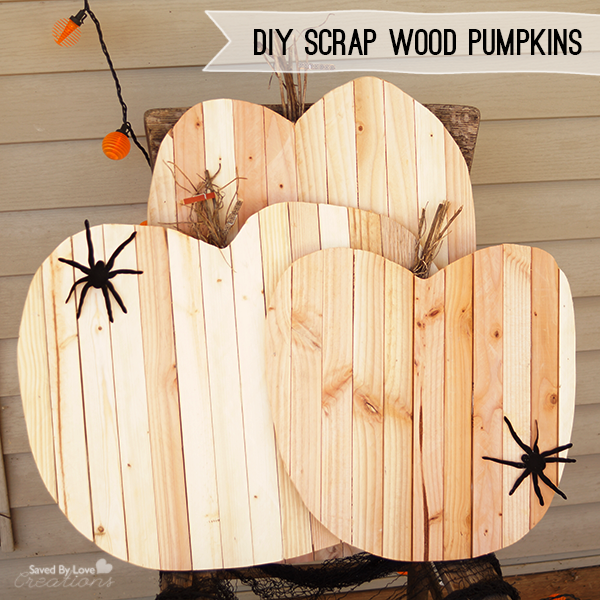
These three pumpkins were made entirely with materials I had on hand, which is always a plus! With my huge pile of wood pieces from previous building projects, I am pretty excited when I can use up some of the leftovers. I used my table saw to rip scrap 2×4 into what are essentially wood shims.  You can do that, or use purchased wood shims or paint stirrers. Let’s go make some free pumpkins!

MATERIALS:

Plywood (i used 1/4 inch since that is what we had on hand, but you can use thicker)

2×4 scrap pieces and table saw or pre made wood shims or paint stirrers

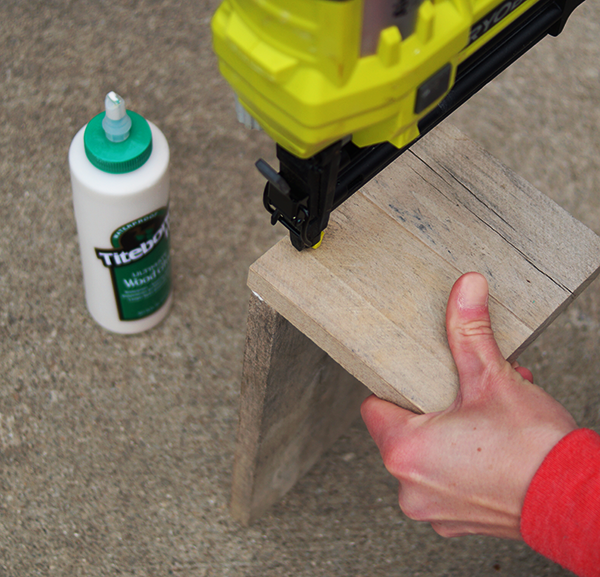
Wood glue or construction adhesive

Sharpie

Jig saw

Ryobi Air Strike Cordless nailer

5/8 inch brads

TUTORIAL:

Plywood Pumpkins

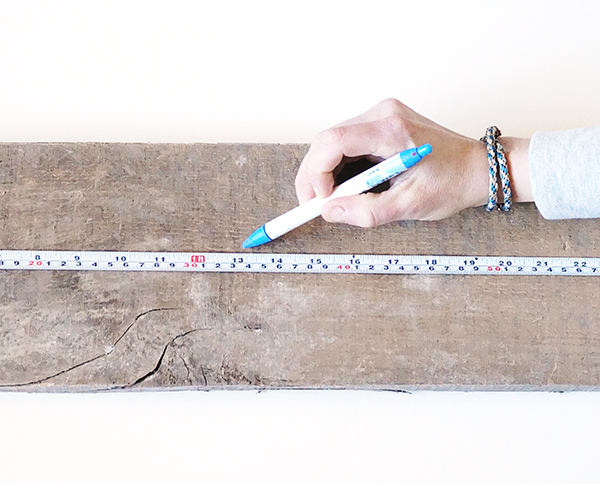
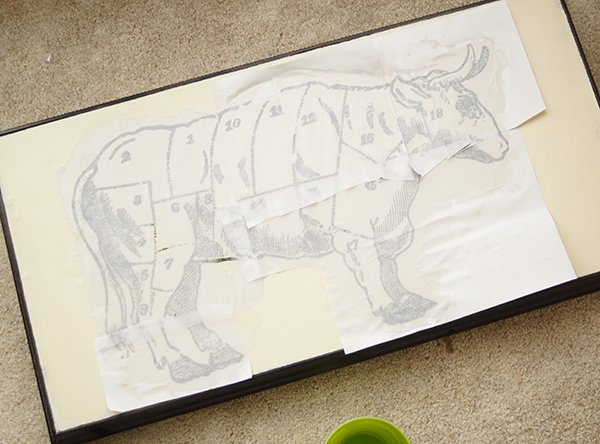
Use a sharpie to draw pumpkin shapes on your plywood.  I made three of varying heights and widths.  You can print templates and transfer your design to the wood with transfer paper too.  I just wanted rustic looking pumpkins so I went free hand.

Use table saw to rip wood

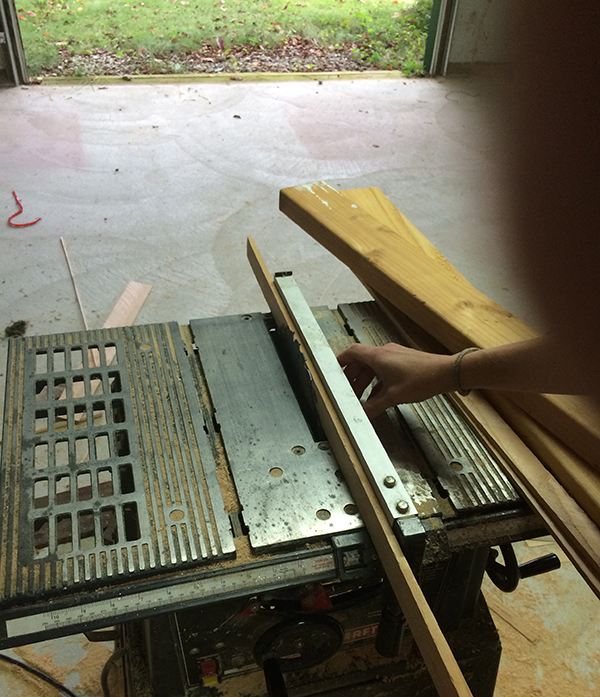
To make the wood shims, I set the table saw guide to the thickness I wanted using a shim from another project.

How to make wood shims

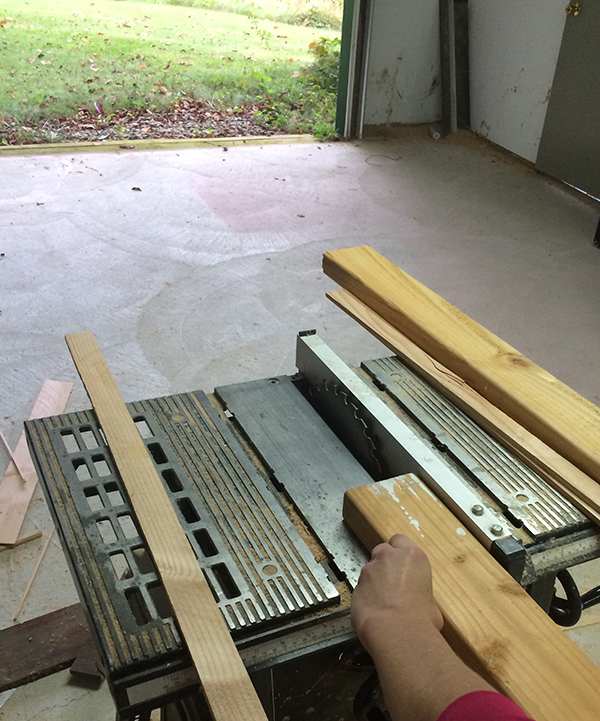
Then I just cut my 2×4 scraps using that guide setting.

Scrap Wood Projects
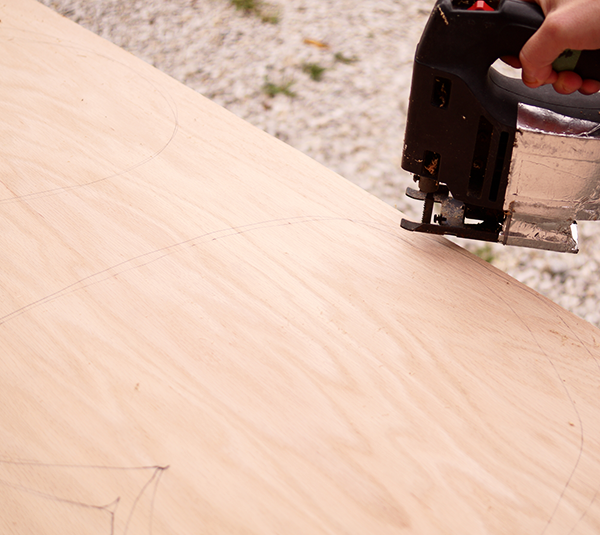
I cut out my pumpkin shapes from the plywood using my jig saw.

Adhere wood to pumpkin with construction adhesive

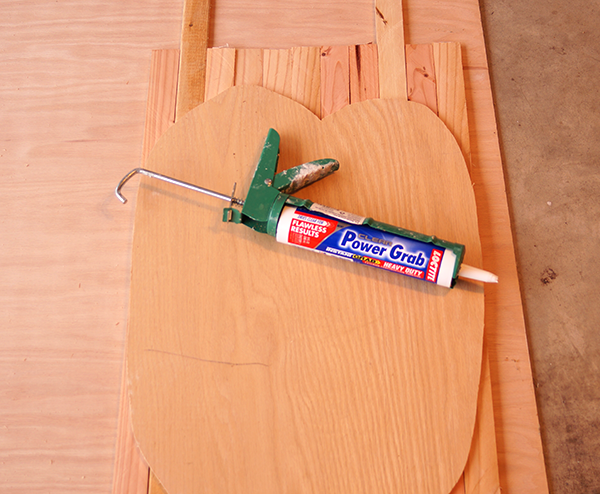
I placed each pumpkin on top of side by side wood shims and glued them into place with construction adhesive.

Secure wood shims with air nailer

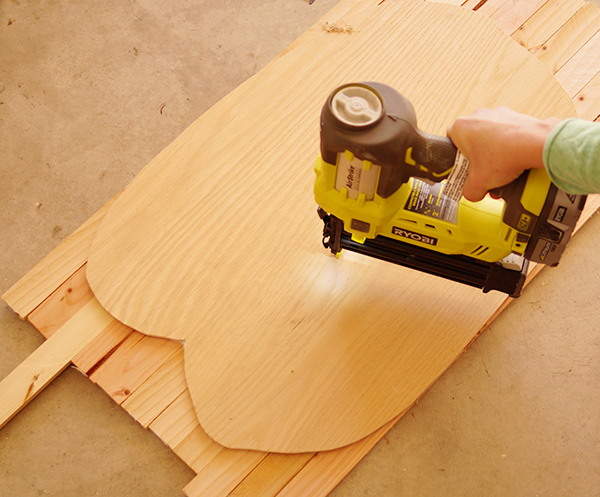
For added strength, I nailed each shim in two places with my cordless nailer and 5/8 inch brad nails.

Let glue dry overnight

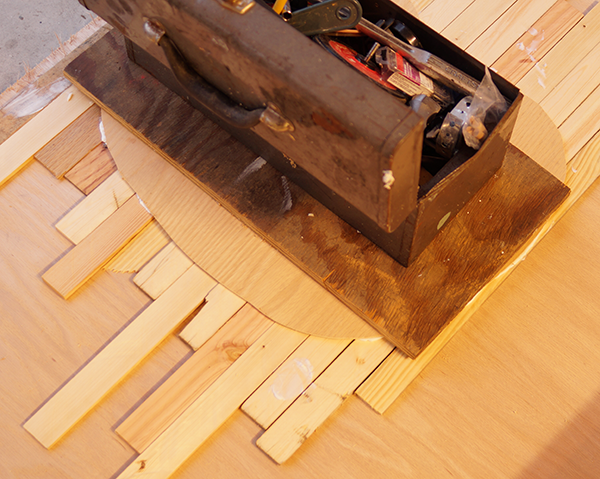
I added weight to my pumpkins and let the glue dry overnight.

Cut with jig saw

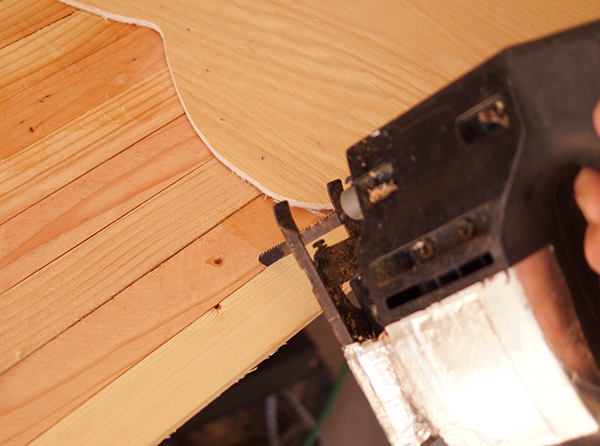
Once dry, I cut the excess wood shims off, using the plywood pumpkin as my jig saw guide.

Hot glue twigs for stems

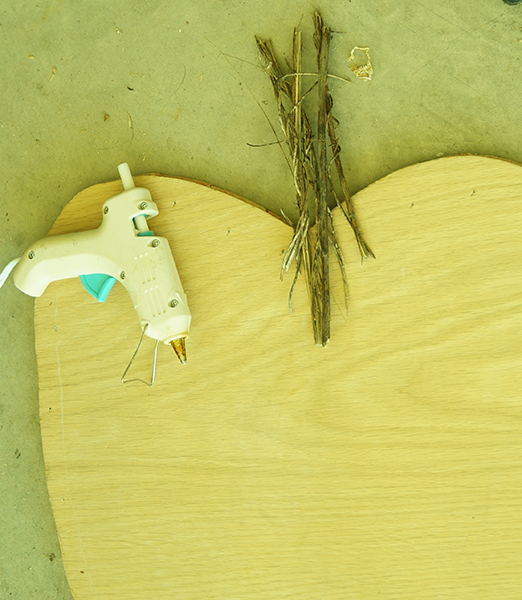
To finish, I hot glued twigs to the back of the pumpkin for the stem!

Check out these other great Halloween DIY projects for your favorite bloggers!
12 Halloween Projects from your favorite DIY bloggers


Tissue Decoupaged Recycled Wine Bottle Lanterns

DIY Decoupaged Recycled Wine Bottle Lanterns

Hanging lanterns in the trees goes a long way towards setting a lovely scene.  With some tissue paper squares and a few wine bottles, you are on your way to  create beautiful, eco-friendly lighting to add ambiance to your outdoor space or party.

 MATERIALS

Decoupage Lanterns Supplies

 -Clear wine bottles

-Bottle Cutting Supplies (See How to Cut Wine Bottles)

-Tissue squares in a variety of colors

-Glass drilling supplies with 1/8 inch diamond hole bit

-metal chain

-jewelry pliers

 -Mod Podge

 -Foam brush or flat paint brush

 DIRECTIONS


1.  Clean bottle and remove any labels.

 2.  Cut bottles to 4-5 inch height and sand any rough edges (See How to Cut Wine Bottles).

3.  Drill 2 holes about 1/8 inch from the top on opposite sides of the bottle (For how to drill in glass, See DIY Mason Jar Chimes).

4.  Clean the cut bottles with alcohol or glass cleaner (I put on gloves at this point to avoid fingerprinting the glass).

Decoupage Lanterns 5

Decoupage Lanterns 7

5.  Paint a strip of Mod Podge down the side of the glass and add a tissue squares.  Overlap them as desired for different effects.

6.  Paint layer of Mod Podge over each strip as you finish, smoothing out wrinkles in the paper with your paint brush as you go.  Don’t over do it as the paper is easily torn.

7.  Once entire glass is covered, go over it with another layer of Mod Podge.  You can use the outdoor formula if you are leaving the lanterns outside long term.

Decoupage Lanterns 1

8.  Add chain by opening link the end link with pliers, inserting it into the hole near the top of the glass and closing it back with the pliers.  Insert the other end of chain in hole on the opposite side.

For more inspiration, visit our 50+ Glass Bottle Crafts:

Reclaimed Wood Wine Bottle Vase Trio

Salvage Wood Wine Bottle Wall Vase Trio

Wine Bottle Wall Vase2 copy

 Reclaimed wood and recycled bottles combine with inexpensive copper hardware for this rustic, ecofriendly wall vase set.  Make it in under an hour with just a few dollars for hardware!  This is perfect inexpensive wall decor, and makes a great, unique handmade gift for the holidays.

MATERIALS

Wine Bottle Wall Vase 4

-Scrap wood cut to desired width (The board I had was 25 inches, so I went with that.  Use any number of wine bottles, and cut your wood the appropriate length for that number.)

-Drill

-1 inch copper bell hanger kit (available in plumbing section of most hardware stores for less than $2 each)

-Picture hanging hardware

-Wine bottles (clean and remove labels if desired as described in Techniques)

 DIRECTIONS

 1.  Paint, stain or decoupage your wood any way you like.  I left mine as I found it since it had the weathered look I love.  Same goes for the bottles.  Paint or decorate them to fit your decor or occasion.

Measure for holes

2.  Measure and mark placement of your bottles, leaving even spacing between each and centering them on the board.  Yay math!

Drill hole for clamps

3.  Drill a pilot hole with a drill bit just smaller in diameter than your screw.  If you aren’t using a drill, use a hammer and nail to make a pilot hole.

Wine bottle wall hanging

4. Attach bell hanger using the screw that came in your kit and a drill or screwdriver.

How to make a reclaimed wood wall hanging

5.  Attach a loop for hanging on each side.

Wine Bottle Wall Vase3

6.  Place on wall and add wine bottles.  Time to head to the farmer’s market for some fresh flowers!

Recycle Wine Bottles into Inexpensive Wall Decor with Reclaimed Wood @savedbyloves

DIY Upcycle Liquor Bottle to Mercury Glass Lamp

How to make Mercury Glass

Get the look of expensive mercury glass with a can of spray paint and some Epson salt!  This simple project takes a genie lamp shaped liquor bottle to an elegant mercury glass lamp for way less than the purchase price you see in stores.

Mercury Glass Lamp Tutorial

MATERIALS

Mercury Glass Lamp 5 

-Glass Bottle of your choice

–Krylon Looking Glass Spray Paint

–Krylon Spray Adhesive Remover

-Epson Salt

-Kraft paper, plastic or other work surface protector

-Drill and 1/2 inch Diamond Hole Drill Bit

-Lint free towel and rubbing alcohol

-Dust mask

-Protective Gloves

-Protective Eyewear

-Container of water with a a soaked towel or rag

–Bottle Lamp Kit

-Lamp Shade

-Light Bulb

DIRECTIONS


1.  Clean bottle and remove labels; to do this, soak bottles in hot, soapy water and remove labels.  Rubbing alcohol in a lint free cloth will remove residual adhesive.  My personal favorite technique is Krylon Adhesive Remover.

Mercury Glass Lamp 3

2.  Drill a hole where you want the cord to exit the lamp, in the back near the base.  For that technique, see my previous tutorial:  How to Make a Lamp From a Glass Bottle. Follow safety precautions!

3.  Clean away debris from drilling, dry bottle with a lint free cloth and tape over the hole you just drilled.  You will see why!

4. Pour Epson salt into bottle so that to about one inch from the bottom.  If your bottle is smaller, you can use less.  It is not important to be exact here.

5.  In a well ventilated area with protected work surface, spray looking glass paint into mouth of bottle.  Make sure to follow instructions on label.  You want to shake the can vigourously before using.  If your bottle mouth is small in diameter like this genie bottle, you will have paint pooling in one spot and running down the neck.  That is fine.

6.  Shake the bottle like a snow globe, so that the salt grabs the paint and drags it around.  This will create the mercury glass look.

7.  Repeat steps 5 and 6 a few more times, allowing each coat to dry for about 5 minutes before applying the next.  Stop when are happy with the look.

Mercury Glass Lamp 6

8.  Follow instructions on your lamp kit to assemble.  The one used here was super simple to and cost $6.

9.  Use a thrift store or new lampshade to fit your décor.

EXTRA TIPS

○ The salt will stick to the wall of the bottle in spots, giving a lovely crystal effect.  You can pour as little or as much of the salt out as you want after painting.

Use this technique for recycled glass bottle vases, votive holders, wind chimes and more.  Keep in mind this only works when the sprayed surface is inside.

DIY Cut Wine Bottle Table Number Centerpiece

Cut wine bottle wedding centerpiece table numbers tutorial @savedbyloves

With just a few simple supplies, you can make this charming wedding reception table number centerpiece for that special day.  Not only that, this can be used for an eco-friendly centerpiece for any occasion!

MATERIALS

DIY Wedding

-Three Green Wine Bottles with corks
-Burlap ribbon
-Lace
-flower embellishments (die cut, hand cut or buy in the scrapbook section of your local craft store)
-18 gauge craft wire
-Antique finish metal chain
-Blingy metallic and other ribbons
-Wedding themed paper craft embellishments
-Adhesive crystal sheets
-Chalkboard tags
-Decorative brad
-Monogram sticker
-Photograph of couple
-Quick grab craft glue or hot glue
-Wire cutter

TUTORIAL

1. Cut your wine bottles to 3 different heights (See How to Cut Wine Bottles)
2. Smooth out any pointy edges with grinder or sand paper.
3. Clean the bottle with alcohol or glass cleaner. I like to wear gloves after cleaning the bottle to avoid fingerprints.
How to cut wine bottles

4. Tie burlap ribbon and lace around two of the bottles near the base.
5. Wrap sparkly twine or ribbon around neck of the remaining bottle and dangle a chalkboard tag with the couple’s monogram from it. Place a decorative brad at the top of the tag.
6. Embellish bottles by gluing on flowers, placing adhesive crystals and draping metal chain as shown.
Wedding Table Number Bottles5

7. Make the wire place card/photo holder. I picked up a picture display at a garage sale and cut the wire holders from that. You can easily make your own with 16-18 gauge wire. Cut a piece of wire about 5 inches and wrap one end around a cylinder shaped object a few times (Highlighter markers or small prescription bottles work well for this.). Bend wire at the base of the circle you just made. You can use round nose pliers to make the little loop on the circle part or just leave as is.
DIY Wedding Centerpiece

8. Insert wire into cork. Create a pilot hole in the cork with a needle tool, small nail or straight pin. Insert wire holder into pilot hole and add a dab of hot glue to secure.
Wedding Table Number Bottles7
9. Place table number, sentiments and photos as shown.

EXTRA TIPS

○ Use this concept for holiday centerpieces, photo displays, anniversaries and other occasions by changing embellishments to match the theme.

DIY Wine Cork Bulletin Board

How to Upcycle Wine Corks into Home Decor

Stay organized, eco-chic style with this cork board made from… corks!  This project is simple, functional, stylish and can be super inexpensive with a thrifted frame.  Start saving those wine corks, ask your friends to save them, and hit your local recycle center to see if they can hook you up with some.  You are going to need quite a few, especially if you have a large frame.

SUPPLIES

Framed Cork Bulletin Board

-Wine Corks

-Utility Knife

-Hot glue gun and sticks

-Frame without glass 

TUTORIAL

1.  Remove glass from frame, leaving just the backing.

Framed Cork Bulletin Board2

2.  Decide on a pattern for your corks.  Simple and repeating looks best.

Framed Cork Bulletin Board3

Framed Cork Bulletin Board4

3.  Starting in the center, begin gluing corks in your chosen pattern directly onto the frame backing.

4.  When you come to the edges where full corks no longer fit, cut the corks where necessary to create the appropriate shape to fit the space.  Continue until the entire frame is full.

Framed Cork Bulletin Board5

EXTRA TIPS

Seal corks after they are all placed for a glossy finish if desired!  These would be great for displaying bride and groom photos for your wine themed wedding reception.

For more inspiration, visit our 50+ WINE CORK CRAFTS:

Kitchen Cabinet Makeover With Chalk Paint® decorative paint by Annie Sloan

How to Paint Wood Cabinets

So my sweet friend Krystal wanted to update her oak kitchen cabinets in a big way.  For like 10 years she wanted to update them.  A decade of cabinet dissatisfaction is enough. That is why I was super excited when the chance to use  Chalk Paint® decorative paint by Annie Sloan came my way.   Today I am sharing how we seized the opportunity, using the Chalk Paint® in colors Old White and Graphite, in addition to the Clear Soft Wax to create the look she was after!

Annie Sloan Chalk Paint

Annie Sloan Unfolded sent us the paints and wax.  This paint is simply amazing.  More about that later.  For brushes, what to use depends on the look you are trying to achieve.  We wanted texture and messiness, and we knew we would be distressing with sandpaper after painting, so we went with the cheap chip brushes you can find in the dollar bin at your local craft store.  There is a wide variety of techniques to use and looks to achieve with these products.  A fantastic place to start is with Annie Sloan’s numerous books on the use of paint in decorating.

Kitchen Before Paint

Here you can see the oak cabinets before we got at them.

Not so great, right?  

We decided to go multicolor, Old white on top, Graphite on the bottom.

How to distress cabinets

 Kitchen Makeover

We just removed the doors and started painting them and the frames.

NO PRIMING, NO SANDING.

This paint is amazing.  It looks wonderful and takes no prep.  Um, yes please.

Distress Technique

It dried super fast.  We did 2 light layers, letting dry about 20 minutes between.  For a distressed look, we lightly sanded the edges and corners randomly on the cabinet doors.  A little bit of distressing goes a long way!

After distressing, we applied the wax with a polyurethane brush.  Super easy!

The coverage  of this paint is unbelievable, really.  I use a lot of different paints in my projects, and this is tops.  Granted it is more expensive than other options, but the difference in quality is significant.

Annie Sloan Paint Project

This entire project was about 24 hours in duration!

Kitchen Cabinet Makeover

What a huge difference!  Remember the yellow above the cabinets…

Kitchen Cabinet Redo

We painted it Old White and added crown molding.  For more on how to install crown molding, see my first experience here!

I think the biggest surprise for all of us involved in the project is the countertops.  That’s right.  We were making plans to do a countertop transformation after painting the cabinets.  We were just certain the new cabinets were going to make that totally urgent.  We found the opposite!  Somehow, the pinkish/mauve looks adorable with the Graphite and Old White!  Did not see that coming at all.

Kitchen Cabinet Upgrade with Chalk Paint

If you want to transform your from outdated to rich and beautiful, this is a great option!

Find everything you need to get going here:

DIY Subway Tile Backsplash

[pinit]DIY Subway Tile Backsplash Tutorial[pinit]

Our kitchen renovation continues with this DIY subway tile installation.  It was easier than I thought it would be, but there are a few ways you can avoid heartache through learning from our mistakes and our victories!

Mussel Bound Adhesive Tile Mat

So this stuff falls under the “Victory” category of our first tiling experience.  We saw Mussel Bound Adhesive Tile Mat at our local big box hardware store and had to try it.  It is super sticky double sided tape, basically.

How to adhere tile

 You just stick remove the backing from one side and stick that to the wall.  It is easy to cut to go around your various outlets and corners.

Place Tile over adhesive

When you are ready to place the tile, you remove the backing from the other side and stick the tile in place!  I am not sure you are supposed to do this, but we removed tiles and repositioned them with no problem when we had to.

Blue Hawk Tile Cutter

This falls into the “mistake” category.  We saw this Blue Hawk Manual Tile Cutter and thought we would buy it for the $30 instead of renting or buying a tile saw.  It scores the tiles then snaps them at the score line.  Ideally it does that.  Lots of chipping took place.  Also, if you have to cut out a section of the tile, forget it.  It is fine for cutting straight through the height of the tile, but don’t even think about trying to cut out a rectangle section.  Nope.

We ended up renting a tile saw for one day.  That was $40.  Then we bought one for $89.  Should have just started there.  It is the Skil 3540 and it worked great for cutting these tiles.  Since we know we will be tiling again, this is a great option, costing just a little more than we wasted spent on the manual cutter and 1 day wet saw rental.

As far as grouting once all the tiles are placed, I used this video from Pretty Handy Girl to guide me.  Love her!

DIY Backsplash Ideas

What do you think?

I LOVE our new kitchen!

Kitchen Before

In case you missed it, here is the before.

WHAT?!

Read about our DIY Countertop Revamp!

Take your kitchen cabinets to the ceiling and get rid of the outdated oak with our DIY Kitchen Cabinet Upgrade!

It is my favorite room.  Stay tuned for the final step in our Kitchen Makeover with Moen!!

DIY Budget Backsplash Idea with Subway Tile @savedbyloves

DIY Horizontal Succulent Planter Box Display

[pinit]DIY Horizontal Succulent Garden @savedbyloves[pinit]

Decorating with succulents is a top design trend that won’t be going away!  That is why I am thrilled to share how we created this horizontal succulent garden placed above our double deck doors.  I took the easy way out and went with artificial plants, even though succulents are easy as can be to grow and maintain.  I was gifted an excess supply of the fakes from Michaels that a friend had leftover and just went with it.  The project was simple and quick, and cheap!  The planter is (no surprise if you have been around here much) made from reclaimed wood.

Here is how I did it!

I had some tongue and groove wood that I picked up from Habitat Restore.  I ripped it with my table saw to about 4 inch wide pieces, and cut 3 of those to 4 feet in length for the 2 long sides and the bottom of the box.  I cut 2 of them to about 5 inches for the short sides.

Ryobi-Airstrike-Nailer

I nailed all of the pieces together with my trusty Ryobi Airstrike Nailer.  The pic shows the creation of this Stenciled Planter Box, but the process was the sam for today’s project.   If I could have just one tool in the whole “stuck on a desert island” scenario, this would be a top contender.

DIY Succuulent Garden

We used 4 3 inch wood screws to attach the finished box into the studs above the double deck doors.  I found a 12x36x2 inch styrofoam sheet in my stash and cut it to fit tightly in the planter box, all the way a cross.

Then I just hopped on a step stool and arranged my faux succulents, shoving the wire stems into the foam to hold them in place.

DIY Succulent Garden

What do you think?  I am going to be honest… I seriously like it bunches.

It is hard to hang things on the freshly painted walls in our new home.  What if I change my mind, what if it looks dumb… so many holes to patch.  Not in this case.  Totally satisified!

If you want to make live succulent gardens, check out our popular DIY Terrariums and Succulent Plants:

How about our 50+ DIY Terrariums and Creative Planters?


Succulent in Decor DIY Horizontal Planter @savedbyloves

DIY Butcher’s Chart Cow Vintage Kitchen Art With Free Graphic

[pinit]DIY Kitchen Art Tutorial With Free Printable Butcher Cow Art @savedbyloves[pinit]

Vintage kitchen art in the form of the butcher’s beef chart is tops in the design world these days.  That is why I was thrilled to score a cookbook from 1898 with the perfect image for such a piece!  I scanned it in, cleaned it up in Photoshop and enlarged it to fit a 28 in x 14 in piece of art scored from a garage sale.  This tutorial shows you how to transfer a large image to a chalky finish surface, and provides the butcher beef chart cow art for you to download for use in your own projects!

SUPPLIES:

Vintage Butcher’s Beef Chart Image  (Click link for image download page)

Image transfer kitchen cow art

Paint brush

Chalky Finish Paint by DecoArt in Whisper

Image Transfer Medium

Clear Wax DecoArt

Laser Printer and Photoshop or other editing software

Painter’s Tape

Spray bottle with water or cup of water

Image Transfer Cow Butcher Art

TUTORIAL:

Image Transfer Vintage Cow Butcher Art

Prepare the surface for the image transfer by painting with Chalky Finish in your choice of color.  I used Whisper.  It took 3 light coats with 15 minutes of drying in between to cover the image on the garage sale art.

While that is drying, prepare your image.  I resized mine in Photoshop to fit the 28×14 inch recipient surface.

 Make sure you reverse the image before printing it so the numbers won’t be backwards in the transfer!

If you are making art larger than your printer will print, you will need to print it in sections and tape it together like I showed you in the video found here:

DIY Rustic Sign Tutorial Using DecoArt Chalky Finish Paint

How to Make Vintage Wall Art

Print the sections, align them and tape together on the back with painter’s tape.

Chalky Finish Home Decor Project Vintage Kitchen Art

Large Art Image Transfer Tutorial

Paint the surface with a thin layer of Americana Image Transfer Medium, and paint the ink side of the image to be transferred with the medium too.  For more detail on using this product, see my Vintage Image Transfer Coaster Tutorial shared at Printable Decor.

How to do an image transfer

Spray water on the back of the printed image and let soak for 3-5 minutes.

Rub paper backing away with your finger tips (there are detailed pictures of this in the graphic coaster tutorial linked above).

Seal the piece with clear wax and you are all set!

DIY Kitchen Cow Art Tutorial With Free Printable Butcher Cow Art @savedbyloves

Check out more cool ideas in our 50+ Image Transfer Projects

Privacy Policy