Awesome Subway Art DIY


Photoshop Beginner Tutorials

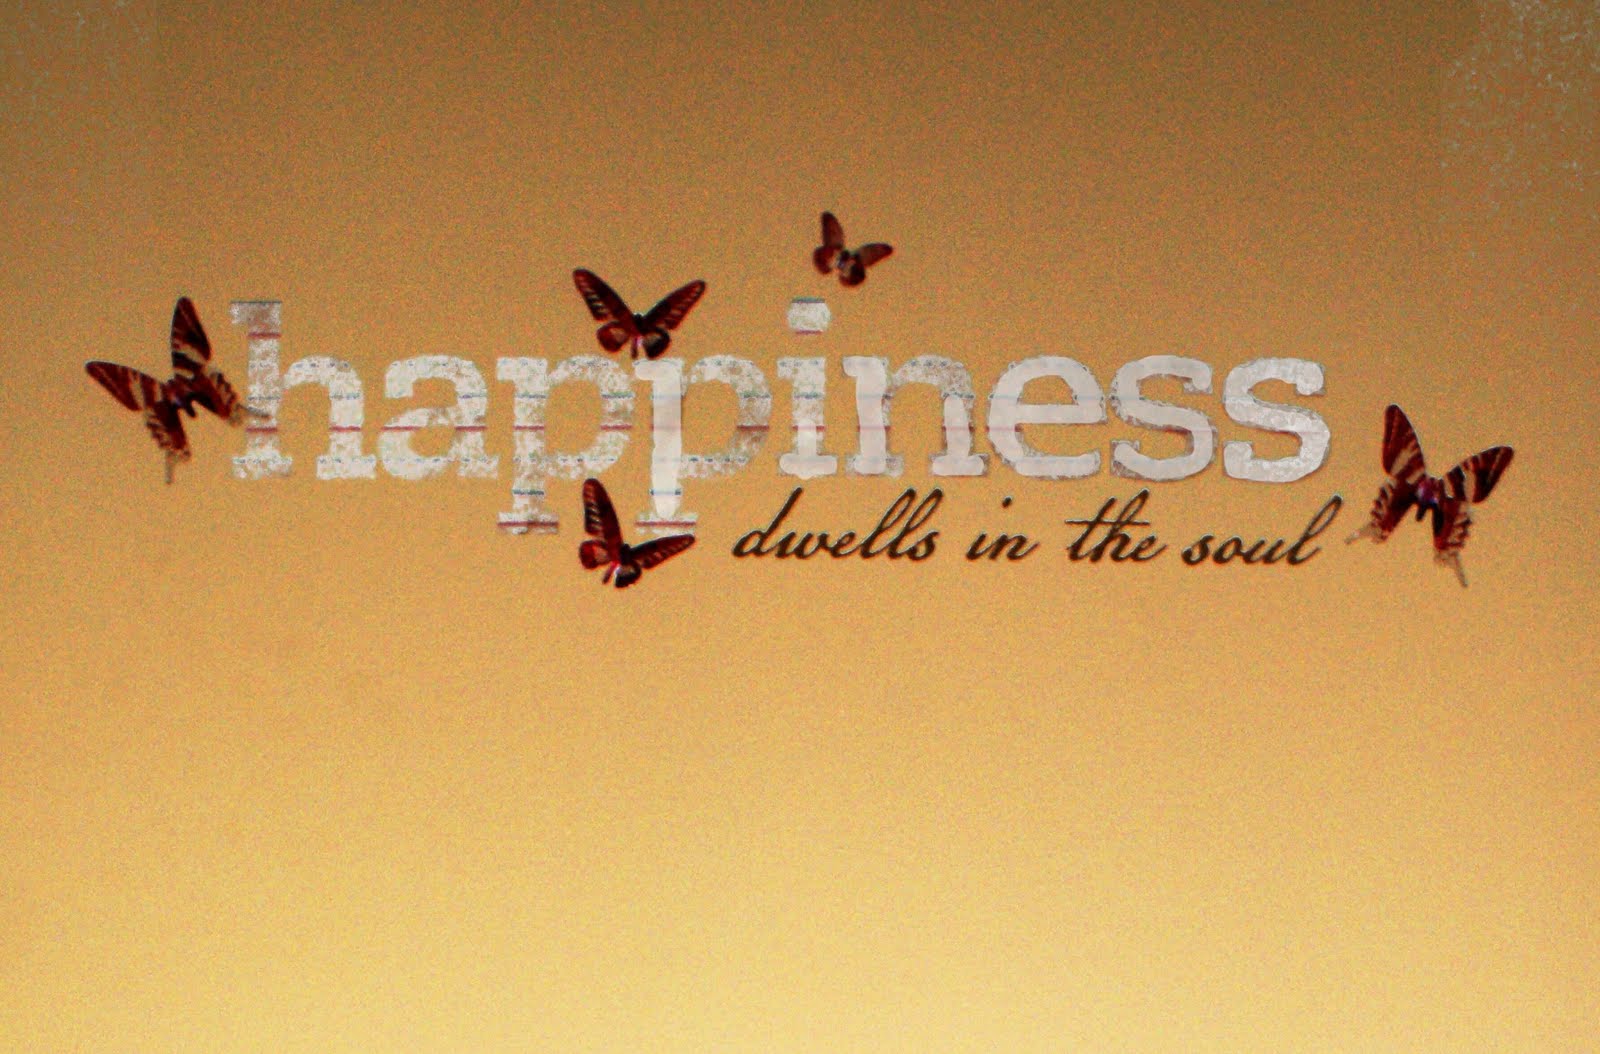
Don’t you just love the subway are that is so big in the blog decor world these days?  I ran into an example on a Pinterest board  that inspired me to create my own.  Here is the original.  This quote is a line from “How I Met Your Mother” – Neil Patrick Harris’s character coined it.  I cracked up when I heard it and loved the idea of it hanging in my stepdaughter’s college dorm room.  It is created in Photoshop, which is wonderful, because you can easily change colors and fonts to suite your needs.  Follow along step by step as I guide your through the CS4 Photoshop process, a rare event here at SBLC!

UPDATE:  Get free printables of all 3 colors at Printable Decor.

Subway art tutorial

Instructions:

  • In the Photoshop toolbar, click  “New” to open a new document

Photoshop Subway art tutorial

  • Set your document size.  I chose 11×17.  Set your resolution to 300 ppi…

Photoshop Tutorials

  • Select your background color by clicking the adjustment layer icon in the layers palatte (labeled below), and choosing “solid color”.  A color picker window will appear, where you can pic your color.  Click on your desired color, or enter the hex code.  This will leave you with a color fill layer that you can easily change  (see second pic below).

Photoshop Subway art tutorial

  • Grab the text tool (shortcut is “T” on the keyboard) and select your font.  You want it to be a blocky font if your are going for the subway art feel.  I used 2 fonts here; Myriad Pro Condensed and Trebuchet MS Regular.  You want to keep each line of text a different layer, so that you can adjust each line individually without affecting the font settings on the other lines.  To make your words fit, adjust the font size, as well as the space between the letters.  This requires opening the character panel (pictured below) and changing the AV setting.  A smaller number means the letters are closer together…

Photoshop Subway art tutorial

  • When you are happy with the letters, grab a grunge paintbrush (keyboard shortcut B, then choose your desired brush)  and in a new layer, paint over the letters in the same color as the background.  I downloaded this awesome high res grunge brush set for free, here.  BIG thank you to digitalrevolution.  This gives a nice distressed look to the piece.

Photoshop Subway art tutorial

Beginner Photoshop Tutorials

Photoshop Tutorials

Remember the adjustable color layer I had you make for your background?  Perfect for if you have 2 stepdaughters both in college, that have different color preferences.  I changed the bright pink to blue for the print you saw in the teaser.  Love how they look.  I have seen several tutorials for these done with paint and stencils on canvas, but this is literally a 5 minute Photoshop endeavor.  No mess, $0.80 per print, frames I had on hand from my obsessive garage sale frame purchasing.

I got an extra print in with a black background that I have in mind for a gift.  It would be really cute made into a faux canvas print by mod podging it onto painted mdf board, like I showed you here.  What do you think?  I would love to hear your feedback on this tutorial.  I know it assumes some comfort with Photoshop.  Did you find it helpful, easy to follow, or did it give you a headache?  I rarely do these and am always looking to see what you all want more or less of here at SBLC.  Thanks!

Photoshop Tutorials

Photoshop Subway Art Tutorials

Recycled Paper Wall Art

Recycled Magazine Page Crafts

Do you have stacks of old magazines lying around that you just can’t seem to trash?  Are you a fan of greener living?  Try your hand at making art from what would have been thrown away.  The possibilities are endless.  I have seen everything from picture frames to bowls to jewelry.  I will be showing you how to make the coils, and sharing what I found works best. This cross took me 2-3 hours total.  The duration will depend on how much of a perfectionist you are, and how many coils your project requires.

Supplies:

  • Magazines
  • Bone folder
  • Glossy accents or other quick dry glue
  • Scotch tape (optional)
  • Mod Podge or other sealant
  • A good movie or soundtrack to enjoy while you fold

Magazine Page Coiled

Instructions

  • I like the folded strips making up the coil to be thin, so I cut the page in half lengthwise, then folding each half in half, and cutting along the folds, making 4 strips from each page.  It looks fine if you use a whole page per strip, just chunkier coils.  Start folding by bringing each long edge to the center and creasing to make 2 new edges (see pic).  Using the bone folder to crease makes much neater coils.  NOTE:  THE PICTURES SHOW STRIPS BEING MADE FROM ENTIRE PAGES; I HAVE SINCE LEARNED THAT STRIPS MADE FROM 1/4 OF A PAGE LOOK MUCH BETTER IN THE PROJECTS I SHARE HERE AT SBLC.
  • Recycled Paper CraftsContinue folding the edges to meet in the center until your strip looks like this…
  • Magazine Page CraftsNow coil your strips. When your come to the end of your strip, place a small dab of glue and hold pressure to secure it in place.  If you want the coil larger, begin another strip where your first one ended.  You can place a thin piece of scotch tape where the two strip ends meet, or just secure each end with glue leaving no gap between them.

Magazine Page Crafts


Magazine Page CraftsTo make the cross, I sketched out the design, made the coils I needed, attached them together with Glossy accents (I love using this on paper – dries clear and fast) and outlined the joined coils with strips to form the “+” shape.  You can make anything you imagine.  Google and you will find all kinds of ideas.  I coated the final piece with Mod Podge attached a wire to the back for hanging and that is that.

I would love to see what you create with your lovely coils.  Recruit friends and family to fold pages into strips for you if your project is big.  My nephew and grandmother were pleased to play along!

ADDENDUM:  I just found an wonderful tutorial with some other tips, here, at Craftstylish.  She used a glue gun and mentions you could use glue, but you have to hold the coil in place til the glue grabs.  With Glossy Accents, this happens in 5 seconds.  Easier and less burn potential than glue gun!

Anthropologie Wall Art Knock Off

Anthropologie Wall Decor

I saw this on Anthropologie’s wall decor product page, and wanted it for my mustard wall in the family room.  Then I looked at the price tag ($698) and knew I was going to have to recreate it if it were going to be on my wall.  This was so very simple you guys.  I opened up Photoshop,  used watercolor brushes to mimic the print, uploaded it to Snapfish, and picked it up at my local Miejer Store a couple of hours later!

Anthropologie Decor Knock OffI ordered a 16×20 print cause that is the biggest I can get same day for the price ($6.98).  When I am not in a hurry, I use Short Run Posters for my large format printing, cause they rock (see this post).  I could go on and on about them, but that is a different topic.  Suffice it to say, SUPER cheap, great quality large format prints.

Anthropologie Wall Decor

After I picked up my print, I hit my local Goodwill and found a perfect square frame for $5.  I removed the pic that was in it, cut mine to fit and that is that. It looks as awesome as I thought it would against the yellow wall, and I spent very little time and money.  Mine is 16×16 versus the Anthropologie version, which is 29×29 in, but did you see the price difference???  16×16 inches is perfect for the space.

Anthropologie Decor Knock Off

Sometimes, I really must get messy with paints and gel medium, but digital art has its perks.  Instant gratification being my favorite!  There are debates on what is right and wrong in terms of copyright, something I have been pondering lately.  Here is why I have no problem knocking off this wall art; I am not selling it.  It is for my personal enjoyment, and to hopefully inspire others to decorate beautifully for less.  More importantly, giving credit where credit is due is just the only way to make being a copycat o.k.  All art is inspired by other art, or nature (God’s art, in my opinion).  Very little is truly original  I in no way came up with this design.  It was all Paule Marrot, the artist of the original piece, and Anthropologie.  I full on copied it, adding some vibrancy, and going with a black instead of white frame.  So, what do you think?

Anthropologie Decor Knock Off

Bird Faux Oil Painting Frugal Wall Art DIY With Tutorial

Birds1
I am obsessed with Mod Podge Brushstrokes these days.  My walls are slowly but surely filling up with what appear to be oil paints on canvas, but are actually art prints on MDF, painted over with the Mod Podge.  These are 12’x34′ and cost me about $10 each total.  I love how they turned out and especially the blue against the wheat colored walls!  You may have seen my earlier post featuring this technique using some Valentine’s Day prints I made in photoshop.  This is a great way to have awesome art for cheap.  You can use old photos, posters, thrifty store finds or any image to create a canvas painting.
I made these prints in photoshop, giving them a painterly effect since I knew I was going to use them in this project.
At Lowes, I picked up a discounted 1x12x72′ board and had them cut my 2 pieces of backing board from it.  The total cost was $8.47.  I even have a little piece of board left over, which I am sure will be used for something!
I sprayed both the board and the back of the print with Super 77, lined up the print with the board and pressed them together, using my hand to flatten the print down and make sure there were no air bubbles.  This stuff is crazy sticky, so make sure you are lined up before laying the print on the board.  No redo is going to happen without ripping the print.
Next, I flipped it over and cut off any excess print with an exact knife.
I lightly sanded the edges to blend and make the print flush with the board.
This is what it looked like after sanding.  Now I put on the Mod Podge Brushstroke.
After this was dry, I primered and painted the edges of the board white to give the canvas look to it.  I attache a wire for hanging on the back, as detailed in my previous post, here.  SImple and lovely!

Vinyl Wall Happiness; Frugal & Fast, With Flair

Happiness3

I found another cheap solution to my barren wall space. I haven’t lived in this house for long, and spent the first few months here painting walls and getting settled. You know I am a fan of vinyl wall decor if you have read this post, this one or this one… I could go on for awhile.

I am a big proponent of cutting my own designs with my Cricute, however, this deal at Joanne’s was just too good to pass up. I love the text, with its inspirational message. Not to mention the 3D embellishment butterflies. The colors coordinate perfectly with my living room. The price tag… less than $15 with my Joanne’s 40% off coupon. Can’t beat it. It would cost me a few dollars for the vinyl to cut it myself, and with the time investment it would take, $15 wins! A great way to bring an element of style to your home on a budget! 

DIY Fabulous Frugal Faux Canvas Painting Tutorial

Create an oil paint effect on prints, using Mod Podge Brushstrokes.
These prints were mounted on plywood and painted with Mod Podge to create beautiful faux oil paintings! Read on for full tutorial…

tut12I am so excited about the way this project went! As mentioned in the prior post, here, I created these prints in Photoshop with the idea in mind that I would try something similar to the project over at Infarrantly Creative (see this post).

I had the images printed at 12×12′ on glossy stock. At Michael’s, I picked up 1/2x12x12′ birch plywood squares. Since I wanted the pictures mounted on 1′ backing, I used Gorilla Glue to adhere 2 pieces of birch plywood together for each of the 3 prints. You could also use MDF in for the backing, cut to the size of your prints. I used the plywood because it was already cut to the size I wanted, and it was cheap.

Once the gorilla glue was dry, I was ready to adhere the prints to the wood. Super 77 has minimal overspray, but make sure you cover your work surface, cause this stuff is sti-iii-cky, for real. Spray a thin coat on both the back of the print and on the wood surface and lay the print in place, smoothing flat with your hand. This holds big time and bonds immediately, so make sure you have the pic lined up before placing it. I turned the piece over on a flat surface and applied pressure to the back to ensure I hadn’t missed any air bubbles. This part was really much easier than I thought it would be. I had no problem with air bubbles.

Next, the fun step using Mod Podge Brushstrokes. I just recently ran across a post using this medium and I am in love. I used a 1 inch foam bruse and small texturizing brush. I read that if you are painting the Mod Podge onto photo paper, you should use an acrylic sealer before applying. This was just glossy stock, and I had no problem with ink bleeding. You may want to test a small area before painting your entire work. I just applied strokes randomly. There wasn’t a lot of strategy. The prints themselves I made with a painted effect in photoshop, so I kinda followed along the strokes in the images, but mostly it was just random. Look how cool they are. They look like for real oil paintings!

After the Mod Podge dried for about 30 mintues, I applied gesso to the sides of the wood (you could also use primer), then painted with white acrylic over that.

I used thick tacks (U-shaped) and wire for the hanging mechanism.

 
Here they are on the wall…


You can do this with your own images, posters or garage sale finds. The Mod Podge brushstroke effect looks particularly impressive with photos that have been digitally altered using paint effects. That is a photoshop lesson for another day.

Pet Pop Art Prints From Your Favorite Photos

It has been awhile since I have had any “photo to art” business, so I am taking the opportunity to promote this service.

You can see the customer’s original photo and the pop art portrait I created from that. How it works: send me the photo you would like as art, pick out a style from my “Custom Photos to Art” Gallery, here, and I will provide you with 3 proofs from which you can choose. If you want something different than what you see in my gallery, just talk to me. I am happy to customize to your specs. Once you are happy with a proof, I will have it printed and sent to you (price varies depending on size). You can also buy the high res electronic file for $10 and have it printed as you wish, instead of or in addition to purchasing a print from me. This customer chose 11×14 for $20 total (for the artwork and final print).

My prices are pretty awesome compared to other sites that offer similar services (usually starting at $100). The reason I am able to provide this service at such a low cost is because… Photoshop is amazing, really. I put in the hours of photo editing for each of the styles you see available 2 years ago and saved the steps in Photoshop as “Actions”, which I can apply to your photos with a click. I end up doing some tweaking, as each photo is obviously different, but what would normally take several hours per pic is achieved in a fraction of the time. You can see an example of my work on child portraits at Infarrantly Creative, here.

I would very much like to get the word out about this great deal. If you are a blogger and would like to trade, I am open to doing work in exchange for a review/feature, or a giveaway on your site. Lets work together!

Last Name Wall Art DIY

LANIERWALL2


I saw these 6 rounded corner square pics at Goodwill and picked them up for a total of $3. It occurred to me in the store that my last name has 6 letters… perfect. I have been wanting to create thrifty last name wall art for awhile now. Check out the steps I took…”1. I lightly sanded the pics and cleaned away debris with a damp towel.
2. Cut scrapbook paper to size and adhere to surface using matte gel medium, mod podge or decoupage medium of your choice
3. Smooth paper to remove any air bubbles using brayer (This step is quite effective in getting rid of bumps).
4. To create the backgrounds: I did an acrylic wash using a dab of red “Golden” brand acrylic with water; let dry completely. I then stamped on the papers randomly with texture patterns in bright orange, painted white acrylic dots of varying sizes randomly, painted a white border with graphite pencil drop shadow, sprayed with shimmer mist and doodled starbursts and scratches…
5. The Name: Draw letters onto boards; I used vinyl stencils I cut out with my cricut and white acrylic paint to do mine. I outlined and blended with graphite pencil to make the letters stand out.
6. Seal with acrylic fixative
7. I adhered to wall using Command picture hanging strips…


That is all. Fun customized thrifty last name wall art! You can create some amazing effects with layering stamps, acrylic washes, doodles, textures, fibers, fabrics, tissue paper. My favorite thing about layering is you can feel free to try whatever you want, and if the outcome is not quite what you had hoped, just cover over the top with something different. This takes off the pressure I place on myself to make it perfect, and frees me to be spontaneous. You can do this on any surface. You may need to prime with Gesso first. I didn’t since I was using cardstock.Total cost: $3 + materials I had on hand. SCORE.

Vinyl Wall Art Cut With Cricut;And a Freebie Cut File Download!


Still working on the nursery. I showed you the grass in this post, and provided the .svg cut file to use with Sure Cuts A lot and Cricut. That post also tells you where to get the 12×24 inch vinyl sheets. Now the palm trees… I had a problem cutting the trunks in segments to the right scale so that each piece aligned correctly. Since I wanted the trunks taller than 2 ft, and cricut’s max is 12×24 inches, I had to do these in pieces. In photoshop, it is a sinch to cut an object into pieces that will fit together, but I couldn’t figure out how to scale in SCAL. If you know, please, do tell! I didn’t obsess about it too much since the trunks are very simple and I knew I could just draw on the backing of the vinly sheet and cut with scissors.

The leaves were easier because I was able to fit each leaf on the 12×24 vinyl sheet. I designed them in photoshop, saved them as jpg and opened them in SCAL, scaling them to what I thought would look good. I knew I wanted 6 leaves per tree, so I made six leaf shapes and cut out 3 sets of the 6 since I was doing 3 trees.
Here are the 6 free downloadable files in one compressed download, or you can just choose individuals below…
6 Individual Palm Leaves:
Leaf 1 View Download
Leaf 2 View Download
Leaf 3 View Download
Leaf 4 View Download
Leaf 5 View Download
Leaf 6 View Download
There are 6 separate .svg leaf files, numbered 1-6. In the above pics, leaf one is the bottom left and they go in order clockwise. Or you can put them in any order you want. Go for it. Maybe you only want 5 leaves on your tree. Play around. Have fun. If you don’t have a Cricut, don’t miss out on your chance to win a free one by entering my Cricut Electronic Cutter Giveaway, here.
I will be posting much better pics once the nursery is completely finished. The best thing about this wall art is that it is super easily removable, and reposition-able. I am hooked. Enter the giveaway!!!

Cricut Giveaway Button

Cabinet Door Art Using Vinyl Cut Outs

cabinetDoorArt3So I found these cabinet doors for a couple of dollars each at my local Habitat for Humanity Restore a couple of months back. I wasn’t sure what I would do with them, but I knew something would happen if I brought them home. I have run across several projects using cupboard doors, and have made a chalkboard from one in the past (here).

After some black spray paint all over, I painted the inner rectangle with a few coats of folk art antique white acrylic paint. Once that was dry, I placed the black vinyl cutouts over the antique white. I smoothed out the air bubbles with a brayer.
This project evolved as I went. I didn’t have anything in mind when I started. I just wanted it to fit into my bedroom decor. After I put the vinyl on, I decided to add ribbon, so I drilled 2 holes in the top. I put one end of the ribbon into each hole from back to front of the door, tied a knot in the front, and pulled the slack back and up. The ribbons aren’t weight bearing. I hung the finshed pieces from nails using the lip on the back of the cabinets.

This is just another of the tons of projects you can create with the help of your Cricut Machine. You can custum design your vinyl cutouts to your liking. Don’t miss out on your chance to win your very own Cricut Create by entering my giveaway.

Privacy Policy