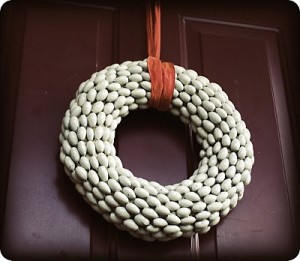
Awesome Acorn Wreath; Thrifty and SOOOO Cute

AcornWhite2


I ran across this post by Dana at “Made”, and filed it under “To Do” right away. The following day, i scored a the above straw wreath at Goodwill for $0.99. It was meant to be. I went to the local dog park and found the perfect almond shaped acorns. Some of them I had to decapitate (remove their hats), but most of them were hatless.

I returned home with 2 plastic grocery bags a little over half way full. I tell you this because I had to go back for more acorns. Get them all. It takes more than it looks like it would.
I tossed them in the sink and washed them with dish detergent, rinsed, then put on a large cookie sheet and baked at 350 degrees for 15 minutes to rid them of any living beings (apparently maggots can happen if this step is skipped – Yuck). Then I haphazardly hot glued them all over the straw wreath (leaving out the back, so the wreath will lie flat against the wall). For the bow, I ripped a piece of fabric and… that is it. $0.99 plus time spent hunting acorns, plus strip of fabric and some hot glue action. Not bad! (Add a few dollars for some spray paint, which I had on hand).
Check out these beautiful spray painted versions Dana posted…

I love the look of these. I can’t wait to spray paint mine. I think I will stay with the natural color for awhile. Oh, who am I kidding, I will be making more. The wonderful thing about spray painting them is that they can be displayed all year round, not just holiday time. I am struck with a wreath obsession this year.
What are your wreath ideas? Post pics, please. I am inspired by you!!!

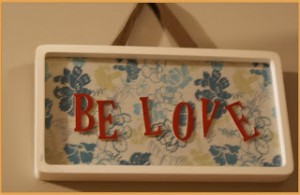
Fabric Wall Art DIY; My Retro Kitchen


Remember my retro kitchen chair/table set? Well, since that project, I have painted the walls a lovely robin egg blue that has been begging for decor to wear. Nothing is quicker and easier as far as adding color to a room then fabric panels. I literally wrapped the canvases with the fabric sheet like I would wrap a gift, then stapled the edges on the back using my staple gun. I am digging the look with the chairs and the bird canvas prints.

There are tons of cool tutorials on fabric wall art, and with the amazing prints available, possibilities abound. Frugal, fabric, fabulous…


Photobucket


My Wee View
badge

Photobucket

badge


BoostMyBlogFriday
Smart and Trendy Moms

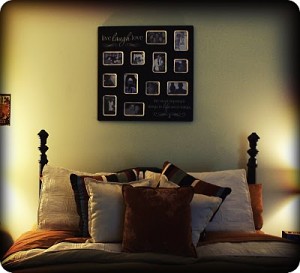
Come, See Our New Bedroom!!

BdrmCollage1


So this post is about what I did today. I found the collage frame at Kohls, and spent the a large chunk of the day finding and editing my favorite pictures of John and me. Aside from painting the walls, I haven’t done much home decor since moving to Bloomington in July. I have been in a dark place and am just recently emerging back into my life and myself. It feels good to be inspired, and to be on the growth side of recent painful events. Vague take home message: Anything that interrupts my fellowship with God is not worth having. Ok, back to the decor…

I LOVE how this collage turned out, and what it says; “The most important things in life aren’t things.”
The paint is kinda pistachio green, and trim is cream. I am loving this combo with the dark, saturated orange and browns. It is a retro, antique, grunge kind of feel. Especially with the metal signs to the left of the collage.
The afghan on the foot of the bed… I had just started to crochet an afghan specifically for my bed, with oranges and browns, when I stumbled upon this one for $2 at a local thrift store. SCORE. Saved myself time and $.
The black furniture is an oak set I spray painted and distressed.
The black shelf under the serenity prayer wall hanging is a dumpster headboard I picked up curbside and made fabulous (see this post).
More home decor to come!!

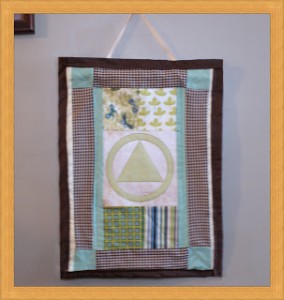
Quilted Wall Hanging

SONY DSC
My first quilted wall hanging, inspired by an organization that has helped millions.

This was fun and easy. Debbie hooked me up with a bunch of old fabric scraps and I was on my way. I made the circle triangle in the center in photoshop, then printed it on fabric made for inkjet printers. I attached the pieces, layered and quilted, then attached a dowel rod and ribbon to the back for the hanger. I am super excited about mixing my love for graphic design with fabric for customized funky wall hangings. Busy girl. Busy…


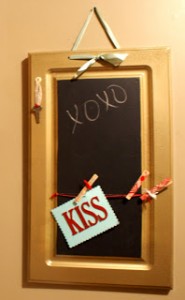
Cupboard Door Turned Cute Chalkboard


SONY DSC


I got this cupboard door at a thrift store for $3. I sanded it lightly, drilled 2 holes for the ribbon hander, spray painted it (Rustoleum Hammered Gold). once it dried, I put a clear coat finishing spray (matte) and place adhesive chalk board paper to the inner rectangle. I guess chalkboard paint would be fine too. I have never used it. I am a sucker for adhesive papers.

I put various scrapbook elements on as shown, using glue gun and or nails. I decorated the clothespins with scrapbook paper to, an idea I first saw at the Creative Crate, on this tutorial. EASY and Adorable. Questions/comments appreciated.
Don’t forget to enter to win a free art print (click here or go to previous post). Be well…


Cool Revamped Thrifty Find Wall Decor

SONY DSC

Here I am, milling through the aisles of my favorite Goodwill store with an awesome girlfriend (hi, Debbie), when this rounded corner white frame appeared in my periphery. For $0.99 I brought the lil’ thing home. After some trial and error crafting, I ended with the final product pictured. SIMPLE. I threw a piece of fabric between the 2 glass panes, stuck some chipboard letters from my scrapbook supply stockpile on the front, stapled a ribbon to the back and… there you have it.


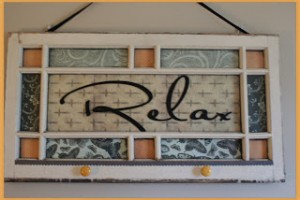
Old Window Into Art…

SONY DSC


This is what came of my unrelenting urge to find an old window and make it purdy. The flame was lit when I ran across this post at Creative Crate. So cute, I had to get me a window…

After combing thrift stores and flea markets to no avail, I got on ol’ trusty google and searched “old windows for sale, Indianapolis”. One of the results was an architectural salvage warehouse. I called (and by that I mean I had my husband call) to see if they had old windows, which was funny to us when we arrived and they had 5 million old windows, amongst other treasures. That is for a whole other post. Suffice to say I found a lil’ piece of heaven that will surely provide craft materials for all of my days…
Anyway, I picked out the window you see here. Just seemed like the one. Turns out, it was ideal because of the dimensions of the individual panes of glass. The large center one was 8.5 inches in height, perfect for my Hobby Lobby 8.5x11in cross paper. The other rectangles were 12 inches wide, perfect for my scrapbook paper. For the tiny squares, I also used scrapbook paper, cut to the appropriate size.
The orange knobs I picked up in the treasured $1 rack at Michael’s. Drilled 2 holes for them, screwed them in. Easy.
The “relax” is vinyl wall decal lettering from Michael’s as well. Again, perfect fit without any alteration from me. There was divine intervention in the choosing of this window. Finally, black bow for cuteness, stapled to top. 2 hinges already present on this heaven sent window provided the hanging mechanism.
This color scheme rocks out with my bedroom decor. And who couldn’t use a little reminder to RELAX as the first thing seen upon awakening?!
Comments are my favoritest things these days…

Thrift Store Pic Scrapbooking Paper Project

SONY DSC


I scored with my recent thrifting. Here is a pic of a map I picked up for $2. I used a gift card I was given for Hobby Lobby to get some fresh scrapbook pages in the color scheme I am adopting for my kitchen. I used some other embellishments I had laying around. Modge Podge and hot glue gun holds it all together. There you go. I love it. Quick, frugal, easy.
I heart comments.

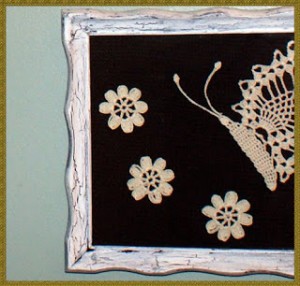
Framed Crochet Butterflies

SONY DSC

I found these pics at a thrift store for $1.50 each. I was delighted. I didn’t take pics of them as they were when I bought them, but I didn’t have to change much. All I did was remove the green felt the butterflies were on and replace it with the brown fabric shown. I also redid the brown frames with antique white spray paint and crackle medium (covered in my earlier tutorial, here).
I, of course, also had to track down a pattern for these doily-ish butterflies. I found this awesome free pattern. How lovely. And the transformation symbolized by the butterfly always lifts my spirit, reminding me that God turns destruction into beauty.
Blessings,

Beautify Thrift Store Picture Frame Antique Style

FinalCrackleFrame

(Final Product!!)

This is the process I use for most framing projects. I find a cheap framed pic at Goodwill, yard sales… I prefer wooden frames, as my options are open in terms of revamping. I can stain, or paint. My artwork to be framed was 16×20, so I was armed with a tape measurer. I went into this knowing I wanted to create an antique white frame for the collage of Princess Ava I showcased in the previous post.
  • I removed the artwork from the frame
  • Sanded frame lightly with sandpaper, and wiped clean with damp cloth
  • Painted with white acrylic paint using paintbrush (I only did one coat, as the original frame was light wood. If you need to recoat for coverage, let first coat dry completely)
  • While this was drying, I cleaned the glass with Windex
  • After about 1 hour, I applied crackle medium and let dry for 2 hours. (I applied a thin layer of crackle medium, as I didn’t want a very drastic crackle)
  • Once dry, I sprayed a coat of Rustoleum clear coat finish for protection.
  • Placed the glass, my collage, and the picture’s original backing and that is all
Privacy Policy