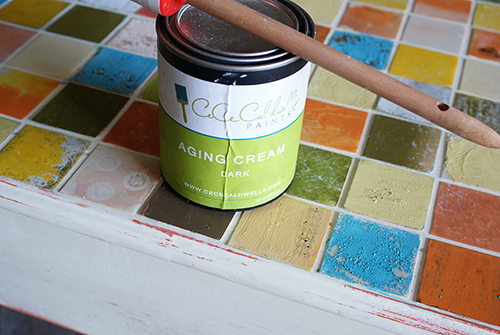
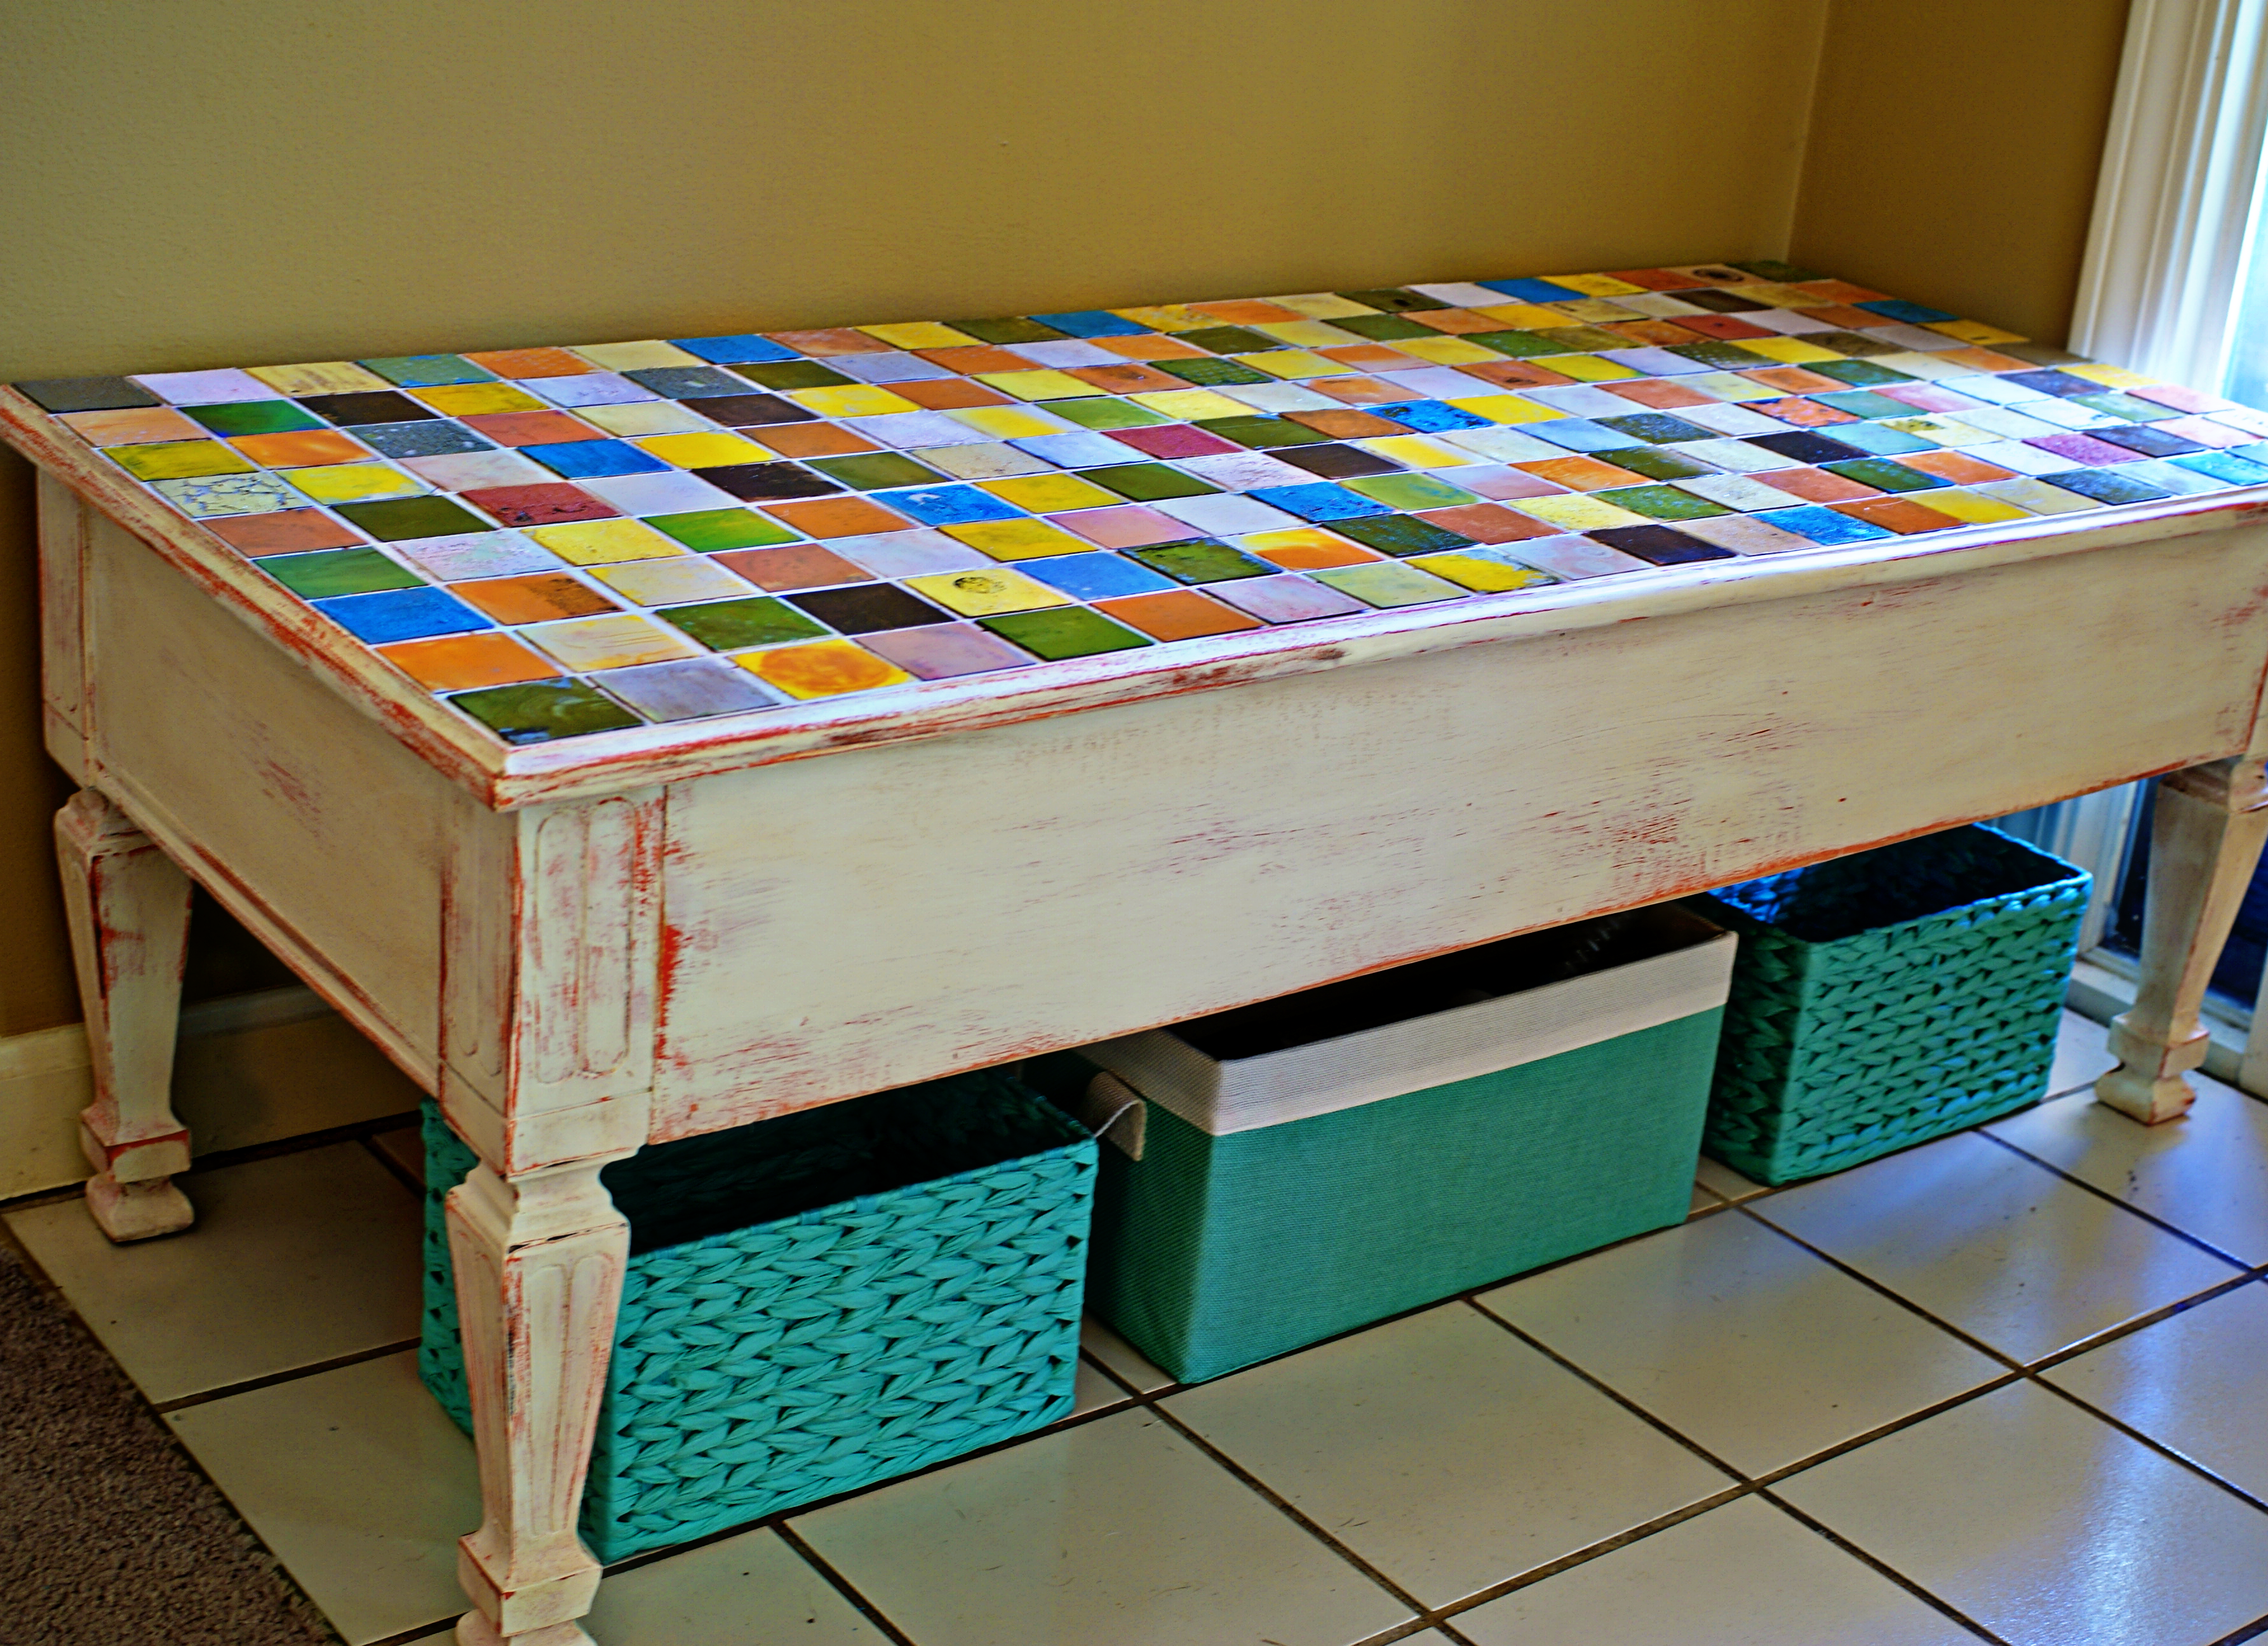
New Americana Multi-Surface Satins & Stencils

[pinit]
Paint a Chevron Coffee Table with @DecoArt_Inc @savedbyloves

[pinit]

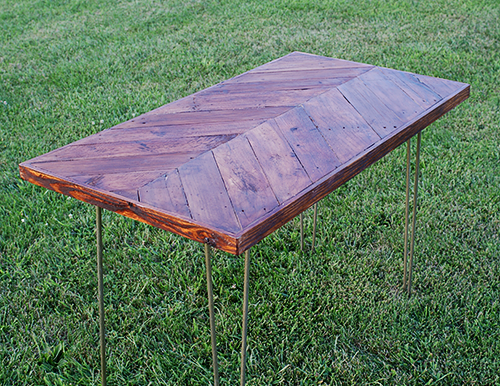
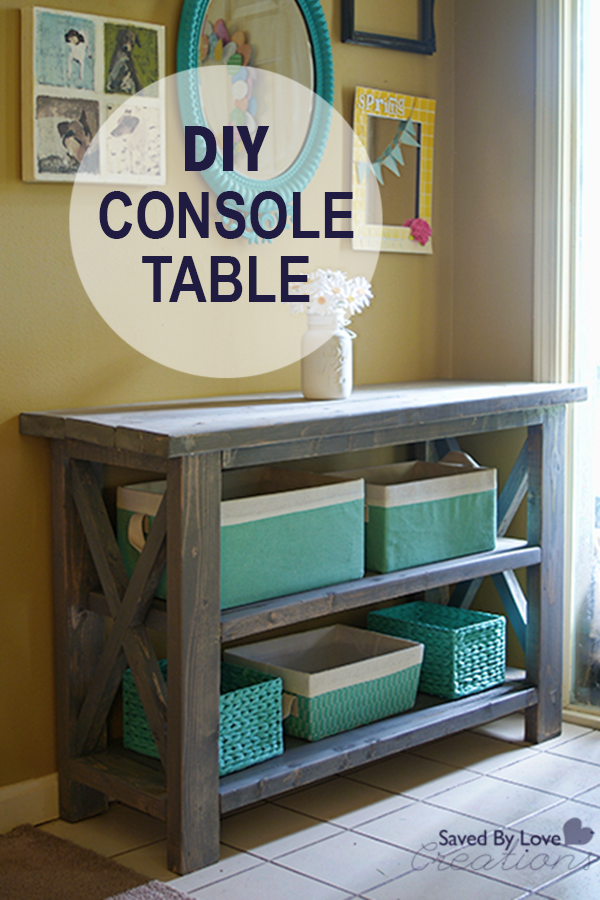
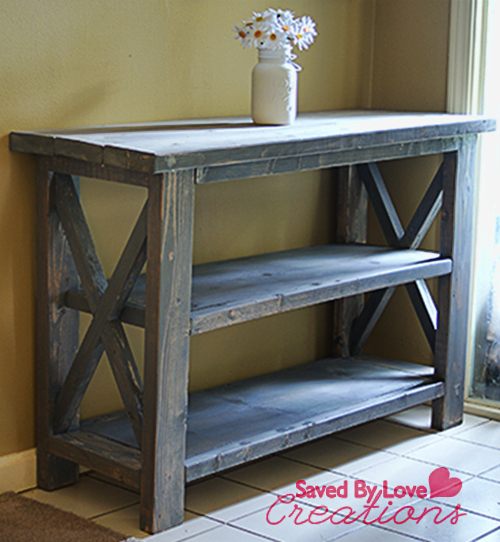
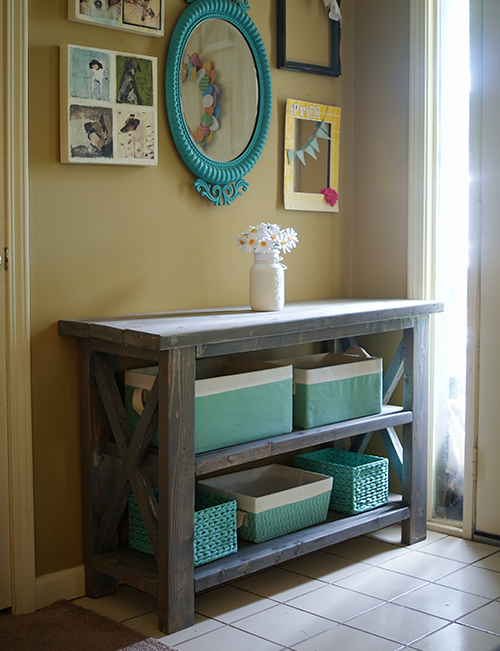
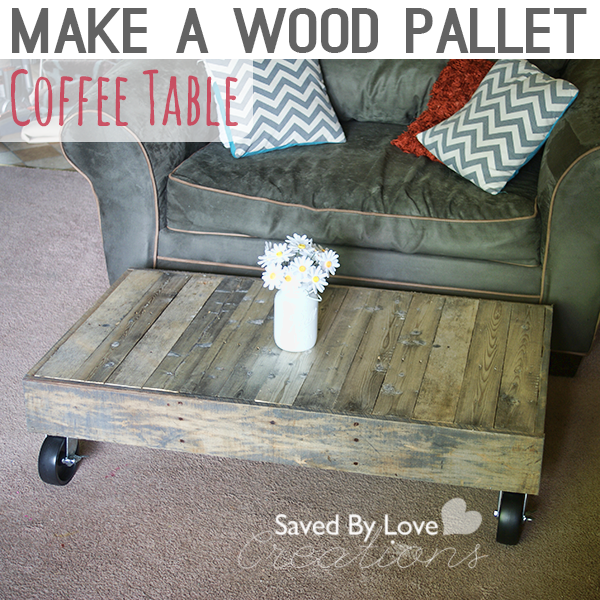
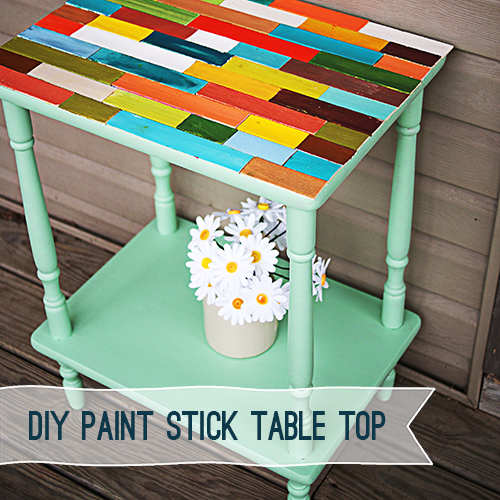
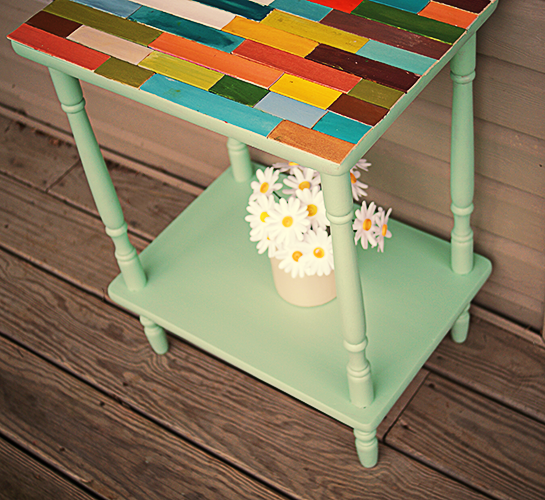
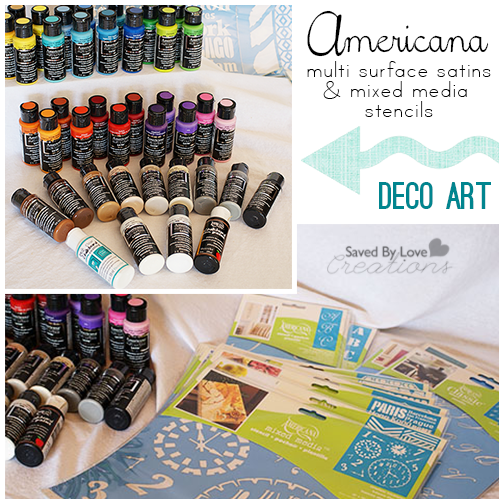
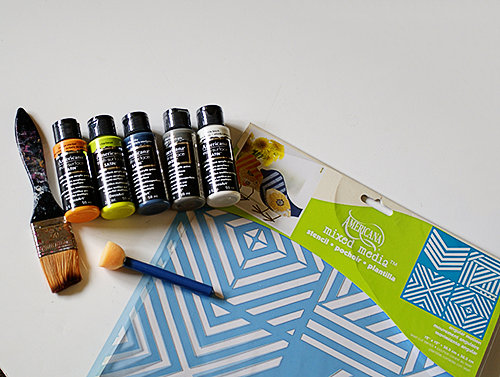
Have you seen the new Americana Multi-Surface Satins and Mixed Media Stencils yet?  I had a chance to try them out, so I used the opportunity to work some magic on a curbside find.  You are going to love not only the colors and stencil designs in this line, but the paint quality is outstanding to boot.  Today I am sharing how I created this modern chevron painted coffee table with my box of goodies!

DecoArt Americana Multi-Surface Satins and Mixed Media Stencils

SUPPLIES:

Americana Multi-Surface Satins

Americana Black Chalkboard Paint

Americana Mixed Media Stencils

Sponge Brushes

Painters Tape

Medium Grit Sand Paper

Coffee Table

DecoArt Americana Multi-Surface Satins and Mixed Media Stencils

TUTORIAL:

Table Makeover

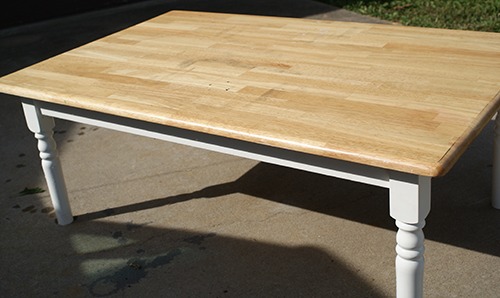
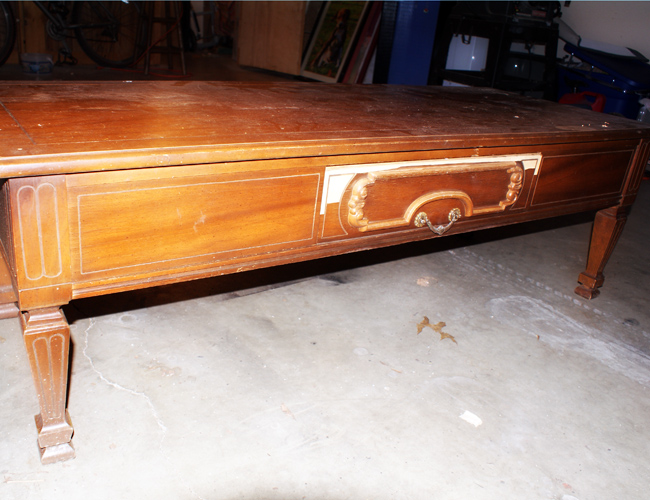
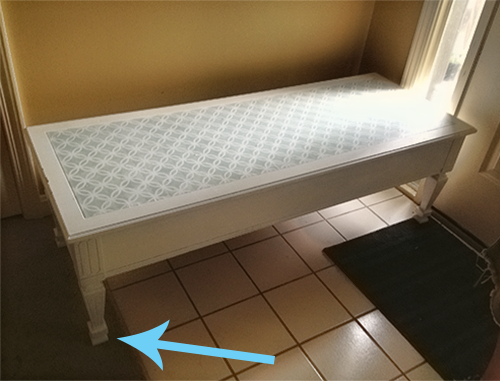
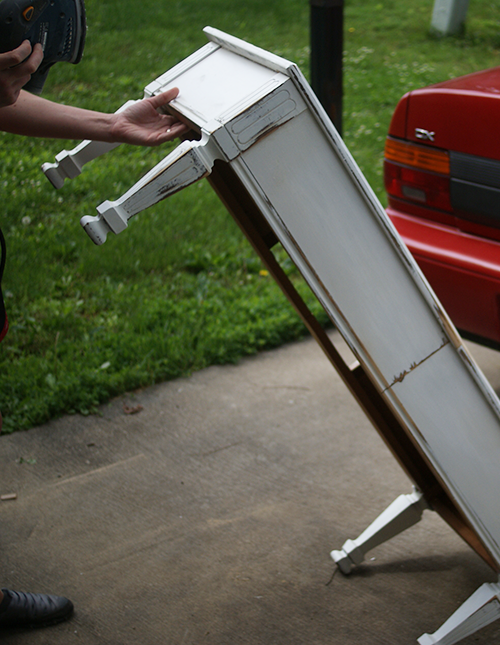
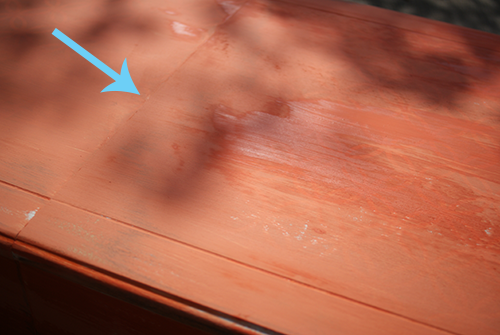
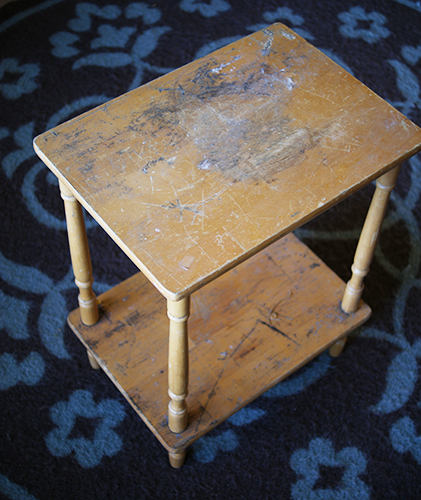
Here is the curbside rescued table before any revamping.

Sanding a Table

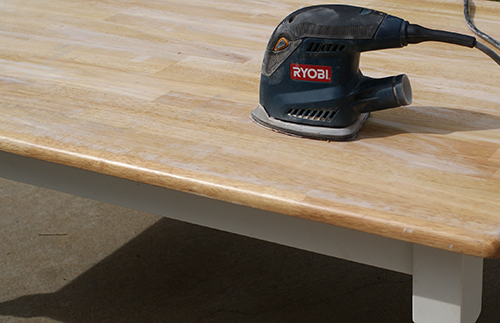
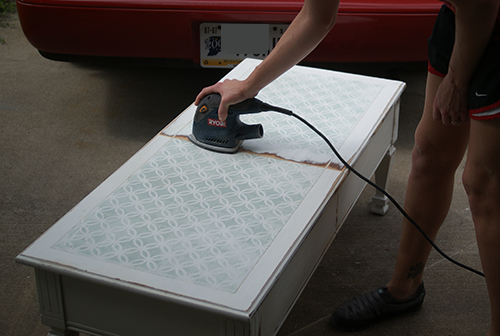
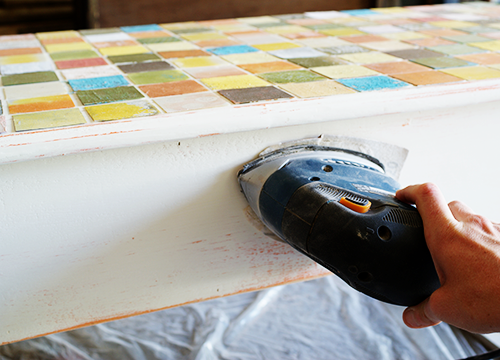
I sanded with medium grit paper to give the paint surface something to grab.

Applying paint with a roller

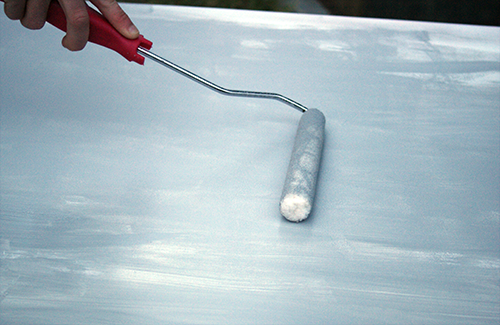
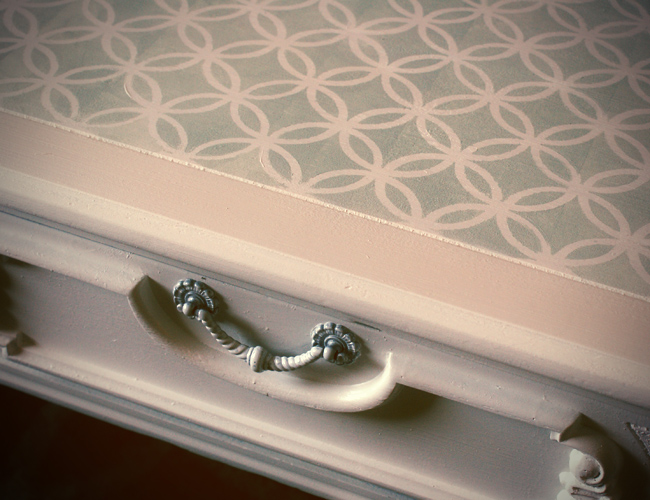
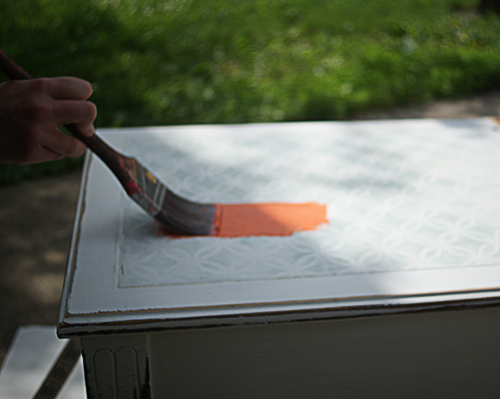
I primered the table top rolled on Multi-Surface Satin color Dolphin.

How to Refinish a Table

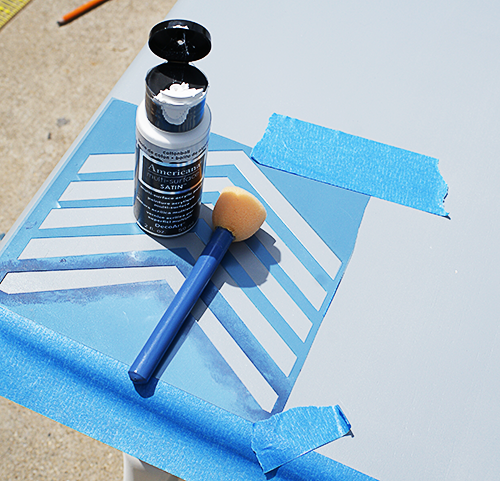
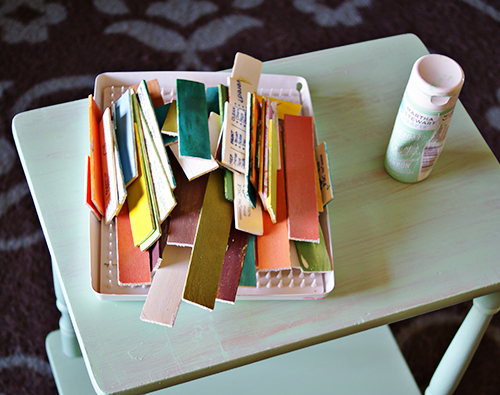
I cut the segment of the stencil I wanted to use off of the main 12×12 inch sheet and taped it into place.

How to Stencil a Table

How to Paint Chevron on a Table

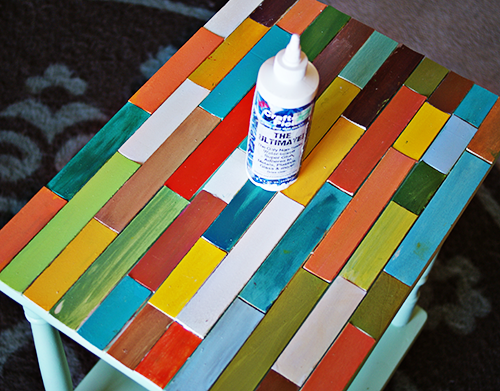
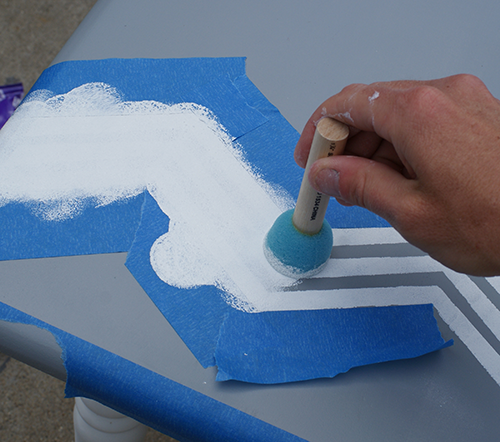
I worked my way down the table, using the sponge pouncer to apply the paint.  Coverage is fantastic.  I decided I wanted thicker chevron strips, so I taped off around the strips and filled in the space between them.

Sand Distress a Table

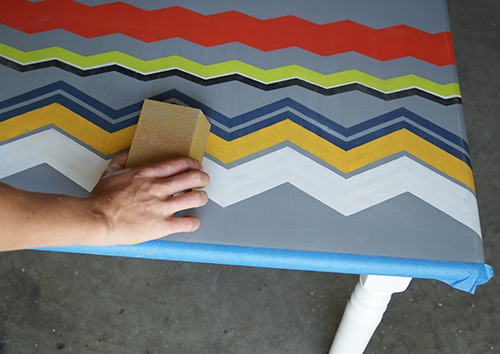
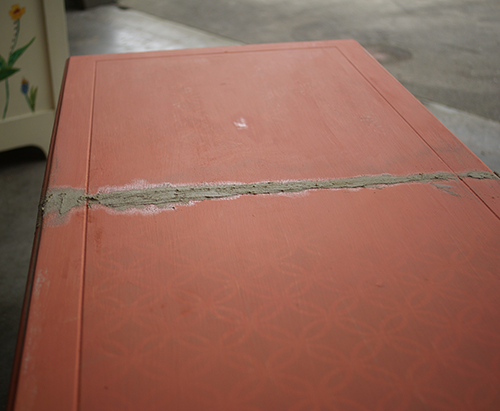
I continued on like this, using various colors of this fabulous paint.  I sand distressed lightly when I was finished.

Glue on Casters

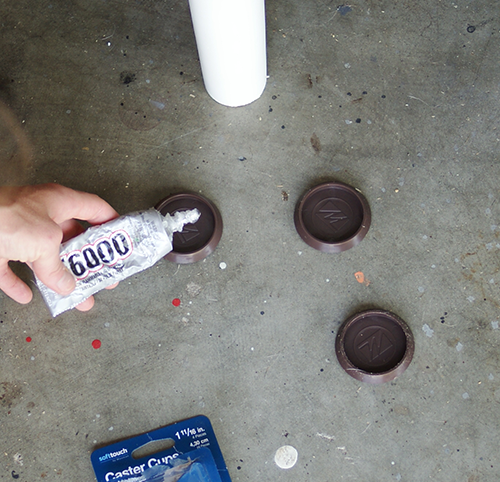
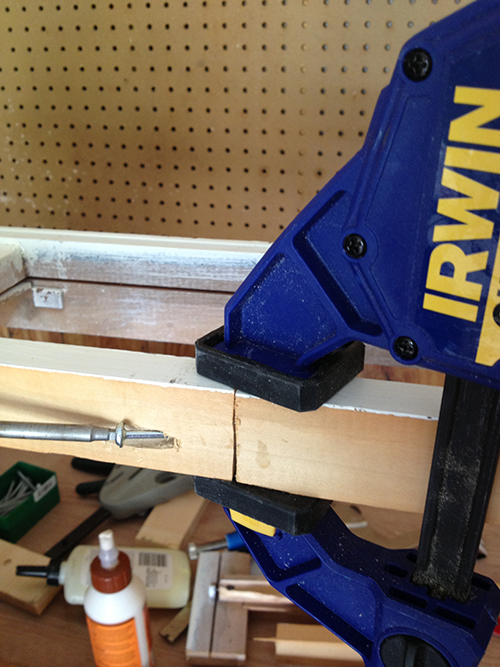
The legs were cut off when I found the table and looked unfinished, so I glued on these caster cups I found at Lowe’s for $1-ish.

Painted Chevron Pattern

DecoArtStenciledTable

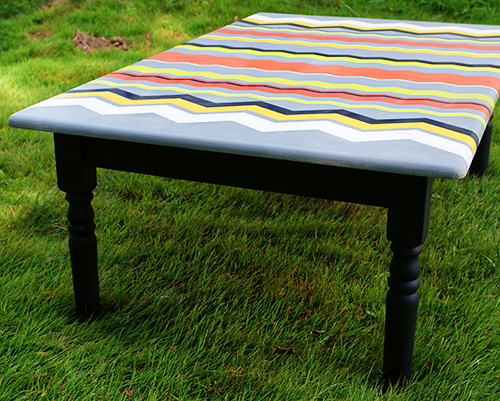
I painted the legs and lower part of table (including caster cups) with Americana chalkboard paint and a soft 1 inch paint brush.

DecoArt Multi-Surface Satin Paint Rebate

Americana Multi-Surface Satins are available for purchase at Michaels, A.C. Moore, Hobby Lobby, and other fine craft retailers.  Go get them now!

Find out more about them at DecoArt!

DISCLAIMER:  The paint and stencils mentioned in this post were provided to me by DecoArt.  All opinions are still 100% my own!

Spray Paint Lamp Makeover

[pinit]Spray Paint Lamp Makeover @savedbyloves[pinit]

One of the easiest, most inexpensive and foolproof ways to revamp a good thrift store find is with a little spray paint.  It has been awhile since I took advantage of this fact.  If you are like me, always getting tired of your decor and wanting to change things up without breaking the bank, a few bucks on a can of color is the way to go.

SUPPLIES:

Lamp that you are sick of

Krylon Dual (Paint and Primer in one) Spray Paint in choice of color – Gray

Painter’s Tape

TUTORIAL:

You can see in this Lamp Makeover Tutorial, that this is not the first go around for this particular lamp.

This was the original lamp I found for $1

How to Redo a Lamp with Spray Paint

Here she is now after a simple, quick coat of Krylon Dual.  That simple!

How to Make a Chevron Table from Reclaimed Wood Pallet

[pinit]

Chevron coffee table DIY from Reclaimed wood shipping pallets @savedbyloves[pinit]

I am a little smitten with today’s project, which is made from shipping pallets and a $5 table I picked up at Habitat Restore.  Reclaimed wood projects are here to stay, folks – at least for this DIYer.  This modern chevron wood plank table took an afternoon to create, but will be enjoyed indefinitely!

Make a Chevron Table

SUPPLIES:

Pallet wood

Ryobi AirStrike Nailer

1 3/4 inch 18 gauge brad nails

Wood Glue

Circluar Saw

Mitre Saw

Wood Clamps

Random Orbital Sander

Rustoleum Wood Stain Dark Walnut

CeCe Caldwell Satin Finish

Lent free cloth

Paint brush

Tack cloth

Yard stick

Pencil

How to Build Furniture for Beginners

TUTORIAL:

How to make a reclaimed pallet wood table

Find a really awesome hairpin leg table for $5 at Habitat Restore and tackle anyone in the way of you and it.  Bring it home.

Make a Chevron Table from Pallet wood

Cut pallet wood to 45° angles using mitre saw.  Meet wood in center to form 90° angles(I drew a line down center of table with pencil using a yardstick).

Glue and nail down with air nailer or hammer and finishing nails.  This is where I use my Ryobi AirStrike brad nailer.  The thing is amazing.  I can’t believe how powerful, lightweight and inexpensive it is.  I use it in all of my reclaimed pallet wood projects and it makes my life worth living, or at least way easier when building.

How to Resurface a Wood Table

Use the circular saw to cut off excess wood extending over edge of original table top.  This is way easier than cutting each individual plank to size.  Way.  Easier.  And.  Faster.  Trim with 1x2s or rips from 2x8s like i did.  I mitered the edges to 45° for a more finished look.

Ryobi Air Strike Nailer

Again with awesome nailer (this is not a Ryobi sponsored post, btw) – glue and nail the trim in place.

Reclaimed Wood Furniture Projects

Orbital sander on wood top

Sand with orbital sander.

Rustoleum Wood Stain

How to apply wood stain

Staining a Wood Table Top

Wipe on Stain per directions, with the wood grain.  This is the first time I have used this Rustoleum stain and I love it.  Gorgeous color, easy to use, what is not to love?

Finishing Wood Table Top

How to Finish Wood Table

How to Build a DIY Reclaimed Wood Bookshelf

How to build a reclaimed barnwood Bookcase @savedbyloves

How to Build a Bookshelf

I have another reclaimed wood DIY project for you today.  I got a truck load (it probably should have been two truckloads, but we squeezed it into one) of 4×8 plywood sheets, 2×6 and 2×8 boards from a craigslist ad.  It was salvaged from a home that these folks tore down and they were happy to have it hauled off and out of their yard.  This project is made mainly from that wood.  The panels that back the bookshelf were milled by a friend of mine who passed them along to me, where they have patiently waited for me to put them to use.  I came up with this cool bookshelf that i finished with homemade chalkboard paint and sand distressed.  CeCe caldwell Clear Wax then Aging Wax sealed the deal and added just the amount of antiquing to suit my vision.  You can finish this project in a day if you are committed, over a weekend if you have some distractions.

Ana White Kentwood Bookshelf Plans by Shanty2Chic

This fine Kentwood Bookshelf by Shanty2Chic that I spied at AnaWhite.com was my inspiration.  I had just taken a woodworking DIY class by Whitney and Ashley of Shanty2Chic at Haven Conference, and I came home on fire to build.  These girls are amazing!  They shared their journey coming from zero knowledge of building or power tools, to being able to build some amazing furniture for their homes.  I have been building since April, and before I started, I was totally intimidated.  I still am by lots of projects, but I am so glad that I broke into the power tool world.  It is way easier than I thought, and not much is more gratifying than building custom pieces, from reclaimed wood no less.  Go check out Shanty2Chic, walk through some of their detailed tutorials and you can build awesome stuff too!  You really can.

One thing they taught me at Haven was to measure as I go instead of cutting all of my pieces called for in the plan.  I hadn’t been doing that, and my pieces would be off almost every time.  Wood is going to curve and bow and do funky things, especially reclaimed lumber and shipping pallets.  I am so glad they emphasized measuring and cutting based on reality and not on the perfect plan.  I decided to scrap the plan entirely for this shelf, and just go with my own dimensions based on what pieces I had on hand, and the measurements as I built.

Bookshelf DIY Tutorial

I made my own 2×2 pieces by ripping the 2×6 boards from the house demolition that I scored.  This is what I used to frame the side planks, which I cut 11.5 x60 inches from the 4×8 sheets of 5/8 inch plywood also from the house demo.   Shanty2Chic used 1×12 boards for the side panels.  I went with plywood since I had it on hand, and I knew I was going to paint the final piece.

Building Bookshelf With Kreg Jig

How to Build your own furniture

You can see the Kreg pocket holes in the plywood side planks that I drilled to attach 2×2 framing.  Attach shelves and top.

How to Build a shelf from reclaimed wood

I  used 3 pieces of the wood my friend milled for the backing.  They were different thicknesses, but since that would only be visible from the back, I didn’t much care.  I just measured and cut to length the center piece, and ripped what I needed off the 2 side pieces so that they didn’t stick out over the edge.  I counter sank 2 inch wood screws to attach the back panels.

How to distress paint furniture

I love the larger panels for the backing, and that I didn’t have to buy any wood for this piece!  Fill Kreg holes with wood putty, liquid nail or caulking.  It doesn’t need to be something that takes stain if you are painting the piece anyway.

ReclaimedSmall Wood Furniture Tutorial

I sanded the unfinished bookshelf with medium grit paper and painted a base coat of CeCe Caldwell Paint in Vintage White  (You can see my other CeCe Caldwell Chalk and Clay Paint projects by clicking the thumbnails below).  After that was dry (about 1 hour indoors) I made a gray DIY Chalk finish Paint using the Make Your Own ChalkBoard Paint Recipe I showed you in an earlier post.

How to Build Furniture From Reclaimed Wood

For a little more aging, I added a coat of CeCe Caldwell Clear wax, then Aging Wax.  I buffed with a soft cloth an hour later and that was that.

Build your own furniture

LOVE!  Thank you Whitney and Ashley.  Can’t wait to see you again!!

Coffee Table Revamp with CeCe Caldwell Paint & Recycled Gift Cards

[pinit]

Makeover a table with CeCe Caldwell Chalk and Clay Paint @savedbyloves http://wp.me/p1BUxN-2Qm[pinit]

I have been dying to share this project with you for-like-ever!  I had this table I wanted to paint with fabulous paint.  So, I contacted my good friend Debi from Debi’s Design Diary and ordered CeCe Caldwell Paints.  Nothing else was going to do for this table.  The stuff is wonderful.

One of the big things that sets CeCe Caldwell paint apart from other brands is that is is non-toxic, containing no VOC and all ingredients are listed on the label.  Many low volatile organic compound paint brands don’t list their ingredients because they are not required to do so.  Many low voc brands still contain lots of harsh chemicals.  You aren’t washing anything harmful down the drain and you don’t have to worry about paint fumes or using gloves when waxing.  That is a plus!

Remember when I revamped this little junky table?  It was the first time I had used CeCe’s product, and it was love at first brush stroke.  You can read all about it by clicking the image or link, but basically I had zero experience and getting the look I wanted was super simple.

Back to today’s project:


I found this thing roadside, brought it home and painted it with a quatrefoil design on top:

You can click the image or go to Martha Stewart Coffee Table Revamp to read about that project.

How to custom Cut a Table to fit a space

Not only did I want to paint the table, but I wanted it to fit in a spot that it turns out was about 5 inches to small for it.   See how it sticks over to the carpeted area where the arrow is pointing?  No good. That is when John and I decided to cut the table in half, remove 5 inches, and put it back together using the Kreg Jig.  Whaaaat?  I know.

How to Revamp a Coffee Table

We took the top off the table then marked a 2.5 inches on either side of the center.

How to Use a Circular Saw

Making a Custom Coffee Table

I used a circular saw and cut along the lines to remove the 5 inch segment.

How to Clamp Wood

I drilled pocket holes with my Kreg Jig (love you, Kreg Jig) and attached the two shortened table halves together with Kreg screws.

Using Kreg Jig to Join Wood

Here is the top of the table joined with pocket holes and screws.  You can see the segment I removed in this photo.

How to cut a table in half and rejoin

I used the Kreg mini, clamping it onto the sides of the table on the inside to make pocket holes to attach the top of the table.

Distress Sanding a table

You can see the seam, just a little.  O.k., a lot.  I sanded the table with my Ryobi sander next.  You totally don’t need to sand or prime when using CeCe Caldwell paint.  I did this to try and even out the seam area.  For the first project linked above, I didn’t prep much at all.  That is my kind of paint!!

Ryobi sander for table distressing

Kissimmee Orange CeCe Caldwell Paint

After I sanded and wiped away the debris, it was time to get painting.  I am all about orange, and this Kissimmee Orange is beeeaauuutiful!

CeCe Caldwell distressed table

It goes on smoothly, with great coverage.

How to Join wood using Kreg Jig

This photo shows the seam at the blue arrow, which still needs some work.  It also shows wet paint vs. dry.  In the sunlight, the paint dries enough to do the top coat in 30 minutes.

How to use wood Putty

Before doing the next coat, I filled in the seam with wood putty.  When that dried, I sanded it down with the Ryobi sander.

Recycled Gift Card Craft

I did one more coat of the Kissimmee Orange to cover the wood putty and seam, then one coat of the Vintage White.  When that dried, I added tiles that I created from recycled gift cards and painted with Tim Holtz Distress Paint.  I showed you how I made and adhered the tiles in this Mosaic Frame from Recycled Gift Cards Tutorial.

How to Sand Distress a Table

Once the tiles were all in place, I used the sander to distress and bring out the orange under coat.

How to Distress Furniture

I went at it pretty aggressively.  You can sand a little or a lot for the look you want.

Clear Wax CeCe Caldwell

Applying Finishing Wax to Table

I applied the clear wax with the wax brush.  It is easy.  Just a light, even layer does the trick.

CeCe Caldwell Dark Wax

I applied CeCe Caldwell aging cream over the clear wax  to grunge it up a bit.  It is a subtle, nice antiquing effect.  I buffed with a soft cloth after an hour or so.  That makes a shiny, more durable finish.

How to Distress a Table

This is the final piece. I adore it.  I am off to order more paint!  I can’t get enough.

To find a CeCe Caldwell distributor near you, visit this Map of Retailers page.

For loads of inspiration on the amazing things you can do with this paint, visit Debi’s Design Diary the blog, Debi’s awesome YouTube channel, Facebook page and Pinterest!

50+ Things to Make from Cement Mix and Concrete Blocks

[pinit]

50+ things to make from Cement / Concrete and Cinder Blocks #DIY @savedbyloves

[pinit]

Did you know there are tons of cool, industrial chic DIY projects you can make using cement?  This week’s 50+ is all about concrete and you are going to love what you see!  I have never worked with it, but after creating this collection of awesome, that is will be changing.  I would love to see your DIY concrete projects too!


Make a Custom Console Table

DIY Rustic Console Table  @savedbyloves

I just can’t seem to leave the garage these days.  Who knew I woodworking was so addictive?!  Today’s project is a variation on Ana White’s Rustic X Console. The only thing I changed from Ana’s plan is the width of the piece. I needed it to fit in a four foot space, so I adjusted the plan so that the top of the table measures 47 inches end to end.

Rustic Console Table #woodworking #DIY plan from Ana White, built by @savedbyloves

The table took the weekend to make.  Ana’s instructions are awesome.

Console

I finished with Minwax wood conditioner and Classic Grey Minwax stain.

Rustic Console Table #woodworking #DIY plan from Ana White, built by @savedbyloves

Shipping Pallet to Coffee Table and Finishing Tips

[pinit]Repurposed Wood Pallet Furniture; DIY Coffee Table @savedbyloves[pinit]

Today’s project is a fun, quick DIY coffee table from wood pallets.  My building partner in crime and I whipped it up in an afternoon.  The plan we used is this Factory Cart Coffee Table from Ana White.  See how we adjusted the plan to fit the pallet scraps on hand, and how we finished the table to a lovely, united weathered gray look.

Repurposed Wood Pallet Furniture; DIY Coffee Table @savedbyloves

TUTORIAL:

Constructing the table

We followed Ana’s plan linked above with the following adjustments:  Instead of 1×6 boards we used thinner pallet slats across the top and the wider pallet slats for the sides.  We just laid out the top slats until the table was the width we wanted, and measured that width.  It was 42 3/4 instead of Ana’s 44 inches, so we adjusted the rest of the cuts accordingly.  The long side boards we cut to 44 1/4 (42 3/4 + 1.5 inches for the thickness of the short side boards ).  The short side boards  and bottom boards were cut to 23 1/2, per Ana’s plan – the same length as the pallet slats making the top of the table.

We used 5 inch diameter casters that we picked up just for this project at Menards.  Casters are more expensive than I had hoped, but considering the wood for the project was free, we still created this awesome table for less than $50!Repurposed Wood Pallet Furniture; DIY Coffee Table @savedbyloves

Finishing the table

I applied Minwax wood conditioner per instructions on the can.  It went on super easy.  I let it sit for 15 minutes, wiped away the excess then stained with Minwax Classic Grey Wood Finish.  This was my first time using wood conditioner, and it made the stain take beautifully.  I will probably use it every time I stain from now on.  It is quick to apply and makes a huge difference, for me anyway.  I usually have blotchy, uneven outcomes when I stain.

To seal I used Minwax Finishing Wax.

Repurposed Wood Pallet Furniture; DIY Coffee Table @savedbyloves

Not bad for a pallet on it’s way to a landfill!

Check out our Wood Pallet 50+ Roundup for more inspiration:

Paint Stick Table Top

How to make a paint stick table top from @savedbyloves #DIY #Tutorial One of my favorite things to do is find curbside “trash” and give it love, transforming it into something unique.  My friend Beckie calls this whole process “Roadkill Rescue” and even has a website devoted to showcasing the web’s best of such transformations; RoadkillRescue.net. Today’s project is my latest rescue.  See how I took a discarded side table and turned into a fun and colorful accent with chalk paint and paint sticks!

PaintStickTable

Roadkill rescue project

Here she is before.  Pretty beat up, but with tons of potential!

PaintStickTable6

I sanded her down with medium grit sandpaper and wiped away the debris with a damp cloth.  Then I painted 3 coats of Martha Stewart Chalk Paint in green.  (Make sure you let the paint dry an hour or so between coats).

I had several leftover paint stirrers, which I cut to various lengths with my scroll saw.  I arranged the “tiles” on the table top, keeping them flush on the left side.  I marked where the end sticks on the right started to go over the edge of the table, and cut them to size with my saw.  The width of the paint sticks just happened to fit perfectly on the table, so I only had to adjust the length of the right edge pieces.

Paint stick crafts

I glued my paint sticks in place with Crafter’s Pick glue.  I put some heavy books on top of the table to weigh the sticks down for good adhesion and let dry overnight.

Seal with Mod Podge Matte.  The End!

Furniture transformation

Speaking of trash to treasure, my friend Kelly of Eclectically Vintage shared some seriously helpful tips for getting the most out of dumpster diving:

Speaking of Paint Stirrer Crafts, there is a 50+ for that!

50+ Ways to Repurpose Old Drawers

[pinit]

Over 50 projects to make from old drawers #upcycle #repurpose @savedbyloves

[pinit]

Don’t get rid of that old dresser just yet.  Did you know there are tons of  creative ways to repurpose old drawers?  I didn’t know there were that many, until I got started on this week’s 50+ roundup.  You will be amazed like I was!


Privacy Policy