Guest Post: Jewelry Box Makeover

[pinit]

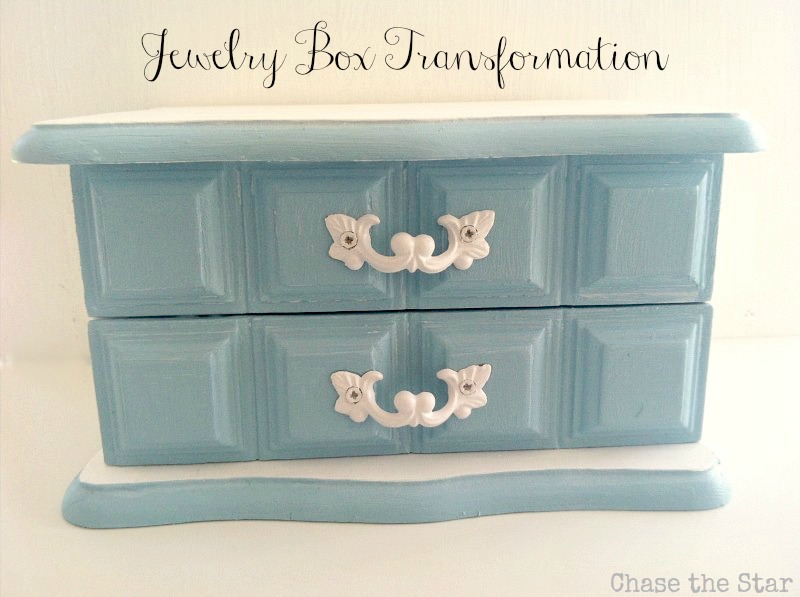
Today Barbara from Chase the star stopped by to share with us a cute jewelry box makeover.  I am a fan of trinket box updates, and this one is no exception.   It never ceases to amaze me what a huge difference can be made with a little paint!  See how Barbara took hers from drab to fab.  Take it away, Barbara!

Hello everyone, I’m Barbara from Chase the Star, where I write about my adventures in crafting, furniture makeovers, recipes, and more!  I’m thrilled to share my latest project, a jewelry box transformation, here at Saved by Love!

{Updating a Jewelry Box}

I found this old and slightly beat-up jewelry box at my local thrift store, it was on sale (oh yeah…second hand and on sale) so I just had to take it home and give it some much needed love.


I had so much fun making this little box over!  All sorts of ideas came to mind.  I envisioned it in a little girl’s room, or perhaps it would live with a sophisticated teen, or even a sit in a family room or entry way.  So many possibilities!  I decided in order to accommodate all of those scenarios, I’d paint it a pretty blue and white.

{Making It Pretty}

The jewelry box had lots of potential.  Although the stain was fading, and it had a few scratches and small chips, the inside lining was in tact, and the bones were great!  This made things easy because repairing and re-lining can take some time.  
Makeover a Jewelry Box @savedbyloves #upcycle

With a small Phillip’s screw driver, I removed the hinges, and the mini drawer pulls.  

The pulls and tiny screws with were sprayed a glossy white. In the meantime making sure to cover the inside lining (I used foil and painter’s tape to protect it), I sprayed primer over the entire piece.

Later, I added a coat of white spray (satin finish) to everything but the drawers. 
Then with a small foam brush I painted the drawers and rims of the top and bottom in a shade of blue I’d mixed together to paint a stool a few weeks back.

I added a light coat of polyurethane to seal my work. Once everything was dry I screwed the hinges and pulls back on to the piece. 


I’m loving the way this piece turned out!  It’s amazing how a little paint can make a world of difference!  
I’d love to see you over at Chase the Star!  Stop by and say ‘hello’, and check out some of my other projects such as my fabric lined mason jars, and metal file cabinet makeover!

You can also visit me here:


Thank you so much Johnnie for letting me share my fun Jewelry Box Transformation with your readers!   

Barbara @ Chase the Star

CeCe Caldwell Paint Distressed Table

[pinit]

#CeceCaldwell Chalk and Clay Paint #DIY  Table Makeover @savedbyloves @cececaldwell

I am pumped about CeCe Caldwell’s Chalk and Clay Paint, which I had the chance to try out in a recent class.  My friend Beckie at Infarrantly Creative hosted the session for some local bloggers to learn about the product.  The lovely ladies of Bungalow 47, Chantelle and Jill, came to Indiana and spent the day educating us on this amazing, completely natural, earth/people friendly paint.

Bungalow 47

I have not worked with anything like this before, and now I am a full fledged CeCe junkie.  Being an instant gratification, “spray paint it and move” on kinda DIY-er, I was elated to find this paint requires little prep.  Not only that, but no experience is necessary to create a beautiful piece.  Count me in.

[pinit]

#CeceCaldwell Chalk and Clay Paint #DIY Table Makeover @bungalow47 @savedbyloves @cececaldwell

Here is how I turned a beat up $5 flea market find into a distressed, chippy table that I proudly displayed in our guest room.

SUPPLIES:

CeCe Caldwell Chalk and Clay Paint; Traverse City Cherry and Seattle Mist

CeCe Caldwell Clear Wax and Wax Brush

Furniture to paint

Drop cloth or plastic

Good paint brush

Clean rags

Sandpaper or sanding block

TUTORIAL:

#CeceCaldwell Chalk and Clay Paint #DIY  Table Makeover @savedbyloves @cececaldwell

Apply wax in a section at a time, wiping away excess before moving to the next section.  This is my first time with wax, so I have nothing to compare it to, but it was simple to apply.  I purchase the wax brush for $18 and love it.  You can tell with clarity where you have wax, since the paint turns much darker when it is applied.  That way you won’t miss an area.  I let my table dry overnight, then buffed with a dry towel for shine.  To clean, just wipe with dry cloth after table cures.  Takes one month to completely cure, so don’t run a sprinkler near it or put it outside in the rain until then!

I absolutely love the chippiness and texture of my finished piece.  This was super easy to achieve.

#CeceCaldwell Chalk and Clay Paint #DIY  Table Makeover @savedbyloves @cececaldwell

#CeceCaldwell Chalk and Clay Paint #DIY  Table Makeover @savedbyloves @cececaldwell

 #CeceCaldwell Chalk and Clay Paint #DIY  Table Makeover @savedbyloves @cececaldwell

Not bad for a $5 table, CeCe Caldwell supplies (thank you, Bungalow 47) and an afternoon’s work.  You will be seeing much more of this product around here.

Make a Woven Belt Seat

Reuse old belts for a chair makeover at @savedbyloves #repurpose #upcycle #DIY

Just as I was finishing up last week’s 50+ Ways to reuse old belts, I walked upon a scene that is a DIY, trash-obsessed, upcycling blogger’s dream.  It was 2 chairs with a “take me” sign.  Immediately the woven belt covered chairs in the collection came to mind.  I snatched up my new finds and brought them straight home.  See how I refinished the one on the left, and made it a cute woven belt seat.

Reuse old belts for a chair makeover at @savedbyloves #repurpose #upcycle #DIY

To see 50+ Ways to Reuse Old Belts, click the thumbnail:

Reuse old belts for a chair makeover at @savedbyloves #repurpose #upcycle #DIY

SUPPLIES:

Old chair (FREE!!)

Painting or staining supplies

As I was applying the stain, I remembered why  I usually go with spray painting when I do a revamp.  Now that it is over, I am happy I refinished it.  I love the dark stain I used (Rustoleum Wood Stain in Kona)

Furniture tacks -$1.30 per pack  of 25 at Lowe’s; You will need 2 per belt needed to cover your chair

Old Belts – I have gathered these from various thrift stores and garage sales along the way.  I used mostly leather, but there is one fabric belt thrown in there too,  At Goodwill, old belts are $0.99.  Go on a half price day and get them for $0.50.  I used 18 belts for this project.  that will vary with the size of your chair and the width of your belts.

Hammer

Scissors that will cut leather

TUTORIAL:

Reuse old belts for a chair makeover at @savedbyloves #repurpose #upcycle #DIY

I LOVE it!  It is sturdy as can be too.  The bottom is ugly, but who cares, right?

Reuse old belts for a chair makeover at @savedbyloves #repurpose #upcycle #DIY

You can make this chair, no problem.  If you want to avoid the whole staining mess, just sand and spray paint your chair in a fun color.

Reuse old belts for a chair makeover at @savedbyloves #repurpose #upcycle #DIY

Reuse old belts for a chair makeover at @savedbyloves #repurpose #upcycle #DIY

Reuse old belts for a chair makeover at @savedbyloves #repurpose #upcycle #DIY

DIY Bottle Cap Ikea Table Revamp

table_696x600


Ashlee from My So Called Crafty Life is running things today here at SBLC.  She has a fantastic Ikea table revamp to share that is inexpensive and super fun.  This particular project is right up my alley, as I am about to purchase a mitre  saw and get into some power tool projects.  Don’t be intimidated.  Ashlee walks you through it like a pro.  Please help me welcome her, and give her lots of love.  She may just be a monthly contributor here, which is great news.  Her blog is uh-mazing!  Thanks for sharing with us, Ashlee.


Today I have a really fun furniture re-do for you! I am going to show you how to take an old IKEA Lack side table and add a super funky and cute bottle cap top. This DIY is a blast to make! It was more labor intensive than most of my projects, but hey, it was so worth the time. The best thing about this redo is that it was pretty inexpensive. The table had at one time cost me a whole $8. Depending on whether you have bottle caps or have to buy them, the cost for the rest of the supplies was under $30. Making this table was the most fun I’ve had with a project in a while! So gather your supplies gals and let’s make a table!
Here’s What You Will Need:
*IKEA Lack Side Table
*169 or more bottle caps
*.75×1.5″ 8 Foot Piece of Pine Wood
*1/2″ Plywood
*Heavy Duty Construction Adhesive
*Liquid Nails
*Wood Glue
*Wood Putty or Plastic
*Trim Nailer and Nails
*Circular Saw
*Mitre Saw
*Paint
*Painters Tape
*Grout
*Grout float
*Bucket
*Sponge
*Screws
*Screwdriver


Step 1: Prep Table- Remove the legs from your table. Wipe down the top and make sure it doesn’t have any spots of gunk or dirt


Step 2: Cut Backer Board- First we’re going to cut the board the bottle caps are going to be glued down to. We want the board to be small enough to allow for the band of pine to go around it. The pine is 1.5″, so we’ll take a little over three inches off of the square measurement of the table and a little extra to give it some wiggle room. The table top is 22×22″ so we take off 3″, we’re left with 19″ and with wiggle room your board should be 18.875×18.875″ square. So, mark your measurements on your board with a straight edge and cut off excess with a circular saw. You can also ask the people at the hardware store to cut your plywood down in store if you need to.


Step 2: Glue Plywood- Mark the border of your plywood on your tabletop. Measure in and mark 1.5″ in all the way around the edge of the table top. Next, squirt a generous amount of construction adhesive onto the tabletop inside those markings. Then carefully glue down the plywood to the tabletop. Let glue set for a few minutes. Screw in a few long screws around the edges and in the middle for extra strength.


Step 3: Glue Bottlecaps- Working from the outside in, squirt dabs of liquid nails and place bottle caps onto dabs of the adhesive and squish down. It helps to lay out the outer band of bottle caps to give you a guide of how to place the other bottle caps to keep rows somewhat uniform. Let the glue set for a few days or at least 24 hours.


Step 4: Cut Pine for Band- Measure from outside edge to outside edge and cut four pieces with a 45 degree angle on a mitre saw. Be careful and try to be as precise as you can. The more precise a cut you have, the better your mitred corner will be.


Step 5: Assemble Band- Squirt a generous amount of glue onto the tabletop where the band piece will go. Smooth out glue with a shim or scrap piece of wood. Carefully glue band into place. Nail down band piece using your trim nailer. Then wipe off excess glue that has seeped out. Repeat with the other pieces until you have a beautiful band around your table top. Lightly sand and putty the nail holes if you like.


Step 5: Paint- Carefully tape off the sides of the tabletop with painters tape. Press firmly and rub your nail into the crease between the band and tabletop so you have a nice edge. Paint band in your desired color. Remove the painters tape while the paint is still wet. Let the paint dry and cure for at least a few hours. It is important to make sure your tape is really good and secure. I waited for a little while to paint after taping and did not repress my tape down, and my lines were not perfect.


Step 6: Grout: Re-assemble the table legs. Be sure to tape off your painted band before you grout. I used ready-made grout that we happened to have on hand, but mixing grout yourself is not hard to do, just follow the instructions on the package. Mix up your grout, then scoop some up on your float and slap it down onto the tabletop. Then carefully push it in and around diagonally around and between bottle caps. You then use the float on its side and smooth the top until you have the gout even and full across how you like it. Next, take a sponge and bucket of water. Dunk the sponge and then wring out most of the water. Wipe down on top and across the grout until the bottle caps are clear and visible and the grout is even like you like it. I have to say, I have used grout many times before with tile projects, and grouting bottle caps is not easy. It takes some care. My gout lines did not turn out picture perfect, but I’m happy with the results as this was my first time using bottle caps. Let grout set up for 24 hours, then go over top again with a damp sponge to remove any residue left by the grout. Remove your tape and wipe down band. And there you have it! You just finished an awesome table!


This table was such a fun project to make! I really love how it turned out! It makes a great addition to my living room, and I know I will enjoy it for years to come! A big “Thanks to Johnnie for the opportunity to guest post! You can see more of my projects on my blog My So Called Crafty Life Here. Stop on by and say Hi.
Happy Crafting Everyone!

Upcycle a Suitcase into a Table

Easy and quick tutorial for turning old suitcase into table at savedbylovecreations.com #upcycle #DIY #crafts #repurpose

This project is one of my favorites so far.  It was free, fast, and the outcome is super cool.  The suitcase was given to me by a friend, the table a curbside find.  Check out how I combined them in a repurpose taking less than 20 minutes.

SUPPLIES

Old Suitcase

Table with surface area that fits under suitcase (this only matters if you are using the legs in the same position as they are in the original table)

Pen

2 inch Construction Screws

Drill

Scrap wood cut small enough to fit inside suitcase, big enough to reach all leg contact points (you will put this in the suitcase and screw through it, the suitcase bottom and into the legs)

TUTORIAL

Easy and quick tutorial for turning old suitcase into table at savedbylovecreations.com #upcycle #DIY #crafts #repurpose

The details of your table may vary how you have to go about this, but you can do it.  Had my tabletop fit inside of my suitcase, I would have just put int in there and screwed the tabletop through the bottom of the suitcase into the legs.  Since it didn’t, I used scrap wood I had on hand that happened to fit inside and still cover the leg holes.  If you have a miter saw, a more precise (involved) version of the process can be found in this suitcase to table  tutorial from Stacie at Stars for Streetlights (who planted the idea in my head with her fantastic project).  I am satisfied with my 20 minute version!

Easy and quick tutorial for turning old suitcase into table at savedbylovecreations.com #upcycle #DIY #crafts #repurpose

Do you have any suitcase repurpose ideas or projects to share?  I still have 2 left and would love to hear from you.

Easy and quick tutorial for turning old suitcase into table at savedbylovecreations.com #upcycle #DIY #crafts #repurpose

Turn That Suitcase Into a Table

Repurposed suitcase table

I have recently come into an abundance of old suitcases.  There are three of them I have picked up during the summer’s junkin’ adventures.  I was thinking I would decoupage them, but then I spied this repurposed suitcase table at Stars for Streetlights.  What a great way to create unique storage that is functional and looks super cool.  Maybe I will decoupage and make a table…

Do you have any suitcase upcycle ideas?

Mod Podge Lampshade Makeover

Lamphade makeover

One of the easiest ways to change the feel of a room is to change the accent colors.  When I get tired of my color scheme, or want to have my home decor coordinate with the seasons, I start with accessories.  Today I am sharing a lamp makeover that is part of my living room color scheme transition.  This project shows that some Mod Podge, spray paint and tissue paper can go a long way in updating accents to transform a room’s style.  The best part?  Save considerable cash by working with what you have instead of buying all new home decor.

Here is how I took a red lamp with a plain canvas drum shade and gave it an aqua base, old handwriting script lampshade makeover:

Decoupage lampshade
Sooo much better now…

Lampshade makeover

How to Makeover Lampshade

It goes great with the spray paint mirror revamp I showed you over the weekend:

More decoupage to come… tomorrow.  You don’t want to miss it!

Aqua Mirror Spray Paint Makeover

How to Spray Paint a Mirror

Updating my decor with a touch of spray paint is a definite favorite of mine.  It is a way to completely change the look of a room without laying out loads of cash on new furniture and accessories.  Slowly but surely , I have been transitioning my living room from reds and neutrals to aqua and orange.  This mirror in our entryway is my most recent stop on the path to color bliss.

Here it is before…

How to Spray Paint Furniture

I used Martha Stewart’s Spray Paint Kit, which allows you to turn acrylic paint into spray paint.  It was a part of a box of crafts I received last summer when her new craft paint line debuted at Michael’s.  The kit is great in that it opens the color possibilities in spray form to include any of the numerous colors of the line’s acrylic paint.  It is more expensive than buying a can of spray paint, but if you just have to have a certain color, it is your go to tool.  I actually used a Folk Art acrylic paint mixture of white and aqua to get the shade I was going for.  The kit is made for the acrylic paint in the line, but it worked fine with Folk Art.

Martha Stewart Spray Paint Kit

Following the instructions on the kit, I mixed equal parts acrylic paint (mixture of white and aqua) with the spray paint medium, attached this to spray can and used like I would any spray paint.  It went on easily with great coverage and no running.

Martha Stewart Spray Paint Mirror Revamp

I love this color for all seasons.  It can be wintery or summery with the right coordinating accessories.

Sooooo much better than the boring before version, don’t you think?

Martha Stewart Spray Paint Mirror Revamp

Remember last year’s spray paint mirror revamp?

These ornate oval mirrors are fabulous.  I look for them every time I go junkin’.

50+ Headboards You Can Make

DIY Headboard Ideas

I love the time of year when I can get busy outside with bigger projects that require cutting wood and good ventilation. That brings me to DIY headboards. There are some amazing creations out there using everything from barn doors to framed photos and salvage items galore. Get creative and make a masterpiece headboard to fit your style, without breaking the bank!

As will all of my 50+ round-ups, if you have a great project that I missed, send me a link so I can include it in the compilation!


Found Coffee Table Revamped

how to paint furniture

Over the summer, I spied this junky old coffee table curbside and snatched it right up.  With the recent unseasonal temperatures, I decided to take advantage of this perfect spray painting weather, so atypical of mid January!  All I did was sand it down, coat it with 2 coats of primer, paint white and stencil the lattice design on top.  I used Martha Stewart home decor stencils and her glossy white paint for the base coat, and cloud blue for the top.  Here she is before…

painting furnitureHere she is now…

how to paint furniture

how to paint furniture

how to paint furniture

how to paint furniture

how to paint furniture

I love it!  One of my favorite rescues.  I got to it just in time too because it is cold and snowing.  Your thoughts?

Privacy Policy