Ice Resin Bezel Pendant Tutorial

Making Jewelry With ICE Resin and Susan Lenart Kazmer Iced Enamels @savedbyloves

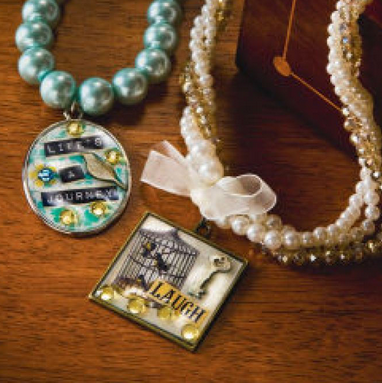
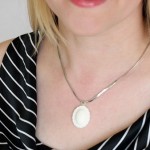
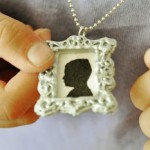
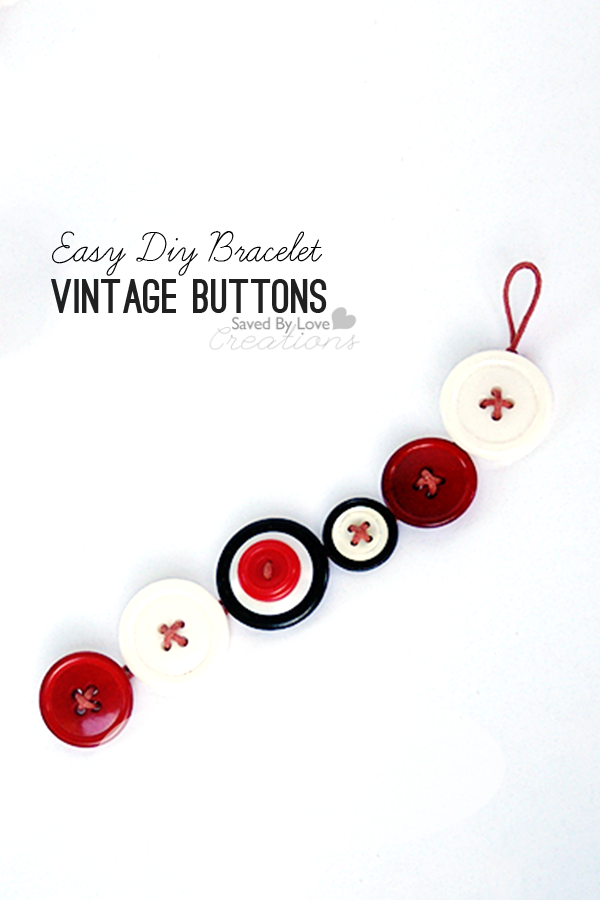
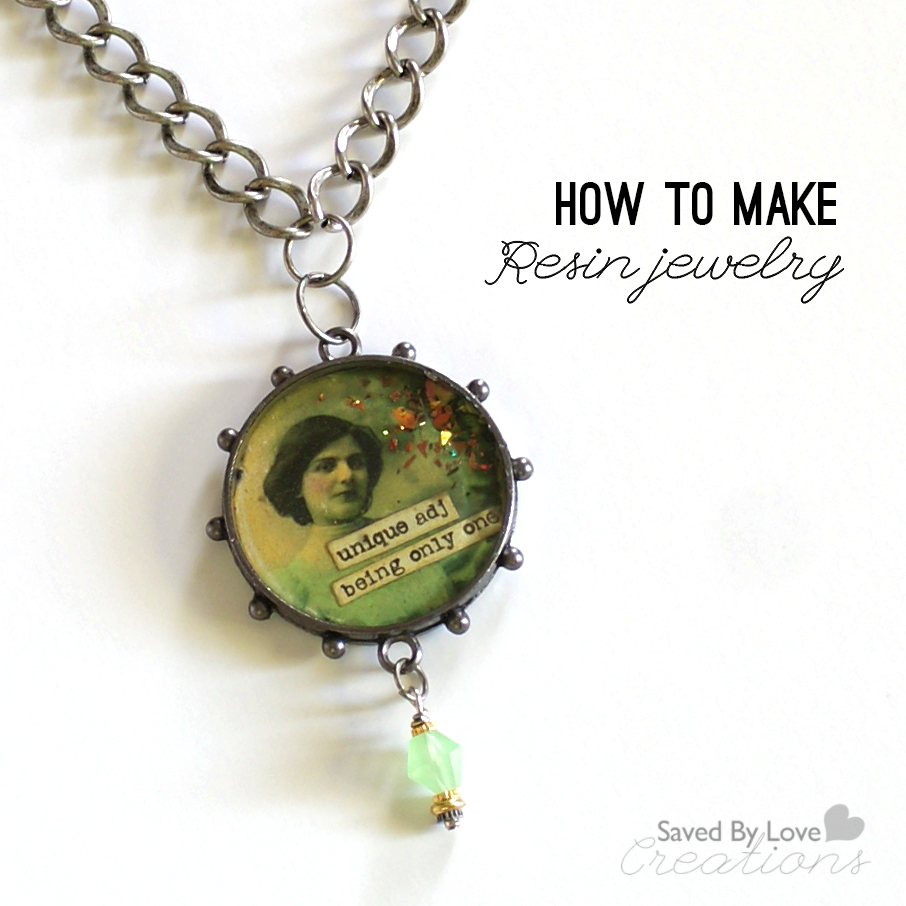
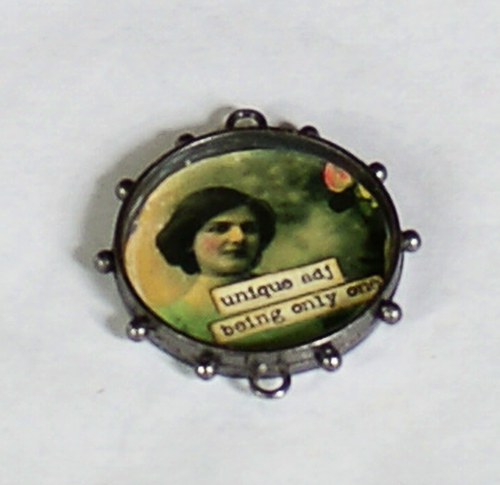
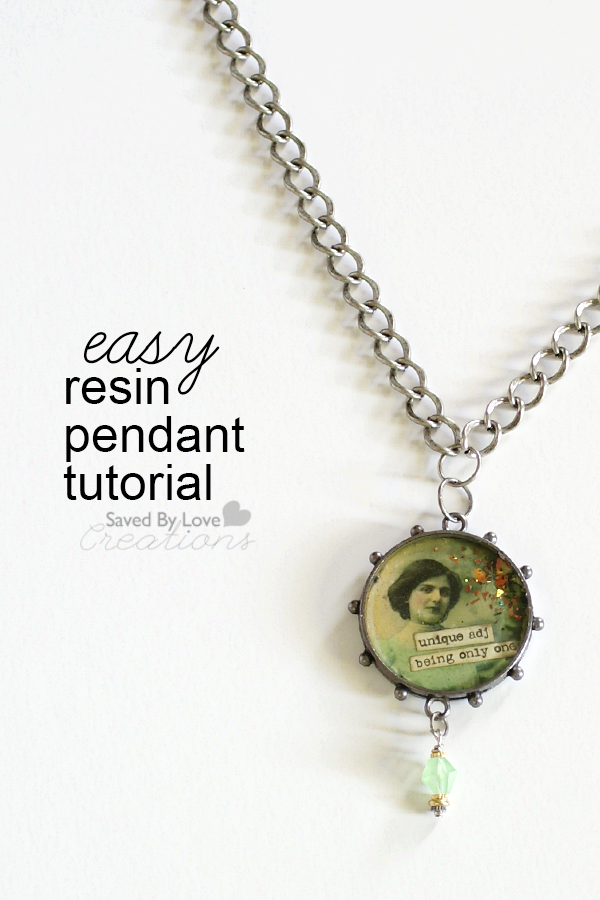
I have shared several resin tutorials with you, trying out the various types available.  ICE resin is quickly becoming my favorite.  It is easy to use, and hardens to a strong, clear, glass-like finish.  Today’s project is a fun bezel resin pendant using Susan Lenart Kazmer’s papers, Iced Enamels and ICE Resin.  You can find everything I used for this piece at your local Hobby Lobby.
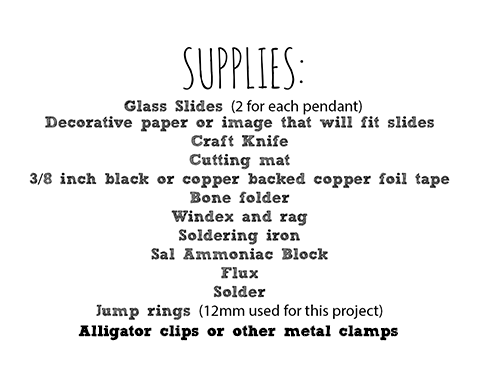
Resin Jewelry Tutorial

SUPPLIES:

Iced Enamels:  Shattered Fire Opal

ICE Resin

Spellbinders Bezel

Tim Holtz Word Stickers

Chain

Charm

Image

Pen

Scissors

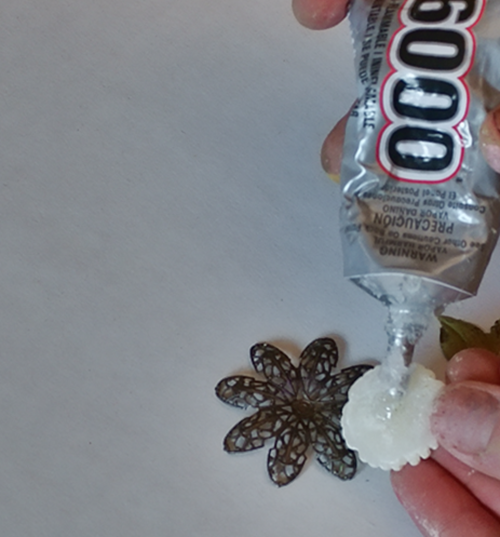
Popsicle stick and cup for mixing resin

Sealant such as Mod Podge or Embossing medium

TUTORIAL:

How to make a Bezel Pendant

Place your bezel over the part of the image you want and trace with permanent marker.

ICE Resin Tutorial

Place word stickers where you want.

Susan Lenart Kazmer Iced Enamels

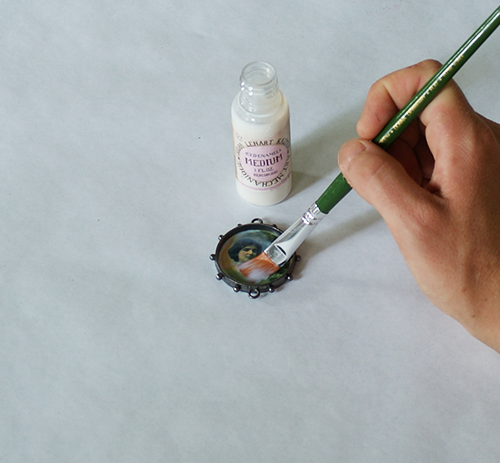
Seal image and word stickers with embossing medium or Mod Podge and dry with heat tool.  This protects the image from the resin, which can darken it if not sealed.

Iced Enamels Shattered Fire Opal

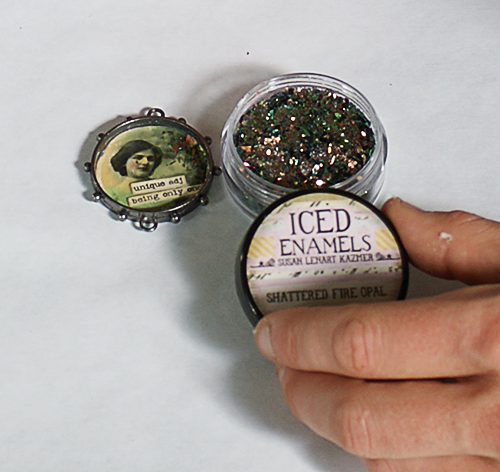
Sprinkle in Shattered Fire Opal Iced Enamels, or glitter or other mica powder.  Anything sparkly will do!

ICE Resin Projects

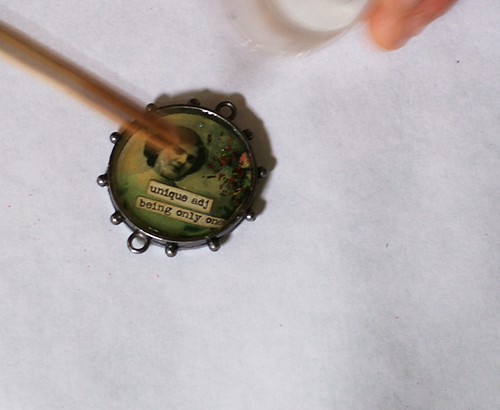
 Drip resin into bezel using popsicle stick until it domes.  Be careful not to overfill!

How to Make a Resin Pendant

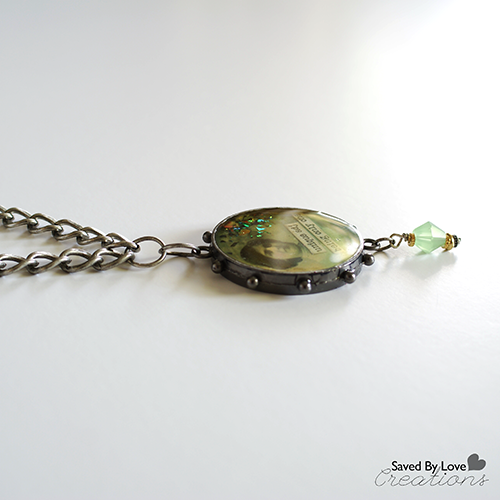
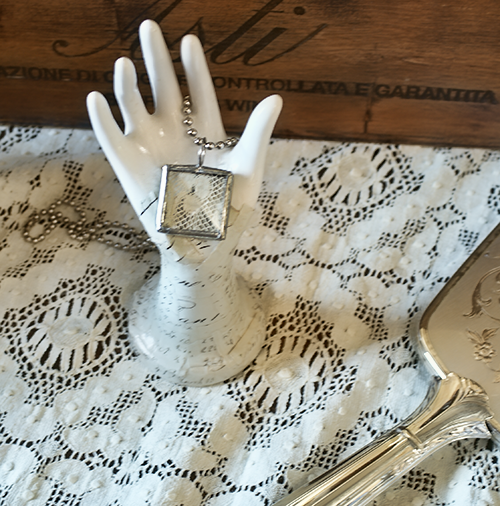
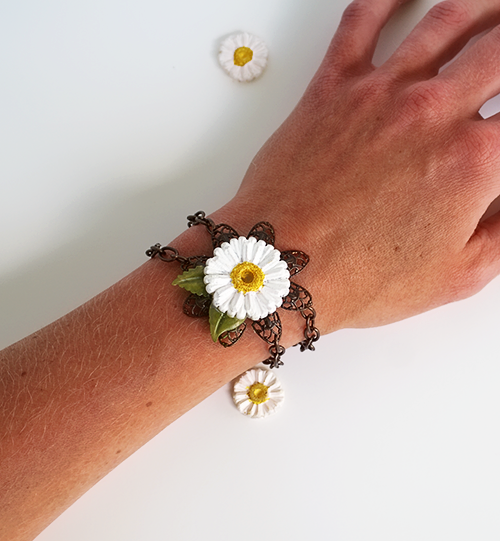
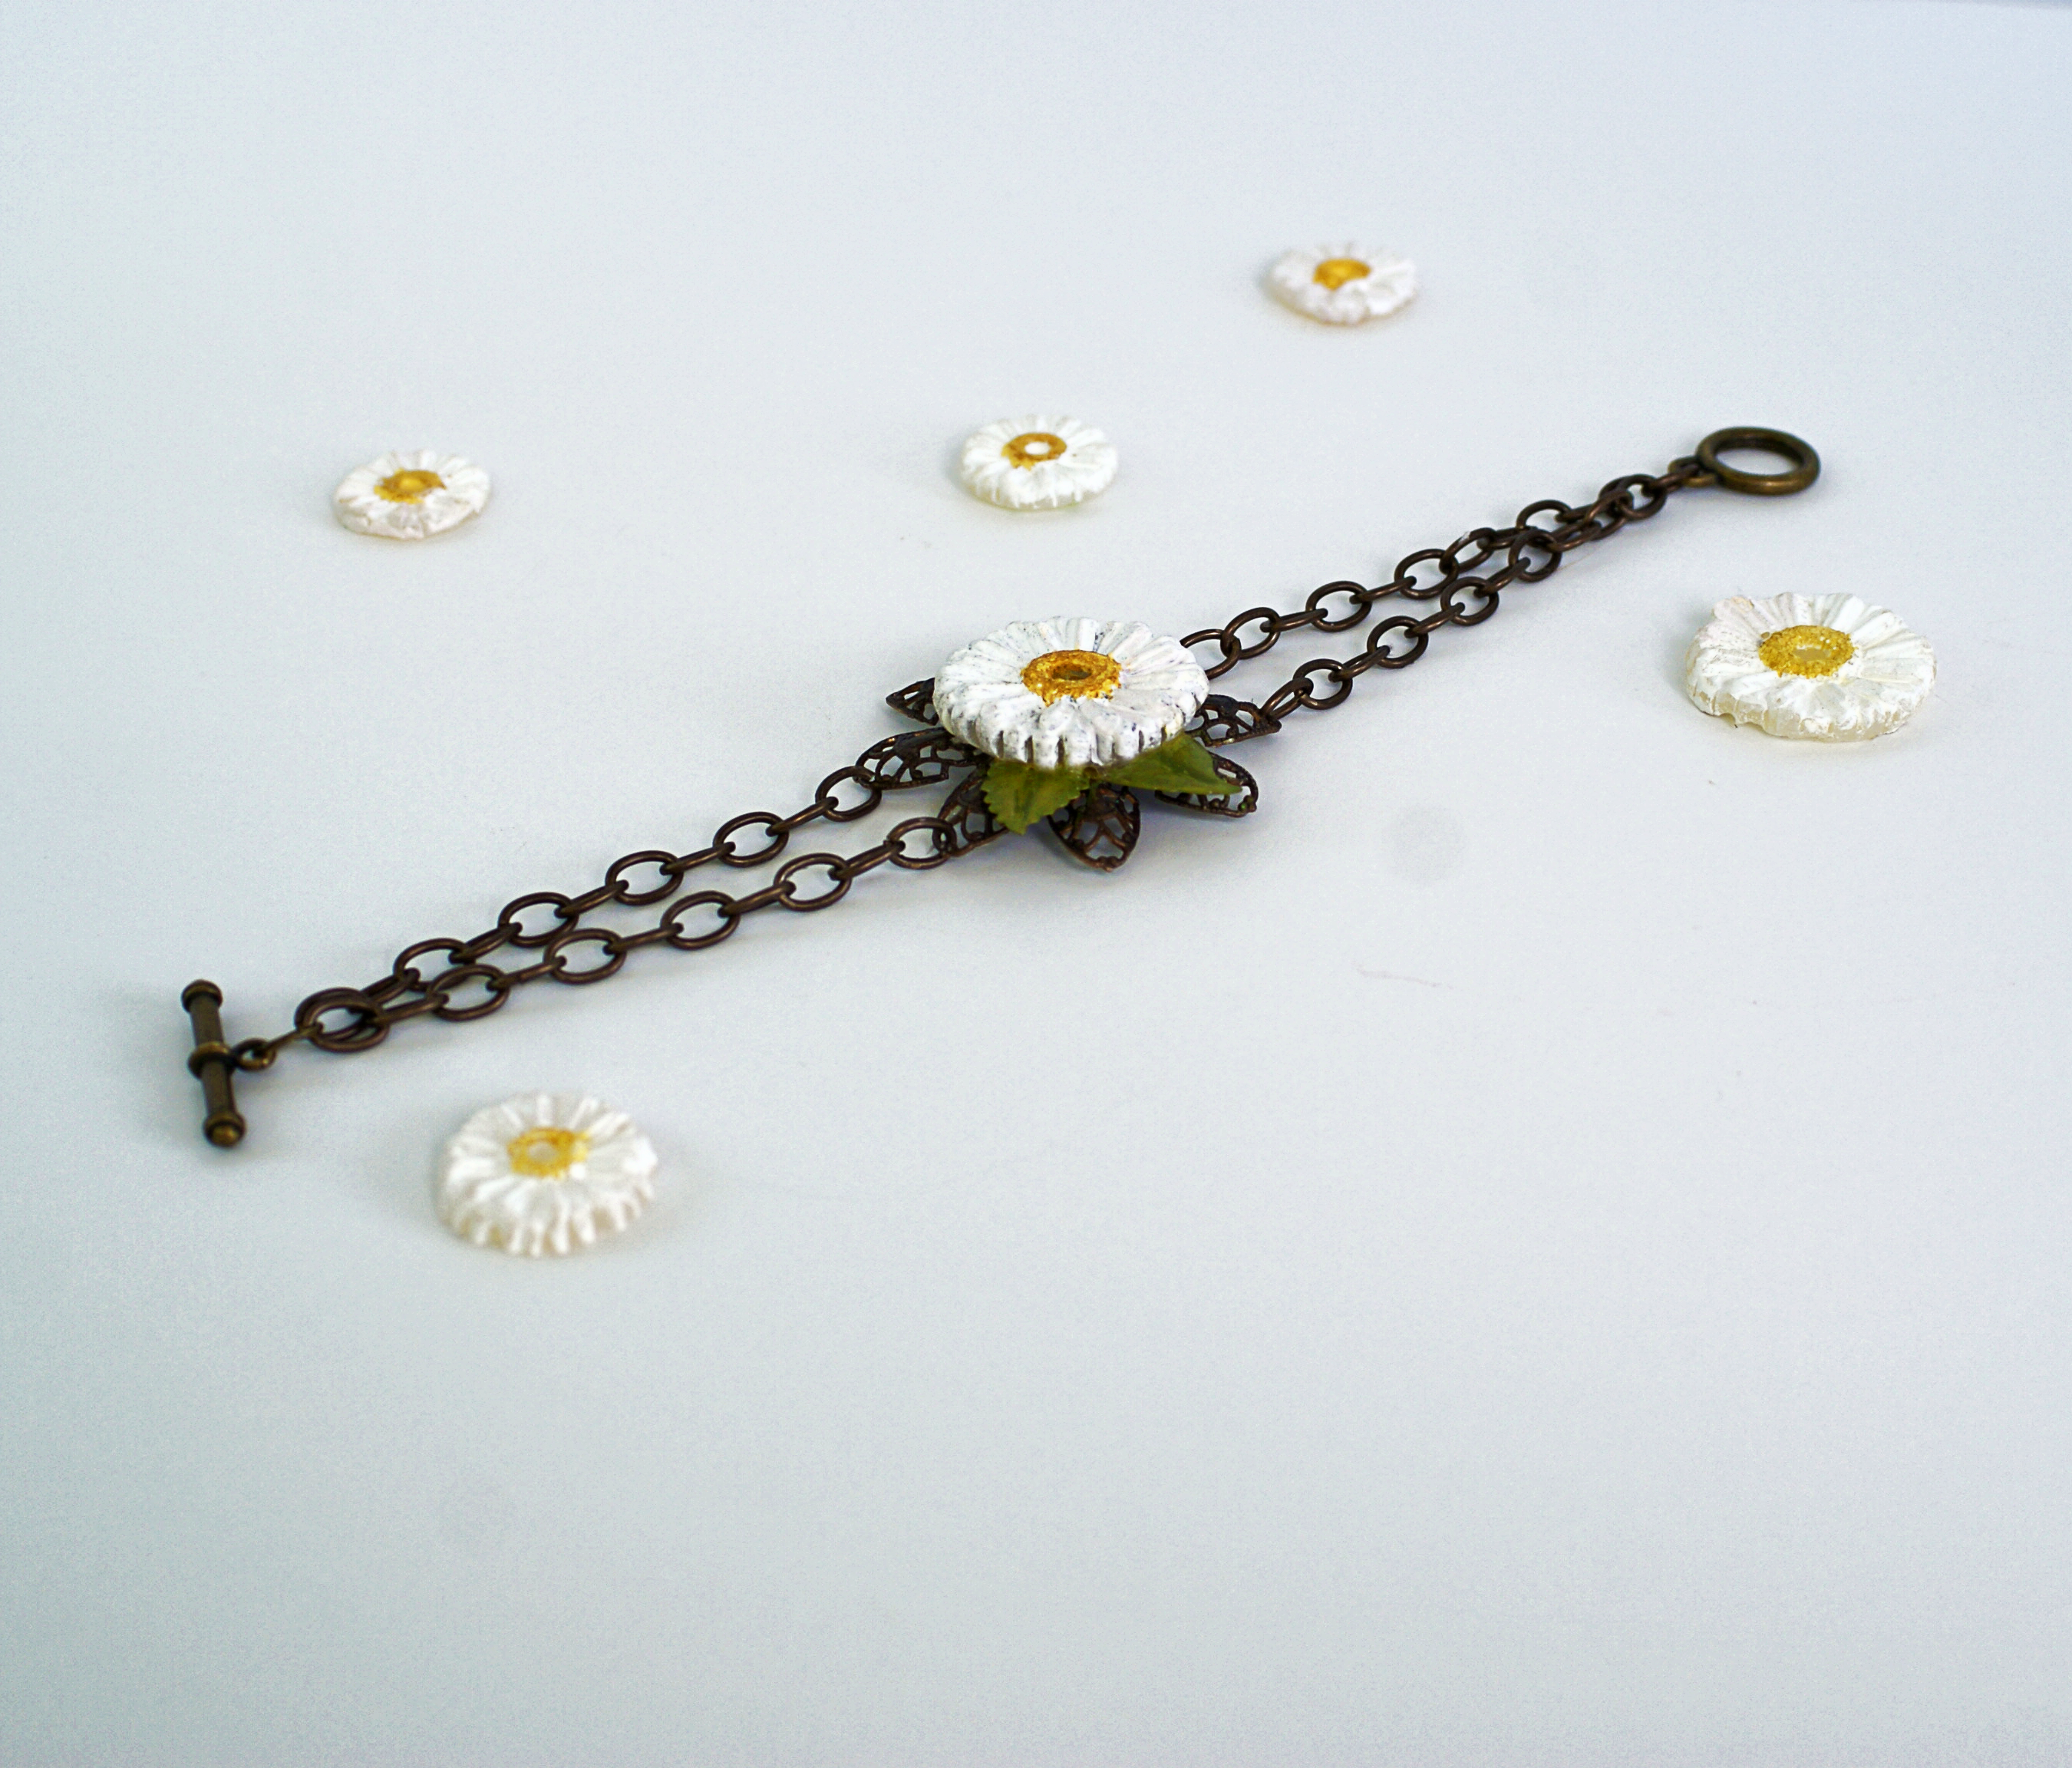
Let dry 6-12 hours, attach chain and charm.  Enjoy your awesome, custom resin jewelry.

Resin Pendant Jewelry Tutorial

Check out more SBLC Resin Projects:


Video Tutorial – DIY Gorgeous Soldered Pendants + GIVEAWAY

[pinit}

how to make a vintage soldered pendant

[pinit]

UPDATE:  WE HAVE A WINNER!  Do you love the look of soldered jewelry, but feel totally intimidated by that hot freaking iron and molten metal?  My creative friend Hope is here to break it down for us in a detailed How to Solder Jewelry video that demystifies the process and will have you making jaw dropping pieces lickity split!  As if that isn’t enough, Hope has teamed up with Saved By Love Creations to give you lovely readers a chance to win your choice of 3 gorgeous pendants!

Soldering Tips for Jewelry

Hope invited me in to record her process!  Before jumping into the video, I want to let you know the supplies you see will being used are from GlassSupplies on Etsy, a shop owned by Robin Ramsden.

Foil Tape For Soldering

This tape used in the video is 3/8 inch wide copper backed foil tape, which you can get at the linked store and probably elsewhere.  Hope recommends black backed foil tape for most simple projects since it holds the pieces together better and is just strong/less frustrating for us newbies!  She was out of it or we would have been using it for sure.  It is available in the linked shop above (GlassSupplies on Etsy).

Obviously if you are using thicker glass pieces than we did, you may need wider tape.  You will have to experiment.

More info on supplies is found below and in the video tutorial.

I did a soldered pendant experiment and shared it with you here:

I took my pendants to Hope’s with me and she helped me figure out how to make them more what I was going for.  I learned so much from hanging out with her that I haven’t seen elsewhere.  It turns out I wasn’t using near enough solder, and oh yeah, my soldering iron tip is disintegrating.   There is a solution for that, and many soldering woes.  This woman solders A LOT and is a wonderful resource!  She is also super sweet, so if something isn’t covered that you want to know about, you can find her on Facebook:  Hope Ellington.  She even takes custom orders, although she is pretty swamped with them right now from what I have seen so hurry if you are interested.

There were so many tips and tricks that I had to break the video up into 2 parts, and they are still long.  You will learn a ton, and if you are like me, your soldering will be vastly improved.  I made a pendant this morning and love it!  Don’t worry, you will see it soon.

SUPPLIES (the video goes over specific brands Hope loves):

Supplies for Soldering Jewelry

Jewelry Soldering Techniques

VIDEO TUTORIAL Parts 1 & 2:

GIVEAWAY

Now for the best part.  You get a chance to win a free handmade soldered pendant from Hope’s Bloomington Indiana Shop, Girlfriends on the Farm!

Pendant 1 – A fancy pants, blinged out vintage ephemeral piece

how to make a vintage soldered pendant

Pendant 2 – A message in a bottle “LOVE”

Jewelry Soldering Techniques

Pendant 3 – Vintage Lace under beveled glass

Soldered Doily Pendant

a Rafflecopter giveaway

How to Make Fabric & Wooden Bead Jewelry

[pinit]

Easy, Quick Fabric Bracelet Tutorial @savedloves
[pinit]

Make a fabric Necklace and Bracelet

I had the pleasure of attending a DIY blogger conference, Haven, in Atlanta over this past weekend.  I could write for days about the awesomeness of that whole experience, but that is not what this post is about.  While there, my friend Jessica from Mom4Real was sporting a cool necklace that I photographed and knocked off.  This is a super fast and easy project.  I used a sewing machine, but I will tell you how to make it the no sew way.

SUPPLIES:

How to make Upcycled jewelry

Fabric Scraps

Fabric Scissors

Wooden Beads 2 Sizes

Beacon Fabri-Tac

TUTORIAL:

Make a dollar store bracelet

You can use old t-shirts, old sheets, any fabric piece you can think of, really.  I used fat quarters and the above picture shows a headband I found at Dollar Tree.  The cool thing about using that is it is already a tube, so I didn’t have to sew or use liquid stitch.  If you use fabric not already in a tube, just cut a rectangle about 14-16 inches (depending on how long you want your necklace or bracelet).  Sew into a tube inside out, then flip right side out.

how to make a knotted bracelet


 Tie a knot like above, put bead, tie another knot and continue until it is as long as you like.  I use an odd number of beads so there is a central one.

Jewelry Making Supplies

Pick out coordinating ribbon and cut to length you want.

Jewelry Tutorial

Sew on ribbon to each end or adhere with Fabri-tac.  I use clothespins to apply pressure.  Fabri-Tac dries super fast and is basically hot glue in a bottle, but not hot 🙂

SONY DSC

For some of the bracelets, I just used the end fabric to tie them instead of adding ribbon.

SUPER EASY, and adorable, I must say.

Fabric Scrap Bracelet Tutorial

Make Mixed Media Mod Podge Necklaces

[pinit]
DIY Mixed Media Mod Podge Necklaces from Michael's, featured by @savedbyloves[pinit]

I found these cool new pendant blanks by Mod Podge at Michael’s a couple of weeks ago, and have been waiting for some inspiration (and time) to create with them.  This Mod Podge® Antique Urban Pendant Necklace Tutorial at Michaels.com is just the nudge I needed.

Have you created with these pendant blanks and papers?  If so, do share.

For more jewelry ideas, visit our Paper Jewlery Projects Roundup:

DIY Recycled Can & Plastic Bag Flower Pendant

[pinit]
Make #upcycledjewelry from #recycledaluminumcans &#plasticBagCraft @savedbyloves

 [pinit]

Recycled crafts are a favorite of mine, especially upcycled jewelry.  Today’s project brings these together in flower pendant made from recycled aluminum cans and plastic bags.  It’s true.  I used a combination of techniques I have shown you in the past; dissecting aluminum cans and fusing plastic bags, both to be die cut with my Sizzix.  This project is fast, simple, eco friendly, and pretty awesome.

SUPPLIES:

Sizzix Die Cut Machine

Flower Layers #2 Die

Soda can

Metal snips

Chain for stringing pendant

Hole punch or hammer and nail to punch hole

Eylet and Eylet setter – I use Crop-a-dile

Paint for petals or you can use the color of the can – I used Vintaj Patina Antiqued Copper

Plastic Bags

Copy paper

Iron

Ironing board

2 pairs of chain nose pliers

Aluminum Can Crafts #recycledcrafts #upcycledjewelry Pendant tutorial

TUTORIAL:

The following video shows how to prepare the can and die cut the flower petals.  You will use the Flower layers die instead of the rose die in the video.

*If you don’t have a Sizzix, you can still cut the can with paper punches like I showed you in this

As you can see in the pendant photo, you need 2 of the larger petal layer cut from aluminum cans.  Paint them if you are going to.  It would look cool with a fun color/patterned can too!  If you are painting them, use alcohol inks, Vintaj patina or spray paint for metal.  Acrylic paint won’t stay put.

Now to cut prepare the plastic bags for cutting with the Sizzix, you need to fuse them as I showed you in this Recycled Plastic Bag Bracelet Tutorial

Die cut the two smaller flowers from your fused plastic bag material.

Now you are ready to layer your petals.  Hole punch the center of all 4 layers then, arrange them in a staggered fashion and insert and set eyelet.

Shape the aluminum petals with round nose pliers or a bamboo stick for dimension.  The plastic you can just fold into position with your fingers.  It won’t bend and hold shapes like the aluminum, but you can cup it some.

CHECK OUT 50+ MORE ALUMINUM CAN CRAFTS WHILE YOU ARE AT IT:

Aluminum can crafts

Daisy Bracelet Tutorial With Mod Melts

[pinit]Mod Podge Mod Melts Bracelet Tutorial @PlaidCrafts from @savedbyloves #ModMelts[pinit]

Disclosure: This is a sponsored post on behalf of Blueprint Social and Plaid. All opinions are my own.

Have you seen the new Mod Melts and Molds by Mod Podge yet?  This stuff is fantastic!  As one who works with resin and polymer clay, I am in love with the ease of use, the detail of the pieces you can create and the speed of the process.  Today I will show you how to quickly create a beautiful daisy bracelet.  You will be seeing several more pieces in the near future made during my afternoon of creating with Mod Melts.

#ModMelts #diy daisy bracelet from @savedbyloves #jewelrymaking

Supplies:

#ModMelts

Mod Melt Mold

Mod Melt Sticks (Sea Glass used here)

Metal Filigree flower

Metal Chain and Toggle Clasp

Metal leaves

Acrylic paint white, yellow and green

Matte Mod Podge

E6000

Jewelry Pliers

Small Paint brush

Paint sponge daubber

Toothpicks

High Temp Hot glue gun

#ModMelts

Tutorial:

how to make flowers with #ModMelts

Heat the Mod Melt stick in your HIGH temp hot glue gun and squeeze into the larger daisy on the flower mold.  Work from the center out, making sure to not overfill.

How to use hot glue gun diy embellishments

Let cool for about 5 minutes.

ModMelts9

The pieces easily pop out of the flexible mold when you bend it.  This is so freaking cool.  Have you ever used resin in a flexible mold?  Hours upon hours of waiting.  No more.

ModMelts11

Now you just paint your daisy.  Mod Melts can be painted with acrylics, alcohol inks, embossing powders and more.  See Cathie Filian’s great photo examples of different ways to color the embellishments.  I show you FolkArt and Martha Stewart acrylic paint in this tutorial.  I also tried alcohol inks and Vintaj patina.  So awesome!

ModMelts13

I painted the middle of the daisy with a toothpick.

ModMelts14

Here are the three pieces I sandwiched for the focal point of the bracelet.  I sealed them with 2 coats of Mod Podge Matte finish, painted on with small, soft brush.

ModMelts12

I used E6000 to attach the pieces.  Let dry for at least 30 minutes before handling.

How to make a metal filigree bracelet

To make the bracelet, I opened chain links and attached them directly to the metal filigree flower using jewelry pliers.

ModMelts4

Using pliers and a jump ring, I added toggle clasp to the ends for closure.

Mod Podge Mod Melts Bracelet Tutorial @PlaidCrafts from @savedbyloves #ModMelts

Give it a try.  You are going to love it! You can find more great ideas and products from Plaid by via Facebook, Pinterest, Twitter, and Paint Me Plaid.

Check out what others have made with Mod Melts:

Make an Easy Bracelet From Vintage Buttons

Make a Button Bracelet #jewelrymaking @savedbyloves

I came across a jar of vintage buttons at a flea market last week (while on vacation, because who takes a vacation from scavenging for junk) and remembered this DIY Button Bracelet  from hopestudios.com.  It seemed like the perfect, quick project to get my creative fix without interrupting quality time with honey.  Making these bracelets is the easy, fast and gratifying.  Start hoarding your favorite buttons right now, and grab some 1mm cord.  Customize for outfits or holidays, like the red, white and blue one for July Fourth.  Hope Studios will show you the detailed how to.

DIY Button Bracelet Tutorial

How to make a bracelet from old buttons #buttoncrafts

This one I made for a more neutral, beachy feel, and pretty much wore it every day.  Three bracelets took 30 minutes, not even long enough for my husband to give me the “Are you seriously crafting right now… right here?” – look.

Make Easy Button Bracelets #jewelrymaking @savedbyloves4

Make-a-Button-Bracelet-jewelrymaking-@savedbyloves

Love buttons but not bracelets made from them?  No Problem.

Here are 50+ ways to Create using BUTTONS!

50 Plus DIY Sea Glass Crafts and Projects

[pinit]
50+ Sea Glass Tutorials with Jewelry, home decor and more @savedbyloves

[pinit]

Vacationing in South Florida has put me in a sea glass craft mood.  The stuff is so beautiful, and I love that it is just waiting on the beaches to be harvested.  Sea glass, also referred to as beach glass, comes in a variety of colors and is used to create gorgeous art,  jewelry and home decor.  I love the wire wrap pendants and charm bracelets featuring the ocean tumbled and smoothed recycled glass.  Don’t live near a coast?  No fear.  You can order sea glass on line, or try out one of the many faux DIY sea glass tutorials below.  As always, if you have a favroite sea glass project that I missed, let me know and I will take a look to see if it fits in the collection!

Mason Jar Shrink Film Necklace

Hello SBLC friends! Amy here from Plucking Daisies to share a Shrink Plastic Mason Jar Necklace tutorial. Shrink Plastic isn’t just for kids anymore. You may feel like a kid again when working on Shrink Plastic projects (it is oh so fun) but the end results are all grown up! Grab your favorite stamps and pre-heat that toaster oven, we’re about to make some shrink plastic jewelry!

[pinit]How to make a mason jar shrink plastic necklace and 50+ Shrink film crafts @savedbyloves

 [pinit]

There are many ways to use shrink plastic for jewelry making. You can make necklaces, earrings, charm bracelets and more! Believe it or not, aside from stamping there are a variety of ways to apply images and add color to shrink plastic creations. For more info and inspiration check out my latest Shrink Plastic Charm Tutorial.

Shrink Plastic Mason Jar Necklace Tutorial

I created this Mason Jar Necklace for Johnnie when we attended SNAP! together this past April. We all know that Johnnie is the Mason Jar Maven after all.

Inkadinkadoo Mason Jar Stamp

I found this Mason Jar Stamp from Inkadinkadoo (available at Michael’s) and thought it would be perfect for a shrink plastic necklace.

How to make a Shrink Plastic Necklace

You can create your necklace with any stamp your heart desires! Be sure to check the size of your image as it will shrink down to 1/3 of its original size. Not into necklaces? No problem! How about a pair of earrings, a pin, or charms for a bracelet? Be creative and have fun…it’s pretty hard not to when Shrink Plastic is involved 🙂

Supplies:

  • Shrink Plastic
  • Copic Markers (or other)
  • Favorite Stamps
  • Archival Ink (Black)
  • Embossing Powder (optional)
  • Hole Punch

STEP 1: Start by stamping your images on Shrink Plastic in Archival ink. I used the Mason Jar Stamp (inkadinkadoo), Collections from the Journey Letters (7 Gypsies), and Fanciful Swirl Alphabet (Hero Arts)

*TIP* You can “Try on” different stamp combinations by stamping on a piece of cardstock and laying a sheet of shrink plastic over top to see how it looks.

Shrink Plastic Mason Jar Necklace Tutorial

STEP 2 (optional): Sprinkle embossing powder over stamped image. I like using Ranger Holographic embossing powder for a hint of sparkle and shine.

Shrink Plastic Mason Jar Necklace Tutorial

STEP 3: Color your image with Copic Markers. If you used embossing powder don’t worry if some of it rubs off during coloring. Just do your best to avoid it if you can.

Check out the link below for an awesome Mason Jar coloring tutorial by Sweet November Stamp designer Amy Young

http://www.youtube.com/watch?v=aV_fRE5zxi0

STEP 4: Use a hole punch to punch a hole at the top of your image or wherever you want it to hang. Cut your image out leaving a wide band around the punched hole to prevent breakage when you add jump rings.

Shrink Plastic Mason Jar Necklace Tutorial

STEP 5: Bake according to package directions. One thing I learned by actually READING the directions for once was that you can press down on your shrink plastic piece while it cools (15 sec) with a piece of paper to get it really flat. *Beware if you used embossing powder you will need to press very gently on the raised portions so you don’t pull them up.

Shrink Plastic Mason Jar Necklace Tutorial

How cute is this? An itty bitty Mason Jar charm complete with a Twitter handle. Saved by Love Creations is where it’s @ in my humble opinion.

STEP 6: Just add Jump rings, chain, and some cute toggle clasps and your Shrink Plastic Mason Jar Necklace is ready to wear!

Shrink Plastic Mason Jar Necklace Tutorial

If you are planning on creating one of these fun shrink plastic necklaces for a gift why not up-cycle an old jewelry box and embellish it with a few pretty bits and bobs from your stash? Have some extra charms you don’t know what to do with? Add them to your necklace. There’s nothing wrong with throwing on a little “extra charm”.

Hope you all have fun creating shrink plastic jewelry for gifts or for yourselves! I wear my shrink plastic charms with pride…and I’m sure Johnnie does too. See you all next time!

Have a charming day!

Amy*

Want more Shrink Film Crafts?  Check out our 50+ Shrink Film Projects Round-up:

Make a Necklace from Colored Pencils

Repurpose colored pencils into this unique necklace - perfect for teachers and artists!  By Caught on a Whim, featured @savedbyloves[pinit]

If you are looking for a unique handmade gift that the artist in your life will cherish, look no more.  This colored pencil necklace DIY from Caught On a Whim is for you.  What a great idea for art teacher appreciation, or anyone who loves color!  I have never seen anything like it, and I seen and made jewelry from all kinds of things.  It doesn’t get much easier, cheaper or more creative!  Great idea.

Privacy Policy