How to Make Patriotic Earrings from Plaster Buttons


[pinit]
Easy to Make Patriotic Earrings with #distressPaint from @savedbyloves

Easy to Make Patriotic Earrings with #distressPaint from @savedbyloves
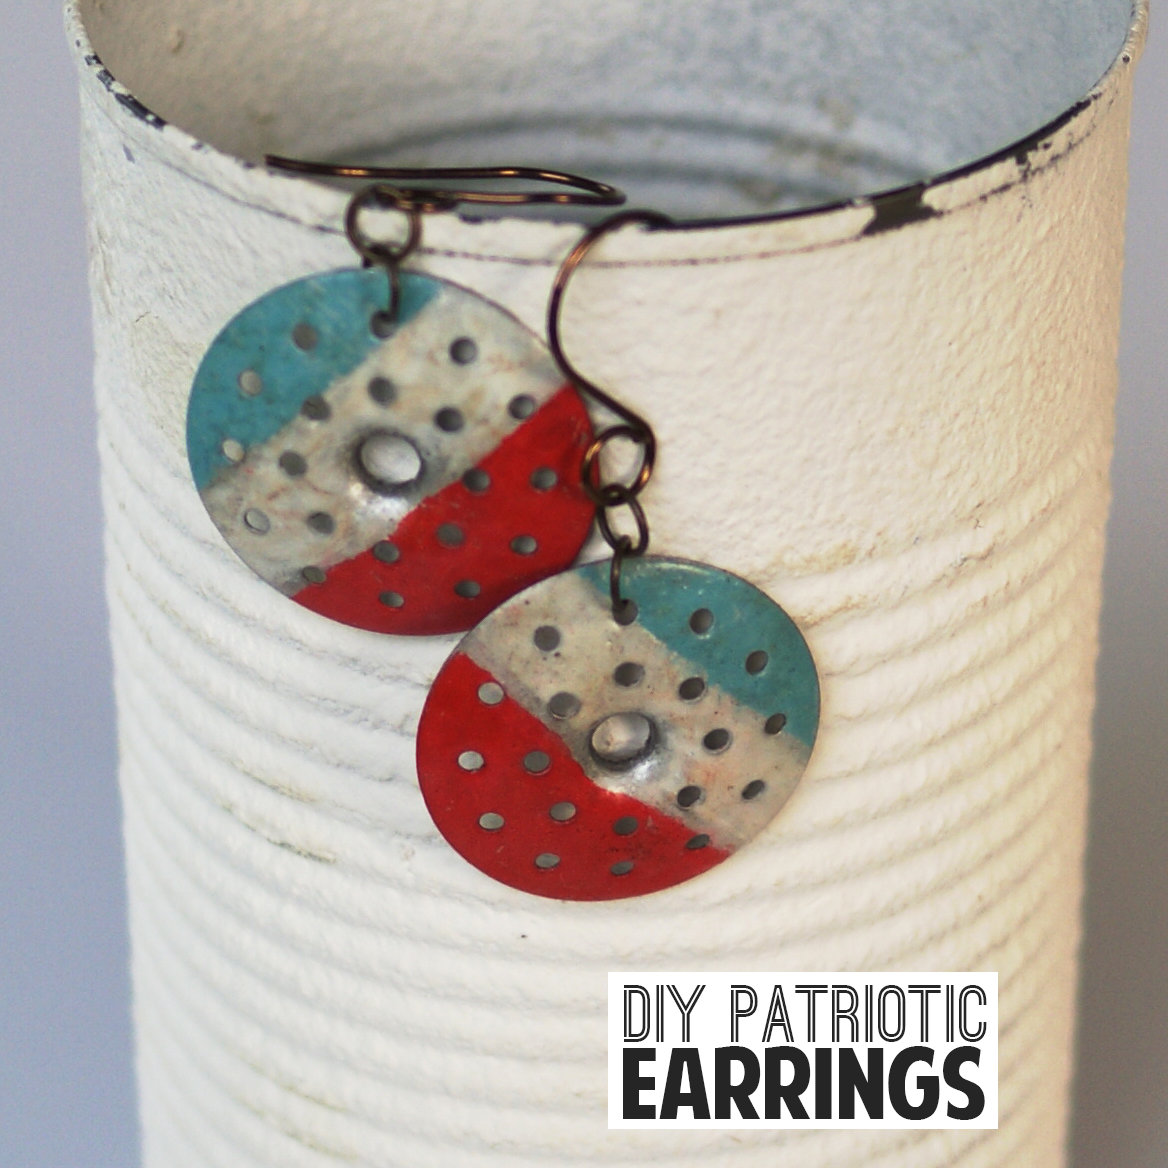
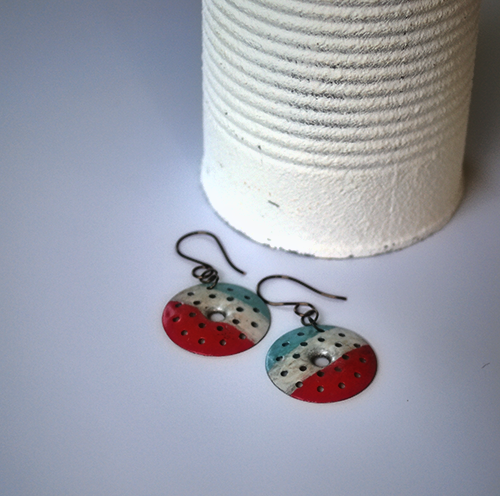
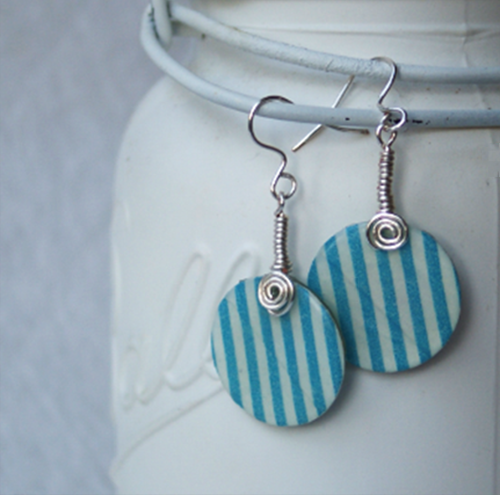
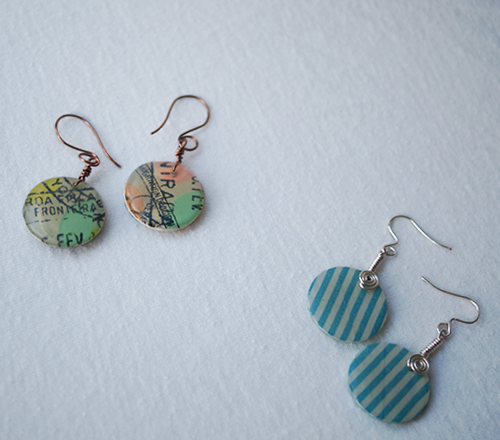
Patriotic jewelry and accessories are one of my favorite things about summer time.  Today I am sharing how I created these grungy americana earrings from plaster buttons (which I had never heard of or seen until one fateful day at a salvage shop) and Tim Holtz Distress Paint.  This project is quick, fun and easy.  I am also going to show you how I make my own lovely ear wires using a cool jewelry  jig from Bead Landing.
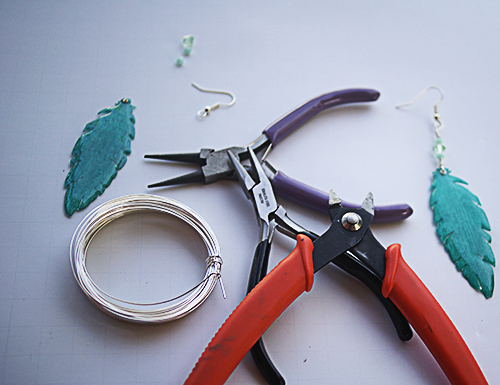
SUPPLIES:

Fourth of July accessories

Plaster Buttons

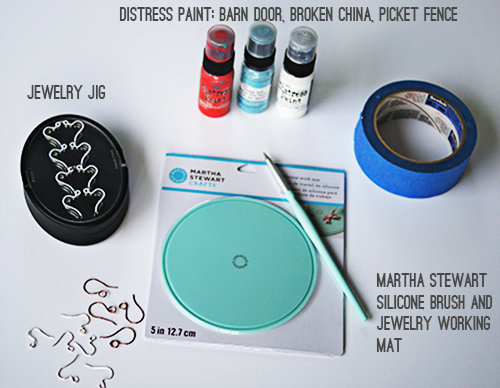
Plaster Buttons (These were a dime each at a local salvage store)

Tim Holtz Distress Paint Barn  Door, Broken China and Pickett Fence 

Masking tape

Bead Landing Jewelry Jig

Artistic Wire Gunmetal Bronze 20 Gauge

Flush Cutters

Paint Brush (LOVING this new Martha Stewart Silicone Jewelry paint brush from her new jewelry line)

Ranger Distress Ink Antique linen

Clear Embossing ink

Clear Embossing Powder

Heat Gun

TUTORIAL:

PatrioiticEarrings2

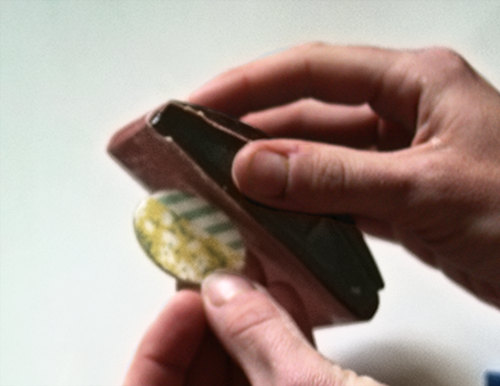
Use masking tape to tape off stripes and paint one at a time, letting each one dry for 30 min before moving onto the next.  I painted directly with the dauber then touched up after all three colors were on, using the silicone paint brush.

PatrioticEarrings7

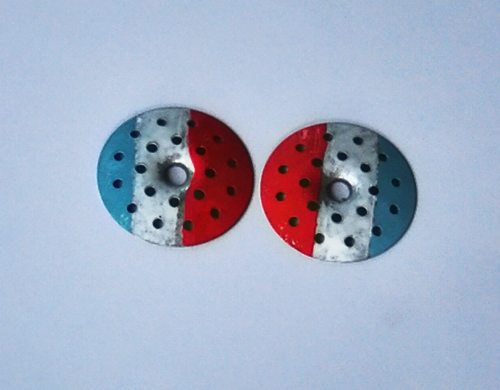
This is what they looked like after just the Distress paint.  I decided I wanted a grungier look, so I dabbed my Antique Linen distress inkpad directly on the earrings.  I poured clear embossing powder over that and melted it to set with my heat gun.  Then to seal the entire painted surface, I applied clear embossing ink all over and then clear embossing powder, again heat setting it.

PatrioticEarrings8
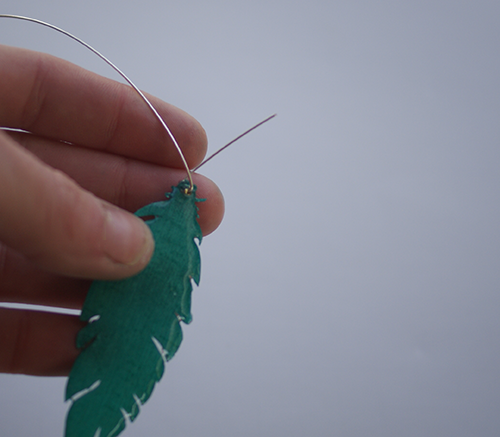
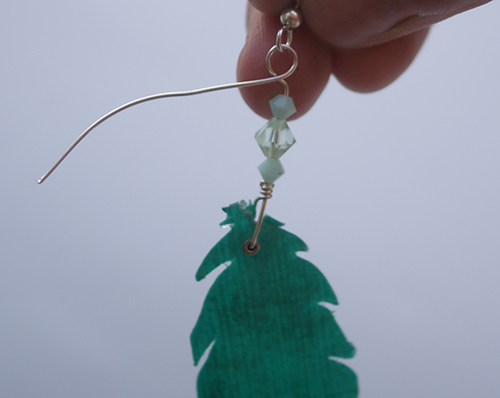
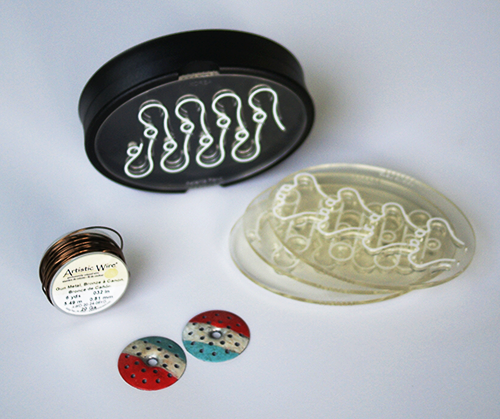
I picked out a pattern for ear wire findings.  The jig linked above comes with 5 options for ear wires.  It is super easy to use. It works best with 20 gauge wire.

PatrioticEarrings9
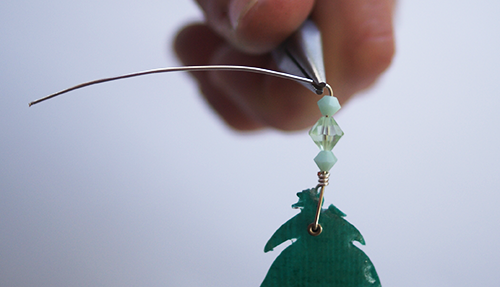
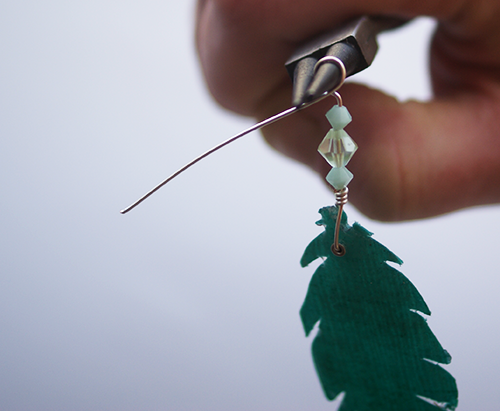
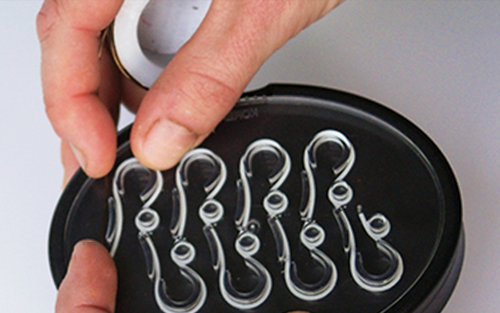
Just insert the end of the wire into the hole to secure and wrap following the white lines.

JewelryJig

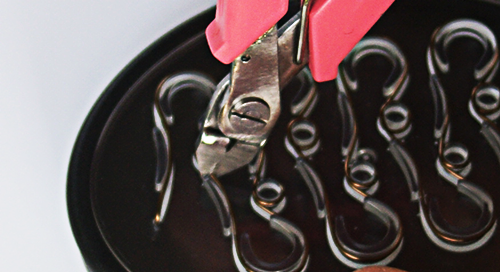
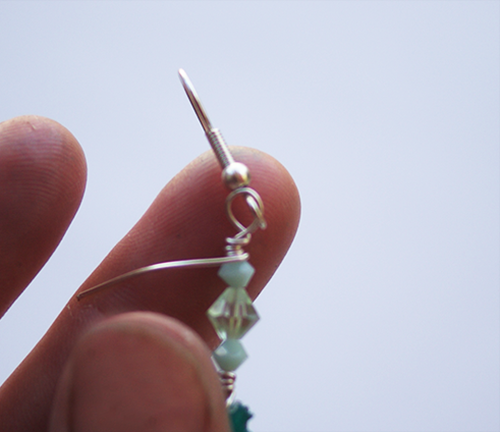
Cut at the dotted lines to separate the ear wires.  You make 8 at a time!  File the cut ends and you are set.

PatrioticEarrings13

For more Patriotic Crafts, be sure to visit our 50+ Patriotic Projects Round-up!

PatrioticPin

Make an Easy Leather Wrap Bracelet

Leather Wrap Bracelet Tutorial by www.lebenslustiger.com featured @savedbyloves

[pinit]

I am a little bit in love with this Leather Wrap Bracelet Tutorial by www.lebenslustiger.com.  Stepping away from the wood shop to get back to the jewelry table, and wanted to share this lovely piece with you.  The tutorial is quite detailed and the project looks simple enough.  I will update with pics when I am finished!

For plenty more DIY bracelets, see SBLC’s bracelet tutorials, and our 50+ bracelet roundup!

Sizzix Rose Charm Bracelet

[pinit]
Sizzix Charm Bracelet Tutorial using washi tape @savedbyloves

[pinit]

Today I am sharing how to make this washi tape rose charm bracelet at the Sizzix Blog.  There are so many ways to use these adorable charms, from bracelets like this one, to earrings, paper craft embellishments and more.  Come on over and make your own!

50+ Creative DIY Jewelry Organizers

[pinit]
Over 50+ Creative DIY Jewelry Storage, Organization, Display @savedbyloves

[pinit]
If you are like me, the organization of your jewelry is… well, not good. It is a problem. Think outside of the jewelry box with these creative organizers you can make yourself in a jiffy. You probably have materials on hand for several of these. My personal favorite is the old rake. How about you? Have you conjured up a way to make your own display? Do share! We would love to include yours.

Make Washi Tape Jewelry and Charms

[pinit]
Easy Washi Tape Earrings

Today’s project is a fun, inexpensive earring tutorial using washi tape, wire and Dimensional Magic by Mod Podge.  I am in love with these.  I wore them on a recent getaway and got so many compliments.  A random lady in a boutique ordered a pair when I told her I made them!  Think about all the washi tape prints and colors.  You could make a pair for every outfit or occasion.  You can use them as charms for embellishing paper crafts, cards, and jewelry projects of all kinds.

Let’s get started!

SUPPLIES:

WashiTapeEarrings5

Mod Podge Dimensional Magic

Circle punch or other shape you want for your charms (you could also cut by hand)

Washi Tape

White Card Stock

Dremel for creating hole or glue on bail (hanging mechanism)

Jewelry Wire – I used 20 gauge copper artistic wire and 20 gauge artistic wire silver coated

Wire cutter

Round nose and flat nose pliers

Make easy Washi Tape Earrings with Mod Podge and a circle punch! @savedbyloves

TUTORIAL:

Make easy Washi Tape Crafts Earrings with Mod Podge and a circle punch! @savedbyloves

Apply tape to front and back or card stock.  Line strips of tape up so that there is no space between them.  Line up patterns for seamless look if your hole punch is bigger than the width of the tape.  Punch out shapes.

Make easy Washi Tape Earrings with Mod Podge and a circle punch! @savedbyloves4

Lay shapes on flat, protect surface.  I like to use this spikey tray I got at Michaels (pretty sure it is Martha Stewart).  That way if I put too much Dimensional Magic on, it will runs off the side and collect in the bottom of the tray, sparing my piece from becoming a big blob.  Apply Dimensional Magic starting in the center, then pulling out to the edge of the shape with the tip of the bottle.  Let sit for about 20 minutes, then come back and remove any air bubbles with a toothpick or with your fingernail.  Then let dry overnight, flip them over and do the other side.  If you want a flat side, you can just brush on Mod Podge with a brush to seal instead of doming both sides.

Make easy Washi Tape Earrings with Mod Podge and a circle punch! @savedbyloves

Use as charms, make earrings, magnets, embellish your paper crafts and more.

I played with wire using a jig from Bead Landing.  I plan on sharing a tutorial on making your own earring findings like I did for these.

Check out some more things to make with washi tape by clicking the thumbnails below:

Washi Tape Rosette  Earring Tutorial

50+ Washi Tape Projects to Make

Tips to Fast, Mess Free, DIY Glass Tile Pendants

[pinit]
Xyron Create a Sticker for Easy, mess free Glass Tile Pendant @savedbyloves

 [pinit]

If you have ever made glass or acrylic tile pendants, you probably know that it is more involved than it looks.  About 2 years ago, I need to make a slew of these, and decided to run my images that I wanted to adhere to the pendant through Xyron’s Create-a-Sticker Machine.  I ran them through oriented so that the image side would be the sticky side, and stuck the tile right on the sticky, as you will see pictured in this tutorial.  This eliminates having to glue the images onto the tiles, which is, at least for me, a messy hassle!  I wanted to scream this technique from the rooftops when I thought of it, but I decided to wait and see how the pendants held up long term.  At last I am here to report that after 2 years, the tiles I made this way look gorgeous.  The image has not peeled away from the glass or discolored even slightly.  You still have to seal the backs so that the pendants are waterproof, but I have a great tip for that step as well.  Read on and you will be busting out gorgeous, durable graphic pendants crazy fast.

 Xyron Create a Sticker for Easy, mess free Glass Tile Pendant @savedbyloves

 SUPPLIES:

XyronGlassTilePendant2

Xyron 1.5 inch Create-a-Sticker  with Permanent adhesive cartridge

Printed images for your tiles, or decorative scrapbook paper/artwork – I create collage sheets in Photoshop with images made to fit whatever tiles I am using (round, square, rectangle in various sizes) and print it, or I create backgrounds with spray ink, ink pads, markers, stamps, rub-ons, doodles to use on my tiles.

Detail scissors

Mod Podge (I prefer satin finish to seal my glass tiles)

Small flat paintbrush

Masking tape or contact paper (super cheap at dollar store and works great for the sealing trick you will see later)

Ceramic tile or other flat surface

Sandpaper 150-200 grit (I use Tim Holtz

Glass tiles or Acrylic Tiles (I use Mod Podge Podgeable Shapes and glass tiles)

Glue on bails (my very favorite are aanraku small bails.  They are beautiful, the perfect size for 1-2 inch round, square or rectangle tiles and are well worth the cost (about $0.40 each)

E6000 glue for the bails (this stuff would glue a person to the ceiling and hold)

-OR-

Jewelry wire to wrap pendants in a glue free way like I showed you previously:

Glue Free, Drill Free Way to Attach Pendants

I love this method for the fancier look compared to the glue on bail.  Sometimes people want simple, other times wire is just the special touch that makes them fall in love with a piece.

TUTORIAL:

XyronGlassTilePendant4

Take the image and cut into a strip that will fit in the Xyron sticker machine.  If you have a larger machine, you can run larger sheets through it to create stickers for several tiles at once.  Here I am using the 1.5 inch on cardstock covered on both sides with lovely washi tape.  Scrapbook paper, photos or whatever you want as your pendant image can be used.  Place the image side face down in the machine (this is the opposite of how you make most stickers since you are going to adhere the glass to the sticky image you want to show).  It is not really important for this example since my washi covered paper is the same on both sides.

XyronGlassTilePendant5

Burnish the image onto the adhesive with a bone folder, credit card or ink pen (yep, I improvised).  This assures the maximal adhesive transfers to the paper image.

XyronGlassTilePendant6

XyronGlassTilePendant7

XyronGlassTilePendant8
Sand any uneven edges left after cutting to tidy up your piece.

XyronGlassTilePendant9

TIP:  Lay contact paper with sticky side up, or masking tape sticky side up on a tile or other flat surface. Place your pendants paper side up, glass side down on the tape or contact paper.  This keeps the pieces from moving around when you seal the back.  I lost hours of my life with sliding pendants that I moved back into place with my fingers, getting glue all over me and fingerprints all over my tiles.  No fun.  This is the best solution ever.

Apply 3 layers of Mod Podge, drying at least 30 minutes between each.  I like to let cure 1 week before sending the pendant off to it’s new home.  After 24 hours, I glue on the pendant bail or make a wire wrap bail like I discussed earlier (see above link).

XyronGlassTilePendants10

Speaking of Xyron, Feature Product Friday is happening, and the start of the show is Xyron.

What is Feature Product Friday, you ask?  It is the brainchild of my friend Amy of Plucking Daisies.  If you’ve been here awhile, you have probably seen her rockin contributions to SBLC.  I love talking about products with Amy.  We are equally obsessed with the next new creative spray ink, paper, design line, gadget and trinket that will help us create what we love and take our imaginations to new places.  We want to share our go to products with you, and see what you have come up with using them.   Each Friday will be a new product featured.  We will show you our projects, as well as a roundup of your best projects using the featured product (see the list below).

Even more good news… Amy is giving away a stash of Xyron supplies, so head over and enter the Xyron Giveaway at Plucking Daisies.

TOP PROJECTS USING XYRON


Make Paper Feather Earrings

[pinit]
 How to Make Paper Feather Earrings @savedbyloves

[pinit]

I heart paper and I heart feather earrings.  It was only a matter of time before the inspiration to make paper feather earrings hit.  That time is now.  You can make your very own with just a few supplies…

 How to Make Paper Feather Earrings @savedbyloves

So you may have heard me and my creative bloggy friends mention SNAP!, a conference that took place last month in Utah.  It was amazing to meet these ladies face to face, and share ideas, laughs, even some dance floor moves.  We get into the details, us creatives.  You should have seen the business cards all dressed up with washi tape, glitter, clips, candies and on and on…  Rebecca at the Crafted Sparrow embellished hers with little aqua paper feathers to hers.

Die Cut Paper Feathers

In all the room chaos, I must have ended up with my roommate’s Crafted Sparrow business card, but no fear.  I put it to good use.  When I got home and started sorting through my stash, I saw the 2 paper feathers and knew earrings were necessary.  You can make them too, no problem.  If you didn’t happen to get 2 of Rebecca’s cards with feathers, you can die cut your own, or just download this free feather template and use it to hand cut your feathers from pretty paper!

SUPPLIES:

2 Paper Feathers

20 gauge jewelry wire

Ear wires

Beads or crystals of your choice for feather stem

Tiny eyelet and setter

Flat nose and round nose pliers

Magic Glos Resin or Mod Podge Dimensional Magic

Awl

Wire cutter

TUTORIAL:

PaperFeatherEarrings3

Apply resin to paper feathers.  I did both sides (when one side dries, flip it over and do the other).  For my thoughts on Magic Glos resin, check out my patriotic sprinkle earrings tutorial.  You can also use Mod Podge Dimensional Magic or 2 part resin, but you will have to wait overnight for these to dry before moving on to the next step.  With Magic Glos the wait is 20 minutes in sunlight or under a UV lamp.

PaperFeatherEarrings5

Poke a hole in the tip of your feather where the stem starts, and set your eyelet.  For the best explanation of how to do this with tiny eyelets, go to Retro Cafe Art Gallery’s post on DIY acrylic tags.  That is how I did it, but I used a the pointy end of an aluminum crochet hook because I didn’t have an eyelet setter tool.

PaperFeatherEarrings6

Cut about 5 inches of wire and insert into eyelet from front to back of feather.

PaperFeatherEarrings7

Bend wire up with a one inch tail as in photo.

PaperFeatherEarrings8

Loop tail around to form coil as shown.  I wrapped four times.  Cut off excess wire from tail if necessary.

PaperFeatherEarrings9

String beads onto wire on top of coil.  I used 2 small faceted beads on either side of a larger crystal.  Bend wire at 90° as shown.  Leave a space between the bend and the top bead for coiling the wire (see below).

PaperFeatherEarrings10

Loop wire around round nose pliers as shown.

TIP: When making earrings, I like to mark with a sharpie where on the pliers I wrap the wire so that I can make the loop on the next earring the same size.

PaperFeatherEarrings12

Slide ear wire finding onto loop, making sure you have it oriented so that when you put it in your ear, the side of the feather that you want to be the front is facing towards the front.

PaperFeatherEarrings13

Wrap the wire to the top of the bead, forming a coil as shown.  Clip the excess wire off with the wire cutter.


Martha Stewart Mother’s Day Etched Glass Pendants

[pinit]
@savedbyloves DIY Etched Glass Tile Pendant #MarthaStewartCrafts #mothersday
[pinit]


Today brings a fun, simple Mother’s Day gift DIY using Martha Stewart Crafts glass etching cream to create customized glass tile pendants!  As I mentioned Monday when I showed you my doily etched wine bottles, this etching cream is simply amazing.  No glass is safe around me now!  Read on to see how to make these lovely pendants in no time!

#marthastewartcrafts #mothersday

SUPPLIES:

#MarthaStewartCrafts

Glass tiles (I ordered mine on Etsy – size 1 7/8 x 7/8 inch

Martha Stewart Etching  Cream and included brush

Martha Stewart Adhesive Stencils

Rubbing alcohol

Pendant Bail (I use aanraku small silver bails from Etsy or Ebay)

Pretty Patterned Paper

Mod Podge Dimensional Magic and Antique (optional)

Sandpaper (150 grit)

E6000

Chain or cord of choice

Masking Tape

Protective gloves

TUTORIAL:

EtchGlassPendants7

Clean glass tiles with rubbing alcohol.

#MarthaStewarCrafts #Mothersday

Place adhesive stencil.

#MarthaStewarCrafts #Mothersday

Tape off area you don’t want etched and apply thick layer of etching cream.

#MarthaStewarCrafts #Mothersday2

Wait 15 minutes and then rinse cream away under faucet.  Make sure to clean stencils well.

#MarthaStewarCrafts #Mothersday3

Find area of paper you want as background.  Trace pendant and cut out paper for backing.  Using double sided paper gives the back of your pendant a pretty, finished look.

#MarthaStewarCrafts #Mothersday4

Use your favorite decoupage medium to adhere backing to tile.

#MarthaStewarCrafts #Mothersday5

When that is dry, sand edges to even things up a bit.

#MarthaStewarCrafts #Mothersday7

Seal paper backing with your favorite medium.  I love the antique Mod Podge.  Apply 2-3 coats, allowing 30 minutes dry time between each.

#MarthaStewarCrafts #Mothersday8

Adhere pendant bail using E6000 or other industrial strength adhesive.

@savedbyloves DIY Etched Glass Tile Pendant #MarthaStewartCrafts #mothersday

Let your bail set overnight and add your chain to finish!

EtchedGlassTilePendant4

I love them!  I made one for my grandma, mom and sister.  What a cool way to add a special touch to customize glass tile pendants.  Use a meaningful photo instead of scrapbook paper as an alternative.  Make them as wedding/anniversary gifts with the couple’s wedding date!  The possibilities are endless.

 Be sure to check out the other Mother’s Day and Father’s Day projects my cohorts are making with Marth Stewart Crafts in the list below this post.

FOLLOW PLAID CRAFTS WITH ME!!

Website :: Facebook :: Twitter :: Pinterest

Disclosure: I wrote this post as part of a sponsored campaign with Plaid and The Blueprint Social.  All opinions are honest and mine!


DIY Cabochon Flower Hairpins: Easiest Project I’ve Ever Done

[pinit]

adorable, easy DIY flower hairpins @savedbyloves[pinit]

I gotta tell you that I don’t think I will ever outgrow flower cabochon hairpins!  I love them to itty bitty pieces.  Do I look silly?  Maybe.  Will that stop me from sporting them.  Nope.  If you aren’t into them cause you think you are too old, you’ll still love this project for the little ones.  Learn how to make these precious pins in just one step!

SUPPLIES:

adorable, easy DIY flower hairpins @savedbyloves

Resin flowers from ( I got mine from Pick Your Plum)

Hairpin blanks

E6000 Glue

TUTORIAL:

adorable, easy DIY flower hairpins @savedbyloves

Ready?  Place a dab of E6000 on the back of a flower and place on hairpin blank.  Ta-dah!

I told you it was the easiest project on the planet.

adorable, easy DIY flower hairpins @savedbyloves

I showed you a similar project in the past.  Remember my Anthropologie hairpin knockoffs?

Anthropologie Hairpin Knock off


These would make great Mother’s Day, birthday or bridesmaid gifts.  Fun for a slumber party craft for the girls too, don’t you think?

What are some of your favorite quick crafts?

Sizzix Embossed Birds Bracelet

Jewelry Tutorial Embossed Metal Squares

It has been a whirlwind of a weekend at SNAP 2013, and I can’t wait to share all of the creative awesomeness with you.  I missed you while I was away and it’s good to be back!

Today I am over at the Sizzix blog sharing this funky metal square embossed bracelet.  I wear the thing all of the time.  It has quickly become a favorite since it goes with so much and I love the design.  Go check out the easy step by step.

Stay tuned for some terrarium fun and so much more!

Privacy Policy