DIY Custom Built-ins from Bookshelves

Today I finally get to show you my completed DIY custom built-ins we made using the 5 Shelf Bookcases from the Sauder website Four of the bookshelves cost less than $250, so we ended up getting four more to fill our space! These are perfect for the built-in project we had in mind, and we love the result!

Here are the assembled bookshelves.

I showed you these a few months ago, before we customized them to look like built-ins here: Stylish Craft Storage with Sauder Bookcases. They looked great then, but we wanted to add trim where they meet, and wrap the tops with crown molding and bottom with the room’s baseboard to tie them into the room.

We removed the room’s baseboard on the walls where we would be putting the bookshelves.

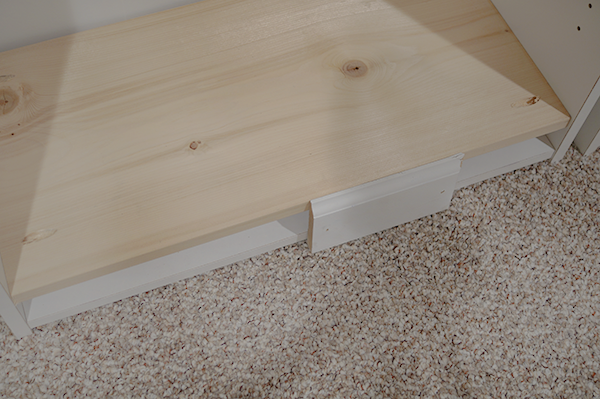
There were several things we ran into during this project. The first was we notices the baseboard was higher than the bottom shelf, so we added a new bottom shelf with 1×12 wood to be flush with the top of the baseboard. We attached the shelves with pocket holes using the Kreg jig.

Where the bookshelves meet, we had 1.75 inches to cover, and we found the perfect trim at our local hardware store. On the edges where there was just one bookshelf wall, we put 1×12 wood as shown so the 1.75 inch trim as flush on both sides.

We started with the baseboards and used construction adhesive along with the nailer.

Luckily we found baseboard to match what was already in the room!

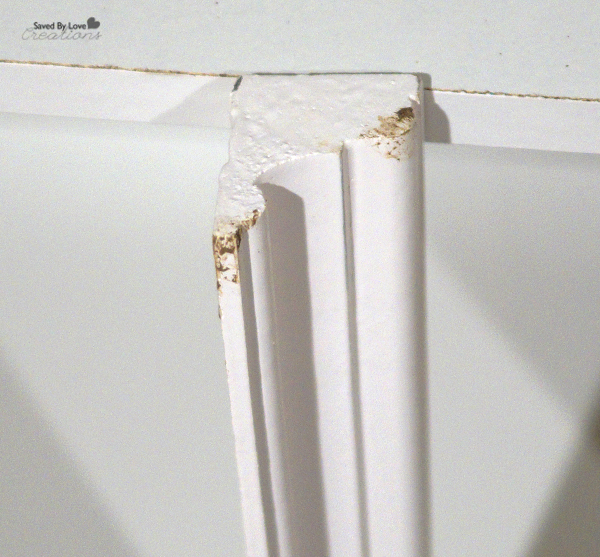
We found this molding at our local big box hardware store and I was elated. We didn’t have to figure out any complex angles since the molding was solid to a right angle!! Phew. You can read about our first experience cutting crown molding here: DIY Kitchen Cabinet Upgrade.

For the molding, baseboard and trim, we used construction adhesive and our cordless nailer to attach. We started with the baseboard and molding, then added the trim to cover the seams.


We found corner trim that was perfect for the corners at the hardware store. We used an unfinished cabinet door we scored for free on Craigslist as a desk in between shelves!

Above the desk we placed three 1×6 shelves, attaching them to the wall stud and bookshelves on both sides using pocket holes.

To see how I made the shelves on the left check out this tutorial: DIY Pallet Wood Paint Storage Shelves.

We primed and painted the trim and added wood and that was that!

These bookshelves are great as they come. With just a few supplies and a day’s time, you can customize them for designer built-in style!

Visit Sauder for more than 30 distinct, affordable furniture collections in a full
line of ready to assemble furnishings for your home, including entertainment, home office, bedroom, kitchen and storage!

Visit my Woodworking Pinterest Board for more home decor and furniture ideas!

This is a sponsored conversation written by me on behalf of Sauder. The opinions and text are all mine.

Halloween Treats Best Pumpkin Cupcake Recipie

The Best Pumpkin Cupcake Recipe @savedbyloves

As soon as 16 year old Brianna told me her passion was baking, I started working on her to share a recipe here on SBLC.  She whipped up these to-die-for pumpkin cupcakes with cream cheese frosting. Today I am happy to let you in on how she did it!  I know she will be a success and you will understand how I know that once you get a taste of these.

PUMPKIN CUPCAKES

Makes 2 dozen cookies with 25 minutes cook time.

Ingredients

1/2 tsp salt

2 1/4 cups flour

1 tbsp baking soda

3/4 tsp cinnamon

1/2 tsp ginger

1/2 tsp nutmeg

1/2 cup softened butter

1 1/3 cup sugar

2 eggs beaten until frothy

1 cup pumpkin puree

3/4 cup milk

Halloween Recipes

Directions

1.  Sift flour, baking powder, baking soda, salt, ginger, cinnamon and nutmeg into medium sized mixing bowl.

2.  Cream butter and sugar until light and fluffy.

3.  Beat in eggs one at a time, then blend in pumpkin.

4.  Stir in the sifted dry ingredients with milk, blending until batter is smooth.

5.  Spoon batter into lined muffin pan, filling each 2/3 full.

6.  Bake at 375° for 25 minutes.

CREAM CHEESE FROSTING

Ingredients

4 tbsp softened butter

8 oz softened cream cheese

4 cups confectioner’s sugar

1 1/2 tsp vanilla extract

Directions

1.  In a large mixing bowl, beat cream cheese, butter and vanilla until well blended.

2.  On low, beat in powdered sugar a little at a time until well blended.

3.  Beat on high until smooth and creamy.


Thanks for sharing with us, Brianna!

Over 50 of the Best Pumpkin Recipes

50 Plus Best Pumplin Recipes @savedbylovesSweaters, pumpkins, orange, leaves, hay rides, these things make me happy. That is why fall is my favorite time of year. I couldn’t resist the urge to search out and share over 50 of the best pumpkin recipes out there. If you have a favorite fall pumpkin recipe that I missed, leave a link in the comments after this post and I will add it to the collection. Enjoy!


Your New Favorite Pumpkin Dessert

The Best Pumpkin Dessert Hands Down Pumpkin Dump Cake @savedbyloves

My mom has been on a dump cake kick lately.  I am new to that entire dessert movement and though skeptical at first, this pumpkin piece of divinity has made me a believer.  Seriously, the best pumpkin dish I have put in my mouth.  Not only is it insanely good, it takes under 5 minutes of prep and 50 minutes in the oven.  This is a keeper.

Ingredients

3 eggs

3/4 c butter melted

12 oz can condensed milk

29 oz can of pure pumpkin

1 tbsp cinnamon

1/2 c white sugar

1/2 c brown sugar

1 box of yellow cake mix

1 1/4 c Pecan halves

Directions

Preheat oven to 350°.

Spray 9×13 inch baking dish with cooking oil

Mix pumpkin, eggs, condensed milk, cinnamon, brown and white sugar in a large mixing bowl until well blended.

Pour the mixture into the sprayed baking pan.  It will be runny like apple sauce.

Sprinkle entire box of cake mix evenly on top of pumpkin mixture.

Evenly pour or spoon melted butter over all of the cake mix, leaving no dry areas.

Evenly disperse pecans on top of the butter.

Bake a 350° for 50 minutes.

Remove from oven and let cool 10 minutes before serving.

Dollop whip cream or vanilla ice cream on top and enjoy!

Amazing Crockpot Butternut Squash Soup Recipe

Crockpot Butternut Squash Soup Recipe to Die For from @savedbyloves


This week’s food theme at our pitch in Bible study was soup, in honor of the onset of fall.  It doesn’t get much more fall than butternut squash, right?  This was my first time cooking with this squash.  It was difficult to peel, but other than that, the recipe was easy and the outcome was delicious.  That is an understatement.  This soup was amazing.  I will be making it frequently.  I had several people insist upon having the recipe.

Butternut Squash

Here is the recipe I used: Crockpot Butternut Squash Recipe.  I followed it exactly except I doubled it and cooked it on high for 4 hours instead of low for 7 hours.

BEST.  Soup.  EVER.

Tissue Decoupaged Recycled Wine Bottle Lanterns

DIY Decoupaged Recycled Wine Bottle Lanterns

Hanging lanterns in the trees goes a long way towards setting a lovely scene.  With some tissue paper squares and a few wine bottles, you are on your way to  create beautiful, eco-friendly lighting to add ambiance to your outdoor space or party.

 MATERIALS

Decoupage Lanterns Supplies

 -Clear wine bottles

-Bottle Cutting Supplies (See How to Cut Wine Bottles)

-Tissue squares in a variety of colors

-Glass drilling supplies with 1/8 inch diamond hole bit

-metal chain

-jewelry pliers

 -Mod Podge

 -Foam brush or flat paint brush

 DIRECTIONS


1.  Clean bottle and remove any labels.

 2.  Cut bottles to 4-5 inch height and sand any rough edges (See How to Cut Wine Bottles).

3.  Drill 2 holes about 1/8 inch from the top on opposite sides of the bottle (For how to drill in glass, See DIY Mason Jar Chimes).

4.  Clean the cut bottles with alcohol or glass cleaner (I put on gloves at this point to avoid fingerprinting the glass).

Decoupage Lanterns 5

Decoupage Lanterns 7

5.  Paint a strip of Mod Podge down the side of the glass and add a tissue squares.  Overlap them as desired for different effects.

6.  Paint layer of Mod Podge over each strip as you finish, smoothing out wrinkles in the paper with your paint brush as you go.  Don’t over do it as the paper is easily torn.

7.  Once entire glass is covered, go over it with another layer of Mod Podge.  You can use the outdoor formula if you are leaving the lanterns outside long term.

Decoupage Lanterns 1

8.  Add chain by opening link the end link with pliers, inserting it into the hole near the top of the glass and closing it back with the pliers.  Insert the other end of chain in hole on the opposite side.

For more inspiration, visit our 50+ Glass Bottle Crafts:

Easy Avocado Egg Salad Recipe

Easy Avocade Egg Salad Recipe


Avocados not only taste great, but are one of the only fruits that contain heart-healthy monounsaturated fats.  They help lower bad cholesterol, elevate good cholesterol and can be used in place of butter in your favorite recipes to cut back on saturated fats. Today I am sharing a yummy, quick and easy recipe for avocado egg salad.  Serve up something a little different  at your next get together.  The potato salad won’t be missed!

INGREDIENTS:

(SERVES 8)

2 avocados

2 lemons

1 medium sized red onion

1/2 cup mayonnaise

1/2 cup toasted walnuts

10 hardboiled eggs, peeled

Salt and pepper to taste

Side dish recipes

DIRECTIONS:

Stir together in a large mixing bowl:  Juice from 2 lemons, 1/2 cup mayonnaise, 1 tbsp water.  Mash in with fork the yoke from 2 hard boiled eggs.  Add salt and pepper to taste.

Add 8 chopped hard boiled eggs , 2 chopped avocados and 1/2 cup red onions chopped.  Stir until well coated and serve over tomato slices.

Top with 1/2 cup toasted walnuts.

Enjoy!

Easy Fried Green Tomato Recipe

Easy Fried Green Tomatoes

 This year my tomatoes are taking their own sweet time ripening to the red that we all know and love.  That, combined with the fried food theme at last week’s Bible study pitch in, prompted me to make fried green tomatoes for the first time ever.  I would make them everyday if eating fried food didn’t creep me out so much.  They were simply delicious.

How to make Fried Green Tomatoes

I bought a cheapo deep fryer a couple of years ago to Mr. SBLC his beloved chicken wings (See Amazing Hot Wings Recipe).

Here is the recipe I used (from My Recipes):  Fried Green Tomatoes

I followed it exactly except I dropped mine in the deep fryer for 2 minutes instead of frying on the stove.

They are sooooo yummy, I am hooked.  We have tons more green tomatoes out there, just waiting to be battered and fried!

Saved By Love Creations Needs You To Investigate

Help Saved By Love Creations


Hi Saved By Lovies!  We have been busy behind the scenes trying to optimize your experience with Saved By Love Creations.  Part of that has been migrating the site to a new host.  During the process, many of you have reached out to let us know when the site was down or misbehaving, and we thank you!  Now we are all settled into our new hosting home, and we want to hear from you!

Are you able to access the site 100% of the time?  

Are you happy with the speed of the pages loading?

Anything else you want to let us know, we want to hear it.  The good, the bad and the ugly!

Click around and tell us what you think.

We appreciate it a ton.

Aldi Ingredients Only Spicy Peanut Chicken Recipe

Peanut Chicken Recipe Using all Aldi Ingredients @savedbyloves

Today I am sharing a dish I whipped up for a recent asian themed potluck dinner.  After all the american fare with the Fourth of July celebrations, our bible study went with oriental cuisine.  I took it a step further and challenged myself to use all Aldi ingredients for a budget friendly, tasty and healthy Peanut Chicken Recipe. The only ingredient not from Aldi was the cucumber, which came from the garden, but you can get them there too! This dish was a big hit with my family and with the group. I am guessing it will be with yours too!

INGREDIENTS:

1/2 cup Crunchy Peanut Butter

1/4 cup Dry Roasted Peanuts

1 lime, juiced

3 cloves garlic, minced

1 tablespoon Hot sauce

3 tablespoons 2% Milk

1 tablespoon Honey

1 tablespoon soy sauce

1/4 teaspoon Ground Cinnamon

1/2 teaspoon Crushed Red Pepper

1/2 cup hot water

3 tablespoons Olive Oil

2 Chicken Breasts, sliced into  strips

1 head broccoli, cut into small florets

1 large carrot, chopped

1 red pepper, cut into 1/4-inch strips

1 yellow pepper, cut into 1/4-inch strips

1 red onion, sliced

1/2 Cup Sweet Peas

1 cucumber, cut into 1/16-inch strips

Rice (optional)

DIRECTIONS:

PEANUT SAUCE:

In a small saucepan, whisk peanut butter, lime juice, 1 clove minced garlic, hot sauce, milk, honey, soy sauce, cinnamon and crushed red pepper. Cook over medium heat until it starts to boil.
Slowly add water until desired consistency. Set aside.

In a large skillet  heat 2 tablespoons oil, add chicken and cook for 10 minutes or until lightly browned.
Add remaining oil, 2 cloves garlic, broccoli, carrot, peppers and onion and sauté for 3 minutes.
Add peas and cook for a couple of minutes more.
Add prepared peanut sauce to the skillet with chicken and vegetables.

Add cucumber, toss to coat.
Sprinkle with peanuts.

Serve over rice or noodles.

Privacy Policy