Build Custom Craft Supply Storage Cubbies

[pinit]

Build a custom storage cubby unit for your craft supplies @savedbyloves

[pinit]

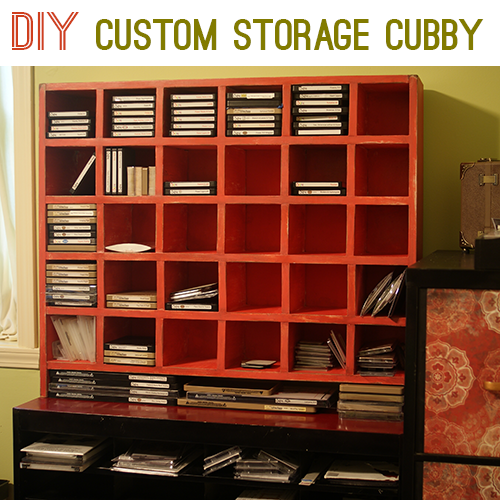
After building my first woodworking project, I knew I wanted to tackle a storage unit of some sort.  I found this 25 Cubby unit plan by Ana White, and tweaked it to make myself a custom Sizzix die storage unit.  I am so very in love with it.  It was easy to make, the only frustrating part being that I had to assemble one shelf at a time and wait for it to dry since I don’t have 4,000 corner clamps!

SizzixStorage5

Instead of using 1×6 boards, I used 1x8s to fit my dies.  I also added an extra column so the unit would be wide enough to fit exactly on top of a mail sorter unit I already had.  Also, what Ana has as the top in her plan, I have as the bottom.  I didn’t shape the extended sides like Ana did.  Instead, I flipped it over and used them as legs.  That way I can store the longer dies and cut plates/platforms in the larger space created underneath the shelf.

SizzixStorage1

Here it is all assembled except for one side.

SizzixStorage4

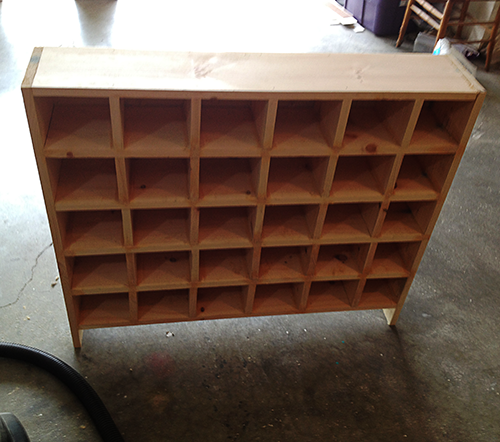
Here is the assembled piece before finishing.

SizzixStorage3

SizzixStorage6

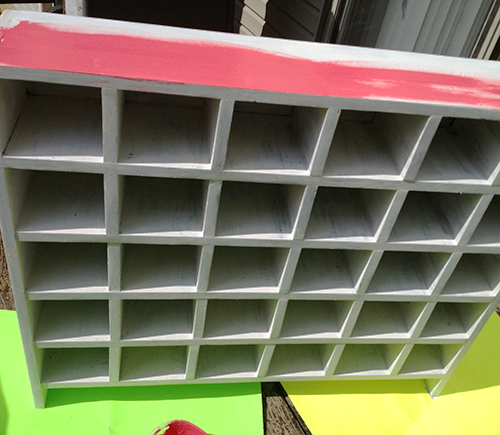
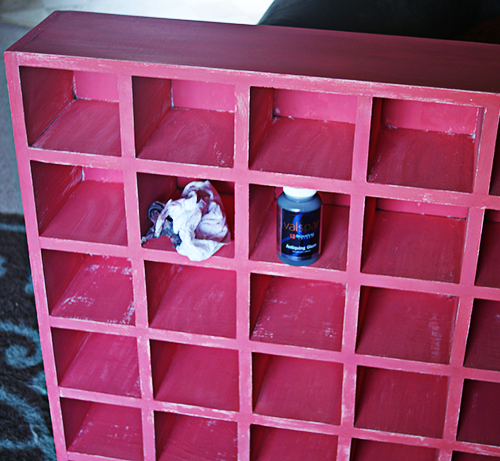
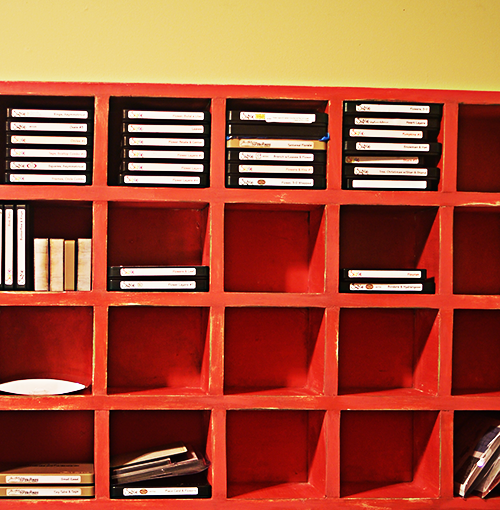
I sanded and painted with homemade chalky finish paint I talked about here.  I used white as the base coat and reddish-pink as the top layer.  I sanded to distress, and went over the whole piece with valspar antiquing glaze.

Painted Burlap Tag DIY From Fox Hollow Cottage

Hello Saved By Love Readers I’m Shannon.

While Johnnie is off at SNAP! I am here to share a quicky craft with you from Fox Hollow Cottage.

I recently completed a Linen Closet Makeover and made some fun burlap label/tags for the baskets that I used to help contain the clutter! I thought you might like to make some for you home too so I am sharing a simple tutorial. They are really easy to personalize so you could use then in a bathroom, kids room, a pantry… or like I did here, to for citrus in the kitchen.

Maison Blanche La Craie Colette Burlap Craft DIY foxhollowcottage 500X

How To Make a Painted Burlap Label/Tag

To make label/tags like mine, you will need;
-burlap
-felt (for backing)
-paint color(s) of choice
-paint pen
-paint brush; med and small/fine size
-twine
-glue gun
-Elmer’s craft bond spray adhesive
Step One
Cut your burlap to desired size. Next, cut your felt a pinch smaller then your burlap so it fits nicely behind it. You will back the burlap with a pc. of felt.
Step Two
Lightly spray your felt with the Elmer’s craft bond and place the felt and burlap together.
Press firmly and smooth.
(Tip; I sprayed my felt piece right over my trash can to avoid worrying about over spray messiness.)
Step Three
Place your paint color of choice on the burlap surface and paint away! I used the new Maison Blanche Paint La Craie shade in “Colette” because it’s aqua. If you have ever read Fox Hollow Cottage, or follow me on facebook, you’ll know I am a total aquaholic so this was a given for me!
(If not… Hello, my name is Shannon and I am a total aquaholic!)
(tip; You can get nice straight lines if you follow the texture of the burlap weave as you cut. The Lines are sort of built-in.)
Step Four
Place your text of choice on the burlap with a Elmer’s paint pen. The paint pen offers more control then a paint brush, and I find it easier to use my regular hand writing to put the text on the burlap this way.
Step Five (optional)
If you like, you can go over the paint pen text with a fine brush and black craft paint to bulk it up a bit and fill in.
Step Six
Tie your twine in a knot, then knot again. Snip ends to desired length. Affix with glue gun to corners or the desired location on your project.
Note: You can also attach a small piece of twine
as a hanger (shown below) to the back of the label/tag
or you can glue/affix it directly on your basket or surface of choice, like this…
These are the tags I made for the baskets I used when I organized my linen closet.
The makeover needed a little oomph and they sure did the trick!
Don’t you love it when the little things just make a space really come together? I do!
And I love them lots more when they don’t take a lot of skill or time to achieve.
That’s It.
Cute. Cheap. Easy.
Have fun if you make some!!
Thanks for having me today Johnnie! Hope you are having a BLAST at SNAP!


Make Aluminum Sheet Containers

Make #DIY storage containers from decorative aluminum sheets by Sugar & Cloth, featured @savedbyloves[pinit]

Raise your hand if you could use more storage containers.  I know I could.  This decorative aluminum sheet container tutorial from Sugar and Cloth is one way to organize with style.  You could even color the aluminum with alcohol inks or metal paint to coordinate with you color scheme.  Head over for the simple, quick instructions and get started on your very own.

Old Window Turned Organizer

Old window organizer DIY by Ashlee from My So Called Life, featured at https://savedbylovecreations.com #upcycle #crafts #DIY

Have you guys met Ashlee from My So Called Crafty Life?  I recently came across her blog, and I am totally crushing on her projects.  She is inspired by vintage style, which she brings to her jewelry and crafting in a way that just works for me.   While creating delicate and lovely pieces, Ashlee is not afraid to bust out the power tools and educate her readers with her fabulous DIY tutorials.  You will be seeing her do just that here on SBLC in September.

When I saw this old window turned organizer, I just couldn’t wait til then to mention my My So Called Crafty Life.  Old window projects have always drawn me in, and this one is just adorable.  Use cork board, chalkboard paint, & chicken wire for this transformation with the detailed photo tutorial.  I recommend you get comfy with a cup of coffee, browse and be inspired.

Budget Friendly Craft Room Storage Solutions

Wood Pallet Storage DIY

This post has been a long time coming.  I originally shared it with It’s So Very Cheri a few weeks back.  I have been dying to show you ever since I started the project.  Here it is, dear readers.  Today, I am going to reveal part of my craft room organization – the pallet organizers!  This project was so rewarding because my creative space was in desperate need of help. 

You may have seen this picture in my post where I admitted I had a serious problem…

Craft room organizing

Something needed to happen, am I right?!  Storage solutions are abundant, but can be expensive when purchased in big box stores.  I was determined to get creative and come up with some budget friendly ways to get it together.

I decided it was time to go vertical and make use of the abundant wall space. While driving around and looking for garage I spied a huge pile of pallets at a local Brewery.  They were happy to part with 2 of them, which I loaded into my truck and brought home. 

I cleaned them with the hose, let them dry, then I spray painted them black with Krylon Dual (paint and primer in one). 

Next I mounted them onto my wall and attached various racks/shelves I picked up at various thrift stores.  There was not much planning here.  I just spray painted the racks so everything was black, and attached them to the pallets like I would attach them to the wall.  That way, the only wall holes are the ones for the pallet.  Everything else hangs on the pallet, and is adjustable. 

Pallet Crafts

Wood Pallet Craft

I got the white horizontal tubs at the hardware store for $1.50 each.  They are great for fabric. 

Once you get the pallets hung, you can customize them to fit your needs.  Here are some examples…

Wood Pallet Projects

I am super happy with my pallet storage units.  The only holes in the wall are where I hung the pallets. Best of all… free!  Yeah, it took some time and effort, but it was well worth it. 

DIY Wood Pallet Crafts

Wanna see how I made that handy dandy hanging marker storage up there on the left?  Click the following image…

How about some free, stylish book storage?  Click the image below…

And here is a quick and easy dollar store 3 tiered organizer DIY:

Finally, for some more fun ideas to use those pallets, check out my 50+ pallet project roundup;

I hope you got some good ideas here today.  Thanks for reading!

xoxo,


DIY Dollar Store 3 Tiered Craft Organizer

Budget Craft Storage Solutions

Here is another peek at my craft room overhaul.  I wanted to be able to see all of my buttons in a way that was cute and vertical, since horizontal space is quite the commodity.  I thought of a tiered cake stand, and decided to hit the dollar store for supplies to make my own.  With the exception of the glue and spray paint (which I had on hand), I got everything needed to create this organizer for less than $4, and I love it! You could even use extra plates in small, med, large, and a couple of wine glasses or candle sticks if you have them handy.

Dollar store crafts

I found these silvery plates in 3 sizes, and some wine glasses, which I spray painted white with Krylon Dual (already has primer in it).   Two coats each with 10 minutes of dry time between did the trick.

DIY cake stand

Next, I just glued the wine glasses in place on the plates with a line of E6000 around the rim and base.  Let dry overnight before using.

Craft Organization Ideas

I love it!  I can see all my buttons, it is adorable, and it cost under $4.

To see how I made the marker storage on the wall, visit this DIY craft marker storage post.

Craft Storage

Visit my craft magazine/book storage tutorial for how to convert hardware store boxes to cute, essentially free storage.

Budget craft organizing ideas

More budget friendly organizing for those craft spaces to come.

What are your favorite creative organizing solutions?

Craft Storage Solutions Continued…

Budget craft organizing ideas

As far as craft book and magazine organizing goes, it doesn’t get much more frugal than free.  For this organizers, I simply collected boxes on various trips to local hardware stores.  They gladly gave me them for free.  If you don’t see empty boxes while browsing the aisles, simply ask an associate.

Here are what mine looked like before spray painting them…

Craft storage ideas

I used Krylon Dual in white and coated each box.  Then I added adhesive scallop border to the upper row.  Eventually I plan to make some cute labels.  I love how it came out.  Now I can see all of my inspiring books and publications without digging through piles of randomness!

Craft room storage

DIY Pen/Pencil Storage From Garage Sale Frame

Craft StorageHere is my first of several posts leading to my craft room organization reveal.  I made this from a $2 framed painting I found at a garage sale.  I simply spray painted the frame black and mounted 2 cafe rods to the front.  Shower curtain rings and silver tins I got from the dollar store provide the marker containers.  It is so much better than the basket I had them in before.  Now I can see all the colors and they are right there to grab when I need them!  I am going to use the top for scrapbooking embellishments still in the package.

How to organize craft supplies

Here is the $2 picture.  Not sure what I am going to do with the canvas, but the frame is working for me!

Craft Room Organization

More on Craft Organization

Magnetic tin storage

Organizing is on the brain here at SBLC.  Magnetic tin storage is one idea I have yet to incorporate into my soon to be revealed craft room revamp.  This would be perfect for small embellishments, and it has the 2 most important storage traits I can think of for crafts; it uses vertical space, and you can see what is in the container.  There are several tutorials on how to make this happen, like this magnetic spice rack how to.  I also found this  magnetic tin storage system ready to install.

Do you use this?  I am thinking cookie sheet mounted to wall, or magnetic paint on plywood.  I have never used the stuff.  So many decisions!

Craft Room Organization at It’s Finest

Organize Craft RoomAre you constantly searching for your scissors amidst piles of unsorted craft stash?  Find it easier sometimes to just go buy another whatever it is because it would be way quicker than finding it in your mess of a creative space?  Karen from Sew Many Ways has set the bar high in craft room organization.  In sorting through my cyclone of a  studio, I came across her most updated Sewing/Craft room post and just had to share this with you.

If you are like me, you didn’t even know this was possible.  In fact, when I looked at her first picture, I almost read no further because I thought “no way”.  But, as you will see when you go to her post, Karen walks you through her various budget friendly storage solutions, step by step.

Remember this…

Organizing your crafts

I am nowhere near a reveal, but much closer than I would have been without inspiration from Karen.  Thank you for sharing with us in such detail!!

Stay tuned!

Privacy Policy