I had been stewing over my inability to locate our starburst tree topper since moving, when I ran across this post at How About Orange complete with tutorial and all.
As soon as I saw it, I was reminded of my missing topper I got at Target a couple of years back, and knew this would be a wonderful replacement. Hello… it is DIY with PAPER, and I even figured out how to incorporate my beloved Cricut!! Jessica at How About Orange (if this is your first time to her wonderful site of inspiration galore, you are welcome) used a template to cut circles and the lines from the outer edge to the center. I decided to make a file I could cut out using Sure Cuts A lot and Cricut.
DIY Starburst Christmas Tree Topper With Free Cricut SVG File
Vinyl Wall Art Cut With Cricut;And a Freebie Cut File Download!

 Still working on the nursery. I showed you the grass in this post, and provided the .svg cut file to use with Sure Cuts A lot and Cricut. That post also tells you where to get the 12×24 inch vinyl sheets. Now the palm trees… I had a problem cutting the trunks in segments to the right scale so that each piece aligned correctly. Since I wanted the trunks taller than 2 ft, and cricut’s max is 12×24 inches, I had to do these in pieces. In photoshop, it is a sinch to cut an object into pieces that will fit together, but I couldn’t figure out how to scale in SCAL. If you know, please, do tell! I didn’t obsess about it too much since the trunks are very simple and I knew I could just draw on the backing of the vinly sheet and cut with scissors.
FREE Download: SVG Cricut Cut Files
 Here is my first freebie SVG cricut cut file. I used 12×24 sheets of vinyl in dark green, which can be found here for $1.89 per 12×24 inch sheet. I just measured the room and figured out how many sheets to order to be able to cover the perimeter with the grass silhouette. Here is the downloadable file for you to use in Sure Cuts A lot to cut on your cricut. It will look like this…

Color Photos to Retro BW With Photoshop; And Free Canvas Print WIth Shipping

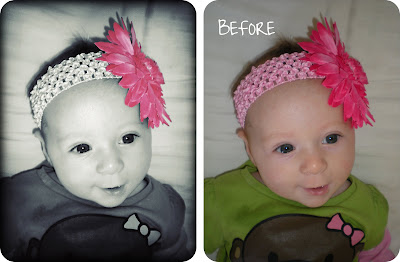
 Whenever Shannon contacts me to do photo editing, I know it is going to turn into a blog post because her kids are crazy adorable. Today, she asked me to take color photos to black and white, leaving Madelyn’s flower pink. She is opting to take advantage of this offer over at Canvas People where you can get a free photo to canvas print when you pay shipping and handling.

Scrapbook Photo Collage Using Photoshop…
 This is the first time I have used scrapbook digital downloads for a photoshop project. I down load this awesome vintage set from Shabby Princess. SO cute.


