Search Results for: wreath

How to Make a Gorgeous Fall Wreath

DIY Fall Decor

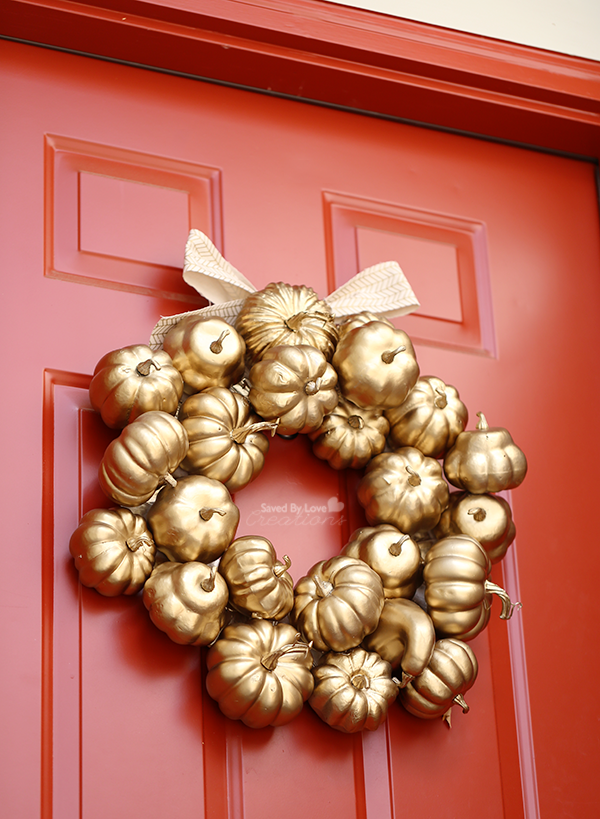
It has been way too long since I made and shared a DIY wreath project with you all. That is why I am a super stoked about today’s simple, cheap tutorial – a gorgeous gilded wreath to adorn your front door. You are going to need just a few supplies and an hour to create your very own. Let’s get started!

how-to-make-a-fall-wreath-savedbyloves

SUPPLIES:

how-to-spray-paint-plastic

Plastic or foam pumpkins and gourds (I got mine for 50% off at Michaels)

Krylon Dual spray paint in metallic gold, or your favorite color

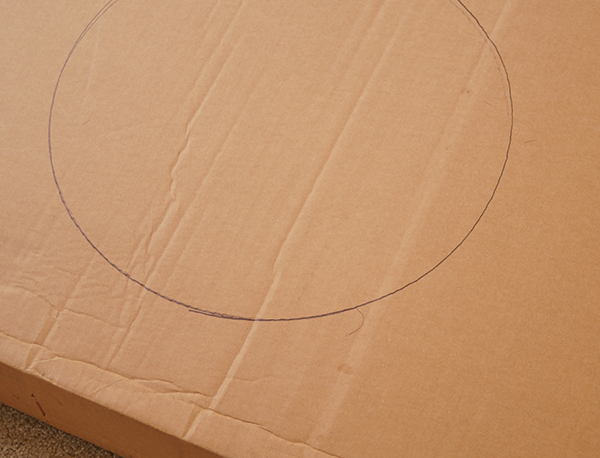
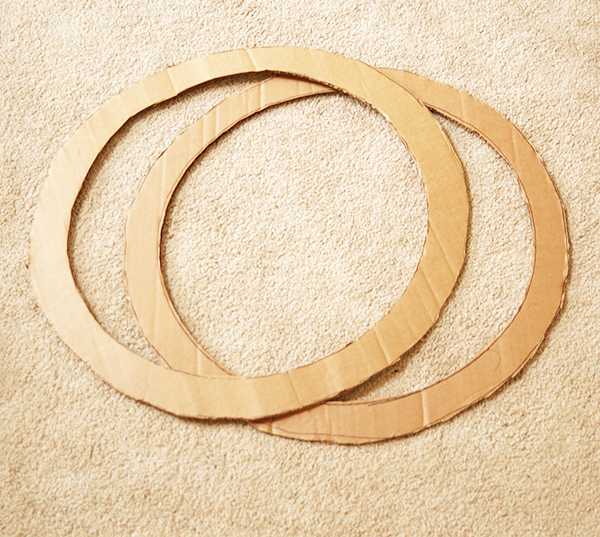
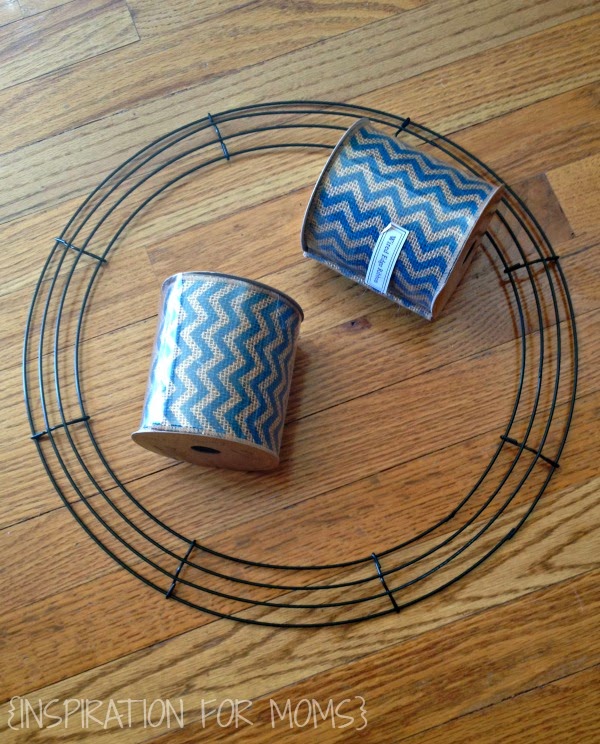
A wreath form, or cardboard with and scissors(I used a pizza box)

Hot glue gun and sticks

Ribbon to coordinate with your paint choice

Drop cloth or old sheet to protect surface from overspray

diy-fall-decor

Begin by laying out your pumpkins on the drop cloth. This project is best done outside since you will be spray painting.

how-to-spray-paint-plastic

Spray pumpkins per instructions on can. Make sure you are using paint that has primer in it. If not, you will need to prime the pieces first. I love Krylon Dual because it has paint and primer in one. It is my go to product for spray painting.

how-to-make-your-own-wreath-form

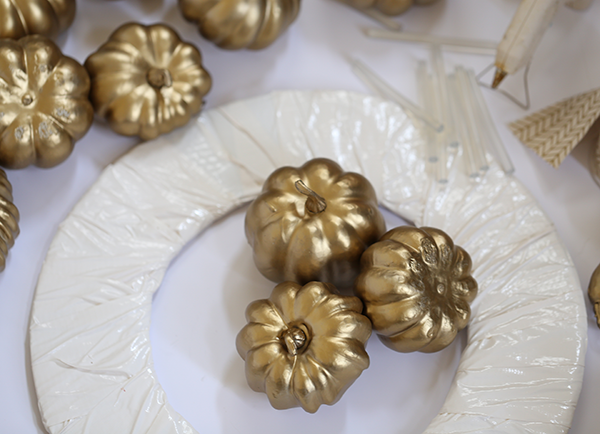
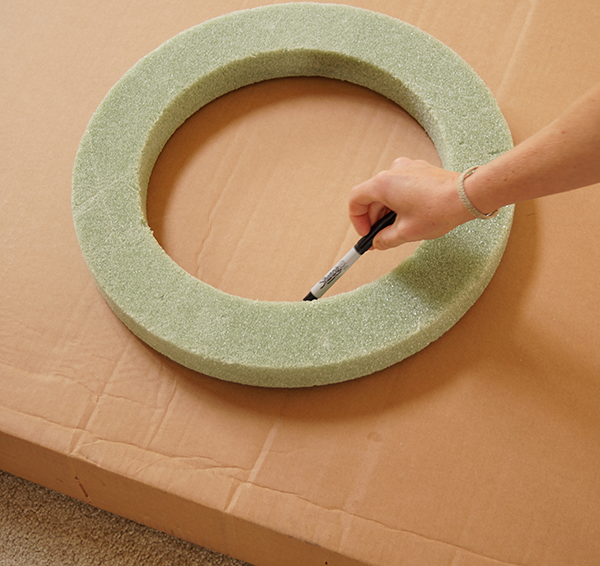
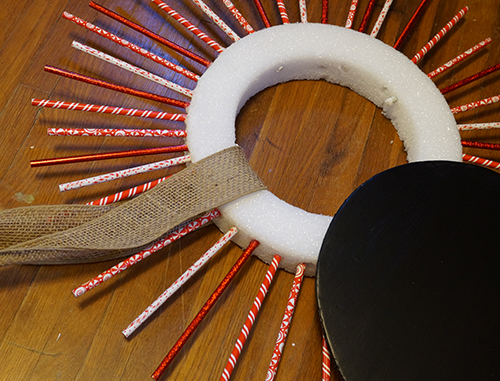
Now for the wreath form. I showed you how to make your own from cardboard in this DIY Poinsettia Wreath tutorial. For this project, I wrapped the cardboard wreath form in duct tape for durability since I planned to hang the wreath outdoors.

diy-metallic-pumpkin-fall-wreath-wm

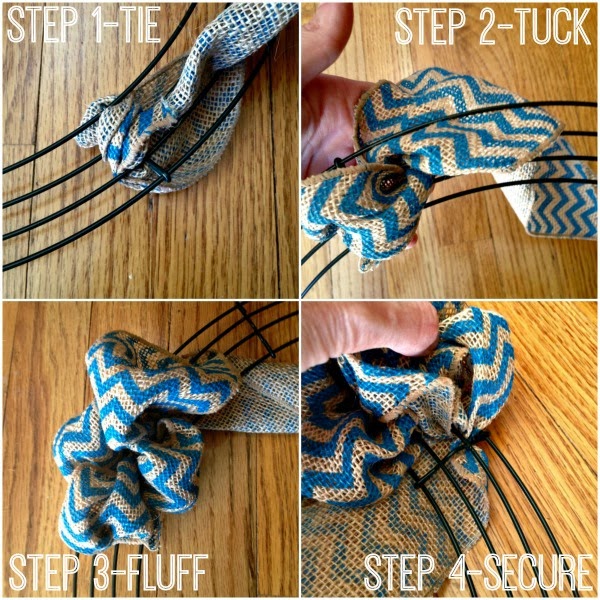
Before attaching the painted, dry pumpkins, place the ribbon around the wreath. Hot glue it into place, then begin attaching pumpkins.
how-to-hang-a-wreath

It’s as easy as that!

pumpkin-diy-fall-wreath-from-savedbyloves

TIP: For more cohesiveness, once all the pumpkins are in place, use the same spray paint to spray the wreath form where it is visible in the spaces.

For more of our festive wreaths, click:

Saved by Love Creations DIY Wreath Tutorials

DIY Alcohol Ink Aluminum Can Christmas Wreath

Aluminum Can Poinsettia Wreath by @savedbyloves

If you are anything like me, you love Ranger Ink products.  I am particularly obsessed with alcohol inks, which paint vivid color on non-porous surfaces such as aluminum and glass.  How excited was I to be invited to share a Christmas project on the Ranger Ink Blgo?! Very. Come see how I created this Recycled Pop Can Poinsettia Wreath for less than $3 with cans, dollar store supplies and alcohol inks! With tons of other projects to inspire you, you will want to make sure to look around while you are there!

If you like this project, I have lots more you don’t want to miss!

Fall Leaf Aluminum Can Wreath with Alcohol Inks

Aluminum Can Angel DIY

50+ Aluminum Can Crafts

DIY Paper Flower Fall Wreath

Make a Paper Flower Fall Wreath

I finally got my hands on the Cricut Giant Flowers Cartridge, and had myself a great time! There are tons of ways to use these paper flowers in decor.  I opted to make this festive fall flower wreath.

DIY Paper Craft Fall Decor

Following the instructions that came with the cartridge, I made the Lotus, Zinnia and Rose in oranges and purple Core’dinations paper.

DIY Paper Flower Fall Wreath Tutorial

DIY Paper Flower Fall Wreath @savedbyloves

I wanted a flat wreath form, so I made one using cardboard.  I do this a lot.  Just find something round in the size you want your wreath, and trace it onto cardboard using a sharpie.

DIY Recycled Cardboard Wreath

I like to cut two pieces of cardboard per wreath form and tape them together…

How to make a fall wreath

Once I made the wreath form, I began laying out my flowers until I had the wreath full.  I glued the flowers into place with hot glue.

***TIP:  I also used got glue for making the flowers.  Gluing each petal into place as they are added keeps them from falling out all over the place as you continue building the flowers.

DIY Paper Flower Fall Wreath

Before gluing the last flower into place, I added a loop of burlap ribbon for hanging the wreath.

How to Make a Fall Paper Flower Wreath

Although it was simple, it did take some time.  Now I have an eternal paper flower wreath!  Totally worth it.

Be sure to visit our 50+ Paper Flower Projects for more inspiration:

Make a Burlap Spring Wreath

Hi everyone! It’s Laura again from Inspiration for Moms.
Today is a beautiful day in Colorado.
The sun is out, the windows are open and the birds are chirping.
Spring is in the air!
So I though it would be the perfect time to make a Spring wreath for my front door.

[pinit]

DIY Spring Wreath with Burlap @savedbyloves

[pinit]

First you will need your choice of burlap and a floral wire wreath.
I was going to pick a green color but my son suggested the teal blue.
I think he has a good eye! 🙂
DIY Spring Wreath - Supplies
If you are intimated by those fancy looking burlap wreaths, don’t be!
I’m hear to tell you there as easy as a simple tuck and fluff!
The first step is to tie your burlap around a middle cross wire.
Then it’s time for step two, gently tuck the burlap
from behind the wreath and push it through the wire spacing to make a loop shape.
Work your way through all three rows.
DIY Spring Wreath - Step-by-Step
Now it’s time for step number three, fluff those loops.
Sounds really technical right?! 🙂
Once you have fluffed, continue on until you get to the next middle wire.
I try to pack as many loops in between the middle dividers
to make the burlap really secure which is step number four.
Continue your way around the wreath until completely covered.
Now it’s time to make the Spring banner.
I already had six burlap triangles but these can be found at most craft stores.
I wanted to add some chalkboard triangles for a little contrast.
I took some chalkboard tags from a previous craft project and cut them into triangles.
DIY Spring Wreath - Chalkboard Tags
I then hot glued my chalkboard cut outs onto the burlap triangles.
I added some white stickers to spell “Spring” and then hot glued
the banner together on some twine.
I had a burlap flower leftover from a previous project and thought
it would be a perfect accessory for this wreath.
You can never have too much burlap! 🙂
Now that my door is ready for Spring maybe the weather will cooperate too.
Hey there is only 9 more days until it’s officially Spring. Then it has to get warmer, right?!
Thanks for hanging out with me today and I can’t wait to see you again next month!
  Until then we can stay in touch by visiting Inspiration for Moms,

Want more?  Check out 50+ Burlap Crafts and Decor Ideas!

Burlap DIY Decor

Make a Cool Wreath From Fabric Scraps

Hi everyone! It’s Vidya from Whats Ur Home Story. Great to back here sharing an exciting project!

Don’t know about y’all but after all the cold and snow this winter I’m so ready for Spring! I know we have got over a month to go but no harm in pretending that it is already Spring around here especially when you have this bright and cheery wreath made out of fabric scraps and felt flowers hanging on your front door.

[pinit]

fabric scraps wreath, spring wreath, felt flower wreath

[pinit]

Other than buying a fake fern sprig from Micheals I didn’t spend a penny to make this beauty. The chevron fabric scraps are from a chair makeover while the vintage lace I salvaged from a neighbor’s trash. The yellow felt strips for the flowers are leftovers from my felt circles pillow, †the other pieces of felt from my handmade Christmas ornament project. The wreath frame is the same one I used to make my Magnolia wreath.

Materials

Foam Wreath form
Fake Greenery
Fabric Scraps
Felt flowers (I made them using this tutorial.)
Hot Glue Gun
Scissors
A small pieces of poster board
2 Pipe cleaners


fabric scraps wreath, spring wreath, felt flower wreath

Tutorial

  • Before you start try wrapping the fabric scraps around the wreath form to see if you have the required length to cover the form. Nothing fancy just some slopping wrapping would do. All you are trying to gauge is how much fabric you need. Also place your flowers on the wreath to get an idea of their layout.

fabric scraps wreath, spring wreath, felt flower wreath

  • Now that you have your pattern figured out start by hot gluing one end of your fabric scrap to the underside of the foam and wrap tightly as you go. If your scrap is not long enough just end it on the back of the foam and start with a new piece. Hot glue the other end. Start with the next scrap in this case, the vintage lace.†I liked the look of the lace over the chevron fabric so I made sure that I started the 2nd chevron wrapping before I hot glued the other end of the lace.

fabric scraps wreath, spring wreath, felt flower wreath

  • For the flowers, trace the wreath form (where the flowers are supposed to go) onto a piece of poster board, cut out, and glue the flowers in the layout that you liked from Step 1.

fabric scraps wreath, spring wreath, felt flower wreath

  • Hot glue the pipe cleaners to the back of the poster board at places where the weight of the flowers would be the most. Ideally you should use pipe cleaners that would match your fabric but black is all I had on hand.

fabric scraps wreath, spring wreath, felt flower wreath

  • Glue the fake leaves to your poster board too. Now attach the poster board ‘flower piece’ to the wreath by tightening the pipe cleaners. And there you have it, your fabric scraps Spring wreath.

[pinit]

fabric scraps wreath, spring wreath, felt flower wreath

[pinit]

Are you ready for Spring too? do you usually make Spring Wreaths?

For more easy DIY ideas stop by†Whats Ur Home Story†or follow me via†Facebook,†Pinterest,†Twitter, G+ or†Instagram.

DIY Wreath & Bouquet from Dollar Store Soaps

[pinit]
Super easy and cheap DIY; Dollar Tree Soap Rose Wreath and bouquet tutorial @savedbyloves[pinit]

Dollar Store Wreath Tutorial


Ok, I will admit, I am pretty proud of this Dollar Store Craft.  I made the rose bouquet and wreath from rose soaps I found at Dollar Tree!  You get 9 in a package and at one of the Dollar Tree stores near me, I found them 2/$1.  It took 12 packages for the wreath and 4 for the bouquet.  Not only are these gorgeous, but they smell good too.  Just don’t put them outdoors.  Rain is not this project’s friend!

Dollar Store Valentine's Day Craft

The soaps come in white, pink and red, perfect for Valentine’s Day!  I plan on making an all white one for year round, since it is just so beautiful!

SUPPLIES:

Wreath Form or foam board and circular objects to trace and cut out a wreath form of your own

Scissors

Hot Glue Gun and sticks

Rose soaps

Additional Supplies for bouquet:

How to Make a Bouquet

Floral Wire

Round nose pliers

Vase

TUTORIAL:

Wreath form DIY

For the wreath, cut out your wreath form if you are making one.  If you have one, skip this step!  I traced a wreath form onto foam board.  I wanted a flat surface instead of the dimensional wreath form.  Cut out with scissors.

DIY Rose Wreath

I decided to go in color block sections.  Lay out your design then glue roses onto wreath form with hot glue gun.

Dollar Store Wreath Tutorial

Hot glue a loop of string on the back and your wreath is ready to hang.

Now for the Bouquet:

How to make a Valentines Day Rose Bouquet

Cut wire 8-10 inches or your preferred stem length.  Start a loop at one end with your pliers.

How to Make a rose Bouquet

Remove wire from pliers and use fingers to continue spiraling as until you get something like the above shot.

DIY Rose Bouquet

Add a dab of hot glue to the base of the flower.

DIY Valentines Day Gift Idea

Glue wire spiral onto flower base.

How to make DIY Rose Bouquet

When you have enough flowers, place in a vase and you are set!

Dollar Tree Soap Rose Wreath @savedbyloves

DIY Starburst Dollar Store Pencil Wreath With @Floracraft

[pinit]DIY Starburst Christmas Wreath with Dollar store supplies and @FloraCraft @savedbyloves[pinit]

I am a member of the Make It: Fun® Team. This DIY Starburst Christmas Wreath is sponsored FloraCraft® Make It: Fun® Foam. All opinions are honest and mine, like always.

Incorporate the chalkboard craze into a fun starburst Christmas wreath made with dollar store Christmas patterned pencils and a FloraCraft® Make It: Fun® Foam wreath form!  This project is easy, quick and cheap.  Use it for gift lists, holiday greetings or a letter for santa!

SUPPLIES:

Flora Craft Dollar Store Christmas Wreath DIY


FloraCraft® Make It: Fun® Foam wreath form

Dollar Tree Christmas Pencils

Hot Glue Gun and Sticks

Cardboard cut in a circle the size you want your chalkboard

Burlap Wire Ribbon

Black chalkboard paint

one inch foam or paint brush

TUTORIAL:

How to make a Christmas Wreath

 Put a dab of hot glue on the end of the pencils and shove them into wreath at varying depths.  It doesn’t matter if the eraser comes through to the center of the wreath because you are covering the hole with your chalkboard later.

Make a starburst wreath

Continue all the way around the wreath.

Make a Chalkboard Wreath

Paint your cardboard with chalkboard paint and let dry.  I did 2 coats, sanding lightly between.

How to make a chalkboard Christmas Wreath

Tie your burlap ribbon in place, then hot glue your chalkboard circle.  Hang and enjoy!

Dollar Store @FloraCraft Starburst Wreath DIY

For more inspiration on creating with FloraCraft® Make It: Fun® Foam, please also check out Crafts n’ Coffee or follow the hashtag #MakeitFunCrafts.

Make a Live Succulent Wreath

[pinit]
How to make a living succulent wreath via Garden Therapy, featured @savedbyloves[pinit]

Are you in love with the look of succulents?  Terrariums and other decor using these hardy plants are crazy popular right now, and I can see why.  They are so easy to care for, and are a great way to add a splash of green to any room.  Learn how to make this gorgeous live succulent wreath with a detailed step by step tutorial at Garden Therapy.

You may want to visit our terrarium tutorial while you are at it:

And of course, there is a 50+ for that!  TERRARIUMS AND CREATIVE PLANTERS

Upcycled Hubcap Patriotic Star Wreath

[pinit]

Upcycled #repurposed hubcab to patriotic star wreath #timholtz #distresspaint @savedbyloves[pinit]

I stopped and pulled a U-turn to rescue a hubcap roadside a few months ago, knowing I would use it for something.  This upcycled soda box star wreath was the perfect project for it since I was going for a grungy americana look.  This was super easy to make and I had everything on hand.  I used my Sizzix machine to cut the stars, but fear not, you can do this project without all that.

Make an upcycled patriotic americana star wreath with @savedbyloves #sizzix

SUPPLIES:

Recycled Hubcap to patriotic americana star wreath @savedbyloves

Hubcap or other wreath form

Empty cereal/soda/food boxes

Foil Tape (available at your local hardware store)

Tim Holtz Distress Paint; Barn Red, Salty Ocean and Picket Fence

Tim Holtz 3D Star Die Sizzix

Tim Holtz Star Bright Die and Sizzix Machine, or 3 D Star Templates and scissors

Hot glue gun and sticks or other adhesive

TUTORIAL:

PatrioticStarWreath7

Cut sheets from cardboard boxes and cover with foil tape, smoothing out wrinkles with your hands.

free 3d paper star template

Cut stars from foil covered cardboard using die or by hand with 3D star template like this one.  I made my stars in 3 sizes; 2 from the die and the middle size by hand from the template.  You can resize and print in small, med and large stars.

Why the foil tape, you ask?

I have made these stars in the past from aluminum cans, paper only, cardboard, heavy cardstock, grunge paper and chickens (I made the last one up).  The best result, in my opinion, in terms of shape and folds is cereal box thickness cardboard.  It holds the creases and 3D shape well, and is free.  Plus you are recycling.  Now doesn’t that feel nice?  Aluminum can stars are cool, but you bend them up while trying to make the creases, so they don’t look as nice.  The foil came into play because I love Tim Holtz Distress Paint on it, and I knew I wanted to use the red, white and blue for this project.  You could paint directly on the cardboard and skip this step if you wanted.  A happy accident happened when the red lettering on my foil tape showed through a the paint and I liked it.  I made a couple of stars with just the tape.

Americana 3D start wreath tutorial #fourthofjuly #patriotic @savedbyloves

Paint your stars as desired and let dry.

Upcycled #repurposed hubcab to patriotic star wreath #timholtz #distresspaint @savedbyloves

I started with the biggest stars, adhering them onto hub cab with 3D foam stickers.  Then I adhered stars to stars for the upper layers using hot glue.  Just play with the placement until you are happy with your design.

Make an upcycled patriotic americana star wreath with @savedbyloves #sizzix

For more patriotic project ideas to get you inspired, visit our 50+ DIY Patriotic Crafts, Jewelry and Decor Roundup:

How to Make a Paper Feather Wreath

Learn how to make this paper feather wreath by Lia Griffith, featured @savedbyloves

[pinit]

This paper feather wreath by Lia Griffith is just the accessory to top off your summer home decor.  Lia used 36 paper feathers and a 12 inch wreath form to make this beauty.  Head over to her post for the link to the leaf template and create your own inexpensive, fabulous wreath in colors that scream you.

To make it even cheaper, check out this aluminum can leaf wreath post where I showed you how to make your own wreath from from cardboard.

Speaking of paper feathers, check out how to make these earrings I shared recently.  Might as well cut 38 instead of 36, right?!

Privacy Policy