

 It is Sunday, my favorite day. To me, God isn’t just at church on Sunday, but it is so engrained in me that Sunday = time with God. I love going and worshiping through song with fellow believers. Today, the sermon was extremely academic. I’m not real sure what was going on, but the music was awesome. I posted this on facebook, so if you have already seen it… oh, just watch it again. It rocks.
Polymer Clay Day 74: Love Kaleidoscope Pendant
by
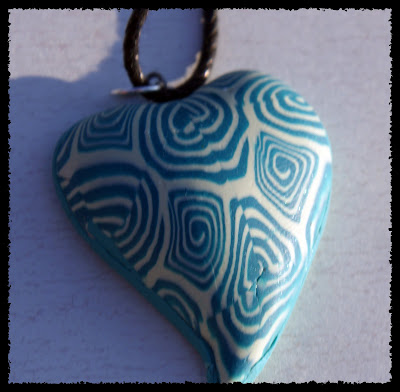
Polymer Clay Day 73: Retro Square Cane Heart Pendant
by

 This project was super easy. I have tried to get this look a couple of other ways that were not only more complicated, but didn’t come out as nice as this one. I love the retro square print. I got the project from Donna Kato’s millefiori cane book:

This book has a lot of good information, especially on cane work. It could have better step by step pics in my opinion, but still quite useful. You can get it on Amazon for $12 used!
Happy claying…
Polymer Clay Day 72: "Love Today" Pendant
by


Designs on both sides… fancy, I know. I have never used this type of frame. Picked it up at Michaels for 1.29. Made a sheet of clay to fit and stamped with black solvent ink. EASY.
Had a beautiful day hanging out with my grandparents. We listened to an Andy Stanley podcast. If you want some relevant to your life, entertaining yet poignant messages on spirituality and Christ’s love, check him out. His podcasts are free, and they truly enhance my life and bring peace. I have listened to several of the various sermons over the past 2 weeks during my morning runs, and feel renewed. You don’t have to be a Christian to benefit from his talks, as he gives practical applications to better your life wether or not you think the Bible is true. Check him out here.
Be love…
Polymer Clay Day 71: "Awesome in Power" Pendant
by


 This is a continuation of Tuesday’s clay theme, inspired by the Chris Tomlin and Toby Mac concert I attended last night. Again, I made the image in Photoshop and worked it into this polymer clay creation. The concert was wonderful, and totally worth the state fair poo smell and severe heat. I woke up morning of with food poisoning and was certain I would not be going to the show. Some prayer, a nap, Tylenol cold, and praise music later, I knew I would regret not going. By the time Chris Tomlin was half way through his first song, I had forgotten I was sick. Toby Mac put on quite the performance as well, and watching the lil’ kids dance and sing along with him was priceless.
Polymer Clay Day 70: "Our God Is Greater" Pendant
by

 Today’s project stems from my excitement about tomorrow night’s Chris Tomlin and Toby Mac concert I am attending with my momma, and awesome friend Shannon. I am giddy. I never thought I would see the day that there would be a concert my mother and I would both want to attend. Her with her Celion Dion obsession, me with my grunge, alternative rock, techno, ani difranco thing I have going. Leave it to Jesus to bring us together at a Christian rock concert. He is our glue.
Here is Chris Tomlin’s “Our God is Greater”…
Polymer Clay Day 68: Timeless Love Pendant; And CONTEST WINNER!
by

 I am going to have to post a tutorial on this technique. I think that will be next week’s tutorial. It is super easy, and the feathered effect is pretty cool. That is it. That is what I’ll do. New color scheme, clay combing in the near future. Get your toothpicks ready folks.
I had an AWESOME garage sale today. One of the benefits of moving to an artsy town when you are artsy… lots of people share my taste, and my love for a good bargain.
Afterwards, went to hubby’s company picnic, climbed a rock wall, enjoyed a euchre tourney, watched my nephew overcome his fear of ponies, played some corn hole… these are the salad days.
GIVEAWAY WINNER:
Congratulations to Neccie! The random number generator came up with 6, and that is you. Contact me so I can get your address. Thanks to all who entered!
Polymer Clay Day 67: Breathe Beauty Chevron Pendant
by

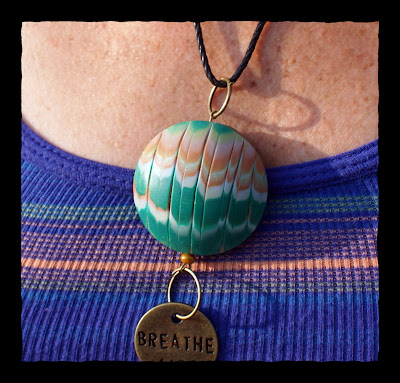
I am digging this color scheme lately. Not much to say. Getting ready for my neighborhood’s community garage sale tomorrow. It is a step back week in marathon training so my Saturday long run is 7 miles. Yippie. Perfect timing too with the garage sale and all. Hoping to make a little cash. Or at least break even 🙂
Polymer Clay Day 66: Artful Heart Pendant
by


 I made this using a striped jelly roll. Sounds yummy, but eating clay = BAD. Anyway… it is a simple technique that produces a pretty cool effect. I textured the back to hide blemishes and fingerprints that inadvertently occur when handling raw clay. I actually like the look of this piece with it’s natural mica glimmer, so I left as is instead of coating with sealant. So unlike me, but it is ok. When using something like gold leaf or Pearl Ex mica powders, a sealant is necessary to prevent tarnishing and loss of mica. One way around this in the case of mica powders is to use Perfect Pearls by Ranger, which has a built in resin and requires no sealant if baked into the clay 🙂


Polymer Clay Day 65: Mokume Gane Foil Tutorial
by
 I made the above pendant using thin slices from the mokume gane technique I detail in this tutorial, using copper leaf sheets, alcohol inks, translucent clay, wavy blade and straight blade (I didn’t use the rubber stamp pictured in this project), acrylic roller, pasta machine, ceramic tile and a toaster oven or conventional oven.
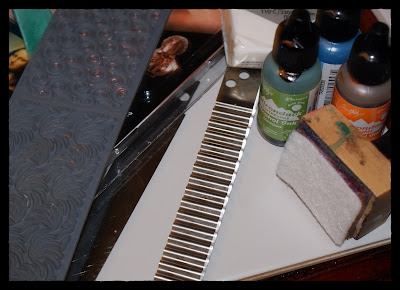
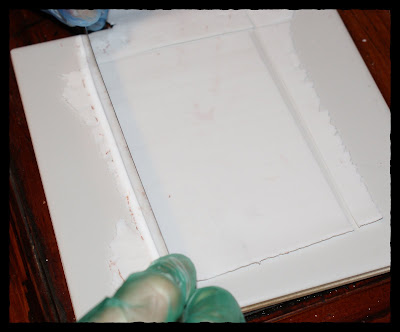
I used three bars of Fimo translucent, rolling it with my acrylic roller until it was thin enough to condition by running it through the pasta machine, working up to a thinness of 6 (my pasta machine has settings 1-9, 1 being thickest, 9 thinnest). The gloves are to avoid fingerprints on the clay, which drives me nuts 🙂

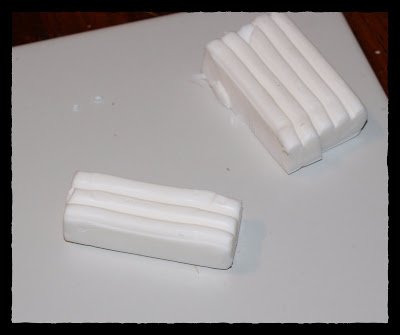
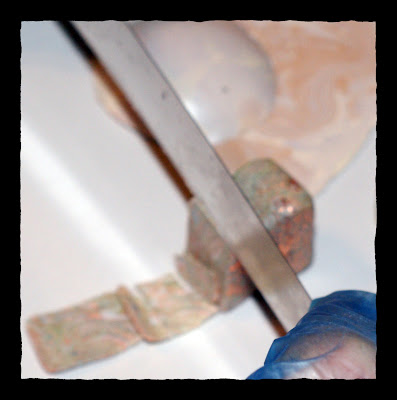
Next, clean up the edges by cutting with the tissue blade to make a rectangle. Cut this rectangle into 2 equal sized rectangles.
 I used copper leaf sheet from Michael’s and patted it down on each rectangle. It will stick to raw clay, so no adhesive is needed.
  Clean up (and save) the excess foil leaf bits.
 Carefully slide the blade under each rectangle to flip them over.
 Use your alcohol inks and randomly dab them with felt applicator on the now upside of the clay rectangles.
 Stack the rectangles, then cut the stack in half.
 Stack these two halves.
 Thin by hand or with acrylic roller to stretch out the stack, being careful not to tear if doing by hand.
 Cut into quarters, then stack again.
 Thin stack using roller or by hand.
 The foil begins to crackle as the stack is thinned.
 Cut stack into quarters again and restack

 Distress the stack using any texturizing method you want. I cut through randomly with a wavy blade. You could use a credit card and make a grid, or use a rubber stamp…
 squeeze sides to smoosh the distressed stack into a tall cube.
 Shave off thin slices and apply to beads, tins, whatever object you want so long as it can be baked at 275 degrees! Raw clay (unbaked) adheres to raw clay, so roll a round ball and apply thin cane slices to make a bead. Roll in hand after applying slices to smooth surface. When applying to already cured clay, or to metal/glass, you will need to use polymer clay glue (I use Lisa Pavelka poly clay glue). There is also a bake-able adhesive by sculpey.
I used my slices on the pendant at the beginning of this post. I have plenty left, so I will be make more creations from it, as is usually the case with canes!

Polymer Clay Day 63: Mokume Gane Metallic Heart Pendant
by


Hanging out with my hilariously random niece, Ashlyn, and nephew, Taylor (17 years and 18 years old). Here are two of the 24.5 rules to get into Ashlyn’s Rag Tag Group of high schoolers (they were all quite funny, these are really the only ones family friendly enough to post) ; #6. Acquire a windowless white van. #10. Recite the Lord’s Prayer backwards, in Latin.
I love random. These two definitely provide that in ample amounts. Off to laugh some more!
