Upcycled: Magazine Page Rose Ring

Magazine Page Jewelry

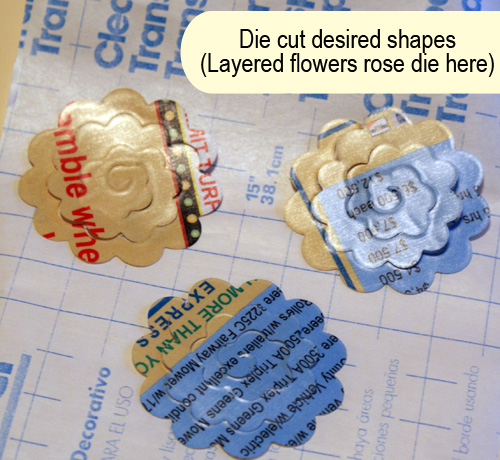
It was only a matter of time before I combined my Sizzix obsession with magazine pages.  I was hesitant because the pages are so easily torn and flimsy if not coated with decoupage medium.  I didn’t really want to run that through my machine.  It hit me that I could laminate the pages with clear contact paper to give strength and durability.  Yay!  Now I can fold, twist and rough up magazine pages about as well as I can heavy cardstock.   This would work well for fragile old book pages and sheet music too.

Recycled Magazine Crafts

Recycled Paper Jewerly

I formed the 3 D rose by coiling the cut strip around a toothpick like the Sizziz 3 D Rose die insert instructs, then I added a jewel to the center of the rose with Mod Podge Dimensional Magic.  I cut some leaf shapes from an old yellow leather purse, and used E6000 to adhere the rose and leaves to the Plaid Ring Bling ring blank.

Recycled Paper Crafts

How to Make Magazine Page Jewelry

Sizzix jewelry tutorial

Haylie’s Handmade – Crochet Meets Compassion

Crochet projects
This is one of the most exciting features I have been blessed to share with you here at SBLC.  My family and I headed out for some Saturday morning garage sales and our very first stop was quite the treat.  We happened to spy a sign that said craft sale, so we tracked down the address, and here is what we walked upon…

Crochet for a cause

This bright and energetic young lady is Haylie of Haylie’s Handmade.  She is an 18 year old with a passion for crochet, and a drive to help those in need.  I am amazed at how many beautiful pieces she had on display as she explained the charity she is contributing to with her earnings. Are you kidding me?  Check this out…

Handmand Crochet for CharityAt 18, I was not thinking “entrepreneur and charity”.  I had to know more about this girl.  In Haylie’s words…

I started learning how to crochet when I was twelve.  I got interested in it by watching my grandmother do it.  She started teaching me then.  When I was fourteen I liked crocheting so much that I decided to start my own business.  At first I only made blankets but as time when by I learned how to make potholders, scarves, placemats and lots of other things.  When I’m not crocheting I spend a lot of time studying.  I’m home schooled. I go to Indiana University High School. It is a correspondence program for high school students through Indiana University.  I’m currently working on getting my honors diploma.  I also enjoy Girl Scouts. I am starting to work on my Girl Scout Gold Award which is the highest award.  The way that I got interested in the charity that I am helping which is called Ivory Coast Mothers and Children was because of my friend.   I found out about what my friend was trying to do to help suffering mothers and babies that have HIV/AIDS in the Ivory Coast and I was really shocked by it.  I couldn’t believe all the suffering and poorness that the villagers of Braffoueby which is the village in the Ivory Coast that I am helping were going through.  I don’t think that it is right for pregnant women to have to walk fifty miles down a dirt road to the nearest health center. I was affected by what I heard and I decided to use my skills and business to help raise money for them.  I donate 20% of my sales to this charity.   I have been raising for Ivory Coast Mothers and Children since October of 2010 and I have already raised over $1000.

What an inspiration!  We met Haylie’s mother, who explained that the girl has always wanted to have a business, and fundraising is in her blood.  Apparently so is crochet!  She has some adorable items, and is happy to make custom items to meet your needs.  Contact Haylie at her website, Haylie’s Handmade, and support this amazing young woman as she crochet’s her way to a better world.

Tulip Tye Dye

Ombre Tie tutorialTie dye has come a long way in simplicity and technique over the years.  Until this project, I hadn’t played with tie dye since childhood, and I remember it being a huge mess.  Wasn’t there something about boiling water, and dying in the washer?  Isn’t that only for t-shirts?  That is why I was a little skeptical about trying out this product, but I am so glad I participated!

Tulip Tie Dye is a cinch to use, and tie dye is not just for the t-shirt these days.  With the “just add water” applicator bottles, protective gloves included in their kits along with the handy surface protector, cleanup was no hassle.  In my box were two 3-Color Tie-Dye Kits, one Paradise Punch and one Tropical Fruit.  You can see all of the available colors at I Love To Create – One Step Tie Dye Products.  If you don’t see the exact shade  you have in mind, know that these dyes are mixable so you can create custom colors.  I accidentally bled orange and teal together in a hobo purse I dyed, and the effect was a gorgeous burnt sienna agains the vibrant turquoise and orange!  It ended up being my favorite finished piece.

Tulip Tie Dye Kits


If you think you can’t make a gorgeous tie dyed piece because you have no idea what to do to make those funky designs, fear not.  The product insert (pictured above) has you covered with detailed step by step photo tutorials of illustrating 8 different techniques.  Here are some example techniques you can find over at I Love to Create.

Tie Dye Instructions

There is something for everyone.  Today, I will show you how I made this ombre neck tie, a perfect Father’s Day gift idea.

  • Following the instructions in the insert, I pre-washed the tie blank (purchased at Michael’s) and let it dry to dampness before beginning.
  • With gloves on and work surface covered,  I filled the bottle with water, shook to mix until the dye powder was dissolved, and applied dye to top 1/3 of damp tie.  The instructions say to use half the bottle, but that was way to much for my lil’ tie, so I poured out the extra liquid into a container for later use.  Left with half the dye, I filled the applicator bottle full with water to dilute the dye for the next segment of the tie.
  • Again, I applied the diluted dye to then next middle segment of the tie, discarded extra dye to leave 1/2 bottle remaining, filled the bottle with more water and applied this to the last segment.

Ombre Tye Dye Tutorial

  • To finish, I covered the tie with the plastic and let it sit for about 5 hours. I then washed by itself in a larger load setting, with a small amount of detergent per package insert.  Line dry… done.

There were so many techniques I wanted to try that I went a little nuts.  Here are some purses I made for graduation gifts this year.  I found the blanks at Joann Fabrics, but you could whip one up yourself in no time.

Ombre purse tutorial

Tye Die Crafts

Tulip Tie Dye Crafts

One more shot of the tie…

Ombre craft ideas

Tulip Tie Dye Kits are available at Walmart, Walmart Canada, Michaels, JoAnn, A.C. Moore, Hobby Lobby, Hancock Fabrics, Meijer. Tie dye kit contents and colors may vary by store.

For more inspiration and updates, be sure and follow ILTC on facebook, Pinterest and Twitter.

Disclosure:  I received product and payment for this post.  All opinions expressed in this post are authentically mine.

Check out these great projects using Tulip Tie Dye:


Glass Tile Pendant Tutorial With Tips and Images

Glass Tile Pendant Tutorial

Today, I am happy to share with you a glass tile pendant tutorial from Irina at Irina’s Cute Box.  These tutorials are abundant in the creative blog world.  Irina shares her version incorporating a bezel setting.  She uses the same jewelry component supplier as I do, Sun and Moon Kits on Etsy.  Wonderful prices and service make this my go to shop for all of my wholesale needs.  In addtion, Irina has available some free printable images you can use for the tiles, and digital collage sheets available for purchase in her Etsy store (see examples and links below).

Digital collage sheets for glass tile pendants

TUTORIAL:

You will need –

  • Images
  • Diamond Glaze or other glaze if you prefer
  • Bezel is used in this tutorial – You could also just leave the glass tile as is, seal the back (with Mod Podge or resin) and glue on a bail for attaching to chain.
  • E6000 or superglue

Free digital collage

The collage sheet is 4×6 inches,  containing twelve 1 inch square images perfect for glass tile pendants,  at resolution of 300 dpi.   Print on heavy (80-100 lb) using laser printer.  Laser images are more vivid and less likely to smear than ink jet.
How to make glass tile pendant
Supplies shown are from  SunAndMoonKits shop on Etsy.

To make the pendant

  • First, cut out image with scissors

How to make glass tile pendant

  • Apply small amount of glaze on the back side of the glass tile.

How to make glass tile pendant

  • Spread glaze evenly and pull out any air bubbles with fingertip or toothpick.
  • Place the image with face down on the glaze and gently press it from center to the edges, ensuring no air bubbles remain.   The paper should slide on the glaze when you touch it. This tells you that the right amount of glaze was applied.
  • Let glaze harden for a couple of hours and trim extra paper on the sides.   Use water and a lint free cloth to wipe away any excess glaze on the glass.

How to make glass tile pendant

  • Put a little bit of super glue in the setting.

How to make glass tile pendant

  • Place the glass tile with paper side down.

How to make glass tile pendant

  • Let dry, add chain and you are finished.

Visit Irina’s  blog for other free graphics and her GraphicLand shop on Etsy for  more beautiful and affordable digital collage sheets in a variety of shapes and sizes!

Graphic Land on Etsy

Digital Collage Sheets for Dominoes

DIY Name Art Under $10

DIY Name Art

I was asked to make wall art incorporating the name Morris, and I remembered a photo letter art project from around Christmas time by Shanty 2 Chic.  Here is my version, inspired by the lovely tutorial from Whitney!  I made it using a piece of hardboard left over from another project, 6 Dollar Tree frames, some spray paint, E6000, 2 washers and a rope for the hanging mechanism.  The photo letters are available for free on Flickr (thanks Whitney).

Letter Photo Art

To finish, I drilled 2 holes on top, glued washers over them and ran canvas rope through for the hanging mechanism.  I am digging the industrial look of the final piece.  This is the first time I have ever used the Krylon Stainless Steel spray paint… love it.

Letter Photo Art

Letter Photo Art

Under $10; Mother’s Day Gifts You Can Make

[pinit]

Over 60 Mother's Day Gifts to make for less than $10 @savedbyloves

[pinit]

Mother’s Day is rapidly approaching. I gathered up some great handmade gift ideas with mom in mind, that you can make yourself for under $10. With jewelry, photo, spa and home gifts to choose from, you will find something just perfect for your mom and she will love that you made it for her.

Jewelry


Photo


Home/Spa


Sizzix Cut & Embossed Painted Can Flower

Upcycled Can PendantHere is a cool Mother’s Day gift idea.  This gorgeous flower pendant is made from an aluminum can and a copper rivet joining the 3 layers.  It really couldn’t be simpler or less expensive.  Mom will love it’s uniqueness.  You can paint it to suit her tastes and she will have a heartfelt, handmade gift on her day.

Handmade Mother's Day gift idea

Instructions:

Rinse and cut your aluminum can to a sheet that fits your die.  Cut two flower shapes and a circle.  Emboss the flower shapes and hammer the circle into a dome shape.  Paint petals as desired with acrylic paint.  If you like the colors on the can, no need to paint.   I used Lumiere and sealed with Krylon Clear Coat.

When that dries, connect layers with rivet or eyelet.  Punch hole in back most flower petal in for a jump ring and add your choice of chain or cord.  That is it.

Upcycled Jewelry Tutorial

DIY Mother's Day gift

Needle Felt Jewelry

Needle felt pendant tutorial

Inspired by this week’s felt project round-up, I gave needle felt jewelry a go.  I played with this briefly to add dots to this felt mushroom a couple of years back, so am a novice to this technique.  It is very easy to pick up, and pretty quick for small jewelry projects like this.

Needle Felt Jewelry

As with most things I create lately, I used my sizzix to cut shapes for these pieces.  For example, for the ring, I die cut 2 small orange circles from a sheet of wool felt and needle punched them together to form the disk shape.  I hand  cut a white felt triange and punched it to the top of the disk.  The blue outline is needle punched wool yarn.  I used a darning needle to create a hole in the disk and thread my wire through it to make a wire wrap ring.Needle felt wire wrap ring

For the pendant, I used 2 larger die cut circles for the base, then needle felted the inner and outer circle shapes and triangle on top of that.  The finished piece is glued to a button using E6000.

Needle felt pendant tutorial

I will definitely be doing more of this.  I wish there was a way I could needle felt without poking my fingers, but what is a little blood for the sake of crafting?

60+ Projects You Can Make With Felt

Felt Tutorials

This was quite a surprising round-up to put together.  I guess I thought of felt as a winter craft supply, but not so.  Spring and summer projects everywhere are using the stuff.  With needle felting, you can easily “paint” in 3D with roving wool, creating anything you can think of.   Or grab some salvage wool sweaters and snip out the shapes you need for your wooly creation.  Once again, this list brings some jewelry projects that have my gears spinning.  What can’t we use to make wearable adornments?  Amazing!


Monogram With Recycled Plastic & Paper Die Cut Flowers

Die Cut Flower Embellished Monogram ArtSizzix Die Cut Flower


Easily make flowers from plastic packaging and old greeting cards!  Now that I have entered the world of Sizzix, no material is safe from getting cut.  This project is all thanks to my friend Amy, of Plucking Daisies.  I inquired about Kraft core paper used in one of her projects.  The next thing I know, I have a box of the stuff, and other goodies from her stash, with tips and tricks she took the time to write out for me.  Sweeeet!!  You will be seeing the supplies she sent me popping up in future posts.

Here, I made flowers from the packaging containing a Tim Holtz embossing folders (Amy’s idea) and a greeting card, both from Amy’s stash.  I used them to embellish a monogram corkboard hanging wall plaque I made for my niece’s graduation gift.

Sizzix Wall Decor

Here is how I did it:

DIY Monogram Wall Art

I held the plastic die cuts over a flame to curl them and give dimension.  Walnut Distress Ink was used on the paper flower edges.   Then I layered and sewed on a button for one set, and inserted a brad for the other.

Recycled crafts

The leaves, I cut from velure, also Amy’s idea.  I sprayed them with “Stiffy” fabric stiffener to give form and prevent fraying.  The rose is leather cut with Sizzix and the 3D rose die.   The piece is a cabinet door I picked up at Habitat from Humanity Restore ($1.25), spray painted,  and adhered cork board to using hot glue.  I drilled holes for the purple ribbon hanging mechanism.  The letter is layered chipboard painted with Adirondack acrylic paint.

Monogram wall art

I love how it turned out!  Perfect for Ashlyn’s dorm room… not to mention how dang cool it was to get an awesome box of goodies from a fellow craft blogger.  Amy was organizing her studio and threw in a bunch of things for me to use.  What a great idea.  My studio is jam packed with supplies I will never get to, that someone else would love to have.  That is why I am passing on the love, and sending out a box to a reader who asked about clay.  I won’t even know it is gone, and if she is like me, the act will make her day.

Thanks Amy!!!  Here Amy shared a project using plastic packaging and alcohol inks, like I did from her tips for my flowers.  Be sure and visit Plucking Daisies for some rockin’ tutorials and creativity.

Privacy Policy