Another Awesome Giveaway

(picture courtesy of Creative Place)
They are at it again! Giving away your choice of 3 beautifully crafted items. Go sign up to win, and look around this inspiring site. Click here to view giveaway details…

Bible in 90 Days


45 days behind me in the Bible in 90 Days Challenge! I am now in Proverbs. This has been amazing. I have never felt so close to God. I think about him constantly throughout the day, and feel his presence and provision in my life.
I became a follower Christ in September of 2009, and was introduced to the beautiful world of Christian rock music. It is all I listen to now, and though it has only been a few months, I don’t know how I ever got along without it.
I am an avid runner/marathoner. I never venture out to hit the pavement without my ipod stocked full of praise music to fuel me. My very first run after being saved, I got caught in a thunderstorm 3 miles from my house. I started to get negative and throw myself a big pity party. All of a sudden, through my headphones came the following words
I was sure by now,God, that You would have reached down and wiped our tears away, stepped in and saved the day.

But once again, I say amen and it’s still raining as the thunder rolls I barely hear You whisper through the rain, “I’m with you”and as Your mercy falls I raise my hands and praise the God who gives and takes away.

That was the first of many experiences where I felt a direct answer from God. I got home and immediately looked up the song – Casting Crowns “Praise You in the Storm”.
Today, this song was brought to mind again as I was reading through Psalms. I got to 121:1 and immediately knew I had heard it in the same song.
I lift my eyes onto the hills
where does my help come from?
My help comes from the Lord, the maker of heaven and earth
I lift my eyes onto the hills
where does my help come from?
My help comes from the Lord, the maker of heaven and earth
What beautiful words, reminding me to keep my eyes on Him, and do His work.
See the video here


Create Signature in Photoshop, Then Add it to the End of Your Blogger Posts…

See mine? It follows every post – not just the ones published subsequent to the addition of the code.

Ok, first make your signature. I did mine in photoshop. Here is how…

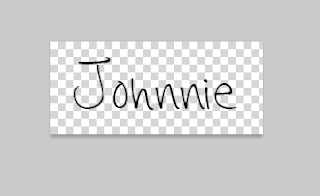
1. Open a new file. I made mine 220px by 96px (trial and error – it fits best after my posts). Make sure you choose “transparent” in the background contents tab as below.
2. Choose the Text tool (keyboard short cut T) and pick your favorite font. I used “Hannah’s Messy Handwriting”, which I downloaded here at dafont.com. Pick your font color and size, and type your name…
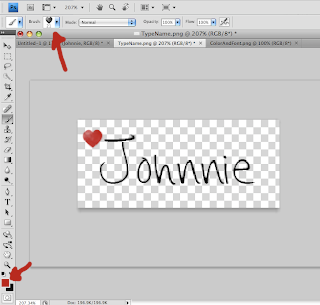
3. I added a heart using a heart brush that I made (that is for a later tutorial)…
Choose the brush tool (keyboard shortcut ‘b’), pick a foreground color and brush that you like and paint design of your choice…
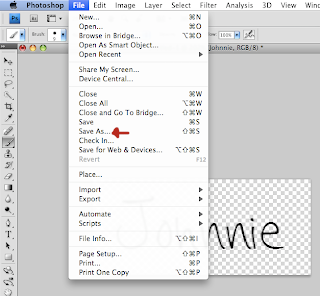
4. Save file and upload to image hosting website (I use Photobucket)…
Save File as .png, so that transparency will be maintained and the signature file will not come with a background that may vary from your post background color.
Now put code for your image into your Blogger HTML template…
Go to your blogger dashboard and click ‘layout’, then ‘edit HTML’, then
check the expand widget box as follows…
Find the line:

Blogger Code Tweaking; the Sites That Helped Me Survive…


For the past 48 hours, I have been swimming in html code, attempting to make my blog look just like I want it to look.

I have a medical degree – html is not something I know… even a little.
Could I have paid someone to do this for me and saved myself a lot of time? Yes. However, I do not regret my efforts. Although my page is not exactly where I want it, I learned much about coding, and about myself. Turns out I love playing with code. Putting that with my love for graphic design… web designer in the making? We’ll see. I never pictured myself in this area at all. Anything is possible.
Here, I would like to share the links that helped me the most in my changing code adventures…
  1. Get a 3 Column Blog: I originally had the blogger minima template. I wanted to go to three columns, which I learned via this tutorial at Three Column Blogger. It was very helpful, although I had to make my outer wrapper width smaller than its suggested 940px in order for my page to load correctly in my safari browser. I found it is wise to stay at 780px or less. Then I had to decrease my main wrapper, sidebar wrapper and new sidebar wrapper widths to fit within the 780px. I found a wonderful diagram explaining margin, padding, wrapper width and how to put them all together here at Blog Buster.
  2. Adding a Horizontal Nav Bar: As you see, there is now a horizontal nav bar under my page header pic. This web tutorial is the best I have ever seen, and really is why I am writing this post. Nicole at The Pixel Boutique did a superb job, and has my full attention.
  3. Adding background image: At Tips For New Bloggers, I found a great tut on this fairly simple tutorial (click here). There are many helpful tutorials on jazzing up your blog on this site.

I also found a site with a list of top blogger resources here at Blogger Plugins. I plan to make the background for my sidebars a different color than for my main post area. I am also considering placing both sidebars on the right and main post on left. Undecided. There are some widgets I plan to add, like blogs i heart, and so forth. I am trying to figure out how to put all of my favorite links in one spot accessible by a link in my new horizontal nav bar (which may just have a new background color next time you see it).

Ok, my husband is giving me that look. You know the one. The -are you seriously still on the computer… really- look!”
So grateful for all of the awesome tutorials I found out there. Much love!!

Bible in 90 Days Progress Report…


So, there I am, obediently reading the day’s assigned pages for “Bible in 90 Days” challenge. Lots to do today in general. Was tempted to just jump into the pulse and start doing, but resisted, knowing that I must keep on the regimen of BIBLE first if I am to finish this task. It was a milestone – 30 days completed, 1/3 of the way through the Bible. Unbelievable. I am starting to tire, to be honest. But I have faith I will be provided what I need to endure.
Anyway… cute beagle (you may have seen his portrait I posted yesterday on FB, and the ensuing comment flux) jumps up to cuddle, so I think. I was stunned to find him projectile vomiting in my lap. Good news… none got on the Bible, and I finished my reading before handling the situation. My favorite passage from today’s Word, you ask… 1 Chronicles 16:34 “Give thanks to the Lord, for he is good; his love endures forever.” Filled me with gratitude, despite lap vomit.

Amigurumi Monster Pattern

This is what I made for my rockin’ nephew, Taylor. He appropriately named his new buddy “Top Hat Head”. Gotta love how that kid thinks. He makes me laugh joyously.

The pattern came from Roxycraft, which you can find by clicking here. Her patterns are crazy cool. I bought the whole package deal from her, and have had a blast playing with her designs. If you don’t already own them, you need to.

Country Shelves Turned Distressed Chic Hip…


I found these oak, country 80’s knick knack shelves at Goodwill for $2.99 total. They were brown oak, which you can kinda see through the first coat of the black spray paint. I was so excited to do these that I forgot to photograph them before I jumped in, but you can imagine. Brown, totally outdated country heart shelves. Moving on…

Instructions:
Sand lightly and spray paint with black (I used flat Rustoleum). Let dry and recoat if needed. With acrylic paint pen by Sharpie, I added gold to the edges and lightly sanded for a distressed look once dry. I sprayed a coat of matte finish. Onto embellisments…
I slapped some scrapbook chipboard shapes to cover the hearts. Added some bows and flowers, attaching everything to the shelves with a dab of hot glue.
I also drilled a hole in the bottom of each shelf for the knob placement. Hard to tell in the pics, but the flowers each have a letter in the middle, spelling “FAITH” down the shelf on the left. Adorable, cheap, and easy. The shelves I mean.

Monday’s Mania

Ok. New tradition for my new blog. I know I said I wasn’t posting for a few days, but this is a nice break from trying to figure out HTML.
I am big on assigning tasks to weekdays beginning with the same letter. It started with “Trash Tuesday”, which helped me remember the pickup day in my new neighborhood. It has taken off from there, and was bound to find its way into my blogging. So, Monday’s post will be “Monday Mania” – a place for me to share whatever creative obsession lingers from the weekend. Enjoy!

1. Crochet Washcloths – Pictured above are the bathroom cloths I made over the weekend. I plan to use the color palate in the other pic, showing my project cotton yarn. I was inspired by this free pattern at lionbrand.com. You do have to register to get access to their patterns, which is free as well.
I opted for the much cheaper yarn (peaches and cream) which I got at wal mart for $1.27. I had never made crochet washcloths before, and never really cared to until I ran across this pattern. I have been using one to was my face and for makeup remover at night. It is actually quite soft, and a little more special since I made it myself.
If you have never crocheted, I highly recommend starting. There are tons of online tutorials to get you started, and this will be a quick, easy project to begin your new craft. I taught myself using Crochet Cabana, an amazing website loaded with in depth tutorials for novices. That was 6 years ago and I am rarely without hook in hand. I being able to make anything from afghans to mittens to cutie little amigurumi. Quite gratifying.
Let me know if you have questions!

Breaking from Posts for a few days…


So that I can learn to spruce up my page designs. I hope to return equipped with a fancy pants site. Thanks to those who have gone before me, and then left tips. I promise to give back in that same way, so stay tuned.

I leave you with my nephew, A.J. – who not only knows a really cool trick involving mentos and diet coke, but coordinates well with home decor (see pic).

Easy No-bake Cookie Recipe


These are my usual contribution to pitch ins and parties. People absolutely love them. I like to promote them as being calorie free, but you will find out the truth when you read the following recipe…

Ingredients:
1 cup milk
2 sticks butter
4 cups sugar
1 cup peanut butter (i use crunchy)
2 tsp vanilla extract
6 cups Quick Oats
4 tablespoons unsweetened cocoa powder
(the above measurements make a mountain of cookies – depending on how you size them when you drop them on wax paper, about 70. You can halve the recipe if you don’t need that many, but in my experience, they disappear like magic)!
Directions:
Put 1st three ingredients in sauce pan and heat to a rolling boil, while stirring. When it comes to a rolling boil, wait onc minute and remove from heat. While waiting for that to boil, combine remaining ingredients in mixing bowl. After removing the saucepan from heat, pour in dry ingredients and stir until mixed. Line counter tops with wax paper and drop mixture into dallops onto the paper. Let stand until cookies harden. Usually about 1 hour.
Note: If cookies don’t set up, you didn’t let them boil at a roll for a full minute. If they are too dry, you let them boil too long.
Let me know if you have questions.
Privacy Policy