Make Fabric Scrap Bracelets

[pinit]

Easy DIY Scrap Fabric Bracelets

[pinit]

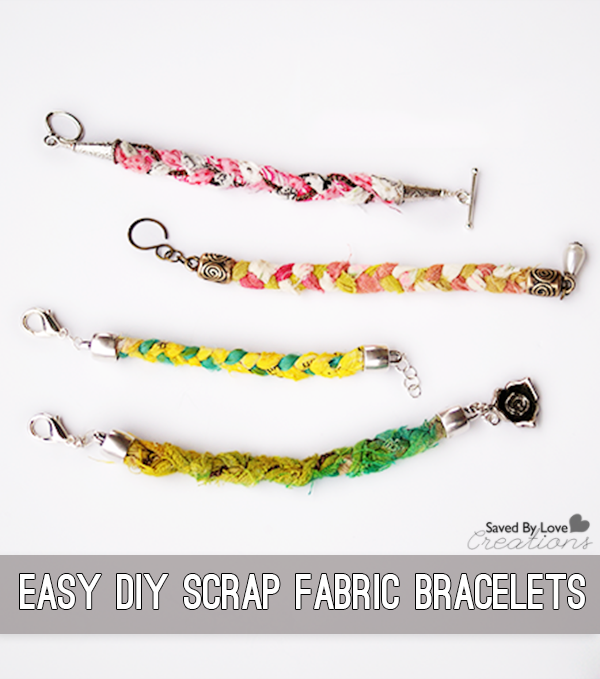
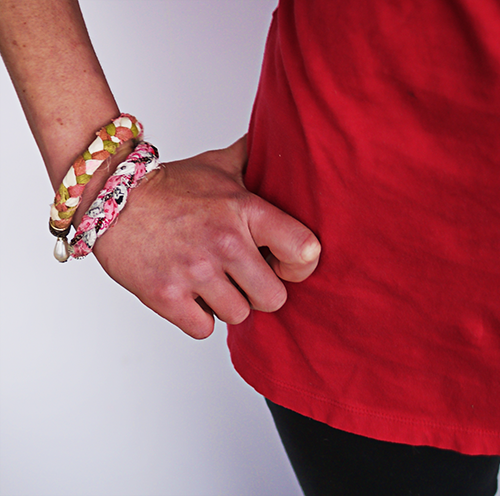
Today I am excited to share a simple scrap fabric project that leaves you with a gorgeous braided bracelet.  If you can braid and glue, you can make this!  I used leftover scraps and a white tea towel which I sprayed with Dylusions ink.  The great thing about these bracelets is you can use any fabric and go crazy with colors to fit your style.  T-shirts, old sheets, vintage hankies, lace, ribbons  would work great.  Make several for gifts.  They work up quickly and easily!

Let’s get started…

ScrapFabricBracelet1

SUPPLIES:

Fabric scraps

Fabric scissors or rotary cutter and mat

End caps or wire and cones (see link in tutorial for what to do if you don’t have end caps)

Industrial strength glue (pictured in tutorial is Fabri-Tac, which did not hold, so I ended up using E6000 which holds about anything to anything but is stinky)

Jewelry findings: Jump rings and toggle clasps

Sewing thread

Easy Scrap Fabric Bracelet DIY from @savedbyloves #DIY #Jewelry #Upcycle

TUTORIAL:

Cut fabric into strips about 10 inches long and 1-3 inches wide (depending on how thick your fabric is and how chunky you want your bracelet).

Using three strips per bracelet  :Gather the strips and tie knot at one end with 15 inches of thread, leaving an inch tail of the fabric strands.

Wrap thread around several times at the top of the braid and double knot, then trim excess thread. (For a detailed photo tutorial of this part, see my kumihimo tutorial)

Braid the three strands until bracelet is about one inch shorter than you want the finished piece to be.

Wrap thread around 10-15 times like you did at the top, then knot and trim excess thread.

Put a dab of glue on the thread for added security and cut off each end of fabric braid right up to the thread. (NOTE:  if you want to use wire and cone beads instead of end caps, see the kumihimo tutorial I mentioned previously).

Put glue in end caps and insert each end of braided strand into an end cap.

Attach toggle clasp with jump rings.  You can add charms if you like.

The End!

ScrapFabricBracelet4

Recycled Pop Can Heart Earrings

[pinit]

#DIY #Upcycled Recycled aluminum can heart earrings by @savedbyloves

Need some earrings to show your Valentine’s Day spirit?  Give these recycled Coke can heart earrings a try.  They are super cheap to create, and your friends will be amazed that they came from a can.  You can used a paper punch or a die cut machine for the heart shape.  The embossing can be done with a die cut machine or embossing folder and rolling pin, like I showed you in my recycled can heart bezel pendant tutorial.

#DIY #Upcycled Recycled aluminum can heart earrings by @savedbyloves

SUPPLIES

Aluminum can

4 4mm jump rings

Earring wires

Metal hole punch

Texture embossing folder

ICE resin

Vintaj relief block

Red acrylic paint and sponge brush

Metal primer

2 pairs of flat nose jewelry pliers

TUTORIAL

Cut aluminum can and primer

See recycled can heart bezel pendant for more details on preparing the can.

Emboss and cut heart shapes

I showed you in the heart bezel pendant tutorial  (linked above) how you can emboss without an embossing machine.  Emboss first, then cut shape (aren’t you proud, Amy?)!

vintaj reliefing block

apply ICE jeweler's grade resin

To dome the resin, pour in middle and pull out to edges with toothpick or needle tool.  Don’t pour too much.  You can always add more resin if needed.  Having resin run over the edges of your piece is no fun.  Seriously.

doming resin instructions

When resin is dry, paint the other side of the earring and hole punch for jump ring placement.

metal hole punch tutorial

punch holes for jump ring placement

Use pliers to open jump ring and attach it to another jump ring and an ear wire.  Close, then open end ring an attach to heart.

inserting jump rings into earring holes

That’s it!

Make upcycled aluminum can jewelry @savedbyloves

DIY Upcycled Pop Can & Resin Heart Pendant

[pinit]#Recycle aluminum cans into gorgeous jewelry #Resin #Upcycle @savedbyloves #DIY @Crafts

Do you have a pile of aluminum cans in recycling bin purgatory?  Well, if you have been around here long, you know I love to cut my cans and form them into various upcycled jewelry pieces.  Today, I am going to show you how I used a coke can, a bezel and some resin to create this fun, one of a kind heart pendant.  It would make a lovely gift for many occasions, and especially the rapidly approaching Valentine’s Day Holiday.  I made it for a gift and personalized it with a monogram stamped charm.  You don’t need a lot of expensive supplies and equipment to one of these yourself.  Here is how…

SUPPLIES

Empty Soda Can, rinsed with warm soapy water

Jewelry Shoppe Heart Bezel and corresponding heart paper punch (got mine at Hobby Lobby)

Resin Jewelry Tutorial, Upcycled Jewelry Tutorial

-OR-

Any heart shape bezel and a sharpie or other permanent marker

Glossy Accents or other metal glue

Grungeboard or scrap cardboard

Embossing folder and machine

Perfect Pearls

3 colors of acrylic paint

Metal paint primer (I used Martha Stewart’s)

Vintaj Sanding Block

Magic Glos Resin

INSTRUCTIONS

#Upcycled Recycled aluminum can jewelry #DIY #Craft tutorial @savedbyloves [pinit]

This project came about as I was doing another project that I haven’t shared with you yet.  There was a leftover aluminum can punched heart shape, and I remembered I had the corresponding bezel.  I found the bezel and paper punch at Hobby Lobby (by My Jewelry Shoppe) a couple of months back.  I decided to emboss the heart and add some acrylic paint and Liquid Pearls for a cool effect.

#Recycle aluminum cans into gorgeous jewelry #Resin #Upcycle @savedbyloves #DIY @Crafts

For the other project, I needed rectangles with a heart cut out in the middle.  If you just want the heart shape used in this tutorial, you don’t have to worry about cutting perfect rectangles.  Just primer and paint your can sheet and punch the heart shape from it.  I showed you how to cut the cans into a sheet in the video here…

Make an aluminum can pendant
Trace the heart twice onto grungeboard, thick cardstock or cardboard and cut out inside the outlines with scissors.  Glue the cardboard hearts together, then glue to bezel.  Use clothespin to apply pressure for good adhesion.  This gives thickness to the thin can top layer.
Emboss your painted and primed can heart.  I used Tim Holtz Texture Fades embossing folder – Pattern and Stitches Set and my Sizzix Vagabond.  It you don’t have an embossing machine, you can hand emboss, or use the folder and a rolling pin like in this video by Sarah Hamer:

Now apply a second paint color over your base (Ranger Paint Dauber color Pool used here).

Ranger Paint Daubbers Pool

Ranger Paint Daubbers Pool

Let dry and and sand with sanding block to distress as desired.  Not shown here, but in my final pendant, I added a third paint color.  The red made the pendant pop.  If you sand away too much paint, it’s ok.  Just paint again and sand until you are happy with your piece.  The raised areas will lose color when you sand, while the depressed areas hold color.  The embossed design is enhanced by the contrast.  So fun!

How to emboss metal jewelry

How to emboss metal jewelry

When you are happy with your paint job, glue heart into pendant bezel on top of cardboard base as shown.  Hold in place with clothespin while glue dries.

How to emboss metal jewelry2

How to use Magic Glos resin

Let glue dry completely, then apply Magic Glos resin like I showed you in this Plaid Ring Bling tutorial.

You can use any resin you want.  I just had this on hand, and love the fact that it cures in minutes vs. the hours it takes 2 part resins to cure.  Maybe you are more patient than me!

Add chain and charms as desired and you are done!

#Upcycled Recycled aluminum can jewelry #DIY #Craft tutorial @savedbyloves

HeartBezelPendantDIY8

Upcycle: Bike Chain to Bracelet

Bike Chain to Bracelet #Upcycle @savedbyloves #Recycle #jewelryDIY

[pinit]

I inherited a box of junk from a friend who thought I would be able to create some lovelies with its contents.  One of the items was a bicycle chain.  I found a video (see below) on Threadbanger that I used to upcycle the bike chain into a bracelet.  I used a large jump ring and clasp for my closure after popping the pin out at the correct chain length for my wrist.  The video is pretty easy to follow.

Bike Chain to Bracelet #Upcycle @savedbyloves #Recycle #jewelryDIY

Bike Chain to Bracelet #Upcycle @savedbyloves #Recycle #jewelryDIY


How to make a Bike Chain Bracelet – Threadbanger by threadbanger
Bike Chain to Bracelet #Upcycle @savedbyloves #Recycle #jewelryDIY

Amazing Alcohol Ink Project Roundup

Things to make from alcohol inks from @pluckingDaisy

Alcohol inks have been a favorite medium of mine since first trying them a few years ago.  If you have never used these inks, get some and be amazed.  They come in an amazing array of colors, and are intended for use on non-porous surfaces like glass and metal.  I bring this up because my fabulous friend Amy at Plucking Daisies has rocked my world with this alcohol ink project round-up she has painstakingly assembled.  Grab some ink and explore this one of a kind list of the best projects incorporating this fun medium out there.

50+ Ways to Reuse Old Belts

50+Old Belt Projects to make at @savedbyloves savedbylovecreations.com #upcycle #repurpose

Got old belts just lying around, serving no purpose? This week, our 50+ roundup will give you plenty of ideas for repurposing them into useful, even stylish, handmade goods. We always try to limit our entries to projects with great tutorials. While there are many tutorials linked here, you will run into a couple of Etsy listings, and photo posts with no tutorial. That is because they were so cool that I couldn’t leave them out of the round-up. Use them as inspiration, and challenge yourself to derive the technique. Then you can share the process with us! Several of these are on my list to complete, beginning with the woven seat from belts! Enjoy, and as always, if you have a belt project we missed, send us the link so we can spread the word about your genius upcycle.


Upcycled Belt Bracelet Video DIY

Upcycled Belt Bracelet with video tutorial from savedbylovecreations.com #repurpose #crafts #totallygreecrafts

Upcycled Belt Bracelet with video tutorial from savedbylovecreations.com #repurpose #crafts #totallygreecrafts


This video tutorial shows you how to use those belts in your donate pile to make customizable cuff bracelets.  The idea came to me when my husband gave me the belt that with a pair of shorts.  He was going to get rid of it, but passed it my way in and challenged me to repurpose it.  It is a perfect frugal handmade gift for all occasions.  I have already made and gifted several of these.

Upcycled Belt Bracelet with video tutorial from savedbylovecreations.com

VIDEO TUTORIAL:


Halloween Decor With {Scrapbooking} Attitude

Scrapbooking Attitude Halloween Decor DIY at savedbylovecreations.com #ScrapAttitude #Halloween #Fall #Crafts

I had the opportunity to try out a cool new product called Scrapbooking Attitude, and am excited to tell you about it.  This is a printable, transparent film you use with your inkjet printer for endless creative possibilities.  Being a huge fan of image transfers, I was thrilled to give this a whirl.

50+ Image Transfer Techniques

Image transfers are done onto glass, wood, paper, polymer clay, ceramic and more, using a variety of techniques, from acrylic mediums to packing tape.  What I love about Scrapbooking Attitude is that it is simple to use, the results are fantastic (even on the embossed, textured surface I used in this project), and it requires an inkjet.  In my experience, inkjet transfers techniques compared to laserjet are not as abundant, are more difficult, and don’t come out  as nicely.  This is bad news since most people, myself included, have the less costly inkjet printer at home.  Scrapbooking Attitude is a fantastic solution.  My only problem was focusing in on a single project.  You will be seeing me use this product more in future projects.   For this post, I went all Halloween on you.

Scrapbooking Attitude Halloween Decorating

The following step-by-step photo tutorial shows you how I transfered “EEK” and spider graphics I created in Photoshop (available for you use as a free Halloween Printable) onto die cut, embossed paper for the banner.  I used the same steps to transfer the spider web graphics onto an old book with a solid orange cover.

SUPPLIES:

Scrapbooking Attitude

Die Cut, embossed white cardstock  (I used this Tim Holtz die for Sizzix, and this Tim Holtz embossing folder)

Antique Linen Distress Ink Pad to ink the raised areas of the embossed cardstock

Mod Podge

Foam brush

Twine

Tiny white clothespins

Black Cardstock Die Cut Scalloped rectangle (I used a Sizzix scallop rectangle die)

Antique Linen Distress Ink Pad

Scissors

Inkjet Printer

Mod Podge 3D foam mounts

TUTORIAL:

Scrapbooking Attitude Halloween Decor Tutorial

 Once dry, I layered the transferred image and shape onto a black cardstock scalloped rectangle cut using Sizzix.  I used Mod Podge 3D foam mounts to adhere the layers.  Then I just clipped them into place on the twine with my tiny white clothespins.

I just love how this transferred into the grooves of the texture.  It looks like it is one with the paper and you can see the background through the image.  You can achieve the transfer with a lamination machine, an iron, or a glue stick, or use Mod Podge like I did here.  The instructions with the product are extremely detailed, and my craft blogging cohorts are posting their techniques, tips and tricks as well.  At the end of this post is a gallery of other blogger’s creations usiing Scrapbooking Attitude for you to see more of what is possible.

To purchase Scrapbooking Attitude packs, visit the website linked. While you are at it, join me in following them on Facebook, Twitter and YouTube for the latest tips and projects.


*I wrote this post as a part of a paid campaign with Scrapbooking Attitude and The Blueprint Social.  All opinions are mine and honest.


Easy DIY Copper Tube Rope Necklace

Copper Tube Necklace DIY

If you are looking for a beginner level, inexpensive, modern and versatile necklace to make, this copper tube necklace tutorial is just the project for you.  With just a few supplies from the hardware store, you will have a trendy piece of jewelry that can be dressy or casual.

The inspiration for this project came from this awesome DIY project book:

I Spy DIY by Jenni Radosevich

Copper Tube Necklace DIY

My copper tube necklace varies from the tutorial in this book, but the outcome is similar.  I love Krylon Dual for painting on, well anything, but especially metal.  The coverage is great, and no primer is needed since it is built into the paint.  Even with Krylon Flourescent, I didn’t use primer.  The paint dries fast, so turning the tube over to paint the other side can be done in 15 minutes.

Lets get started!

Easy Copper Tube Necklace DIY photo tutorial at savedbylovecreations.com

SUPPLIES:

Scissors

1/4 inch inner diameter soft copper tubing

Tube Cutter

Braided Hemp Cord

Darice 10mm silver end connectors

4-6 mm Silver Jump rings (2 per necklace)

Super glue or E6000

Hex Nuts

Silver Toggle Clasp

Chain nose pliers

Krylon Dual in Camp Green, Classic Gray, and Krylon Flourescent pink

TUTORIAL:

Copper Pipe Tube Necklace Tutorial

 I love these end connectors for round braided cord like in this project.  I picked mine up at Joann’s, and they are linked above in the supply list.

This necklace can be worn single, double or triple!  Just make sure to vary the length of the rope if you are wearing more than one at a time.

Disclaimer:  I received Krylon Dual Spray paint to try for this project.  If I hadn’t, I would have bought some and done the project, sharing exactly what I shared because I already love this paint.  All opinions are honest and mine!

Upcycle a Suitcase into a Table

Easy and quick tutorial for turning old suitcase into table at savedbylovecreations.com #upcycle #DIY #crafts #repurpose

This project is one of my favorites so far.  It was free, fast, and the outcome is super cool.  The suitcase was given to me by a friend, the table a curbside find.  Check out how I combined them in a repurpose taking less than 20 minutes.

SUPPLIES

Old Suitcase

Table with surface area that fits under suitcase (this only matters if you are using the legs in the same position as they are in the original table)

Pen

2 inch Construction Screws

Drill

Scrap wood cut small enough to fit inside suitcase, big enough to reach all leg contact points (you will put this in the suitcase and screw through it, the suitcase bottom and into the legs)

TUTORIAL

Easy and quick tutorial for turning old suitcase into table at savedbylovecreations.com #upcycle #DIY #crafts #repurpose

The details of your table may vary how you have to go about this, but you can do it.  Had my tabletop fit inside of my suitcase, I would have just put int in there and screwed the tabletop through the bottom of the suitcase into the legs.  Since it didn’t, I used scrap wood I had on hand that happened to fit inside and still cover the leg holes.  If you have a miter saw, a more precise (involved) version of the process can be found in this suitcase to table  tutorial from Stacie at Stars for Streetlights (who planted the idea in my head with her fantastic project).  I am satisfied with my 20 minute version!

Easy and quick tutorial for turning old suitcase into table at savedbylovecreations.com #upcycle #DIY #crafts #repurpose

Do you have any suitcase repurpose ideas or projects to share?  I still have 2 left and would love to hear from you.

Easy and quick tutorial for turning old suitcase into table at savedbylovecreations.com #upcycle #DIY #crafts #repurpose

Privacy Policy