

Archives for December 2009
Scrapbook Paper Wall Art
by
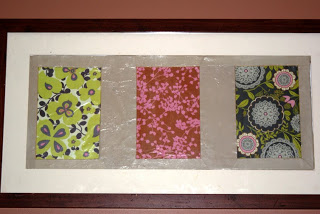

This project was super easy. These framed scrapbook wall pieces now hang in my stepdaughter’s bedroom and she loves them. Pretty self explanatory. I just took some scrapbook pages that coordinated well with my home decor, framed them in old cheap garage sale frames, and hung them! One of my very favorite things to do is to buy old frames with not so hip art, and replace the original art with my own prints. In this case scrapbook paper.
Frugal and cool. If you try this, post pics. The possibilities are endless. Let me know if you have questions.
Easy No-bake Cookie Recipe
by
 These are my usual contribution to pitch ins and parties. People absolutely love them. I like to promote them as being calorie free, but you will find out the truth when you read the following recipe…
Ingredients:
1 cup milk
2 sticks butter
4 cups sugar
1 cup peanut butter (i use crunchy)
2 tsp vanilla extract
6 cups Quick Oats
4 tablespoons unsweetened cocoa powder
(the above measurements make a mountain of cookies – depending on how you size them when you drop them on wax paper, about 70. You can halve the recipe if you don’t need that many, but in my experience, they disappear like magic)!
Directions:
Put 1st three ingredients in sauce pan and heat to a rolling boil, while stirring. When it comes to a rolling boil, wait onc minute and remove from heat. While waiting for that to boil, combine remaining ingredients in mixing bowl. After removing the saucepan from heat, pour in dry ingredients and stir until mixed. Line counter tops with wax paper and drop mixture into dallops onto the paper. Let stand until cookies harden. Usually about 1 hour.
Note: If cookies don’t set up, you didn’t let them boil at a roll for a full minute. If they are too dry, you let them boil too long.
Let me know if you have questions.
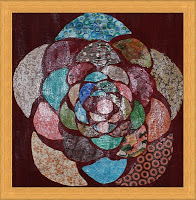
DIY fabric/paper wall hanging
by


I got the idea for this from a free instruction pamphlet at Joanne’s. I have no clue where that paper is, so can’t reference it (if you know, tell me and I will give the designer proper credit). Anyway, it was some kit with fabric quarters and canvas with lines drawn in the sun shape you see here to guide placement of the fabric pieces. Instead of buying the fabric and canvases, I found some cheap square already painted on canvases from Goodwill and used fabrics and scrapbook paper I had at home. I used modge podge to make everthing stick. This piece is a favorite of mine for sure. Let me know if you have questions!
Fabric Wall Hanging DIY
by
 This is an old tapestry I got at Pier One, probably 10 years ago. I have draped it over various things in the slew of apartments I inhabited during college. It’s edges are worn in spots, and it just needed to go, or to take on a new form.
For this EASY project you will need:
1. Any piece of fabric you would like to display as shown. I bet you could score a treasure if you put in some thrift store time.
2. An unfinished wood dowel rod and “knobs” – I got both at Joanne’s (can you tell it is around the corner from my house?), for a couple of dollars. Any curtain rod would work.
3. Tassels or other embellishments.
4. Wood stain if you want, or just leave rod as is.
5. Curtain clip rings large enough in diameter to
slide onto your rod.
And Viola! My stepdaughter actually asked if there was a window behind it. Oh, Michelle.
Let me know it you have questions.
More Crocheted Cuteness, and Quick Gift Ideas!
by
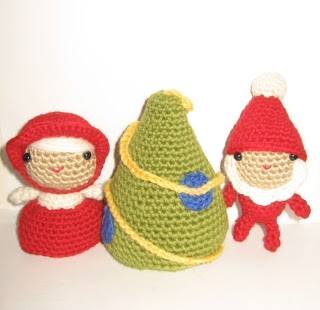

I LOVE amigurumi, and my niece is enthralled with cupcakes. I found this awesome cupcake pattern in Ana Paula Rimoli’s book “Amigurumi World: Seriously Cute Crochet”. See her Etsy store here.
This jewel worked up quickly. The only changes I made are:
instead of seed beads for sprinkles, I used needle felting on roving
wool in red, blue, green and white. Also, I left off the mouth.
Ana Paula Rimoli has the most adorable patterns. I am in love with her Mr. and Mrs. Claus with Christmas tree (pictured above). She has posted the patterns for free on her blog. I just came across this gift, so… I have more cuteness to crochet before Friday. Thanks, Ana. You rock! Merry Christmas!!
Cutest Felted Snowmen from Knit Picks
by
 Pictured is my version of the Knit Pick snowmen pattern, available for free download! I used Moda Dea bamboo wool in cream, and it felted fine in the washer on hot (2 cycles, with detergent). I abandoned the pattern in terms of accessories, mainly because I find crochet to be faster than knitting, and I was in a hurry. I just crocheted the earmuffs, hat and scarf.
I am in love with these little guys. This pair is going to my grandparents for Christmas. The shorter one will have a scarf, or a nice winter poncho of sorts. I will post when finished! Just wanted to get something posted today, and there is still time to whip up a couple of these for last minute gifts. I am happy to write out a pattern for the hats and earmuffs, but since I have 2 followers including myself, and Unholy Nancy doesn’t crochet, you will have to message me and request it!
Many holiday blessings!
Pier One inspired fabric wall flower…
by
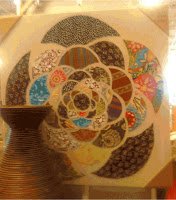
While at Pier One last weekend, I saw this fun decoupage fabric flower canvas. The price tag was something like… $way to much and ten cents, so I decided to create my own version for way less. I snapped a photo with my handy dandy phone and was off to hack this must have piece. After some photoshop time, I had templates for the petals from my phone pic and the fun began. Here is my final piece, and how I did it!

You will need:
*Canvas (got mine at goodwill, had a painting on it – $3, size 24x36in)
*A piece of material large enough to cover your canvas and wrap around the edges wrapping a gift. Mine came from the fabric remnant bin at Joanne’s fabric; $2.99
*Several pieces of fabric with various prints to coordinate with your home decor, for the petals (mine are leftover scraps from previous endeavors)
*Scissors, Modge Podge or other decoupage medium
*Paper and printer for template to cut the petals out of the fabric scraps
*Staple gun or hot glue gun to attach background fabric to canvas
Instructions:
1. Iron background fabric if need be
2. Attach to canvas, wrapping like a gift and stapling on backside (Great How About Orange tutorial here).
3. I used the actual photo I shot with my cell phone (above), opened it in photoshop, blew it up to 400% ,and printed out the different petals (there are five different sized petals, and the central circle)
4. Count the petals to determine how many of each size you will need, and cut them out of your fabric.
5. Arrange them on the canvas, on top of the attached background fabric, and coat each petal generously with modge podge. I painted on 2 additional coats of 3/4 modge podge 1/4 water, allowing the piece to dry between each.
I think that’s it. Let me know if you have questions. And show us your pics when you are finished!
