DIY Recycled T Shirt Rug Tutorial

How to crochet a round rug from DIY Tshirt yarn @savedbyloves


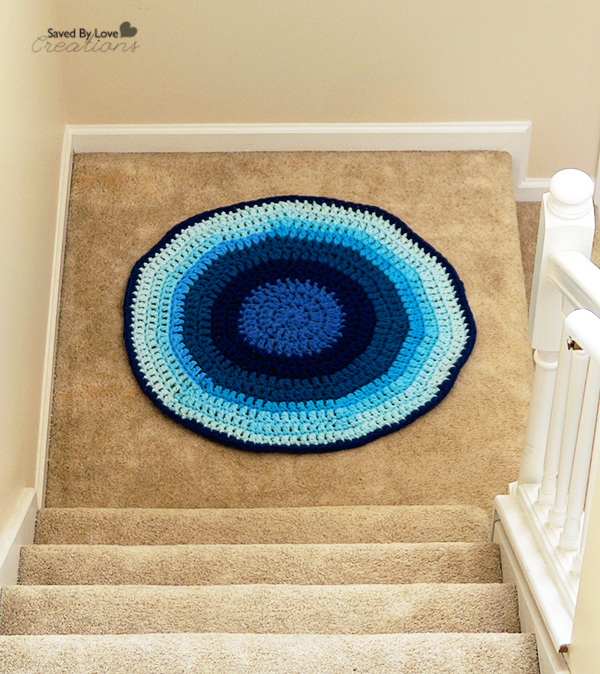
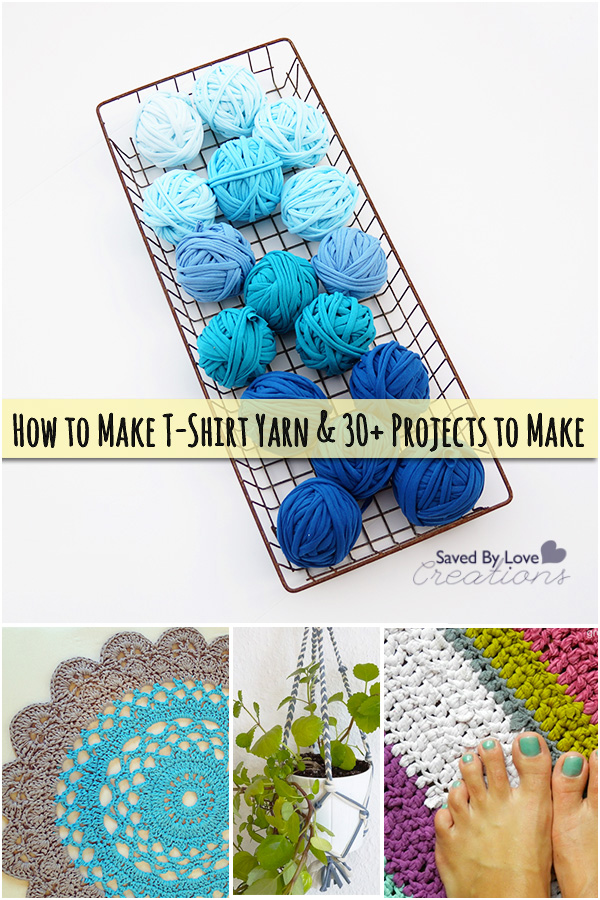
Last week I shared with you How to Make T-Shirt Yarn along with over 30 projects to make with it. I showed you the pile of yarn I whipped up in various shades of blue:

How to Make tshirt yarn and 30 Plus projects to make @savedbyloves

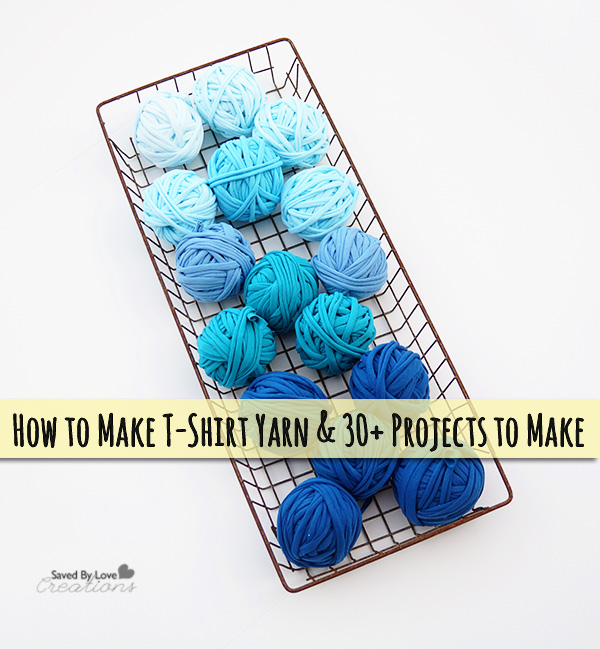
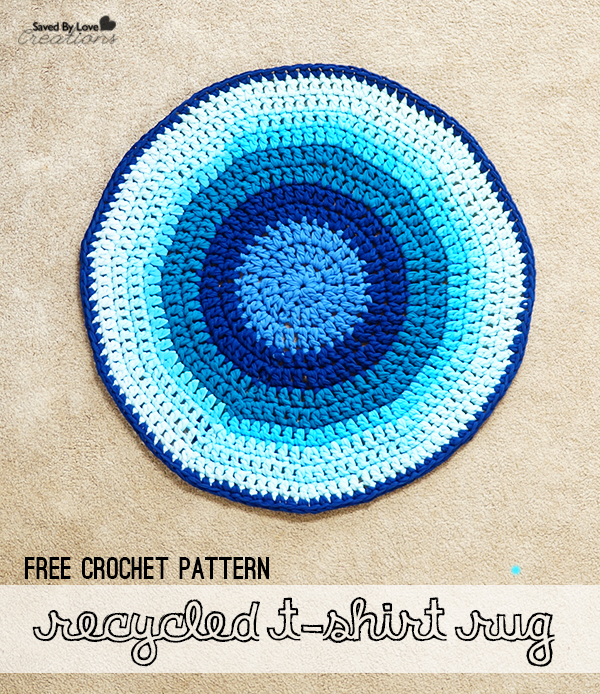
Today I am sharing the pattern I used to create my round t-shirt rug from my handmade yarn! My rug is worked in the round, and I was able to get 11 double crochet rounds (or rows) from the yarn pictured. To get the gradient effect for the blues, I used Tulip fabric tie dye in turquoise. I just dyed a white shirt, diluted the solution with water, dyed the next white shirt, diluted with water once more and dyed two white shirts. I dried these in the dryer, then cut into continuous t-shirt yarn as shown in the tutorial linked.

Recycled Tshirt Yarn Rug Tutorial

It took some trial and error to make this flat circle rug with my t-shirt yarn. The first attempt, I used a Size P (10.0 mm). I was much happier when I went up a size to Q (15.75 mm). It was WAY easier to work with the yarn using the larger hook! I made my strips 1.5 inches wide and this was the best hook size.

Crochet in the round

Here is the pattern:

To begin, either use the magic ring method, or Ch 4 and join with a slst to form a ring.

Round 1:  Ch3. 11 x dc into the ring. Join by making a slst into the top of the first dc.

Round 2: Ch3. Dc inc in the next st and each st around.The last dc inc will fall in the back end of the sl st join, which is quite tight, but that is how I learned to crochet (and design).  Join to the first dc with a sl st.

Round 3: Ch3. *Dc inc, dc* x 11.  Join to the first st with a sl st.

Round 4: Ch3. *Dc inc, 2 x dc* x 11.  Join to the first st with a sl st.

Round 5: Ch3. *Dc inc, 3 x dc* x 11.  Join to the first st with a sl st.

Round 6: Ch3. *Dc inc, 4 x dc* x 11.  Join to the first st with a sl st.

Round 7: Ch3. *Dc inc, 5 x dc* x 11.  Join to the first st with a sl st.

Round 8: Ch3. *Dc inc, 6 x dc* x 11.  Join to the first st with a sl st.

Round 9: Ch3. *Dc inc, 7 x dc* x 11.  Join to the first st with a sl st.

Round 10: Ch3. *Dc inc, 8 x dc* x 11.  Join to the first st with a sl st.

Round 11: Ch3. *Dc inc, 9 x dc* x 11.  Join to the first st with a sl st.

***I stopped at 11 rounds, but if you want to keep going, just increase the number of single stitches between increases by one for each round.

To finish: Ch 1. Sc in every stitch around. Join by making a sl st into the first st. Ch 1 and bind off.

Double Crochet Round Rug Free Pattern

50 Plus Awesome Accent Walls

50 Plus Amazing DIY Accent Wall IdeasWhen we moved into our new house, we went neutral with the walls as we painted. My thought was to save the boldness for accents. Well, now it is time for some accent walls. I gathered some of my favorites creative accent wall ideas on a budget to share with you. If I missed yours, leave me the link in the comments below. There are some great ideas on the cheap, and several easily removable temporary ideas. I hope you are inspired to liven your favorite space with some stencils, planks, stripes, panels or something else new!


50 Plus Amazing DIY Accent Wall Ideas FB

Valentine’s Day Washi Tape Charms

DIY Washi Tape Resin Charms for Valentines Day

Today’s project is a washi tape and resin craft that makes the perfect Valentine’s Day gift! Follow along as we die cut washi tape and apply ICE resin for a quick and easy charm that you can customize to fit your needs.

Valentines Day Washi Tape Craft

I was inspired on a recent trip to the craft store by these Valentine’s Day prints on washi tape by Hampton Arts.

Valentines Day Washi Tape Craft 3

I covered white card stock with strips of the tape as shown.

Valentines Day Washi Tape Craft 4

I folded the excess tape over the back of the paper. If you want your charms two sided, you could cover the entire back in tape as well, or use printed scrap book paper instead of white card stock.

Valentines Day Washi Tape Craft 5

I cut the tape covered paper with these heart dies by Spellbinder’s Media Mixage.

Valentines Day Washi Tape Craft 6

Here is what they look like after die cutting the shapes.

Valentines Day Washi Tape Craft 7

I sealed the front and back of the hearts with Iced Enamels Medium. If you don’t seal the paper tape, the resin will darken it and look funny. Let dry.

ICE Resin

I used ICE Resin on my charms. You could use any jewelry grade resin, or Mod Podge Dimensional Magic.

Valentines Day Washi Tape Craft 8

Following the directions on the resin package, I mixed the two parts in a plastic dixie cup with a clean craft stick.

Valentines Day Washi Tape Craft 9TIP: Place the paper hearts on top of sticky contact paper to keep them flat while resin dries.

Use the toothpick to drip the resin onto the hearts.

DIY Washi Tape Valentine's Day Jewelry Idea

Hole punch the hearts once dry. The resin instructions say 6-12 hours. I let mine sit overnight and used a jewelry hole punch to place holes for jump rings.

Washi Tape Crafts

Add keychain fobs and other charms. I went for keychains with the larger hearts. I will be using the smaller hearts for earrings!

How to Make T-shirt yarn and 30 Plus Projects to Make

How to Make tshirt yarn and 30 Plus projects to make @savedbyloves

I have been a busy girl creating yarn from old t-shirts. Did you know you can make a continuous strand of yarn and create a sizable roll of yarn from just shirt? Once you have created your yarn, the potential projects you can create are unlimited.

I used the exact process shown in this video DIY from Releve Design. I have a couple of tips to contribute to this excellent tutorial. Try to find the cheap cotton t-shirts without side seams. They are best so you won’t have bumps where the seams would be. If you want specific colors like I did, you can stock up on white t-shirts from you local thrift store and die them. I created a gradient in blues this way, using the same dye and process I showed you in this ombre Father’s Day gift post
I plan to make a rug, but you can pretty much make any crochet or knitting pattern with this upcycled t-shirt yarn. Here are 30+ t-shirt yarn projects to get you going. Enjoy!


How-to-Make-tshirt-yarn-and-30-Plus-projects-to-make-@savedbyloves

Found Object to Upcycled Lighting

DIY Upcycled Light from @savedbylovesI say “found object” because I am 98.9% unsure what it is. I went through a phase where I scooped up anything that I could picture as a light fixture or hanging pendant lamp and that was cheap. This one I was particularly excited about since I got it for $5 and it was just waiting to house a lightbulb. I finally got around to making it happen as the final step in our laundry room renovation. At the thrift shop where I purchased it, I was told it is an old cow milk filter. Don’t worry, I cleaned it well before mounting it on my ceiling!

Old Cow Milk Filter to Light Fixture

Found object lighting

Here it was to start. I cleaned it with baby wipes and sprayed Mod Podge matte finish on it to seal it.

Update old lighting

I removed this brass fixture that I was dying to replace. It dangled there until my husband got home from work since I had no idea what I was doing and didn’t feel like being electrocuted.

How to update lighting

This milk filter was perfect to wire and hang because of all the holes. We just removed the socket from the old fixture and thread the wires through the top of the filter.

DIY Found Object Light FixtureWe used screws with washers to reattach to the ceiling and that was it!

Upcycled Lighting

We love it! So unique and such an improvement from the brass.  Oh yeah, and it cost $5, let’s not forget!

Visit our 50+ DIY Lighting Ideas for more inspiration!


DIY Mudroom Storage Bench and Coat Rack

DIY Mudroom Storage Bench Free Woodworking Plans @savedbylovesOur laundry room is the high traffic area of the house. We go through it every time we come or go from the house. It had been crying out for a place to hang coats and to drop off “stuff” rather than haul it in and lay it on the kitchen table. One Saturday my husband decided that he was going to throw together some sort of a coat rack / bench that would serve our needs. Once he got me going on the idea it turned into a full blown re-do of the room. I have shown you the Free Laundry Room Printables and DIY Hardware Update, and today I am sharing how to make this fabulous mudroom bench/coat rack. This project was pretty easy once we got started, and cost under $150! We LOVE it. It is super handy, and it prompted us to paint and replace the floor in the room. It is now my favorite room in the house! On to the project.

Shopping List

1. 3/4-inch birch-veneer plywood to build the seat box. Get one 4×8 sheet.

2. exterior-grade beadboard plywood to make the back panel on the wall. One 4×4 sheet will cover the area.

3. 1×16 solid-wood panel to make the seat lid. Get one 6-foot board.

4. 1×12 solid-wood panel to make the fascia board and shelf. Get two 6-foot boards.

5. 2×4 to create a support strip for the hinges that hold the box lid. Get 6 feet.

6. 1×4 to create the applied paneling on the front and sides of the box. Get four 8-foot boards.

7. 1×2 to cap the unfinished top edges of the bench box. Get 10 feet.

8. 3/8×7/8-inch panel molding to add a picture-frame detail to the paneling on the box and to trim above and below the beadboard panel. Get five 8-foot lengths.

9. ½x1-inch parting bead to finish the edges of the beadboard plywood.

10. 3/4-inch quarter-round molding to trim the beadboard panel and the base of the box. Get 16 feet.11. ½x7/8-inch decorative shoe molding to trim out the shelf, seat lid, and fascia. Get three 8-foot lengths.

12. 9-inch shelf brackets

13. 2-inch L-brackets to secure the box to the floor. Get seven.

14. European cabinet hinges to allow the lid to overlay the box and open smoothly. Choose ones that are labeled “for frameless cabinets.” Get three.

15. Toy-box lid supports to keep the lid from slamming shut. Get two to support the weight of the lid.

16. 1 5/8-inch deck screws

17. 3½-inch deck screws

18. 2½-inch deck screws

19. 2-inch trim-head screws

20. 2d finish nails

21. 3d finish nails

22. carpenter’s glue

23. vinyl adhesive caulk

24. 180-grit sandpaper

25. Shims


THE BENCH

The bench I chose was modeled after a picture I saw of a classic entry hall built-in I saw on the This old house blog. It had everything we wanted; a place to sit, a place to store stuff, a shelf and plenty of coat hook space. All of this combined into a really nicely appointed, decorative piece that looks nice fits the room. We made adjustment to the plans to fit our needs where necessary. The dimensions were altered because our particular space required the bench to fit in a corner. Likewise, I changed a few pieces of the trim work to suit our taste. The shopping list I’m going to provide you will cover the better part of your project for the size bench we used. If you decide you want to expand or alter to fit your room then you might need to modify your purchase list accordingly. Here’s the one I used to start.

  1. Build and trim out the bench seat:


I found the best spot in my laundry room was in one of the corners. So the first thing I did was take up the baseboard around the entire room. Next I just built a simple plywood box that would become the bench. No need to put a bottom in it. The box dimensions for my particular spot turned out to be 451/2 inches wide by 18 1/4 inches deep by 16-3/4 inches tall. Build this box out of ¾ inch “good-one-side” plywood. Try to get the box to sit as level on the floor as possible and fasten through the back into the studs in the wall using 2.5 inch deck screws. Just a couple or three places will be plenty. The Top of the box (which will be the bench seat is going to be made from the same ¾ inch plywood. It will need to overhang the box by about ½ inch on the front and the sides. But it will not go all the way to the back. ( you will see why later) Also, if your situation is like mine, where the bench will butt up against a wall in the corner, the top wont overlap on that side. So the dimension of my Top piece was 46 ½ by 16 inches.


  1. Install the hinge support

Using a miter-saw, cut a 2×4 to fit the inside of the box along the back wall. Cut a 3½-inch-wide strip of plywood to the same length. Screw the pieces together with 15/8-inch deck screws. Position the 2×4 assembly along the back of the box, 3/4 inch above the back edge. Screw it on, through the box and into the studs, using 3½-inch deck screws. This piece will later be hidden by a plywood strip and molding. This is why the top is not as deep as the whole box. This is where the hinges are going to fasten.
Screw L-brackets inside the box and to the floor, three inside the front edge and two on each side, to hold the box in place.

  1. Attach the panel molding to the seat.Next, I trimmed out the front and the one visible side of my box with 1 x 4 boards. This gives the box a dimensional, shadow box appearance. Cut the 1 x 4 so that the long pieces fit inside the two shorter upright pieces. This way you don’t see a cut edge. To create a profile on the inner edge of the 1×4 framing, cut panel molding to fit inside the 1×4 rectangles. Miter the ends of the molding. Nail the molding to the box, tight against the 1x4s, with 2d nails.


  1. Cap and Trim the box

Cut a piece of 1×2 to the width of the box. Glue and nail it to the top edge of the box front with 3d finish nails. Cut two pieces the depth of the box and use them to cap the sides. The side caps should now sit flush with the 2×4 assembly secured to the wall. Trim the base of the box using quarter round molding mitered 45 degrees at the corner joints.

  1. Trim the seat lid


Using a miter saw, cut strips of ½x7/8-inch decorative shoe molding to fit the front and side edges of the lid. Miter the ends at the corners, but leave the back edges square. Attach the molding to the lid edge with wood glue and 2d finish nails.

TOH Tip: To avoid splitting narrow wood stock with finish nails, dull the points of the nails with the strike of a hammer before tapping them in.


  1. Install the Lid

Rip a piece of plywood to 2¼ inches wide and the length of the box This 45/3/4 inches in my case. Nail it down at the back edge of the seat box to cap the 2×4 assembly. This is labeled as the “Hinge support” on the above photo. Attach the lid to the 2×4 assembly using three European cabinet hinges, installed according to the “full overlay” instructions. This type of hinge allows the lid to open completely over the 2×4 assembly but conceal that same assembly when it’s closed. The lid should overhang the box by 1 inch on the sides and front. This sounds more complicated than it is…Since your top has been cut short of the box dimension by this amount, you will have this 2/1/4 inch strip across the back that does not open with the lid. (see pic). You have to have this to carry the hinges. Setting the hinges requires a little bit of patience. The proper distance will be determined after a couple of openings and closings. There has to be a slight space to allow the lid board to pivot by the stationary hinge mounting board.


  1. Mount the bead-board back panel

I ran the beads on my piece vertically. Since my bench was less than 48 inches I could use just one 4×4 sheet and rip it to the right height. In my case I liked keeping the board 4 feet above top of the lid. So actually you could purchase just one 4×4 sheet already cut. Where the bead-board meets the top of the bench seat I put a 1×4 trim piece to finish out the back. As you will see later, when I finish placing the shelf facia board later, I will put a matching piece at this seam. I think it finishes the back board nicely.


  1. Hide the Bead-board edges


I chose to use a small cove molding to finish out the vertical edges of the bead board. As with all of the trim in this project, take a look at the variety of Trim pieces available and get ones that suit your taste. There are lots and lots of styles available. Some will obviously not work at all and others will be great. There is no hard and fast rule to my knowledge. We often just use what we have left over from other projects.


  1. Finish the Trim

I chose to use lengths of quarter round trim along the bottom edge of the box where it meets the floor. I mitered the corner where it wraps to the side. Take a look at your finished box at this point and decide if there are any gaps or spots that you feel like you want to cover with trim work or if just caulking alone will fill.

  1. Install the Fascia for the shelf


Use a piece of 1×12 shelving board cut to the length of the top of the beadboard panel. This board will be called the fascia board for the shelf and will be where the coat hangers will ultimately goMount it to the wall using 2-inch trim-head screws installed through the studs


  1. Mount the Shelf Brackets


Measure and mark the placement of two shelf brackets on the fascia board.
Using the provided hardware, install the shelf brackets flush with the top edge of the fascia board and on center at your marks.


  1. Secure the Shelf


Cut a piece of stock 1×12 shelving board the width of the bead-board.
Set the shelf on the brackets and tight against the wall. Secure it to the brackets with 2-inch trim-head screws. Cut a 1×4 trim board and attach it to the top of the bead-board to fascia board seam. Attach with 2d nails. Caulk seams.

DIY mudroom bench plans


  1. Paint the Bench


Sand the entire bench with 180-grit sandpaper. Fill all the nail holes and gaps between moldings with caulk. Prime the bench, bead-board panel, shelf, and moldings, then paint them with two coats of semi-gloss latex.

Mudroom bench woodworking plans

  1. Attach the hardware


Screw coat hooks to the fascia board, spaced evenly between the brackets.


Here you can see the accent wall we painted with stripes. Click the image or text for the FREE Laundry Room Printables!


Three Free Laundry Room Printables @savedbyloves


Easy Cheap Hardware Update

How to Update Brassy Hardware With Spray Paint @savedbylovesOne of the first things I knew I wanted to change when we moved into our house was the brass hardware: knobs, hinges and light fixtures. I pictured that happening immediately, but the reality of how much time it takes to renovate kicked in, and I am just now getting to the hardware! I wanted to share with you a quick, cheap and easy way to get the finish you want on your hardware without having to buy all new pieces. The stuff is expensive, so buy a can of spray paint instead and invest a little time! This one change makes a huge difference in the look of your decor.

DIY Mudroom Storage Bench

I finally got addressing the hardware as we finished up the laundry room you have heard me going on about around here lately. It was so perfect… new floor, new built-in mudroom bench, striped walls and laundry room printables.  Then there were the shiny brass hinges, locks and knobs. I couldn’t take it.

How to Spray Paint Door Knobs and Hinges

The solution was a $7 can of spray paint and a little time. I just removed the doors and took off the hinges and knobs, cleaned them with soap and water, dried them completely and sprayed them with Rust-Oleum Metallic Paint & Primer in One – Oil Rubbed Bronze. I let them dry overnight just to be safe, and put everything back the way it was, new and improved!

I gave you a sneak peek at the mudroom bench. You will be getting a detailed how to quite soon!

In case you missed the Free Laundry Room Printables, click here or the photo:

Three Free Laundry Room Printables @savedbyloves

Free Vintage Laundry Room Printables


Three Free Laundry Room Printables @savedbyloves

We recently renovated our laundry room, top to bottom. I will be sharing all the juicy details with you in upcoming posts, but today is all about free laundry room printables, from me to you! I created these in photoshop, using these free graphics from my favorite vintage graphics source, The Graphics Fairy: Washer and Iron, Clothespin.

Free DIY Laundry Room Printables @savedbyloves

I pulled them into Photoshop and added an old book page background I scanned in from a stack of books I inherited recently. The font I used to ad the text is “Century”. Super easy to create, I made them in 11×14 to go with the black frames I had on hand, but feel free to resize them to meet your needs. Download the freebies by clicking the text under each thumbnail below to pull up the full res version, then print, or save to a flash drive to take to your local printer. I had mine done at Office Depot on cardstock for less than $3 total! Not bad for some adorable laundry room art.

Wash Laundry Room Printable

WASH PRINTABLE

Dry Laundry Room Printable

DRY PRINTABLE

Press Laundry Room Printable

PRESS PRINTABLE

Enjoy and stay tuned for the mudroom bench reveal and tutorial!

How Use Google Plus to Make Free International Calls

Make Free International Calls from Your Laptop using Google Plus @savedbylovesOur recent trip to Europe forced us to seek out the best options for keeping in touch with our loved ones back home. We added international to our cell phones, but that wasn’t cheap, and wasn’t unlimited, so it was time to get innovative. After all, I talk to my dear grandmother at least once a day. No way would either of us last 2 weeks without talking. Nor would my grandmother be figuring out Google Hangouts while I was away. I knew there had to be a way to make use of the hotel WiFi for calling cell phones and landlines from my laptop. I was correct… Google Plus is the way. Calling any phone number from your Google+ account is super easy, and at least from Paris and Germany to Indiana, it is free.

Here is how it is done:

How to Make International Calls For Free

Log into your Google+ account and go to “Home” in the left upper part of your screen. Scroll over it to bring up the pull down menu and go to “Hangouts” (see the big yellow arrow).

Make Free International Calls from Your Laptop

A new screen will appear, and near the top right, you will see the text bar with the phone icon. Click the phone icon and this will appear:

How to Make Free International Calls from Your Laptop

Enter the phone number (I dialed “1”, then the area code and phone number, and it worked)

How to call long distance for free with laptop

You will see this screen and hear a ringtone while it is calling. When the other person answers, you will see this:

How to Call the US from Europe for FreeSo this is how we kept in touch while I was away. It was perfectly clear, with no delay! Since the hotel Wifi was included in our bill, we just used it to make free calls. The caller ID on the person’s phone you are calling will show as “Unknown”, so you may want to let them know that beforehand (if they are anything like me, they won’t answer when they see that).

A couple of times I used my Google+ smartphone app to call from my iPhone over wifi too. Super easy!

Laduree Hot Chocolate Recipe Knock Off

Laduree Hot Chocolate Recipe Knock Off @savedbyloves

If you read anything about traveling to Paris, Ladurée hot chocolate and macarons are bound to be mentioned. We heard about the place first on Rick Steve’s audio Paris app, in one of his many interviews with Parisians.  Then pretty much everyone we talked to about “must see places” in Paris recommended we go there for chocolat chaud (hot chocolate).

Laduree Paris

Well we went there, and I must say, the hot chocolate was smooth and divine.

chocolat chaud paris Recipe

I came home, and much like with the french onion soup recipe I shared yesterday, I had to try to recreate the experience here in Indiana! After some time with Google, I found this Parisian Hot Chocolate Recipe. I followed it to the letter, using Ghirardelli bittersweet chocolate chips from the local Wal Mart. To grind them, I used my blender on “grind”. I also blended the mixture after adding the chocolate in the same blender on “Liquefy” for 1 minute.

Best Hot Chocolate Recipe

It was so much like the real thing! The next 10 minutes consisted of “mmmm….” and that’s about it. I have made it twice more since then, and it is a huge hit in our house. I won’t make hot chocolate any other way now.  If you can’t make it to Laduree, this is the next best option! Enjoy.

Privacy Policy