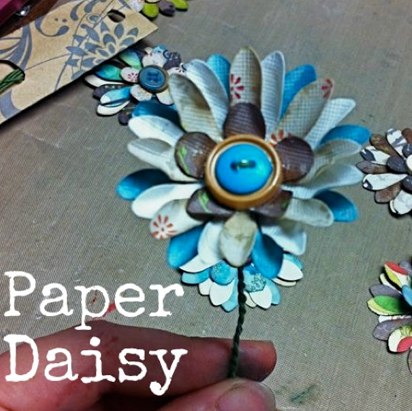
I am so excited to introduce you to Amy from Plucking Daisies. She has recently joined Saved By Love Creations as a contributor *happy dance*. This girl is a flower making – sizzix cutting – copic marker ninja. Amy has tons of tricks up her sleeve for upcycling scraps and trash into whimsical art with a bit of a Tim Burton meets Alice in Wonderland flair. Now she is here to share how to create this fanciful bouquet with us! This tutorial is great for those without a die cut machine, since paper punches are used. Learn Amy’s tips and techniques that will have you making striking paper flowers to brighten your space. Visit her inspiring blog, and plan on developing a crush.
Paper flowers are a fun and whimsical way to add beauty to your home. They make lovely gifts that are sure to bring a smile. Unlike regular flowers Paper flowers will never wither and die so you can enjoy them all year-long. It doesn’t take much to make a beautiful paper flower arrangement. You can make your own paper flowers with just a few simple tools and scrap paper from your stash.
*For this arrangement you will need just 2 paper punches. The Large Daisy punch by Marvy and Small Daisy Punch by EK success were used here.
STEP 1: Grab some scrap paper from your stash and start punching! (I have used scraps from the DCWV “Green Stack”)
STEP 2: Color the underside of your flowers with Distress Stain in coordinating colors
* Unless you are using double-sided paper you will need to color the white side of your flowers. Distress ink can also be used.
STEP 3: Pierce a hole through each flower (you can pierce several flowers at a time. Curl large daisy petals with a stylus. Cup small daisies by pressing down center with sculpting tool.
*TIP: If you don’t have a stylus you can use a paintbrush or chopstick. For cupping place flower on foam pad or mouse pad.
STEP 4: Arrange flowers in layers to ensure proper color combinations. Once satisfied arrange layers of buttons on top then start assembly line.
* I typically layer 3 large daisies and 1 small with two layers of buttons.
STEP 5: Take one piece of wrapped floral stem wire and 1 piece of plain floral wire. Fold in half and thread on buttons smallest – largest. Holding button between thumb and forefinger twist wires together. Thread wire through pierced petals (smallest – largest) adding a drop of glue to seal each layer. Make a wire curl and press against back of flower to finish.
STEP 6: Attach Flowers to floral picks using floral tape.
STEP 7: To create your arrangement simply insert floral foam into a container and “Plant” your flowers. Twist the wires around your finger until you are satisfied with the fullness of your paper flower arrangement. Fill with glass gems or stones and embellish with ribbon.
Ta-Da! You just made a Paper Flower Arrangement!
See? Making paper flowers is easier than you think! I was able to create 4 of these Paper Flower arrangements for my sister’s Baby Shower using paper scraps from my stash. Paper Daisies are a great way to learn and get comfortable with paper flower making. Once you have mastered the paper daisy you can try your hand at more advanced paper flower making techniques.
Hope your creativity is blossoming today!


