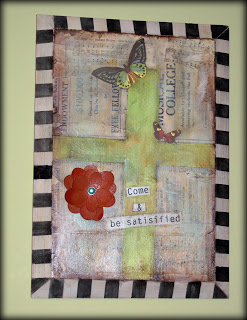
Ok. I am going to attempt to take you through each step in the process of making this mixed media collage. You will need:
- Some kind of board for your surface; I used an all wooden plaque with an eagle and some army prayer on it that I picked up from Goodwill for $2
- Gesso
- Brayer
- Paintbrushes
- Bubble Wrap or other texturizing material
- Old paper; I used an aged hymnal I picked up at a flea market, and some aged newspaper from a local thrift store
- Matte Gel Medium
from your local art store or order it online. This stuff is more expensive than Mod Podge, but I swear by it in these types of projects.
- Golden Liquid acrylic paints; Titan Buff
, raw umber
, a robin egg blue acrylic paint, or other background color of your choice, and acrylic black (for the striped border)
- Tattered Angels Glimmer Mist
in color of your choice. I used orange.
- Ranger Distress Inks Pads:
I used Walnut, Antique linen.
- Scrapbook Paper in pattern of your choice
- Sentiment of your choice printed out on computer paper
- Krylon or Other Acrylic Sealant
- Soft Charcoal Pencil, and eraser
- Butterfly or other images cut out
- Embellishement of your choice – I cut this flower out of Ranger grunge board and sprayed it with the orange tattered angels mist mentioned above
Instructions:
- Cover your surface in a coat of Gesso and let dry completely (this is basically a primer that evens out the surface and makes your paper adhere more uniformly). You can use a hair dryer or heat tool to speed the drying along.
- Tear or cut your aged background papers to cover the surface, adhering with a thin layer of Matte Gel Medium. Make sure to smooth out any air bubbles with your hands or a brayer.
- On palate paper or a non stick craft sheet (like freezer paper), place a few drops of your liquid acrylic Titan Buff, raw umber and robin egg blue a few inches from one another. Run your brayer through all of the colors until it is covered in paint, then run it randomly across your canvas until you are satisfied with the background.
- Spray the Tattered angels mist onto the palate paper on top of the acrylics you already rolled your brayer through. Roll the brayer through this, then randomly on the canvas again.
- Dip bubble wrap in the robin egg color and texturize the background in places:

- While this is drying, cut out a cross or desired shape from coordinating scrapbook paper. I just used a straight edge to draw a cross, and cut it out using scissors. Spray it lightly with the colored mist you used in your background to unite the shape with the piece. Adhere it to your surface using matte gel medium. Let the surface dry completely (again, a few minutes with your hair dryer or heat tool will get you there)
- Spray your computer print out text with the Krylon Crystal Clear or other acrylic sealant. This is important if you use inkjet print outs because the matte gel or mod podge will smear the ink if you do not seal it first. Once dry adhere your cut out text using – drum roll please – matte gel medium!! Repeat this procedure for any other computer print out images you want to add (I added the butterfly).
- Now coat the entire piece in a thin layer of matte gel and let dry completely (if you are impatient like me, you will have heat tool in hand right now).
- Grab your antique linen Ranger Distress ink pad and ink the entire surface. This is a very light color, and dragging it across everything pulls the elements together with the background, unifying the entire piece. With the darker Walnut stain in pad, ink the edges of the piece and blend using your fingers. I love this technique for distressing/aging and use in often.

- Using the charcoal pencil, add shading around the cross and the words, blending with your finger or a paper towel
- To get the stripes on the border, I painted the whole beveled edge with titan buff (this is my favorite white – I used it constantly). When this dries (hey there heat tool, how’s it goin’), tape off the stripes with low tack artist tape and paint over with black. Once completely dry, remove the tape to reveal your stripes. You do not want to remove the tape before completely dry because bleeding will occur.
- To finish, spray a coat of sealant on your piece and add any 3D embellishments you desire. I made the orange flower form grunge board using my Cricut (a whole different tutorial)!
Some of you expressed interest in the angel piece I did here:
Follow the above steps, but instead of adding a cut out scrapbook paper shape, sketch an outline of the figure with a charcoal pencil, keeping an eraser handy to make changes. Fill in the different parts with acrylic washes (paint plus water mixture) in desired colors. For the light skin areas, I used a very light wash (lotsa water) with the titan buff. Paint on the wash and dab with dry paper towel to remove excess water. Once this is dry, add details to the face using PITT artist pens and water based blend-able craft markers for color to the eyes, mouth and hair. I colored in the whites of the eyes with a white gel pen. Just experiment and play til you love it. Make sure you seal it, especially if you used water based markers.
Let me know if you have questions.
So, I thought it was Wednesday until about 5 seconds ago. Sorry no features this week. I am going a little crazy I guess. Here is the hop. Back to normal next week!!


