Hello! It’s Colleen and I’m back with a fun paint craft today. Are you a fan of burlap like I am? I saw these little burlap bags in that store that starts with Wal and ends with Mart and couldn’t resist them. A set of 3 for under $3? Oh yeah. I would’ve bought more but I had no idea what I was going to do with them.
They’re not quite large enough for wine bottles so that was out. They’d make cute party favors but I’m not throwing any parties. And I simply couldn’t wait for the holidays – although I did buy another set so I’d have them for Christmas presents.
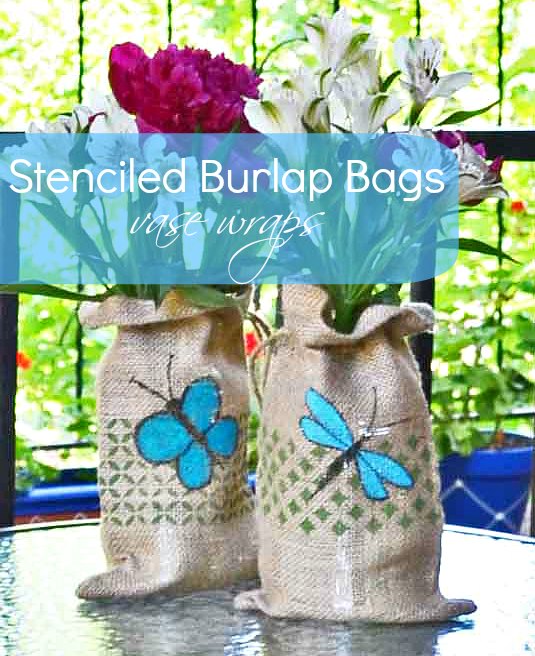
They are the perfect size for canning jars. But who wants to cover up Mason jars, even with burlap? I just grabbed some regular ol’ jars, filled them with water, slipped them inside the burlap bags and made a cute burlap vase!
However the only thing cuter than burlap is painted burlap so let’s paint!
Supplies:
- Burlap Bags (available at Walmart and craft stores)
- Mod Podge peel ‘n stick stencils
- Sharpie marker
- Stencil Pouncer or foam brush
- #8 paint brush
- piece of cardboard to fit inside the bag
- painter’s tape (optional)
- wax paper (optional)
Paint:
- Folk Art Calypso Sky (for the dragonfly)
- Folk Art Fresh Cut Grass
- Folk Art Aqua (for the butterfly)
We’re going to start with stenciling the bags. Usually stenciling burlap is tricky because of the weave and the nubbiness. But Mod Podge just came out with a line of stencils that are self-adhesive that I just love.
These stencils adhere pretty well to the burlap but I found if you lay a piece of wax paper underneath the bag, when you lay the stencil over it, the edges will grab the wax paper and anchor the stencil so it won’t move. I also put some painter’s tape on both sides but that was to protect the burlap from over-stenciling.
After your stencil is placed, load your pouncer or foam brush with the green paint. Then tap it a few times on a paper towel or on your palette plate to ‘off-load’ some of the excess paint. This helps to prevent bleed-thru under the stencil.
Pounce in an up and down motion, making sure you have full coverage with the paint. Rather than pressing hard, tap lightly and repeat the application as needed. I found the coverage to be really good and only had to touch up a couple of areas with one application.
While the paint is still wet, carefully lift the stencil off, place it on the wax paper and wipe the paint off of both sides with a damp paper towel. Even though these stencils are self-adhesive, you can reuse them over and over again. Once the stencil is clean, place it back onto the mylar strip it comes with.
If you’re stenciling more than one bag, toss your foam pouncer (or brush) into a plastic baggy to keep it moist while you’re cleaning the stencil. If you put the foam into water, even with wringing it out thoroughly, you’ll still get an excess of air bubbles in the paint.
Let the paint dry thoroughly and keep the cardboard inside the bag.
Now we’re going to draw a little dragonfly. If you don’t trust your freehand skills, you can grab a dragonfly pattern here that I drew. There is a butterfly pattern in there too. Since I draw a lot, I make quite a few patterns for my readers. But you can always find clip art on Google too or practice drawing your own. Yes! You can only get better, the more you practice!
Okay, to draw a simple dragonfly, start with a dot and a long oblong shape. That would be his head and his body.
Then draw two more elongated ovals, and then under those two more that are a little shorter.
Add a couple of antennae and you’ve just drawn a dragonfly!
Fill in the wings with Calypso Sky using the #8 brush, or any other brush you have on hand.
Allow the paint to dry and then go back over the outline with the Sharpie.
Next, go grab one of your clean jars and fill it with water.
Now I’m gonna share a top secret florist trick! Just kidding. I was a florist but I used floral tape, not scotch tape. (works about the same though, ha!) Criss cross some tape over the mouth of the jar, creating a gridwork. Then gather your flowers in one hand and when you have them arranged how you want, wrap a twisty-tie around the stems. Place the stems thru the centermost opening in the tape grid.
Ta da! You can arrange flowers now!
Then slip the jar with the flowers into your stenciled burlap bag.
Isn’t this a cute way to use some plain ol’ jars? They’d make a pretty gift too!
What else would you use these bags for? I’d love to hear your ideas too!
Thanks so much for hanging out with me today! I hope you’ll come visit me at Just Paint It too. You can also find me on Facebook, Google+, Pinterest and Instagram. And of course, I’d love for you to drop by my Etsy and Zazzle stores.
I’ll see you next month!

