
Do you have stacks of old magazines lying around that you just can’t seem to trash? Are you a fan of greener living? Try your hand at making art from what would have been thrown away. The possibilities are endless. I have seen everything from picture frames to bowls to jewelry. I will be showing you how to make the coils, and sharing what I found works best. This cross took me 2-3 hours total. The duration will depend on how much of a perfectionist you are, and how many coils your project requires.
Supplies:
- Magazines
- Bone folder
- Glossy accents or other quick dry glue
- Scotch tape (optional)
- Mod Podge or other sealant
- A good movie or soundtrack to enjoy while you fold

Instructions
- I like the folded strips making up the coil to be thin, so I cut the page in half lengthwise, then folding each half in half, and cutting along the folds, making 4 strips from each page. It looks fine if you use a whole page per strip, just chunkier coils. Start folding by bringing each long edge to the center and creasing to make 2 new edges (see pic). Using the bone folder to crease makes much neater coils. NOTE: THE PICTURES SHOW STRIPS BEING MADE FROM ENTIRE PAGES; I HAVE SINCE LEARNED THAT STRIPS MADE FROM 1/4 OF A PAGE LOOK MUCH BETTER IN THE PROJECTS I SHARE HERE AT SBLC.
 Continue folding the edges to meet in the center until your strip looks like this…

 Now coil your strips. When your come to the end of your strip, place a small dab of glue and hold pressure to secure it in place. If you want the coil larger, begin another strip where your first one ended. You can place a thin piece of scotch tape where the two strip ends meet, or just secure each end with glue leaving no gap between them.

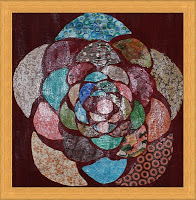
 To make the cross, I sketched out the design, made the coils I needed, attached them together with Glossy accents (I love using this on paper – dries clear and fast) and outlined the joined coils with strips to form the “+” shape. You can make anything you imagine. Google and you will find all kinds of ideas. I coated the final piece with Mod Podge attached a wire to the back for hanging and that is that.
I would love to see what you create with your lovely coils. Recruit friends and family to fold pages into strips for you if your project is big. My nephew and grandmother were pleased to play along!
ADDENDUM: I just found an wonderful tutorial with some other tips, here, at Craftstylish. She used a glue gun and mentions you could use glue, but you have to hold the coil in place til the glue grabs. With Glossy Accents, this happens in 5 seconds. Easier and less burn potential than glue gun!


I love this! It looks so great and you could do so many different projects with this same idea. I would love it if you would stop by the crafty link party I am just starting and link up this post!
http://linesacrossmyface.blogspot.com/2011/07/craft-link-party-1-cure-for-common.html
:)Rachel
I love this idea! Thanks for sharing on Sugar Bee Crafts!
Very cool! I don’t know if I would have the patience to do this, but with this fab tutorial, it’s good to know that I Could… 🙂
This is great! I am thinking about making one of these for my SIL for Christmas! It’s totally her style!
Wonderful idea and your project results are pretty and eye catching 🙂 I’m a huge fan of diverting waste paper into artful purposes! Nice job!!
Very cool take on the rolled paper craft! I’ve got a few projects along these lines waiting to get finished on the back burner.
Very clever! Great idea!
Jen
Johnnie, this is wonderful! I’ve seen bowls made from magazines, but haven’t before seen the medium used to sculpt other objects. I must say, it’s even more beautiful this way. Your cross is so artfully composed. Stumbling it, of course, but pinning it too!
Jenn
It’s a very nice idea! I especially like it because the Cross is so colorful 🙂
Cecilia
Clever! I just may have 1,000 magazines to use for projects like this.
Great idea for recycling paper! Your cross turned out beautiful!
superbe idée
bravo
this looks awesome
Nice job, that looks too cool! I’ve linked this to my wall art post too today, well done!
I really love this and I can see where you could also do hearts or initials. Great project for pre-teens as well! Thanks for sharing!
Wow, wow, wow, that is soooo cool! Gorgeous!
This is awesome! I would love to attempt this, but was wondering how you connect all the coils to form your object? Do you just use more glue? Also, I see that you formed the coils into a cross frame. What did you use for the frame? It looks like it is covered in more magazines, or did you actually make the frame with the magazines?
how did you make the outside of the cross?
For this project, I sketched an outline of the cross around the coils, and used it as a guide to form the outline with strips. Now I use cookie cutters and any other 3D form to make my outlines, like I showed you here; https://savedbylovecreations.com/2011/12/little-quilled-magazine-page-cross.html
I am obsessed with making this cross, but have many difficulties so far. Any advice on how to do this would be helpful and MUCH appreiciated. I find that the rolls are not very tight nor do they stay “stuck” together with the glue. I have tried craft glue, elmers and even a glu stick.
Thank you!!!
Hi Michelle. I can totally relate with being obsessed about making this cross. That is what started the whole thing for me. It took turn after turn to figure it out. Read this post for the homemade glue step. Adds even more time to the already tedious project, but makes a huge difference. I hope this helps!
Love the coils! Hope you enjoy seeing the lamp I made from them at http://www.facebook.com/kdiannelutz.stephens/photos#!/photo.php?fbid=287011984761211&set=pcb.287012014761208&type=1&theater
Is it feasible to join all your strips befote coiling? One big long continuous strip for the bowl and another for the lid? Also, could you please tell me the approximate measurements of your lovely dish? Thx so very much. L.
Hello you are very good and I ‘m starting now this technique and I am pretty well ! thanks for your tutorial . please let you give me the link of tutorial for Christmas trees with this method of recycled paper
I saw on your site but now can not find it . Thanks and Merry Christmas !
Sorry but my English is bad
[…] see how the coils are made, read this […]
[…] Fold the magazine pages into strips as I described here. […]
[…] coiled paper addiction. Many of my lovely readers were quite smitten by the cross wall art, here. I have received a lot of positive feedback, including several of you pointing out what a great […]
[…] any size you want, using more coils. For instructions on making the coils, see my earlier tutorial, here. The only difference is the newspaper page is longer than the magazine page. Use the entire […]
[…] If you read the end of my last post, you had to know that coiled newspaper coasters were next, right?! These are quite simple to create. Not quick, as folding the paper into strips is time consuming, but easy and essentially free. For my tutorial on creating the strips, click here. […]
[…] showed you how to make the round coils in this earlier post. Just follow the instructions and make the coils coaster sized. That is it. Tie […]
[…] instructions on how to make the strips and coil them, see this post. Attach 13 one inch coils side by side with crochet thread or other durable string like the […]
[…] beautiful wall art for your […]
[…] return! These little things are so easy to make, and basically free. I have shown you the larger cross wall art, and a small cross ornament. A sweet friend who knows how into rolling paper I can be, pointed […]
[…] strips as shown in this magazine page coiling tutorial. I use a 1/4 magazine page for each strip. Some tutorials show 1/2 page or full page. I like […]
[…] 14. Cross […]
[…] was inspired to create coiled paper art by seeing a post on Recycled Paper Wall Art a few months ago. Though I tried using magazine pages for the paper, I much prefer using scrapbook […]
[…] Number 1: How to make a cross from recycled magazine pages […]
[…] the paper is no different from my tutorial here, but after the first few coils from the center, bend the strips into corners to morph the circle […]
[…] I am giving pinterest full credit for the idea behind this project. How many of us pinned this project when you came across it on pinterest? Obviously I did too. And so, I just had to try […]
[…] slide it off) carefully so that you maintain the shape, and create your filler coils. For tips on making strips from magazine pages, see my earlier […]
[…] las figuras de papel periódico con los colores que […]