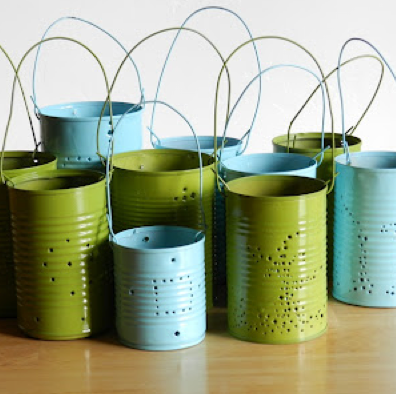
Impress your guests and Illuminate your backyard event with these adorable tin can lanterns from Grow Creative. It doesn’t get much cheaper than free.


Johnnie Lanier
Founder of Saved by Love
Share
Pin
Tweet
Related

Pier One inspired fabric wall flower…
December 20, 2009

Cutest Felted Snowmen from Knit Picks
December 21, 2009
Fabric Wall Hanging DIY
December 24, 2009
DIY fabric/paper wall hanging
December 26, 2009
Comments


What kind of paint did you use to paint the cans? I would assume most are flammable. Thanks a ton. Super cute. I think I will do for Halloween. 😉
This is a project I featured, meaning it isn’t mine. She doesn’t say what she used, but I would recommend Krylon indoor/outdoor. I have done tin can lanterns with that, no problem. I even spray painted my tea kettle a robin egg blue color. I have boiled water in it daily on a gas stove for over 2 years… it is flawless still!
What did you use for poking the holes?
I would use a hammer and small nail.
Make sure you put water in the tin can and freeze it to avoid dents on the can, then use the hammer and nail to make your design.
So you fill the entire can with water so that the inside is a complete cylinder of ice? Just wanting to clarify that I am understanding this right.
Fill it with sand and pack it down before using hammer and nails. Ice may break your cans.
Thanks! 🙂
A much faster way is using a drill with a small drill bit
What type of wire do u use?
I would use 18 gauge craft wire, or even wire coat hangers.
Thanks for the idea! I’m going to start saving my larger cans. I’m using craft wire that I already have and buying some paint to use for my daughter’s birthday party…she’s having a dress up party for Halloween. And to be on the safe side…as no candles I’m going to use those glow sticks they have in the Dollar Tree.
Cans are in the freezer now, these are so adorable!!! I’m doing a few for steps and porch for trick-or-treaters. 🙂
Beautiful and simply classic
I made these years ago after seeing in the “Good Things” column in Martha Stewart Living. She did say to freeze them, which I did, and it worked great, it does not break the can! Hers weren’t even painted, so neither were mine, and eventually they rusted a little (which would look okay in some rustic garden atmospheres). I want to make them again, but painted … love that idea, especially with the right paint!
You can also print a pattern from your computer on a piece of paper that you can cut to the diameter of the can. Then place dots where the pattern neeeds to be “punched” with the nail and tape it around the can. Works for non-artistic types like me.
Any advice on getting the sticky glue off the cans?
Warm water and vinegar works well for me. I fill my sink with it and maybe a drop or 2 of dish soap. I hope that helps!
I’ve been saving cans for a different craft… and now I guess I’ll save some more! These are cute! PInning it!
I knew I have been saving my campbell soup cans for a reason! Thanks for sharing the tutorial!
I’d really like to make these and paint them pastel colours, what kind of paint should I use as I’m assuming the tins will get a little hot…
Many thanks
Lucy x
[…] got the original idea for these on Pinterest via Saved By Love Creations and I think I may try lanterns for other seasons one day. They are super cheap and cheerful! […]
[…] savedbylovecreations.com via Brittany on Pinterest Tagged with: decor • diy • recycle If you […]
[…] love these DIY Tin Lanterns. How great would these be painted in your favorite colors for your next garden […]
[…] savedbylovecreations.com via Angel on […]
[…] Tin can lanterns […]
[…] saw this awesomeness. And we switched […]
[…] Source Awesome, can’t wait to try this! […]
[…] Image Source via Pinterest RePurpose Tin Cans into Chic Outdoor Lighting […]
[…] savedbylovecreations.com via TIMJAN & PIONER on Pinterest Finfina pinnar med växtnamn för att hålla ordning bland […]
[…] Source […]