
The creative minds at Plaid are at it again, with their new Easy to Paint craft line. You can pick these up today at AM Moore and Michaels craft stores! I received a sample of products to test drive, and I think you guys are going to love stencils, and the various project ideas provided. I used them to turn a goodwill find into a lovely wall piece.
Here is what I started with…

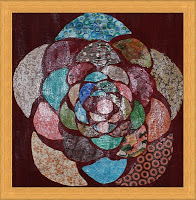
I spray painted the frame black, and covered the inner piece with a square of music note printed scrapbook paper, using mod podge to adhere the scrapbook paper to the square.
I picked out a Folk Art painting stencil from the new line, and using a roller sponge applied folk art acrylic paint in aqua. I love love love this color. Anyway… I used stencil adhesive to keep the stencil in place. The lines were crisp and perfect (which, given my history with stenciling is impressive)!


In retrospect, I would have diluted the paint with a little bit of water so the to make the paint layer more transparent, but I still love it. Fits right in my with my fall entryway.

There are cool peel and stick stencils for curved surfaces like glass, that I can’t wait to use with Folk Art’s enamel paint. The stencil packaging comes with step by step instructions for inspiring projects that look pretty easy to pull off.
You will be seeing a peel and stick stencil project soon. Have you tried these? Do share.


These look really cool! Your project turned out wonderfully!
Love how this turned out! Never thought to paint over music sheets!
This turned out beautiful! I love pretty frames too! Thanks for linking up.
XO,
Kate
SO darling!! Would LOVE it if you would link these up at my turquoise lovin’ party going on right now!! http://www.sweetlittlegals.com/2011/11/turquoise-lovin-13.html
This is adorable. I am going to have to go buy me the materials and get making this. I love everything about it. I would love it if you could link this up to our linky party going on right now.
http://junkintheirtrunk.blogspot.com/2011/11/link-it-up-wednesday-3.html
Very impressive and what a pretty colour and design too. Such a clever, creative idea. Thank you for sharing!
Really cute! And it looks so nice with the rest of your decor! Thanks for sharing this @ Show & Share. I am so happy to have you!
this is really cool and i am trying to do something of the sort but use letters instead of a patter. what did you use for the pattern to get it to stay so flat and not peel the paper off when you peeled it off?
Am I not getting it? How did you get from the first stencil to the negative stencil in the final product?
where can i find stencils in the UK?? i have looked everywhere and can only find the normal ones that are the opposite way round (a square with the design cut out) thanks nicki
[…] Tutorial […]
[…] Number 6: How to make stenciled wall art […]