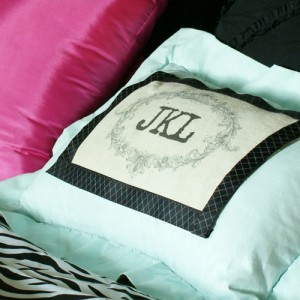
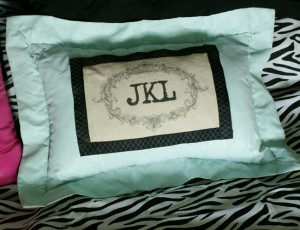
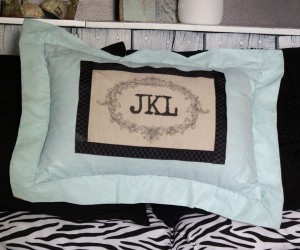
Wow, I “made” a pillow. You may have noticed, there aren’t sewing projects here at SBLC. I don’t do that. I think about doing it occasionally, but it doesn’t happen. Here is a project, sans sewing, that includes printing on canvas drop cloth material, painting a pillow with fabric paint, and attaching fabric to fabric using liquid stitch. Easily and quickly make yourself a beautiful, custom, decorative pillow!
Supplies:
- Old Pillow (Mine is a Goodwill score)
- Martha Stewart Decorative Paint by Plaid and Fabric Medium
- Drop Cloth Canvas cut to 8.5×11
- Graphic image (I used frame image from Graphics Fairy, and put the letters in with Photoshop)
- Inkjet Printer
- Spray Adhesive
- Paintbrush
- Ribbon
- Stitch Witchery
- Liquid Stitch or other fabric glue
Instructions:
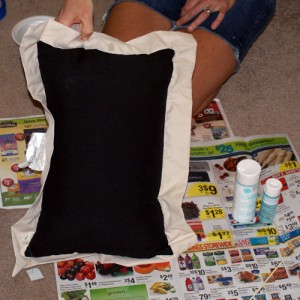
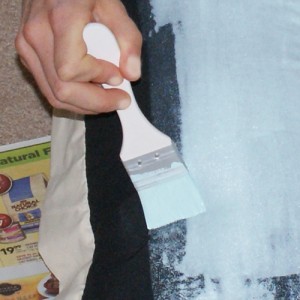
- Mix paint with fabric medium as directed and paint your pillow! It felt kinda cool to be painting a pillow. I got some strange glances from family members wandering by, but who has a an awesome pillow now?
TIP: The instructions for the fabric paint medium said to let dry for 24 hours. I needed to add another coat over the black area of the pillow, so I dried the pillow immediately after the first coat with my heat tool. Then I added the second coat and let dry overnight.
- While your pillow is drying, you can prepare your image on your canvas piece. Go on over to Graphics Fairy, and get yourself a lovely free image (I used this image). Cut it to fit your printer, and using spray adhesive, adhere the canvas piece to a piece of photo printer paper or to cardstock. A regular old thin piece of printer paper isn’t sturdy enough. Insert the piece into your inkjet printer, fabric side down, and print your image.
- Cut your image to the desired size, fuze ribbon to frame it with Stitch Witchery, then glue the piece onto your dried pillow using Liquid Stitch. Let dry overnight. You are done!
What do you think. I love it. The pillow is a little “crunchy” from the paint, but let’s face it, it isn’t meant to be functional. Not bad for a new sew project!



It’s very pretty!
I think it’s lovely! You did a great job. I like anything with monograms. Thanks for the visit today. 🙂
Love your “no sew” pillow! I love monograms yet have nothing in my house with them… need to get creating!
What a great change! Love the color you chose! And the monogram is so fun to personalize your space!
I would love to have you share this @ my link party, Show & Share–
http://southernlovely.blogspot.com/2011/08/show-share-3.html
Very cute! Thanks for the inspiration. I’ve been looking for something to spruce up my pillows on my bed.
I love your pillow – you really brought it to life! Thanks so much for sharing. I just bought some of the paint for a drop cloth pillow I am making. Glad to see it work3d so well!
Wow, what a cool idea! I can honestly say I’ve never thought to paint a pillow . . . but that sure does sound fun 🙂 I love it!
Love the colors and the monogram. It’s amazing what you can paint! Came over via Simply Designing.
Looks very effective!!! Great tutorial…
I love this idea! You are so creative! I’d love for you to link your adorable project to Things I’ve Made Thursdays. I’m trying something new this week- We have two sections to the party- one for kids’ things and one for “Anything”!! I think this post would be an awesome addition to the “Anything Goes” party!
Hope you’ll stop by on Thursday and link up!
Melanie
bearrabbitbear.blogspot.com
I love this! Great job! I would love it if you would share this and/or any other projects you have been up to at Tuesday Talent Show at Chef In Training! Thanks so much and I hope to see you there!
-Nikki
http://chef-n-training.blogspot.com/
I know I’ve already told you this but I’m in love with this pillow. So much that I featured it today on Sew Woodsy!
So pretty!! Would LOVE it if you would share this project at my turquoise lovin’ party going on right now!! http://www.sweetlittlegals.com/2011/09/turquoise-lovin-4.html