


[pinit]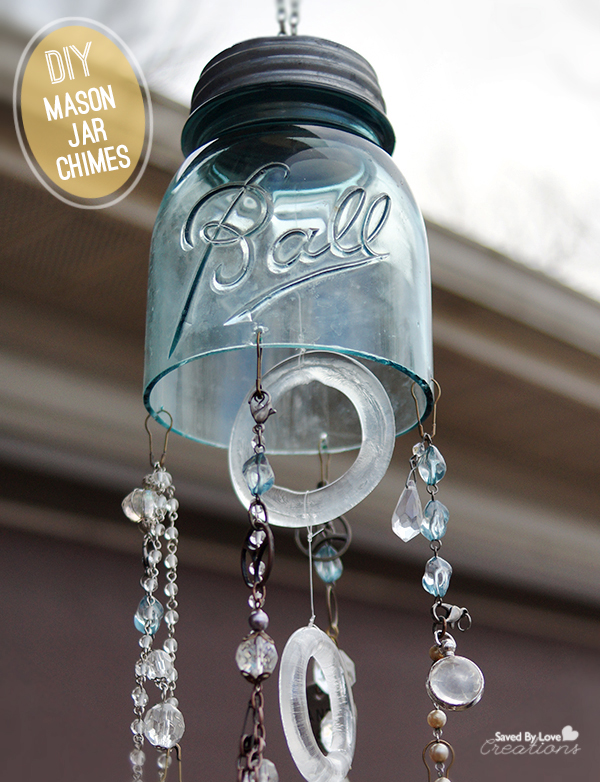 [pinit]
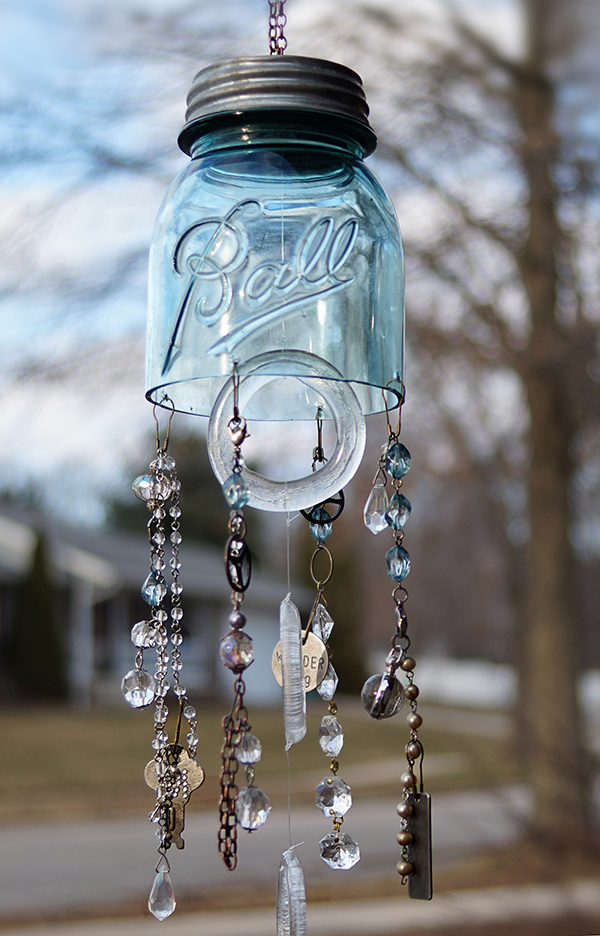
It was only a matter of time before I tried out my bottle cutter on a mason jar. Today I am sharing how I pulled off this mason jar to wind chimes upcycle, just in time for spring and outdoor decor. This project is a great stash buster for those beads and charms you’ve been stockpiling. There will be some cutting and drilling of glass, but don’t fear, you can do this!
SUPPLIES:
Mason Jar with lid
2 eye screws
piece of scrap wood about 1/2 inch thick and smaller than lid
fishing line or other clear string
scissors
beads, chain, charms and connectors of your choice
Bottle cutter (Creator’s Cutter used in this tutorial)
Butane micro torch or candle and lighter
Dremel or other Rotary tool – I used Beads Landing Rotary Tool
measuring tape
Shallow container with cold water for drilling your jar (this will make sense later)
Bucket of cold water deep enough to submerge jar
Protective mask and goggles
E6000
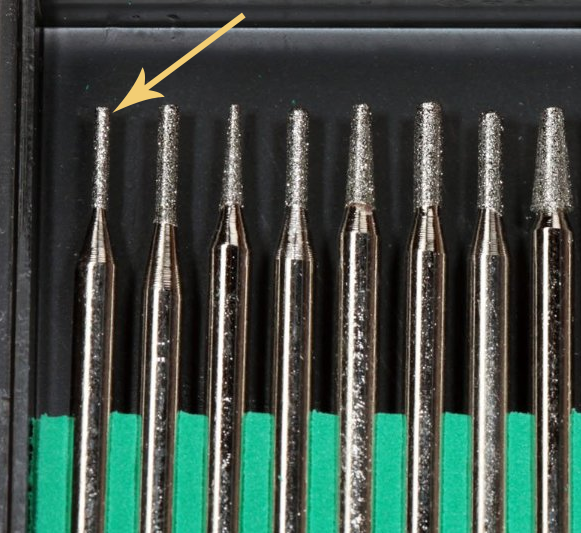
Diamond Bits for glass; I used a bit from this set
Permanent marker
Medium Grit Sand Paper
Glass beads or wine bottle rings (see my Wine Bottle Rings tutorial)
TUTORIAL:
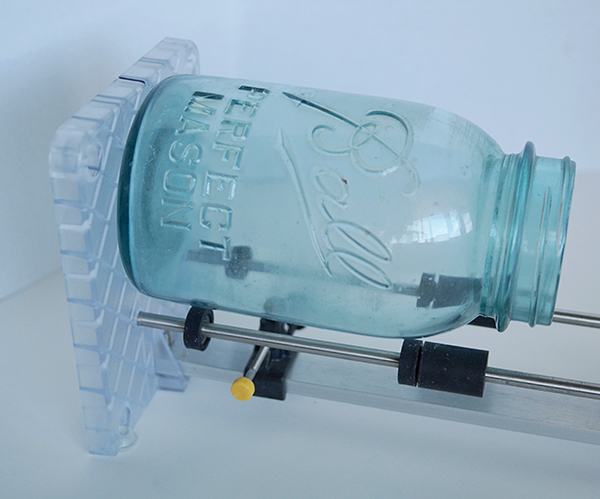
I place the mason jar on the cutter (My wine bottle cutting tutorial has a video on using this specific cutter).
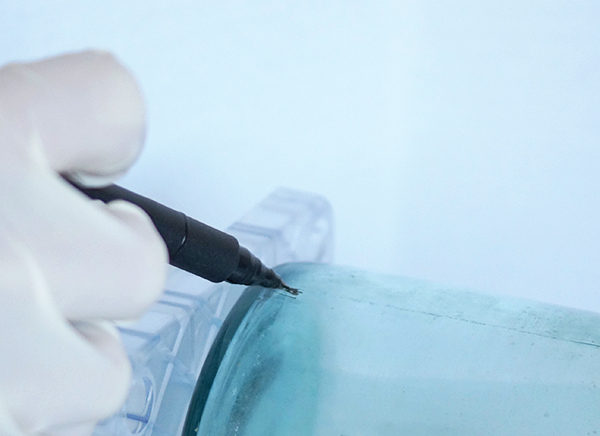
Mark the jar so you know when you have made a complete rotation.

Once the score line is made, it is time to apply heat/cold to it. I like to do this with a butane micro torch while rotating the bottle on the cutter jig. I have moved the blade out of the way and am just using the cutter jig to hold the bottle and give me a way to rotate it easily with one hand while holding the torch with the other.
If you are using a torch, one minute is plenty of time for applying heat. Sometimes this is enough to break the score line. If not, submerge jar into cold water, covering score line. That is all it took for me on this mason jar. If yours doesn’t separate, repeat the heat/cold until it does.
If you are using a candle, watch the video linked above for instructions.

This is what my break looked like. Not bad! Now it is time to sand and smooth the edges.
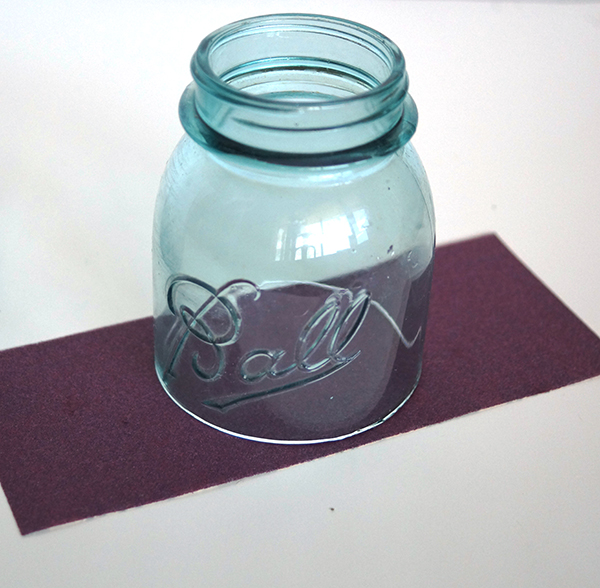
Sand lightly with medium grit paper. Get the inner and outer edges of the break. This is pretty quick.
You will notice after a minute or 2 of sanding that the edge is smooth to the touch and won’t cut you.
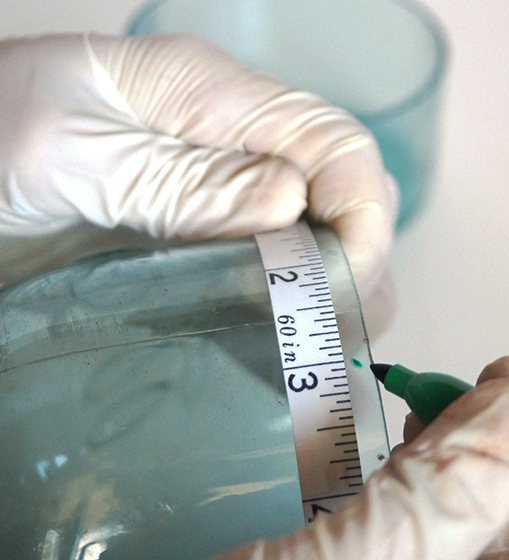
I measured the diameter of my jar and it was 12 inches. I marked every 3 inches for drilling a hole. This gave me 4 holes evenly spaced around the jar for stringing beads and charms.
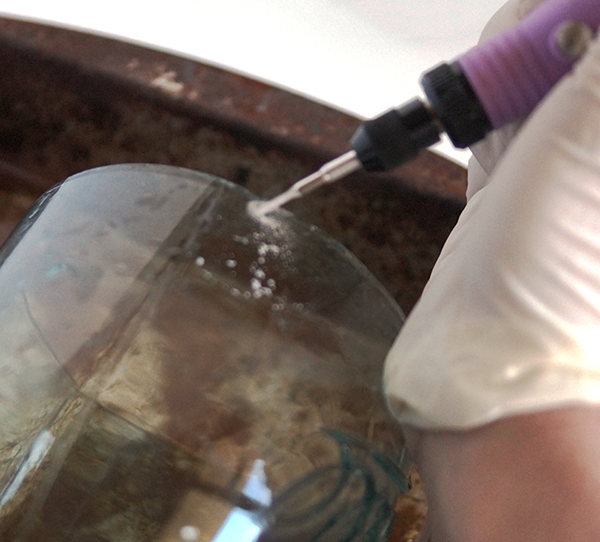
Before drilling, put on eye gear and mask!!
Place jar in shallow container of cold water. I use a square baking tin.
To begin drilling, come in at an angle to start an indentation.
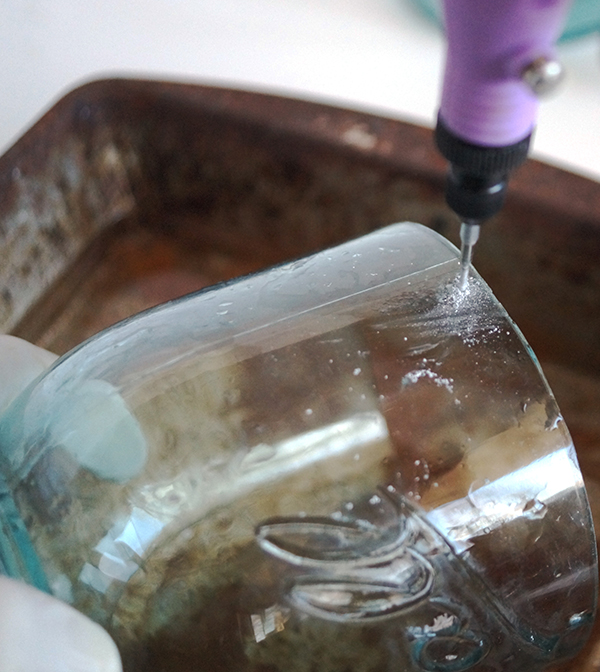
Once the indentation is started, move drill to 90°. Every 30 or so seconds, stop drilling and rotate jar so that hole gets rinsed out and glass where your were drilling gets cooled. This prevents the glass from breaking due to high heat. Continue until you have drilled all the way through.
Do this at each mark around the jar.
Use fishing line or beading string to string various beads, charms, found objects and chain to your liking in each hole.
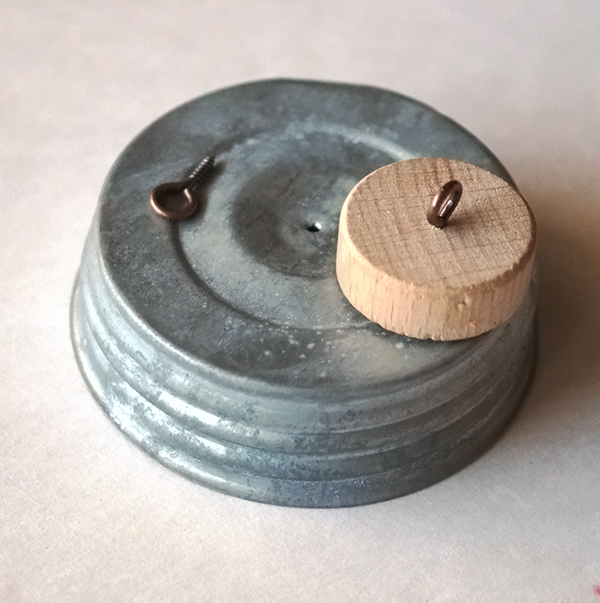
I wanted to use the old lid that was on this jar in the design, so I needed to have a way to hang the chimes by it. I used a hammer and small nail to make a hold in the top center.
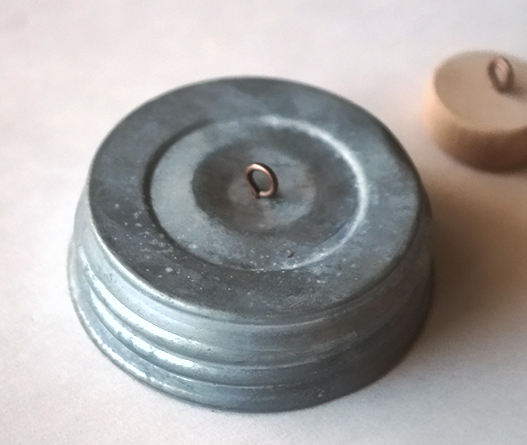
Next I screwed in the eye screw as pictured.
I screwed into the wooden disk and screwed the remaining eye pin to the other side as shown. I later added E6000 to the wooden disk on the side that contacts the jar lid for added strength. It gets pretty gusty around here in the spring!
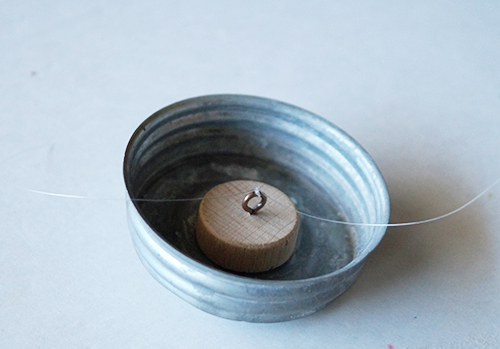
I cut a length of fishing line to the eye screw and tied the other end to a wine bottle ring, tied another ring to that one, and another ring to that one for a total of 3 hanging down from the middle of the jar.
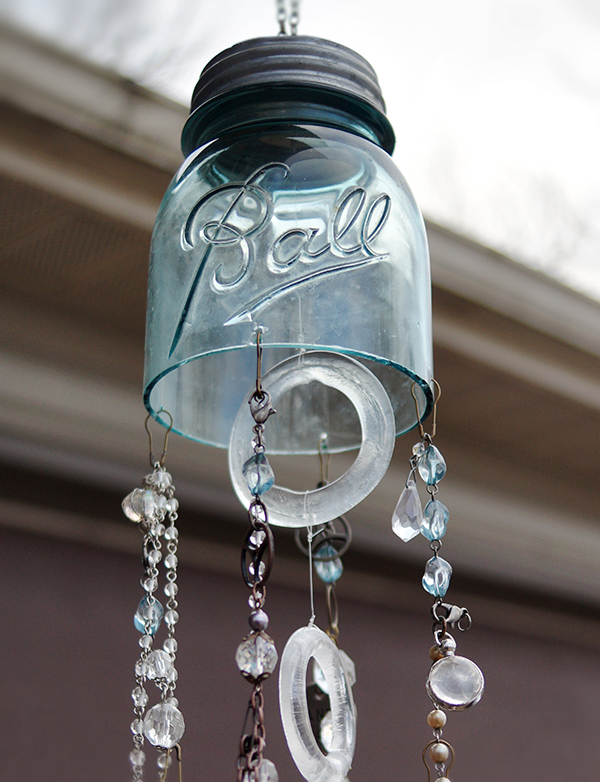
To finish, put the lid on the jar and add chain to the eye screw on top for hanging. Hang and enjoy!
For more mason jar crafts, visit our Collection of 75+ Mason Jar Projects

For more DIY Chimes, visit our 20+ DIY Chimes post!


I like it! Have a great weekend….
This is so beautiful Johnnie! The project, tutorial, and photos are top notch! I wish you lived closer so you could train me to use these tools 🙂 I must plan a visit to your neck of the woods soon!
Amy*
I would love it if you came here! Thanks for the project love. Miss you!
Like the windchimes! Really cute idea.
I’m in love with these! Will be sharing on FB 🙂
Thanks Amanda!! xoxo
Love the wind chime! Where do you find your glass beads? Also, where did you get the large glass hoops/rings? I have looked everywhere and can’t find anything similar.
Thanks so much! 🙂
Thank you for the love! The glass beads are in my stash from local craft stores like Hobby Lobby and Michaels. As for the large glass rings, I made them from wine bottles in my kiln. I showed you how to do that here.
This was an excellent tutorial – thank you for sharing! One question about “fusing” the wine bottle rings … when you cut the circles and put in your kiln – do you stack 2 together to get the do-nut shape? or does one melt down like what you have pictured for the wind chime and the green necklace? Thanks!
Elaine, thank you! To answer your quesiton, I do not stack the circles to get the donut shape. One just melts down like those pictured! It is super cool and I am addicted.
Hi Johnnie! Since Facebook is notorious for not letting page owners know when I tag them, I thought I would stop by myself and let you know I featured this post and my readers loved it! https://www.facebook.com/CraftsbyAmanda/photos/pb.323548680216.-2207520000.1397173019./10153988888255217/?type=3&theater
Awesome!! Thanks Amanda.
Beautiful! My grandmothers name was Johnnie 🙂
LaNita, thank you! And how cool to know I share my name with your grandmother. Is that how she spelled it? I have never met another female Johnnie.
Thank you for all the tips i need to get started going to make this for a friend she thought it is so cute she will be surprised when she opens her ???? thanks again
[…] very own Johnnie of Saved by Love Creations will knock your socks off with this gorgeous Repurposed Mason Jar Wind Chime! Johnnie is the […]
[…] Saved by Love Creations offers a really excellent, easy-to-follow detailed tutorial on how to make your own mason jar wind […]
[…] week I shared this DIY Mason Jar Chimes tutorial and I bet you were left wondering what was to come of the bottom part of the jar. Since I cut […]
[…] First you need to drill a hole in the top of your dome for a place to insert wire for hanging the pendant. Follow the detailed instructions I showed you in this tutorial: Mason Jar Chimes Tutorial and Drilling in Glass. […]
[…] Mason Jar with bottom 1/3 cut off (How to cut mason jars) […]
[…] you love the sound of wind chimes singing? I have shared with you how to make DIY Wind Chimes from Upcycled Mason Jars in the recent past, and today I am sharing with you my newest […]
[…] Mason Jar Chimes/Saved by Love Creations […]
[…] *If your containers are spherical without a neck like one of mine pictured, you will need to drill holes in the glass, which I showed you here: How to Drill Holes in Glass […]
[…] Tutorial: savedbylovecreations […]
[…] savedbylovecreations […]
[…] Tutorial: savedbylovecreations […]
[…] savedbylovecreations […]
[…] savedbylovecreations.com […]
[…] savedbylovecreations.com […]
[…] Tutorial/Source: savedbylovecreations […]
[…] Here all you need a half-cut mason jar with a lid that can be hung aloft on a wooden support, next you can make pendant ornaments with beads, chains, and charms which can also be hung on the lower part of the mason jars by making some holes in the glassy rim as you can see. savedbylovecreations […]
[…] savedbylovecreations.com […]
[…] Tutorial: savedbylovecreations […]
[…] Source: Saved by Love Creations […]