[pinit]
[pinit]
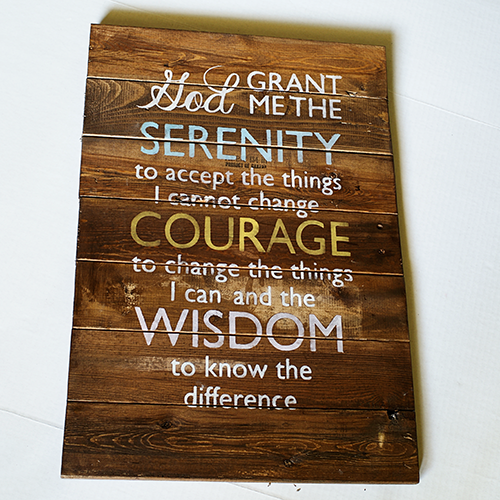
I have been a long time fan of making signs from reclaimed wood. If you have tried to make a pallet sign, you may have run into the same dilemma as I have. How do you attache the wood pieces together? Some people use the pallets as they are and just paint on them. I prefer each plank to be the touching edge to edge. Before I discovered the Kreg Jig, I scabbed my pallet planks together like I showed you in this How to Make a Sign From Reclaimed Wood Tutorial. This is a way easier process using the jig. You drill perfect pocket holes based on the wood thickness and the join is flush, edge to edge. A Clean, strong, quick and easy attachment, that I am told doesn’t even require wood glue! I used it anyway because I am just like that. Pallet signs have gotten way easier since I made this investment. This is not a sponsored post! Read on to see how it works.
SUPPLIES:
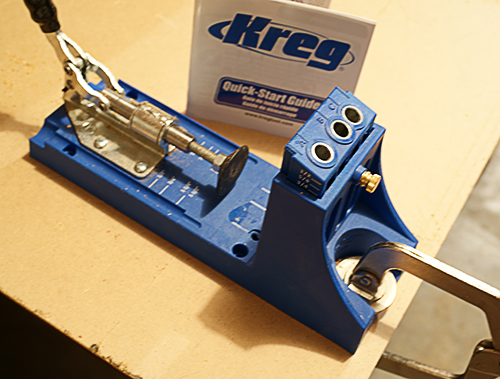
Kreg Jig with drill bits and clamp
Shipping Pallet Boards (I pry mine off of the pallet with a pry bar a.k.a I have my husband do that part)
Stencils for words (I cut mine with my cricut machine)Wood Stain and lint free cloth
Acrylic paint (I used Tim Holtz Distress paint but anything will do)
TUTORIAL:
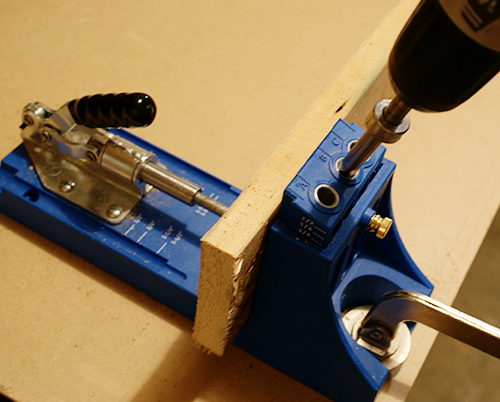
I drill two holes in each pallet, one one each end, a few inches in. The pocket guide is set to 3/4 inch since that is the thickness of this pallet wood. You can go down to half an inch but remember to use shorter screws. There is a great chart that shows you what settings to use. So the neck of the drill bit has a stopper that you set, then the guide with the holes that you drill through is set to that number, and there is a corresponding screw length. The jig comes with a handy chart for quick reference. SUPER easy!
Once your holes are drilled in each board (except the bottom one, which doesn’t need holes), swap to the screw driver bit which is shown in the drill in this photo (both bits you need come with the jig).
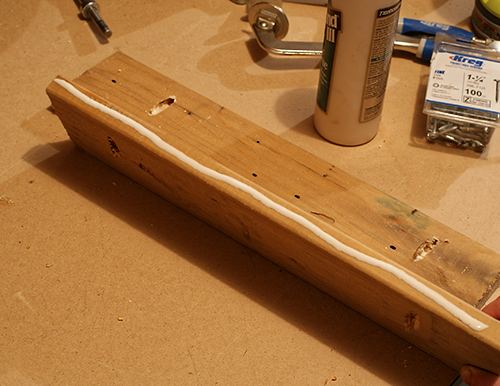
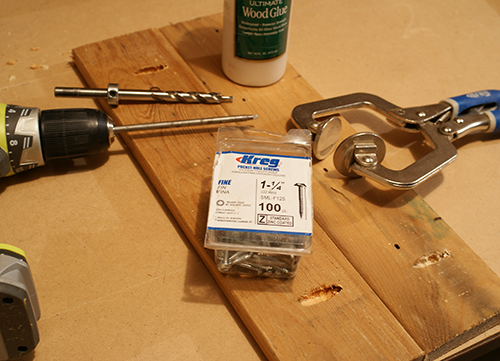
Add some wood glue or don’t (see above).
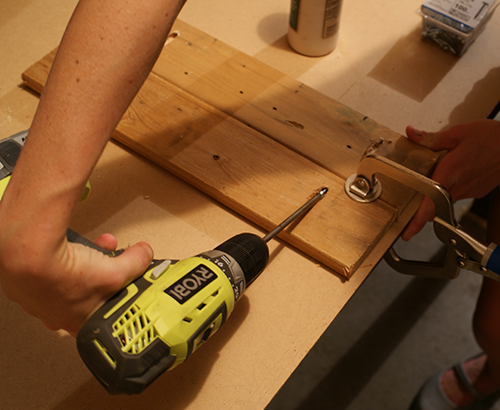
Then drill your screw into the pocket hole.
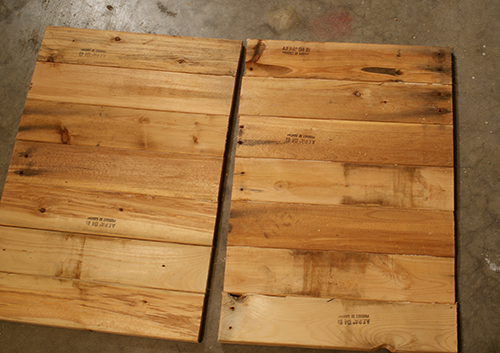
Keep going until all of your pieces are attached. I stained my sign with Walnut color Minwax Gel Stain. Let dry.
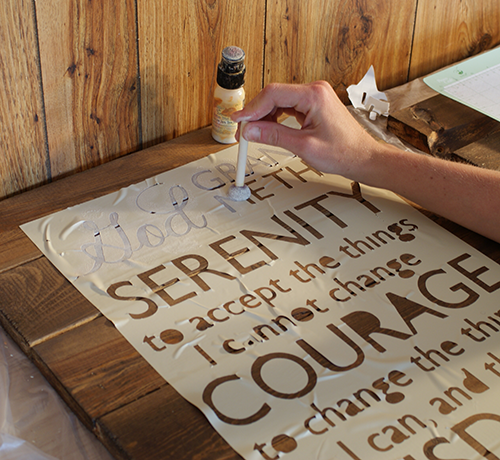
Use your stencil to create the phrase. I cut mine from contact paper using my Cricut.
Attach wire to the back with nails or a staple gun and hang!


I love the sign so much and the kreg jig makes everything look so much more professional!
Thanks Kelsey! I am loving the thing for signs and pretty much everything I build now. It is a go to.
Hi Johnnie. I love everything you make! I have been wanting to make a sign for a while now, and actually found a curb-side wood pallet over the wknd and picked it up. Could you show me though, or do you currently have a tutorial on how you did your letters w contact paper/cricut for the sign? Thank you so much!
Leave the backing on the contact paper and put your pressure on 3 (which reads medium) and your blade depth to 3. This will give you what’s called a kiss-cut. It will just cut through the contact paper but not the backing. Take your contact paper (with the backing) off your cutting mat. Now you want to take off those parts of your image you don’t need (the negative space). After this is completed, you want to align your contact paper to where your image is going to go and slowly take off the backing as you press down your image (or stencil) onto your signage. Get a popsicle stick or such to press your contact paper down so that there are no bubbles. And there you have it! Also, if you are using vinyl, use the same settings on your cricut.
Sorry, let me clear something up! On your cricut machine put pressure on 3 and blade depth on 3 and place your contact paper (with backing on) on your cutting mat and cut your image. Then take your contact paper off your mat and take off the negative space.
hi! I just purchachesed the cricut explore and I’m so excited to create create create!! But I’m wondering how you got it to cut on such a large piece of contact paper??
I love that you completely re-created the pallet! I haven’t heard of the jig you used. I was taught by an elderly woodworker to clamp the boards together and using a carpenters square, just draw a straight line across the edge of both boards, find the center of each, drill holes, and use a short piece of dowel to lock them together with wood glue. The jig makes it much more accurate and simplified, so thank you for that!
And I’m seconding Allison’s request, it would be so great to see how you did the Cricut stencil – please??
I shared & liked SBLC on FB!
What do you do about the inside of some of the letters? , ex: q, e, o, a, d, g, B. I have a Silhouette, and when you pull the paper from the mat, the inside of the letters aren’t attached.
You mentioned using your cricut to cut the stencils. Is there a specific cartridge used to make the subway sign text look or do you utilize different fonts and arrange the cutting tool for each font? I have been looking into doing this but haven’t figured this part out yet.
I have my cricut connected to my laptop via sure cuts alot. I think you can’t do this with the newer cricut machines. I can cut anything I can design in photoshop. I think you may be able to do that in Cricut Studio with your laptop now. Hope that helps. xoxo Johnnie
I also used my cricut to cut a stencil out of contact paper, is there a trick for keeping your paint from bleeding under the contact paper?
[…] I brought her home and cut into thirds with my table saw. I just measured and marked so the sides would be equal height. The first step was attaching the two smaller parts for sides to the larger segment (which would become the top of the console). I used my go to connector tool, Kreg Jig. You can read about how to join using Kreg in my DIY Pallet Sign Using Kreg Jig Tutorial. […]
[…] I attached scrap wood planks between them using my Kreg Jig, like I showed you in this DIY Pallet Sign Tutorial. […]
[…] showed you how to make a wood pallet sign using a Kreg Jig in this DIY Pallet Sign Tutorial. Kreg makes joining wood slats super easy. I LOVE […]
[…] where you will create pocket holes with Kreg Jig. Create pocket holes like I showed you here: How to use a Kreg Jig. I decided to stagger my shelves, so I created pocket holes four inches from each end on half of […]
[…] together with the Kreg Jig Pocket Hole System and 1 inch screws (I showed you how to use that here: How to Use a Kreg Jig). The blue circles show the Kreg pocket […]
[…] by assembling the side panels with two pocket holes (I show you how to use the Kreg Jig here). Set the depth of the jig to match with thickness of your pallet wood. My pieces were 1×3 […]
[…] dimensions of the pillow I already had on hand. Using my Kreg® pocket hole system (I showed you how to use a Kreg® jig HERE), I attached the four sides together with 1 1/4 inch screws and wood glue. For the top […]
[…] attached the 5 inch pieces to the 18 inch piece using pocket holes with my Kreg Jig (see How to Use Kreg Jig). The pocket holes are circled in the […]
[…] pocket holes to connect the pieces at each corner to form a frame. For more details, see my post on How to Use a Kreg Jig and DIY Barnwood […]