[pinit]
[pinit]
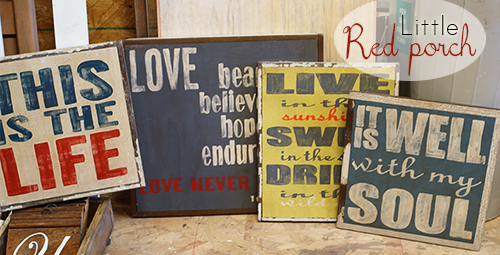
I was recently blessed to meet Pam, a local talent with a passion for hand painting rustic, inspirational signs. I have noticed her signs fly off of the shelf (or porch, more accurately). At the venue where we met, every sign I thought needed to come home with me was on hold, waiting for it’s lucky recipient. Pam is a busy mom, wife and small business woman who found the time to invite my husband and I into her lovely farmhouse for a day. As a result I get to bring you this detailed tutorial showing you how to make your own hand painted, distressed wood signs. Pam has an abundant supply of reclaimed wood and a rocking wood shop at her disposal, but you can make these without all of that. The best news is I have had several of you ask about die cut machines and how to make stencils for your signs without one. Pam does this with a cheap text editor on her computer, and a regular printer with black and white ink. Let’s get started!


would love to buy the software…its not showing $1.23 for me on amazon…
This is great inspiration for the artwork I want to create for my partner’s new office space.
Thank goodness I found this! I have been admiring some Rebecca Puig reclaimed wood art, but I knew I could make something myself. Thank you very much for the know how!
Oh good, Laura! I am excited to try it too. I would love to see the outcome when you make your own.
Its not showing 1.23 for me either. Can someone help me find it?
It must have sold!
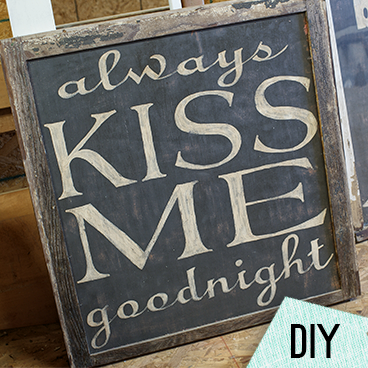
i love them! what an inspiration- I am desperate to find the name of the font used in the “always kiss me goodnight” sign, in paticular the words always and goodnight. Can someone help?
I will try to find this out for you, Julie!
So I have that software but cant figure out how to print like that. Everytime I try to print it squishes my project down to fit one 8.5 x 11 piece of paper. Can anyone help me?? Please!
nicole – did you ever figure out how to do it?
I wish you offered classes… Think about it! 😉
I do the copying over transfer paper for all my scroll saw work. Many designs are possible. Many ideas for wood working embellishments are possible. I like your tutorial. It is very informative. I can use some of it also.
I love your signs. Used Printshop for years but now have an IPad and can’t find any comparable program. Do you have any suggestions? Thank you.
So I bought the software mentioned above, but I can’t seem to figure out how to print it like Pam did. If you could ask her how she does it (type of project to create, any special settings?) I would greatly appreciate it!
Look at the picture about where she is talking about PS. See the text box and how it’s not centered on the template? That’s how she prints them off (from what I can tell) — in pieces. So, she’ll have one full design come out on maybe 4 8.5×11’s for example. She then overlaps the pages so that the writing/design fits together, kinda like an abstract puzzle. Am I making any sense?? Lol. Where can I buy transfer paper, btw? Also, I know that transfering writing/patterns can also be donr with a transparency sheet and overhead projector. You can still fit the whole design on an 8.5×11, but trace with a pencil then paint. We used to do this often when making backdrops.
I got my transfer paper at AC Moore
Hello, I recently bought the program to try this out, but I’m having trouble figuring out what part of the program she uses to make the outlines. I also looked at the picture above but couldn’t see where she was in the program. I would appreciate any help you can provide.
I am unable to find the software at that price as well :/ Am I looking in the wrong place? I just clicked the link…
thank you 🙂
by the way… great post!
Awesome tutorial. Love the signs. Could you tell me where to find the Print Shop 23 Deluxe, which you can buy for $1.23 at my Amazon affiliate link. I am new to your blog and don’t know where to look for it. Thanks
Michelle
Love your ideas & instructions. I am not tech-savvy.was trying to find the version Print Shop 23 Deluxe for the minimal price $1.23 you used.However, I can not seem to locate. Any help would be appreciated! Thank you much
I can’t find the software for less than $13 on Amazon. am I looking in the wrong place?
did anyone ever figure out how to make the oversized project on Print Shop?
Does anyone know what fonts are being used!? They’re all gorgeous!
Hi there! Awesome tutorial! I’ve always wondered how to make these signs! I’m featuring this post on my blog this week…come on over and check it out!
Shara
How does she nail in the back pieces, but then you can’t even see the nails from the front of the sign?
I purchased Print Shop 3.5 and I’m trying to tile print which you described in your tutorial; how Pam highlights the boxed images and then prints it out…continuing to do it again; however, moving the highlighted area over. My problem is Print Shop is not allowing me to highlight the image and when I print the image (words) even with it created to fit the board I’m using…it’s only printing 1 single paper. Do you have an suggestions?
Can you explain how to print the words on multiple pieces of paper?
Hi Candi. I made a video showing you how to print the words on multiple pieces of paper using Photoshop. You can probably figure out how to apply what I show you in another editing software program if you aren’t using Photoshop. You will find the youtube video in this DIY SIGN TUTORIAL. I hope that helps. Let me know if you have questions!
Can anyone post to say how she uses the print shop program? I have had a lot of trouble figuring out how to begin a project using it…
Hi Melissa. Pam uses Print Shop, I use Photoshop. I can’t speak to how to use print shop. You can ask her for help at https://www.facebook.com/LittleRedPorch. I am sure she will be glad to point you in the right direction!
I recently watched your tutorial on how to print your sign text on 8×10 paper. Looking to learn how to use ps5 to create the text before printing. Do you have a tutorial on this? Or one you can refer for me?
Hi I was looking to try and make a sign (as per tutorial) , could you please tell me exactly what type of Valspar paint as I can’t seem to find in UK
Thanks very much!
I have Print Shop software but would love to know what ‘project’ to use to create the wood signs and how to print.
I was wondering what sheen of the valspar paint is used? Also If i were to do a black background white lettering and grey stain, would that work out ok instead of walnut?
The sheen is satin, Renee. I think back background with white lettering and grey stain would be beautiful!
what sheen of the valspar paint does she use?
I want to have a sign made that says
“We know Mom ; it’s all About You”
[…] all loved this DIY Rustic Hand Painted Sign Tutorial from Pam at The Little Red Porch so much, that she has decided to love you back with a sign […]
[…] this feeling in mind I scoured Pinterest, and this tutorial stood out for […]
[…] technique is the same as this rustic sign DIY from guest artist Pam of The Little Red Porch, using the chalky finish paint. I also added a video illustrating how to use Photoshop to print […]
[…] and pretty easy to make. Pam from Little Red Porch came over and showed us her technique in this DIY Rustic Wood Sign . I made a video showing you how to use Photoshop to print your text in sections so you can tape […]
[…] year round, but particularly so now. For the detailed tutorial on how to make this sign, see our Rustic DIY Wooden Sign Tutorial. Below you will find the Photoshop file I used. The tutorial just linked shows how to […]
[…] painted sign from The Little Red Porch. I first introduced you to Pam and her signs with this DIY Rustic Hand Painted Sign Tutorial and you couldn’t get […]
[…] I won’t bore you with the details of how to make one of these signs, since I have covered that thoroughly in this DIY Rustic Reclaimed Wood Sign. […]
[…] I used my Cricut make a stencil out of clear contact paper. I love to use contact paper for stencils because it is way cheaper than adhesive vinyl. You can download the image file here: Joy and Holly Berries. If you don’t have a cutting machine, you can print and transfer the image using transfer paper like I showed you here: DIY Reclaimed Wood Sign. […]
[…] :: Wie man ein handbemaltes rustikales Schild aus Altholz herstellt ( Gespeicherte Bylovecreati … […]