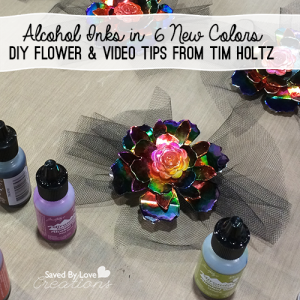
New Alcohol Ink Colors from Ranger & Video Tips from Tim Holtz CHA 2014

[pinit]New Ranger Ink Alcohol ink colors and DIY Flower with CHA 2014 Tim Holtz Video @savedbyloves[pinit]

I am so excited about the new alcohol ink colors from Ranger that I had the chance to demo at CHA 2014.  We used them making these beautiful flowers from the Tim Holtz Tattered Florals Die from foil card stock.  They were quick and easy to make, and can be used as barrettes, corsages and more!

New Ranger Ink Alcohol ink colors and DIY Flower with CHA 2014 Tim Holtz Video 2

Here are the supplies we used.  Make stripes of various ink colors on the blending tool.  Drag across the flower layers and the flower button for the center.  Once dry, shape flower layers and attach wiht brad through accordion folded organza rectangle.  Use glue dot or hot glue to attach flower button to center of flower.  The end!

Check out the following video where Tim Holtz talks about the new colors in the Ranger alcohol ink line, and gives really cool tips on how to use the alcohol blender pen to color with the inks!

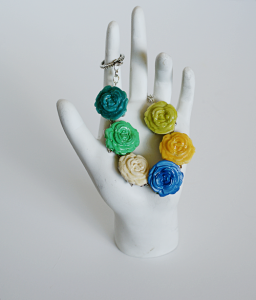
Easy DIY Rose Bracelet

[pinit]
Make an easy diy rose bracelet with #modmelts #resinflowers @savedbyloves
[pinit]

Today’s project is a lovely summer bracelet featuring roses made with Mod Melts.  I showed you this new product last week in this DIY daisy bracelet tutorial.    I love that you can use it with silicone molds to  quickly create detailed flowers that are commonly made with slow curing resin.  You can whip out this bracelet in well under 1 hour!

FlowerBracelet7

SUPPLIES:

ModMelts and Molds with Sticks (see: tutorial for using the mod melts)

Connector Metal Squares (I found these at Joanns)

Jump rings

Toggle clasp

metal chain

2 pairs of flat nose jewelry pliers

E6000 glue

TUTORIAL:

diy how to make a flower bracelet

Create your charms using Mod Melts as in the link above.  I used the smaller rose on the Floral Mold.  I painted 6 of them in a green/blue color palettes.  I sealed them with Mod Podge matte finish.

how to open jump rings

Connect the squares with jump rings.  Begin by twisting jump rings open with 2 sets of pliers.

jewelry making tips

Add a square.

how to connect jewelry pieces with jump rings

Add second square and close jump ring by twisting back with 2 sets of pliers.

FlowerBracelet13

Continue adding squares until you have enough for each rose charm.

how to use E6000 for jewelry; how to glue metal to plastic

Glue each rose onto a square with E6000 and let dry for at least 1 hour.

FlowerBracelet4

To finish, use jump rings to attach toggle clasp on each end for bracelet closure.

how to make resin jewerly

What do you think?  Are you ready to try this stuff yet?  I have tons more charms left from my afternoon of creating with Mod Melts.  As promised, you will be seeing more!

For plenty more DIY bracelets, see SBLC’s bracelet tutorials, and our 50+ bracelet roundup!

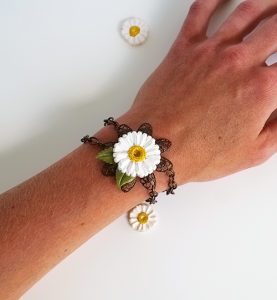
Daisy Bracelet Tutorial With Mod Melts

[pinit]Mod Podge Mod Melts Bracelet Tutorial @PlaidCrafts from @savedbyloves #ModMelts[pinit]

Disclosure: This is a sponsored post on behalf of Blueprint Social and Plaid. All opinions are my own.

Have you seen the new Mod Melts and Molds by Mod Podge yet?  This stuff is fantastic!  As one who works with resin and polymer clay, I am in love with the ease of use, the detail of the pieces you can create and the speed of the process.  Today I will show you how to quickly create a beautiful daisy bracelet.  You will be seeing several more pieces in the near future made during my afternoon of creating with Mod Melts.

#ModMelts #diy daisy bracelet from @savedbyloves #jewelrymaking

Supplies:

#ModMelts

Mod Melt Mold

Mod Melt Sticks (Sea Glass used here)

Metal Filigree flower

Metal Chain and Toggle Clasp

Metal leaves

Acrylic paint white, yellow and green

Matte Mod Podge

E6000

Jewelry Pliers

Small Paint brush

Paint sponge daubber

Toothpicks

High Temp Hot glue gun

#ModMelts

Tutorial:

how to make flowers with #ModMelts

Heat the Mod Melt stick in your HIGH temp hot glue gun and squeeze into the larger daisy on the flower mold.  Work from the center out, making sure to not overfill.

How to use hot glue gun diy embellishments

Let cool for about 5 minutes.

ModMelts9

The pieces easily pop out of the flexible mold when you bend it.  This is so freaking cool.  Have you ever used resin in a flexible mold?  Hours upon hours of waiting.  No more.

ModMelts11

Now you just paint your daisy.  Mod Melts can be painted with acrylics, alcohol inks, embossing powders and more.  See Cathie Filian’s great photo examples of different ways to color the embellishments.  I show you FolkArt and Martha Stewart acrylic paint in this tutorial.  I also tried alcohol inks and Vintaj patina.  So awesome!

ModMelts13

I painted the middle of the daisy with a toothpick.

ModMelts14

Here are the three pieces I sandwiched for the focal point of the bracelet.  I sealed them with 2 coats of Mod Podge Matte finish, painted on with small, soft brush.

ModMelts12

I used E6000 to attach the pieces.  Let dry for at least 30 minutes before handling.

How to make a metal filigree bracelet

To make the bracelet, I opened chain links and attached them directly to the metal filigree flower using jewelry pliers.

ModMelts4

Using pliers and a jump ring, I added toggle clasp to the ends for closure.

Mod Podge Mod Melts Bracelet Tutorial @PlaidCrafts from @savedbyloves #ModMelts

Give it a try.  You are going to love it! You can find more great ideas and products from Plaid by via Facebook, Pinterest, Twitter, and Paint Me Plaid.

Check out what others have made with Mod Melts:

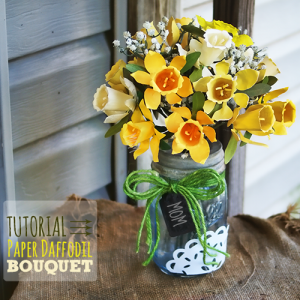
Make a Paper Daffodil Bouquet and Mason Jar Vase

[pinit]
Learn to make a gorgeous Paper Daffodil Bouquet #sizzix and painted #masonjar vase

[pinit]

As soon as I saw the new daffodil Sizzix die by Susan Tierney Cockburn, I knew a bouquet was in my future.  Mother’s Day brought just the occasion.  Today I am sharing Susan’s video detailing how to make the flower, then how I added stems to make this lovely daffodil bouquet in a mason jar vase.

how to make paper flowers

You will need:

Yellow cardstock – I used Coordinations in various yellows and even tried a crepe paper daffodil which I found to be to annoying to do more than once.  You can see the lone crepe flower in the upper left of the above pic.

Sizzix Susan Tierney Daffodil die

 Daffodil Sizzix die by Susan Tierney Cockburn

Doily Lace Medallion Sizzix Die by Eileen Hull

Mason Jar with Lid

Craft Glue

Susan’s Garden Tool Kit

Floral wire

Green Floral tape

Hot glue gun

Flat nose or round nose Pliers

TUTORIAL:

Make each daffodil as shown in Susan’s video.  Don’t add the leaves just yet.

Adding Stem to Finished Flower

how to make a paper flower bouquet

Bend wire to 90° one inch from the end with your pliers.  Then grab tip of wire with pliers and twirl inward to create a spiral.  It doesn’t need to be pretty.  You are just creating a surface for gluing the stem to the flower base.

PaperDaffodilBouquet3

Place a dab of hot glue on the calyx at the base of the flower.

paper craft flowers

Press spiral into hot glue dab immediately and hold in place for 30 seconds until glue sets.  Add leaves last, using a dab of hot glue at the base of each.

Learn to make a gorgeous Paper Daffodil Bouquet #sizzix and painted #masonjar vase

To finish the flowers, wrap wire in green floral tape.  This is optional, but I think it makes the stems look way better than just the naked wire.  Cut stems to fit your jar (6-8 inches should work, but just put one into the vase to see how much excess wire you have).

Making the Bouquet

Arrange flowers into a bouquet: Hold a flower in one hand.  Add alternating shades of yellow daffodils to frame your central one, turning the bouquet each time. Point the blooms towards you as you continue adding around, creating a rounded shape.   When you are happy with the shape of your bouquet, secure stems with floral or a rubber band.

I added baby breath looking artificial flowers from the dollar store to fill in the spaces between my daffodils.  Wouldn’t hydrangeas be pretty with the yellow too?!

The Mason Jar Vase:  I painted my mason jar with DecoArt glass stain like I showed you in this Mason Jar Chandelier Tutorial.

Punch a hole in your mason jar lid with a nail and hammer, then pound away to make a hole large enough for the bouquet.

I inserted my bouquet and embellished the vase with green jute, a chalkboard tag and a paper doily I die cut from white cardstock using Eileen Hull’s paper lace medallion die.

PaperDaffodilBouquet6

She was overjoyed, and the piece became our Mother’s Day lunch table centerpiece!  This bouquet would be great for wedding centerpieces and bridesmaid bouquets too.

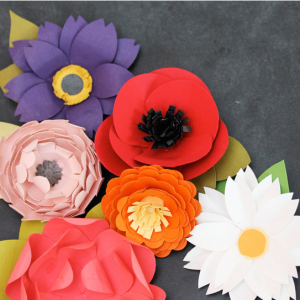
Make Easy Paper Punch Flowers & More DIY Flowers

[pinit]
Make Easy Paper Punch Flowers at Damask Love, featured by @savedbyloves

[pinit]

It is no secret we love paper flowers around here.  This time of year, they are even more on the brain since they make such great Mother’s Day gifts.  That is why I wanted to share with you this lovely variety of paper punch flowers with complete tutorial I found at Damask Love.

Crepe paper roses DIY

Let’s not forget this crepe paper rose tutorial I shared with you!

How to Make Paper Daisies

And who wouldn’t love this DIY paper daisy bouquet?

Make Terrariums Galore in Under 1 Hour
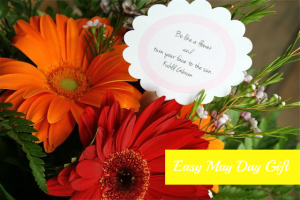
Terrariums3

How to Make a terrarium, DIY @savedbyloves

How to Make a terrarium, DIY @savedbyloves

Today I am excited to share my first terrarium project (aside from the pendant I made in Cynthia’s class that I told you about yesterday’s 50+ Terrarium Projects to Make).  Since I have a habit of hoarding random glass containers from my junkin adventures, I had just the collection to whip up 5 different succulent planters.  The project was done in under 1 hour, and cost about $20 total!  I am giving some as gifts, and adding some to my own display in progress.

How to Make a terrarium, DIY @savedbyloves

On this $1 glass bowl from the dollar store, I etched “GROW” using Martha Stewart’s Glass etching cream that I showed you in this doily etched wine bottle post from Monday.  Perfect for a terrarium!

DIY Terrarium Supplies

SUPPLIES

Various succulents from your local nursery – I even found some at Walmart

Succulent Soil

Activated Charcoal

Little Rocks

Moss

Thrifted glass containers, jars, etc

How to make a terrarium

TUTORIAL

Terrariums9

Put some small rocks at the bottom.  These drain the water from the soil.

If you are working in a closed container, you want to put a layer of charcoal next.  This prevents mold from forming in the closed vessel.  If you are working in an open container, this is not necessary.

Next put a layer of moss (I found the bright purple, green and white in a variety pack at Michaels).

Put an inch or 2 of soil next, then stick in succulent cuttings as you like.  You can cover the soil with moss, pebbles or other embellishments as desired.

How to Make a terrarium, DIY @savedbyloves

Your succulent will take root if all goes as planned.  As Cynthia Bee pointed out, if it dies, just start over.  You are out just 1-2 bucks.  Watering frequency will depend on your local environment.  It is better to underwater than to over water, as the latter leads to root rot.  Spritz with water once a week or so, and place in indirect sunlight.  Too much direct sun will burn your plant!

How to Make a terrarium, DIY @savedbyloves

 Easy DIY Terrariums

Easy May Day Gift

Hi Friends! My name is Malia and I blog over at Yesterday on Tuesday where I love creating crafts and recipes. Thank you Johnnie for having me over. I am a big fan! Today I want to share a super simple May Day project… you know that day where you get to spread the love by leaving flowers for people?

[pinit]

Easy-May-Day-Gift

[pinit]

All you really need are some flowers and quick feet so you can leave them on your neighbor’s doorstep and DASH away!

MayDay2

But these printable circles can will make your flowers extra special. Keren from FPTFY created them to use as tags for your May Day surprises. Just download, print and cut out or punch (I used a 3′ scallop circle punch)… and you can stick them on a popsicle stick or coffee strirrer to tuck them in your bundles.

MayDay3

Blooms from the grocery store are prettied up with some craft paper and rik rak.

MayDay4

There are four different flower/spring quotes to choose from:

MayDayWebEx

Simple Download Instructions

1. Click this link for the May Day Tags

2. Click actions, then view all sizes, then select “original,” save to your computer and print.

Enjoy and Have Fun! Thanks again Johnnie.

YOT sig 3

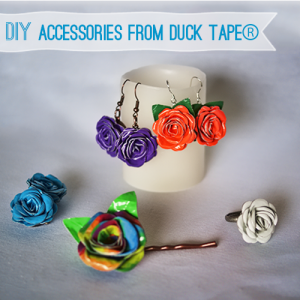
DIY Prom Accessories From Duck Tape®

This is a Sponsored post written by me on behalf of Duck® Brand for SocialSpark. All opinions are 100% mine.

[pinit]

Make Duck Tape Crafts #StuckAtProm #DIY @theduckbrand @savedbyloves

[pinit]

If you have been around SBLC for awhile, you know that I heart crafts made from Duck Tape®.  That is why I was so thrilled when invited to use it to create a prom themed project.  The stuff comes in over 140 colors and prints, meaning you are sure to find the perfect match to accessorize that fab dress, or even to make the dress in its entirety!  I am going to show you how I created these roses and used them to make hair pins, earrings and a ring.  This project is quick and easy.  You will have beautiful prom accessories in no time.  Then I will tell you about Stuck at Prom®, a scholarship contest in which your creativity could win you some serious cash!

Sizzix and Duck Brand Duck tape jewelry #prom

To start, I made Duck Tape® sheets using foil squares I had on hand.  Disposable foil containers or any craft foil that is thin and flexible will work. Cut it the apporpriate size for the die shape.  Cover both sides of the foil with your favorite color/pattern of Duck Tape®.

Sizzix Flowers 3-D die jewelry

I used the Sizzix Flowers 3-D Die for the rose shape and the Flower Layers & Leaves Die for the leaves.

Run the tape covered foil through the machine and coil the resulting spiral shape around a skewer or toothpick from the outside towards the center per die instructions.

E6000 Sizzix flower die Duck Tape Crafts

Put a dab of glue on circle tab in center of die cut flower and press to bottom of rolled shape.  Hold between thumb and index finger for 20 sec or so for glue to have time to grab.

Duck Tape Crafts

Now you have your rosette.  If you want leaves, die cut or hand cut them from green Duck Tape® covered foil and glue them to the bottom of the rose.

#ducktapecrafts #DuctTapeFlowers

I used my duck tape roses to make earrings, a ring and a hair pin, all of which would make perfect prom accessories when matched with the dress.  It takes 5 minutes to create a rose, and not much longer to incorporate it into an accessory.  Quick, easy and super cool… my kind of project!

Rivoli Holders

For the earrings, I glued the roses into these rivoli holders that have a connector ring on 2 sides.  I added an ear wire with a jump ring and that was that.  You could add a crystal or other charm in the bottom ring if you wanted some extra bling.

Duck tape hair accessories

For the hairpin, I glued the leaves to the bobby pin blank, then the rose on top of those.

Duck tape rose ring

duct tape rose tutorial

For the ring, I simply glued the rose onto a ring blank.  Easy!

#StuckAtProm

Do you have a Duck Tape® prom idea?  If so, you will want to check out the Stuck at Prom® Scholarship contest where over $40,000 in scholarships are up for grabs!  Visit the link for entry details and deadline.  Join me in following Duck Tape on Facebook for inspiration and updates.

Visit Sponsor's Site

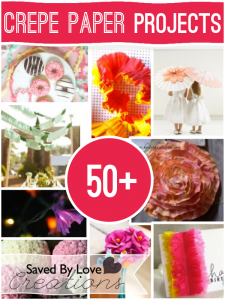
Over 50 Crepe Paper Crafts to Make

[pinit]

Over 50+ crepe paper crafts to make @savedbyloves #DIY #Wedding #crafts

[pinit]

This is the perfect time of year to gather up some crepe paper and create lovely DIY wedding decor, Mother’s Day gifts, paper bouquets, and  countless accessories for celebrations of all sorts.  The paper comes in wonderfully vibrant colors, and is inexpensive to boot.

Make easy crepe paper roses with DIY and template @savedbyloves

I showed you these crepe paper roses I made last week.  If you missed it, go check out the easy DIY and free template for your petals and leaves.  You will have a gorgeous bouquet that your friends will have to get super close to to see that they aren’t real roses.  Best part?  They don’t wither!  What a perfect Mother’s Day gift for those with moms that love to get roses.

Beautiful hand made card with crepe paper fringe
What a festive, simple to create, one of a kind birthday card!  See what I mean about the vibrant colors?  At Paper Crafts Connection, you can check out how this card evolved.  Make several at the same time to have on hand for those birthdays that sneak up on you.
#weddingDIY crepe paper flower aisle markers
Add that special touch to your ceremony with this crepe paper aisle marker from Hello Lucky.
Over 50+ crepe paper crafts to make @savedbyloves #DIY #Wedding #crafts
Martha Stewart shows you how to make a variety of crepe paper flowers, including peony, tulip, lily and rose varieties.  You would swear they are real flowers.  Sturdier, cheaper and available in any color, any time of year, crepe paper flowers are the way to go for your DIY wedding!
Over 50+ crepe paper crafts to make @savedbyloves #DIY #Wedding #crafts
Make your own photo backdrop easily and for just a few bucks with this DIY Crepe Fringe Party Backdrop at Somewhere Splendid.

Those are a few of my faves.


Now for the 50+ collection!


DIY Crepe Paper Roses

How to Make Crepe Paper Roses[pinit]

Make easy crepe paper roses with DIY and template @savedbyloves[pinit]

Spring is in the air and paper flowers are popping up all over the place.  Today’s project fits right in with the flower mania, and can be created in loads of colors to fit your style.  Crepe paper is perfect for making realistic looking roses.  It stretches and curls in a way that is perfect for mimicking actual petals.  Grab some crepe paper sheets in your favorite colors and let’s get started!

Make easy crepe paper roses with DIY and template @savedbyloves

SUPPLIES

Crepe Paper Sheets in Petal colors (streamer rolls won’t work for petals since they are not wide enough)

Green crepe paper sheet or streamer roll for leaves

Scissors

Glossy accents or other paper glue

Floral tape

Floral Wire

Pencil or bamboo skewer

Petal and leaf template (click thumbnail below to reveal full size template and print)

Paper rose petal and leaf template free printable

Make easy crepe paper roses with DIY and template @savedbyloves

 TUTORIAL

I showed you how to make roses using scrapbook paper and the above template in this PAPER ROSE DIY WITH TEMPLATE post.

Follow the same steps, using crepe paper instead.  I had a hard time finding crepe paper sheets, but then ran into a huge stash of it at my local Goodwill.  Score!  I linked where you can find some on Amazon under supplies above.

You can cut several layers of the crepe paper at once, for several petals with one cut.

Make easy crepe paper roses with DIY and template @savedbyloves

Making these with crepe paper was easier than using cardstock since the crepe paper is thinner and wraps around the floral wire more easily.  You can stretch the petals by lightly pulling with your fingers and curl them with the skewer or pencil to shape them more easily too.

I am in love with them!  Won’t they make such a great Mother’s Day gift?!


Make easy crepe paper roses with DIY and template @savedbyloves

Privacy Policy