Lavendar Bath Salts

How to Make Lavendar Bath Salts #DIY #Gift from utryit.com, featured @savedbyloves

[pinit]

I found this lovely lavendar bath salt DIY tutorial at utry.it, and I just had to share it with you!  I can think of several friends and relatives that would love to get this as a gift.  Whip some up to have on hand for birthdays or Valentine’s Day gifts!

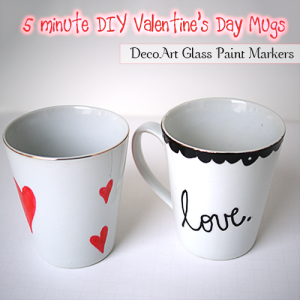
DecoArt Glass Marker Love Mugs

@DecoArt_Inc Valentine's Day Mug Dollar Store Craft @savedbyloves

[pinit]

I was blessed to receive a box of craft supplies from DecoArt, including some fun glass markers that I used on dollar store mugs  for this Valentine’s Day craft.  The project couldn’t be simpler or cheaper, and leaves you with some adorable, hand doodled, custom love mugs to gift your sweeties on this fast approaching day!

@DecoArt_Inc Valentine's Day Mug Dollar Store Craft @savedbyloves

Supplies:

Rubbing Alcohol

Lint free cloth

Plain Coffee Mugs

DecoArt Glass Markers

Oven (optional)

DecoArt Glass Markers

Tutorial:

Clean glass with rubbing alcohol

Shake markers well, depress tip on scrap paper until ink flows

Decorate Mugs as desired

Deco Art Valentine's Day Mug

Between 4-8 hours of paint application, bake mugs in oven preheated to 375° for 40 min for dishwasher safe finish.

@DecoArt_Inc Valentine's Day Mug Dollar Store Craft @savedbyloves

@DecoArt_Inc Valentine's Day Mug Dollar Store Craft @savedbyloves

I told you it was simple!  Check out more fantastic ideas and products from DecoArt by keeping up with them on Twitter, Facebook and Pinterest.

*Disclaimer:  I received free product to try for this project.  All opinions are honest and mine!

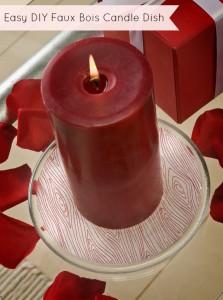
Faux Boise Candle Base & Candle

Faux-Bois-Candle-Base-with-candle

Well hello there! I’m Amy from Mod Podge Rocks. I’ve never been a big Valentine’s Day person until I did a Aqua Valentine series last year . . . in which I threw hearts on their head by turning them blue. It made for a more interesting Valentine’s Day in terms of crafting, and I’ve loved making projects for February 14th ever since.

Candle Base 2

This year I made a project that I made for Valentine’s Day but you can use all year round. It’s not “obvious” Valentine’s Day but that is why I like it! I actually used woodgrain (aka faux bois) tissue paper that I got from Target on clearance for $.99 – it was leftover from Christmas. Add some Sparkle Mod Podge, Dimensional Magic and a red candle and you have instant home decor. Here’s how I made it.

Gather These Supplies

$1 candle tray from the dollar store
Mod Podge Satin
Mod Podge Sparkle
Mod Podge Dimensional Magic
Tissue paper
Pencil
Paintbrush
Scissors

IMG_6981

Here’s the dish straight from the dollar store – soak it to get the tag off of the bottom.

IMG_6982

Spread out the tissue paper (try to find the non-wrinkliest area possible) and place the dish face down. Trace with a pencil.

IMG_6983

Cut out the circle and keep trimming until it fits inside the dish. I had to trim and fit several times.

IMG_6984

Spread a layer of Mod Podge Satin down into your dish. You can use Matte or Gloss too – it really doesn’t matter. The reason I didn’t use the Sparkle is because I didn’t want any texture between the tissue paper and the glass (which the glitter particles can cause). If you don’t care, you can use the Sparkle Mod Podge to apply the tissue paper too.

IMG_6992

Put the tissue paper into the glass dish and very carefully smooth down with the paint brush. Tissue paper is very fragile. Let it dry for 15 – 20 minutes and then spread Sparkle Mod Podge over the top.

IMG_6993

Add Dimensional Magic to the top, inside the lip of the glass dish. It’s going to take overnight to dry because of the amount of Dimensional Magic.

Candle Base 2

I love this look! Love that it’s white and red woodgrain, so I can use it for Valentine’s Day, but I can also keep it out all year round. I also love that it only cost me a few dollars to make!

Candle Base with candle 2

Come visit me at Mod Podge Rocks for daily decoupage ideas – also visit me at Facebook, Pinterest, Google Plus or follow my RSS feed for more!

Embellished Heart Lights

Hey there SBLC friends!  Amy from Plucking Daisies here to share a quick and easy Valentine’s Day decor project.  Today I’m going to show you how to update a set  of string lights and turn them into ribbon wrapped heart lights.  You probably have all the supplies you need to create this project and if not a quick trip to the dollar store will have you “Lighting the way to LOVE” in no time!
ribbon-wrapped-heart-lights-beauty-text-2

I’m in the midst of a MAJOR studio purge and found this beat up set of heart lights (among other things) squirreled away in my stash.  These heart lights were looking less than “lovely” so I decided to give them a makeover.

ribbon-wrapped-heart-lights-text.jpg

How to make Ribbon Wrapped Heart Lights

If you don’t have a set of Heart lights in need of an update regular white string lights will work just fine!
Ribbon Wrapped Heart Lights | @PluckingDaisy #DIY #ValentinesDay #DollarStoreCraft
STEP 1:  Start by cutting a length of thin ribbon.  Don’t worry about measurements, you can always cut more if you run short.
Ribbon Wrapped Heart Lights | @PluckingDaisy #DIY #ValentinesDay #DollarStoreCraft
STEP 2:  Attach one end of your ribbon (as close as possible to the light) with a drop of hot glue.
Ribbon Wrapped Heart Lights | @PluckingDaisy #DIY #ValentinesDay #DollarStoreCraft
STEP 3:  Wrap ribbon around wire allowing some of the white to show through as you go.  Be sure to hold it tight to prevent unraveling.  Keep wrapping until you get to the end and secure with Hot Glue.
*If you run out of ribbon simply cut another piece and attach with hot glue wherever you left off.
Ribbon Wrapped Heart Lights | @PluckingDaisy #DIY #ValentinesDay #DollarStoreCraft
STEP 4:  Trim off any excess ribbon so it is flush with the wire.

Embellishing Ribbon Wrapped Heart Lights

Now for the fun part, embellishments!  You can use whatever your little “heart” desires to embellish your lights.  Use your imagination and especially your stash!  Anything goes here so put a pom-pom, a bird or whatever you want ON IT!
Ribbon Wrapped Heart Lights | @PluckingDaisy #DIY #ValentinesDay #DollarStoreCraft
For my lights I used Heart Table Scatter, Glitter Heart Stickers, and Felt Heart Stickers from Dollar Tree.
Ribbon Wrapped Heart Lights | @PluckingDaisy #DIY #ValentinesDay #DollarStoreCraft
STEP 1:  Count the spaces between each light and select the items to embellish your lights.  Lay them out creating a pattern if you wish.  Cut a 7 in piece of thin wired ribbon to hang a large embellishment between each light.  *I used felt heart stickers from Dollar Tree.
Ribbon Wrapped Heart Lights | @PluckingDaisy #DIY #ValentinesDay #DollarStoreCraft
STEP 2:  Attach ribbon to back of embellishment (Felt Sticker) and place a matching piece on top to secure.
Ribbon Wrapped Heart Lights | @PluckingDaisy #DIY #ValentinesDay #DollarStoreCraft
STEP 3:  Curl your ribbon around a dowel or paint brush handle.
Ribbon Wrapped Heart Lights | @PluckingDaisy #DIY #ValentinesDay #DollarStoreCraft
STEP 4:  Find the center between the lights and wrap the end of your curled ribbon around it.  Secure with Hot Glue.

Adding Floating Hearts

The last time I was here at SBLC I showed you how to create floating stars using Monofilament (Winter Tree project) .  Monofilament makes it easy to create a whimsical “floating” effect on almost any project.
Ribbon Wrapped Heart Lights | @PluckingDaisy #DIY #ValentinesDay #DollarStoreCraft
I used the same technique for the felt hearts only this time with monofilament.  By layering Glitter stickers from Dollar Tree onto a 3-4 in piece of monofilament I was able to create floating hearts on either side of the felt hearts.
Ribbon Wrapped Heart Lights | @PluckingDaisy #DIY #ValentinesDay #DollarStoreCraft
To attach floating hearts just add a dab of hot glue to the back of your light string (preferably on the ribbon wrapped part).  *Remember a “Dab’ll do ya!”
Ribbon Wrapped Heart Lights | @PluckingDaisy #DIY #ValentinesDay #DollarStoreCraft
That’s all there is to it folks!  Now simply hang and enjoy your new and improved heart lights.   Kick back with a box of Russell Stovers (in a heart-shaped box) and let your “Love” lights shine!
Have a Lovely day!
Amy*

Find me at Pluckingdaisies.com | Pinterest | Facebook | and Twitter for more creative ideas and tutorials.

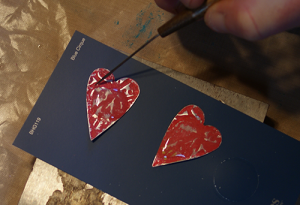
Recycled Pop Can Heart Earrings

[pinit]

#DIY #Upcycled Recycled aluminum can heart earrings by @savedbyloves

Need some earrings to show your Valentine’s Day spirit?  Give these recycled Coke can heart earrings a try.  They are super cheap to create, and your friends will be amazed that they came from a can.  You can used a paper punch or a die cut machine for the heart shape.  The embossing can be done with a die cut machine or embossing folder and rolling pin, like I showed you in my recycled can heart bezel pendant tutorial.

#DIY #Upcycled Recycled aluminum can heart earrings by @savedbyloves

SUPPLIES

Aluminum can

4 4mm jump rings

Earring wires

Metal hole punch

Texture embossing folder

ICE resin

Vintaj relief block

Red acrylic paint and sponge brush

Metal primer

2 pairs of flat nose jewelry pliers

TUTORIAL

Cut aluminum can and primer

See recycled can heart bezel pendant for more details on preparing the can.

Emboss and cut heart shapes

I showed you in the heart bezel pendant tutorial  (linked above) how you can emboss without an embossing machine.  Emboss first, then cut shape (aren’t you proud, Amy?)!

vintaj reliefing block

apply ICE jeweler's grade resin

To dome the resin, pour in middle and pull out to edges with toothpick or needle tool.  Don’t pour too much.  You can always add more resin if needed.  Having resin run over the edges of your piece is no fun.  Seriously.

doming resin instructions

When resin is dry, paint the other side of the earring and hole punch for jump ring placement.

metal hole punch tutorial

punch holes for jump ring placement

Use pliers to open jump ring and attach it to another jump ring and an ear wire.  Close, then open end ring an attach to heart.

inserting jump rings into earring holes

That’s it!

Make upcycled aluminum can jewelry @savedbyloves

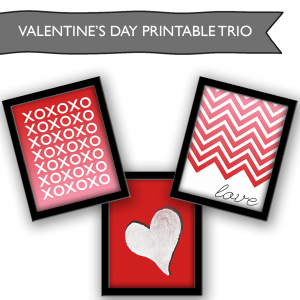
New Printable Love Trio

#Valentine's Day #Printable Set from @savedbyloves #Freebie

[pinit]

#Valentine's Day #Printable Set from @savedbyloves #Freebie

[pinit]

It was time to update my 11×14 frame trio that gets switched out to correspond with the holidays.  I created this red/pink/white ombre Valentine’s love themed printable set to share with you.  I love how it came out!  For just $1 a print at my local Office Depot, updating the decor can be done without breaking the bank.  Just right click the thumbnail to pull up the full res version.  Save to your computer or flash drive to print.  I have mine done at Office Depot on regular printer paper.  The image is 11×14 inches, which they will print on 11z17 in paper.  Just cut off the excess for your 11×14 frame.  You could have them crop it to 8×10 if that is your preferred frame size as well.

XOXO ombre free printable

Heart free printable

Love chevron free printable

Don’t have frames?  Mount it to MDF or scrapwood like I showed you in this faux canvas art DIY.

Don’t want red and pink?  Check out last year’s printable Valentine’s Day trio I shared with you:


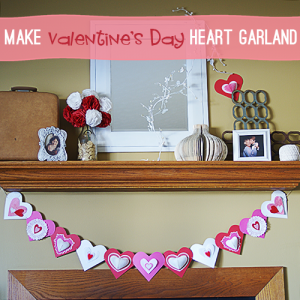
Easy Valentine’s Day Heart Garland

Valentine's Day Garland #DIY #Craft @savedbyloves

[pinit]

Cupid’s arrow hit me in the decorate muscle, and I’ve been making paper hearts zealously ever since.  I stacked and strung some paper hearts and scrapbook embellishments together for this pink, red and white Valentine’s Day heart garland.  It is quick, easy to make, and I am digging it.  See how to make your own…

Valentine's Day Garland #DIY #Craft @savedbyloves

SUPPLIES

Valentine's Day Garland #DIY #Craft @savedbyloves

Red, white and pink cardstock paper hearts

Valentine’s day themed scrapbooking embellishements (I got felt sticker hearts and pop up hearts at Michael’s)

Paper Doilies

Glue dots or other adhesive

Hole punch

Twine or other string

Scissors

Valentine's Day Garland #DIY #Craft @savedbyloves

TUTORIAL

Adhere smaller heart embellishments onto larger cardstock hearts.

Create enough layered hearts to make your garland the length needed for its intended space.

Take a leftover scrap bigger background heart, fold in half and hole punch on outer edge (both sides at same time in same spot since folded in half) where you want to thread for hanging.

Unfold and use as template for placement of holes in layered hearts by lining up on back of layered heart and using holes as guide for hole puncher.

Lay out the hearts and move them around until you are happy with the order.

String and hang!

Valentine's Day Garland #DIY #Craft @savedbyloves

Valentine's Day Garland #DIY #Craft @savedbyloves

Find over 50 ways to decorate for Valentine’s Day:

50+Valentine’s Gifts to Make

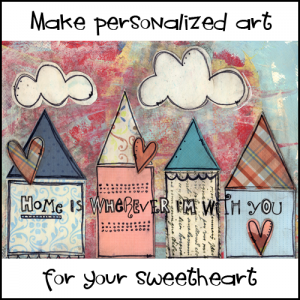
Valentine’s Day Mixed Media Art

Home Is Wherever I'm With You Mixed Media from @savedbyloves

[pinit]

This is my second project adapted from Stephanie Ackerman’s Doodle Too Class (a class that totally rocks my socks off, btw).   I made four houses to represent each place John and I have lived in over the course of our marriage.  I will show you how I added text, and provide you a printable of the phrase.  I am not going to show you the details of the process creating the scene, because I want you to take Stephanie’s class for that.  In general, you just Mod Podge shapes cut from scrapbook paper onto a background created with acrylic paint.

Mixed Media Valentine's Day Art Gift from @savedbyloves

Once your background is fairly complete, at least having the main elements in place, scan it into your computer, open in Photoshop and play with various fonts and phrases.  When you are happy with your text, print it and transfer to the original background as shown.  You can print my text below to use for your piece if you would like.  Just right click it to pull up the full res version and print that.

EPSON MFP image

HomeWithYouScannedLettered

This is what my text looked like over the scanned image.  I turned off the background layer of my art and printed just the black text on white paper for the transfer.

Transfer Text to mixed media artwork with transfer paper @savedbyloves

HomeIsWhereverImWithYouTut3

The Ott light is super helpful and awesome for transferring text and for seeing what the heck is going on in my mixed media art!

HomeIsWhereverImWithYouTut6

HomeIsWhereverImWithYouTut4

Pitt Artist pen, size small

How to create mixed media art @savedbyloves

Pen-touch White Pen

Make Valentine's Day mixed media art @savedbyloves

After I was happy with the text and the outlining of my shapes, I applied a coat of my favorite Mod Podge ever.  It is an antique finish and it is so cool.  I use to glaze my final pieces to pull the layers together with an antique tone.  Then when that dried I would seal.  Now I do it in one step with Mod Podge antique, and it turns out exactly how I love it.  Thank you Plaid!

Dollar Store Valentine’s Decor

Dollar Store Valentine's Day Decor EASY and Cheap @savedbyloves

[pinit]

If you are looking to get festive for Valentine’s Day, and decorate quickly for little cost, this is the project for you!  I made it to the dollar store yesterday for the first time in way too long (ok, since Christmas), and found myself in a wonderland of pink, red, LOVE and hearts.  I noticed some fun Valentine’s Day gift bags, and the wheels started turning.  It occurred to me that I could frame them for a lovely mantel, cupid style.  I grabbed three bags, 2 frames.  For that $5 + some items I already had, and about 10 minutes of my time, I created a lovetastic scene.  So can you!

Supplies:

Frames (one I had on hand, the other 2 are from Dollar Tree), bags from dollar store, scissors

Dollar Store Valentine's Day Decor EASY and Cheap @savedbyloves

Tutorial:

Cut area of bag to fit frame and insert.  The end!

Dollar Store Valentine's Day Decor EASY and Cheap @savedbyloves

For the smaller frame, I removed the 3D heart that was on one side of the gift bag and placed it on the outside of the frame for depth and interest.

The little pink and red heart scatter are from Dollar Tree too.

Dollar Store Valentine's Day Decor EASY and Cheap @savedbyloves

Not bad for under $10, huh?  I have the other sides of the bags to create with too!

Don’t forget to visit our Valentine’s Day themed 50+ Roundups!

IF you want to see more Dollar Store Valentine’s day projects, or want to share your own, be sure to visit the Dollar Store Themed Valentine’s Day Link Up hosted by Fox Hollow Cottage and Debbidoo’s!  Click the thumbnail below…

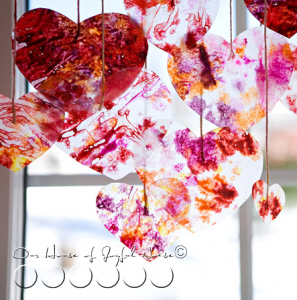
Valentine’s Day Window Hearts

Make crayon hearts for faux stained glass Valentine's Day decor via House of Joyful Noise, featured @savedbyloves

[pinit]

What to do with all of those broken crayon shards?  Laura at House of Joyful Noise created these gorgeous crayon hearts, just perfect for Valentine’s Day festivities.  I personally would keep them up all the time.  Head over for Laura’s detailed step by step photo tutorial and create your own window love.

Privacy Policy