When I saw these fantastic neon t-shirts made with duct tape and spray paint, I just had to share them with you. I must make a chevron version. The 80’s would be so proud. You will find the full tutorial at Go Radio.
Archives for June 2012
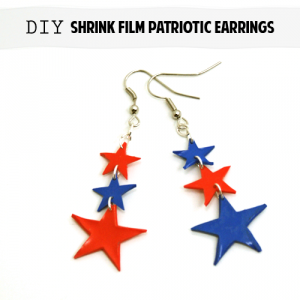
Patriotic Shrink Film Earrings
Make inexpensive, one of a kind, festive jewelry with shrink film to rock at your Fourth of July cookout. These patriotic star dangle earrings are a snap to create. I used my Sizzix to cut the shrink film sheets, but you can trace a stars right onto the sheet and cut them out by hand if you don’t have a die cut machine.
Supplies:
Colored shrink film
Star die, or template and scissors
jump rings
Earring findings
needle nose pliers
Hole punch
Parchment paper
Heavy Card stock
Oven
Cookie sheet
Instructions:
- The shrink film comes in 8.5×11 inch colored sheets that are the thickness of cardstock. Use scissors or die cut to cut stars in 3 sizes, keeping in mind that shrinkage is about 1/3 original size (make the stars that much bigger than you want them to end up in your final piece).
- Use 1/16 inch hole punch to punch holes in stars before baking. Be careful not to get to close to the edge of the star.
- Set oven to 300°. Place parchment paper on cookie sheet and arrange stars, spread out so they are not touching. Place another piece of parchment paper on top, and heavy cardstock or matte board on top of that. Place in oven and bake for 3 minutes.
- Remove cookie sheet from oven, let cool for a few minutes, then remove the cardstock and parchment paper and take a look at your stars.
The above picture shows the amount of shrinkage, and what happens when you don’t cover the stars with parchment paper and cardstock.
- Now assemble your earrings, connecting the stars with jumprings and connecting the earring findings as shown:
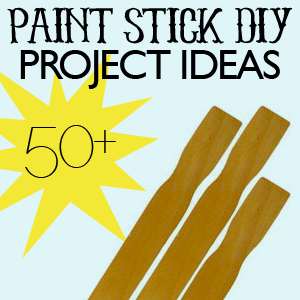
50+ Paint Stick Projects to Make
We always have paint sticks lying around, as often as we love to change a room’s color. We have scoured the web to bring you over 50 projects you can make with these surprisingly versatile stirrers. As always, if we missed your paint stick project, send us a link, and we will get you in the list. Enjoy!
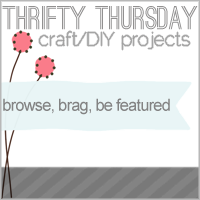
Thrifty Thursday Week 80
Welcome to Thrifty Thursday. If you are visiting for the first time, take a look around at the awesome projects, and share your own. If you are back, thank you for visiting again. You are what makes this an inspiring DIY/craft project round-up!
It has been a Mod Podge project frenzy around here lately. Check out all their new awesome products and what we have been creating with them here.
LINKY STUFF:
How it Works: No giveaways, shop or links to your main blog, please. That way we know when we come to Thrifty Thursday, we will only encounter DIY projects and not end up sifting through a bunch of other links. Entries not related, or to main blog pages/shops/giveaways will be deleted.
Other stuff:
*Please add a text link or my button to your post!
*A few projects from the previous week’s linky will be spotlighted, so let them know they ROCK!
*By submitting your project to Thrifty Thursday, you are giving SBLC/Decor 2 Adore{able} the right to feature the project with a photo, brief description and link back to you for full scoop.
*Please visit the at least the 2 blogs above you and shower them with comment love.
*I will choose 2 participants to feature the following Thursday, Please drop by and love on the features!
*Leave me a comment and let me know you were here. I love hearing from you.
*Have fun and be inspired!
*My friend Nikki knows how to throw a great party too. Be there…
FEATURES:
How cute is this firecracker centerpiece from Chicken Scratch?
I wish I had seen this cute driftwood wreath by Local Sugar before my beach trip last month. Feel free to send me driftwood so I can make my own!
Show off time!!
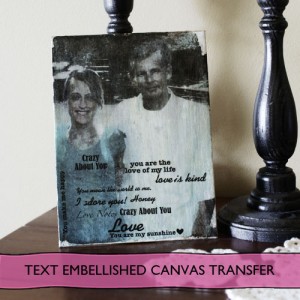
Mod Podge Transfer Instagram Photos to Canvas & Text Embellish
I have been busting at the crafty seams to tell you about this new product line from Mod Podge by Plaid Crafts. It includes Podgeable collage papers, Podgeable Shapes, a bunch of new Mod Podge formulations, finish sprays and tools! I could not believe when I opened the box and saw all of the shiny new supplies:
I have used many of the products since getting the package in the mail and will show you a round up at the end of this post. Today’s project uses the same image transfer to canvas I showed you last week, using Mod Podge Glossy for the transfer and Mod Podge Antique for the finish coat, with a couple of tweaks – I used Photoshop to create an Instagram effect on the photo before printing it for the transfer. After the photo transfer, I used Mod Podge Rub-On transfers to embellish the final canvas with text.
You will need:
- Your photo printed on laser jet
- Mod Podge Glossy Finish
- Mod Podge Antique Finish
- Mod Podge Rub on transfers
- Foam brush or other paint brush
- Canvas to fit your print (the print used here is 11×14)
- Bowl of water
- Dry towel
- Mod Podge brayer or squeegee
- Mod Podge Silicone mat, or other non stick work surface
Follow the instructions I showed you previously, using your photo. I used these free Photoshop actions by Daniel Box to edit my photos with Instagram effects in PS before having them laser printed at my local Office Depot.
Instructions:
- Cut Photo to fit canvas, and coat canvas and photo with generous layer of glossy Mod Podge.
- Flip image (print side down) over onto canvas, making sure to center it where you want it before placing, and smooth out any air bubbles with Mod Podge brayer, squeegee or with your hand from the center out.
Let that dry for a minimum of 2 hours. I let mine dry overnight.
- You will may need to re-wet with a mister or sponge brush and continue rubbing away paper backing until you are satisfied with the image. It doesn’t need to be perfect. You are going for a vintage feel, and you are going to use Mod Podge Antique and rub-ons on top, so a distressed look is ok. Just try not to remove too much of your image when you are rubbing away the back.
- Once you are happy with your image, Coat with Mod Podge Antique, as many coats as you need to get the antiqued effect you desire. Let dry 30 min between each coat. I applied my the text after the first coat of Mod Podge Antique, then coated twice more to lessen the contrast between the rub-on transfers and the image. Apply Mod Podge rub on transfers per package instructions.
These are fantastic. They come in phrases for family, love, seasons, holiday, and pretty much anything you can think of. I used the love theme for the image of my husband and I. The Father’s Day theme was perfect for the picture of my husband with his father and son. Application was easy with the included craft stick.
- Here you can see the image for the Father’s Day Gift I used is slightly smaller than the canvas, giving a white border in my finished piece. I wanted that look, and I brushed around the edges with white acrylic paint.
Here are all of the projects I have done with the new Mod Podge line, and which product I used in each (click images to go to full photo tutorials):
PODGEABLE PAPERS AND ACRYLIC SHAPES
MOD PODGE DIMENSIONAL MAGIC
MOD PODGE RUB-ON TRANSFERS
MOD PODGE GLOSS
MOD PODGE GLOSSY
MOD PODGE ANTIQUE
MOD PODGE TRACEABLE SHAPE TEMPLATES
MOD PODGE GLOSSY
MOD PODGE ANTIQUE
MOD PODGE PEARLIZED ACRYLIC SEALER
I am so excited about this line. Everything I have used has been wonderful. It is no secret I love me some scrapbook paper jewelry, and the Podgeable Papers are scaled to fit those clear acrylic Podgeable Shapes perfectly. I have big plans there. My favorite new product is the Mod Podge Antique. I love the effect, and that it is produced by a product that also seals. These products are now available at your Michael’s Craft Stores.
If you want to learn step by step how to use all of these different formulations, and be inspired by over 40 how to photo tutorials, make sure you check out Mod Podge Rocks, the book It is a steal on Amazon. I have it, love it, refer to it often, and reviewed it here.
Join me in keeping up with the exciting products and projects using them by following Plaid Crafts:
Plaid Crafts on Pinterest: http://pinterest.com/plaidcrafts
Plaid on Facebook: http://www.facebook.com/InspiredByPlaid
Plaid on Twitter: http://twitter.com/plaidcrafts/
Disclosure: I received product and payment for this post. All opinions expressed in this post are honest and mine.
Check out these amazing projects using this rockin’ line of Mod Podge products!
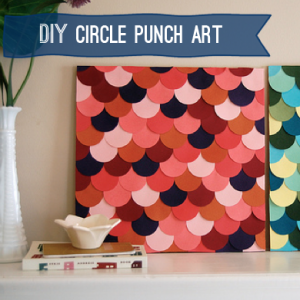
Make Scallop Wall Art With Your Circle Punch
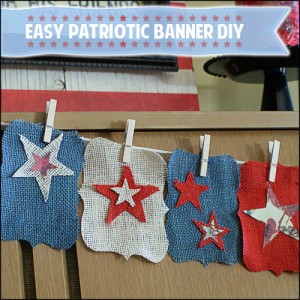
I love a good paper punch project, especially one that results in beautiful wall art for next to no cost. That is why I had to share this beautiful piece from You Are My Fave. Make sure you visit and check out how you can make your own DIY scallop wall art!
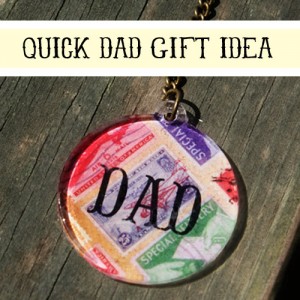
DIY Quick & Easy Dad Gift
If you need a last minute handmade gift idea for Dad, check out this easy “Dad” keychain you can make in no time. If you are like me, and you stalk your local Michael’s store, you may have seen the new, so so so cool product line from Mod Podge. I will be telling you a lot more about it next week. For this project, I used some of their new paper craft supplies:
You will need:
- Decorative scrapbook paper, with a good guy print (I used the travel themed Podgeable Paper)
- Acrylic Podgeable Shapes
- Rub-on transfer, dad themed
- Mod Podge Dimensional Magic
- Craft Scissors
- Key fob and jump ring
- Sand paper
Keep your eyes peeled for upcoming projects using this fun new line all over the craft blog world!
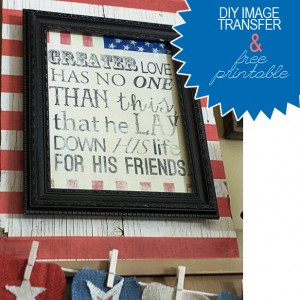
Patriotic Printable and Transfer to Canvas Tutorial
Today I am sharing a technique using Mod Podge to transfer a laser printed image to canvas. I have been playing with this method a lot lately. There are several of tutorials about it on the web with several variations in the Mod Podge finish used, how long to let the image dry, and other steps. I will show you what worked for me. You can download the patriotic printable I made for this project at Printable Decor.
You will need:
Laser jet image (the one I used is linked above) – reversed if there is text
Mod Podge Glossy Finish
Foam brush or other paint brush
Canvas to fit your print (the print used here is 11×14)
Bowl of water
Dry towel
Instructions:
TIP: To create an aged effect even greater than the one produced by the transfer process, I used Mod Podge Antique instead of regular Mod Podge. This stuff is new from Plaid Crafts, and I am completely in love. I have gone through almost the entire bottle in 2 weeks! It gives your project an antique tone, either subtle or profound depending on how many coats you apply. For this transfer I applied 2 coats, drying 30 minutes between. It is great for transfers because it makes parts where the image came off less obvious. I use acrylic washes or glaze to get that result when doing layered mixed media pieces. It is so cool to have a finish that does it for me, while coating and protecting the piece. I love you, Mod Podge.
To see how I made the striped backing, you are going to have to come on back. Just know that it was free, and it took 5 minutes!
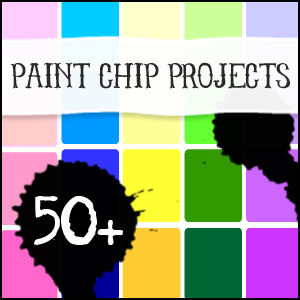
50+ Paint Chip Projects to Make
Once again, I am amazed at the creativity among us! Be ready for lots of color and inspiration. You are going to want to hit your local hardware store and snatch up your favorite hues to get started on these fantastic projects! Disclaimer: I am in no way condoning paint chip hoarding or theft, but repurposing instead. Enjoy!