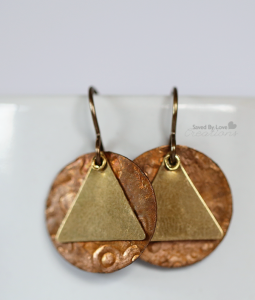
How to Make Jewelry From Flattened Pennies

pin-how-to-make-upcycled-jewelry-from-pennies

This post has been a long time coming. At this point, I can’t even recall what inspired me to smash pennies and turn them into jewelry, but something did and here we are. I will walk you through the interesting, not entirely legal process I used. Please note that in no way am I encouraging anyone to break the law, or to go anywhere near railroad tracks. The Midnight Rider controversy is no joke. While cute, this jewelry is not worth dying for, so be smart.

how-to-make-aa-jewelry

SUPPLIES:

Pennies or other coins

Clear masking tape

Jump rings

Jewelry Hole punch

jewelry rivets

Vintaj metal paints

Lisa Pavelka Resin Magic Glos

Magic Glos UV Resin, by Lisa Pavelka

Sizzix machine

Butterfly rings Sizzix Die

Media Mixage Triangle Dies

Media Mixage Circle Dies

Vintaj Vogue Stamping Blanks, Triangle 14mm

Your favorite embossing folders

eyelet setter

ear wire

Jewelry pliers (2 pair)

Paint brush or sponge dauber
1/4 cup white vinegar
1 teaspoon salt
Non-metal bowl
Paper towels


wm-aa-jewelry

TUTORIAL:

tape-pennies-to-track

This is the sketchy part. SBLC assumes no responsibility for any injuries that may occur. That said, this is also the super fun part. Tape the coins to the railroad track as shown in the photo. Not taping them just means searching needlessly after the train has passed, since they get thrown from their original location during the process. The tape keeps them in place.

pennies-after-flattening

This is what y0u will have when you retrieve your now flattened pennies. Flat, but yucky, right? No problem. To clean the little guys, pour the vinegar into the bowl and stir in salt. Put about 5 pennies into the solution and let them soak for about 10 seconds. Use a toothbrush and running water to remove debris and rinse clean.

how-to-flatten-pennies-for-free

They don’t have to be perfect.

how-to-flatten-pennies

Emboss your pennies and die cut into jewelry shapes. Here i cut the flattened and embossed pennies into circles and attached Vintaj Vogue Stamping Blanks Triangle 14mm using a rivet. Just hole punch the penny circles, insert rivet through triangle and circle, set with eyelet setter and attach jump ring and ear wires. Done!

aa-necklace-circle-triangle

For this pendant, I die cut a ring with the Sizzix butterfly rings die – a favorite die of mine. I cut a triangle with another embossed flattened penny and painted it using vintaj patina paints for metal. Once the paint was dry, I applied Magic Glos UV Resin, by Lisa Pavelka. I love the domed resin look. You can put this in direct sunlight to cure, or cure it in 10 minutes using Lisa Pavelka’s UV light. I went the 10 minute route! It’s been awhile since I used that stuff, and I forgot how fun it is.

upcycled-coin-pendant-jewelry-tutorial

This piece is comprised of a Vintaj metal blank (the background circle) and a flattened penny triangle that I painted with Vintaj Patina. I didn’t seal it. I enjoy the simplicity of the circle/triangle, and love the colors together. After applying the paint, go over the triangle lightly with medium grit sand paper to reveal the raised areas created by embossing previously.

Visit here for more RESIN JEWELRY TUTORIALS

fb-how-to-make-upcycled-jewelry-from-pennies

What do you think? Do you have a less illegal method for flattening pennies? Can your rope your husband into doing it for you, like I did?

You can use any coin, by the way. I just like copper.

I’d love to see what you can do with flattened coins. If you don’t have a die cut machine, you can cut shapes with metal shears or tin snips for your own custom creations! Happy crafting!

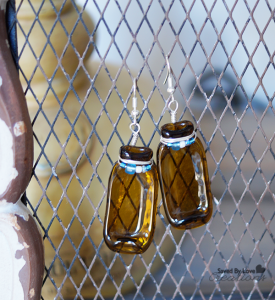
DIY Fused Mini Amber Glass Bottle Earrings

DIY Fused Glass Bottle Earrings @savedbylovesSo, I am crazy excited to share today’s jewelry tutorial with you. These earrings are my go to piece for several reasons.  They are beautiful, unique and go with all kinds of outfits.  I got the idea when flattening wine bottles in my kiln.  I remembered the tiny bottles, or vials that people fill with mica powder and little notes and thought it would be so cool to flatten them.  I wasn’t sure what I would do with them flat, but as soon as the kiln cooled and I laid eyes on them, I knew I wanted to wire wrap and wear them!

MATERIALS

7 Gypsies Amber Apothecary Bottles

Round nose jewelry pliers

Flat nose jewelry pliers

20 gauge jewelry wire

Flush wire cutter

Earring findings

10 coordinating seed beads

Microwave kiln

 TUTORIAL

Fuse your bottles, one at a time in your microwave kiln.  I showed you how to use that here: DIY Wine Bottle Earrings. You can also use a regular kiln if you have that. Let them cool to room temperature before continuing.

How to wire wrap jewelry

Cut 7 inches of wire and string 5 beads onto it.

How to make fused glass jewelry

Place beads in front and situate wire at neck of fused bottle as shown.

How to wire wrap jewelry2

Bring the left side wire around the bottle neck and back to the front as shown.

How to wire wrap jewelry3

Wrap both wire ends around the neck a few times, ending with 2 wire tails in the back as shown.

How to wire wrap jewelry4

Wrap the two ends as shown so that they are vertical.

How to wire wrap jewelry5

Coil one end around the other as shown.

How to wire wrap jewelry6

Trim the end of the wire you just coiled.

How to wire wrap jewelry7

Use the flat nose pliers to bend the remaining tail to form a 90 degree angle.

How to wire wrap jewelry9

With the round nose pliers, form a loop as shown.

How to wire wrap jewelry10

Thread the ear wire onto the loop, then trim the excess tail.

Fused Amber Glass Bottle Earrings

I love them!  I can’t wait to make more.  Next I will use clear vials and color them with alcohol ink.  Exciting stuff!

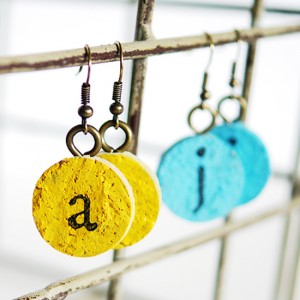
DIY Easy Cork Monogram Earrings

[pinit]Mongram Cork Earrings[pinit]

 Did you know that wine corks can be sliced into disks, painted, inked and stamped to create beautiful custom jewelry.  Not only are these monogram stamped earrings stylish and eco friendly, but they are light as a feather.  The customization possibilities are infinite!  Follow the steps below to make your own, or use the same process to make pendants, charm bracelets and wine glass tags!

Monogram Wine Cork Earrings DIY Upcycled Jewelry from @savedbyloves

CLICK HERE FOR MATERIALS LIST AND TUTORIAL


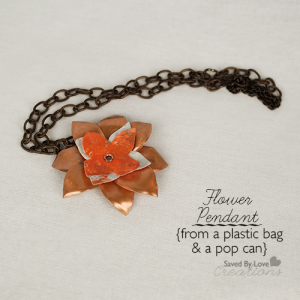
DIY Recycled Can & Plastic Bag Flower Pendant

[pinit]
Make #upcycledjewelry from #recycledaluminumcans &#plasticBagCraft @savedbyloves

 [pinit]

Recycled crafts are a favorite of mine, especially upcycled jewelry.  Today’s project brings these together in flower pendant made from recycled aluminum cans and plastic bags.  It’s true.  I used a combination of techniques I have shown you in the past; dissecting aluminum cans and fusing plastic bags, both to be die cut with my Sizzix.  This project is fast, simple, eco friendly, and pretty awesome.

SUPPLIES:

Sizzix Die Cut Machine

Flower Layers #2 Die

Soda can

Metal snips

Chain for stringing pendant

Hole punch or hammer and nail to punch hole

Eylet and Eylet setter – I use Crop-a-dile

Paint for petals or you can use the color of the can – I used Vintaj Patina Antiqued Copper

Plastic Bags

Copy paper

Iron

Ironing board

2 pairs of chain nose pliers

Aluminum Can Crafts #recycledcrafts #upcycledjewelry Pendant tutorial

TUTORIAL:

The following video shows how to prepare the can and die cut the flower petals.  You will use the Flower layers die instead of the rose die in the video.

*If you don’t have a Sizzix, you can still cut the can with paper punches like I showed you in this

As you can see in the pendant photo, you need 2 of the larger petal layer cut from aluminum cans.  Paint them if you are going to.  It would look cool with a fun color/patterned can too!  If you are painting them, use alcohol inks, Vintaj patina or spray paint for metal.  Acrylic paint won’t stay put.

Now to cut prepare the plastic bags for cutting with the Sizzix, you need to fuse them as I showed you in this Recycled Plastic Bag Bracelet Tutorial

Die cut the two smaller flowers from your fused plastic bag material.

Now you are ready to layer your petals.  Hole punch the center of all 4 layers then, arrange them in a staggered fashion and insert and set eyelet.

Shape the aluminum petals with round nose pliers or a bamboo stick for dimension.  The plastic you can just fold into position with your fingers.  It won’t bend and hold shapes like the aluminum, but you can cup it some.

CHECK OUT 50+ MORE ALUMINUM CAN CRAFTS WHILE YOU ARE AT IT:

Aluminum can crafts

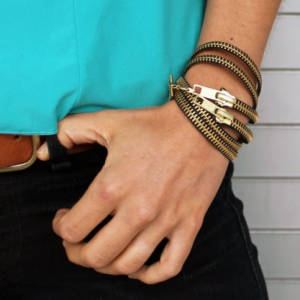
Make Cool Upcycled Zipper Bracelets

Make #Upcycled Zipper bracelets 5 ways at Brit + Co, featured @savedbyloves

[pinit]

Did you know there are at several ways to upcycle old zippers into chic, eco-friendly bracelets?  It is true.  Brit + Co shows you how in 5 Ways to Turn Zippers into Awesome Arm Candy.  The black and gold above is my favorite.  Head over for the rest.  This is the perfect project for a quick, inexpensive gift or accessory for your own wardrobe.

For plenty more DIY bracelets, see SBLC’s bracelet tutorials, and our 50+ bracelet roundup!

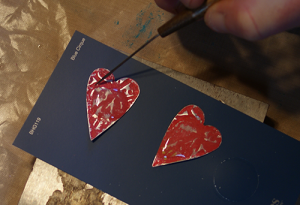
Recycled Pop Can Heart Earrings

[pinit]

#DIY #Upcycled Recycled aluminum can heart earrings by @savedbyloves

Need some earrings to show your Valentine’s Day spirit?  Give these recycled Coke can heart earrings a try.  They are super cheap to create, and your friends will be amazed that they came from a can.  You can used a paper punch or a die cut machine for the heart shape.  The embossing can be done with a die cut machine or embossing folder and rolling pin, like I showed you in my recycled can heart bezel pendant tutorial.

#DIY #Upcycled Recycled aluminum can heart earrings by @savedbyloves

SUPPLIES

Aluminum can

4 4mm jump rings

Earring wires

Metal hole punch

Texture embossing folder

ICE resin

Vintaj relief block

Red acrylic paint and sponge brush

Metal primer

2 pairs of flat nose jewelry pliers

TUTORIAL

Cut aluminum can and primer

See recycled can heart bezel pendant for more details on preparing the can.

Emboss and cut heart shapes

I showed you in the heart bezel pendant tutorial  (linked above) how you can emboss without an embossing machine.  Emboss first, then cut shape (aren’t you proud, Amy?)!

vintaj reliefing block

apply ICE jeweler's grade resin

To dome the resin, pour in middle and pull out to edges with toothpick or needle tool.  Don’t pour too much.  You can always add more resin if needed.  Having resin run over the edges of your piece is no fun.  Seriously.

doming resin instructions

When resin is dry, paint the other side of the earring and hole punch for jump ring placement.

metal hole punch tutorial

punch holes for jump ring placement

Use pliers to open jump ring and attach it to another jump ring and an ear wire.  Close, then open end ring an attach to heart.

inserting jump rings into earring holes

That’s it!

Make upcycled aluminum can jewelry @savedbyloves

Privacy Policy