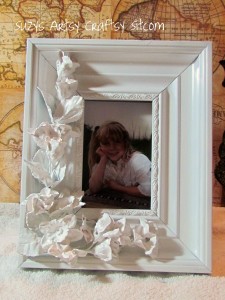
{Guest Post} Faux Porcelain Flower Frame

Faux porcelain frame tutorial

I am beside myself with excitement to have today’s guest, Suzy from Suzy’s Artsy Crafty Sitcom.  This has been one of my favorite places to visit since I first started blogging, and if you are familiar with the “Sitcom”, you know why.  I always leave creatively inspired, educated, and laughing my tush off.  What is better than that?  You will love her amazing craft tutorials and her weekly guest star interviews, co-hosted by Tom Selleck and his mustache (yep… that is right)!  Enough from me…

My name is Suzy and I’m thrilled to be invited to be a guest on Johnnie’s blog! I’m the author and zookeeper over at Suzy’s Artsy Craftsy Sitcom. My blog is a place of humor, dog hair, and crafty tutorials. I like to specialize in creating beautiful art and decor from everyday objects. The cheaper, the better. Making something that is inexpensive look like a fabulous swanky art piece just makes my day.


Today, I’m going to show you my version of a Faux Porcelain Frame. Since I don’t work with porcelain, and I’m kinda cheap, I am going to use plaster.

For this project I used:

Plaster of Paris
Silk flowers from the Dollar Store
A thrift store frame
Hot glue
Krylon White Gloss Spray Paint

I chose smaller flowers from the Dollar Store, ones with good definition. I clipped them into individual stems and small groups, keeping just a few of the leaves.

Take a disposable cup and fill it at least half full with powdered plaster. Add water gradually, stirring until you get a watered down consistency similar to thin yogurt.

One by one, dip your flowers fully into the plaster. Carefully shake of any excess plaster so that you don’t lose the definition of the flowers. I found that it helped to use my fingers to squeeze off extra plaster. This is pretty messy, so don’t stop to answer the phone or anything. The plaster will dry and your phone will never be the same. Not that I’d know anything about that…

Place your flowers on a sheet of wax paper to dry.

Faith is my craft apprentice wanna-be. Unfortunately, the lack of opposable thumbs slows her down. It’s kind of a shame.

Anyway, once the flowers have totally dried (a couple of hours), it is time to start gluing them onto your frame. I found this awesome frame at a thrift store, but any frame will work.

Arrange the flowers in a pleasing way. Don’t worry if you didn’t totally cover up the colors with the plaster. The next step will solve that problem. Glue them down the way you like with hot glue.

Using the Krylon White Gloss Paint, I then sprayed down the entire frame and flower combination. Be sure to attack it from all angles in order to get all the nooks and crannies in the flowers.

Faux Porcelain Frame

Once it is dry, add your favorite photo, and there you go. The white gloss paint gives the entire piece a porcelain look. If anyone asks, just tell them that you spent hours carving that frame from porcelain that you mined yourself in the wilds of Patagonia. I’m sure they will be impressed.

Johnnie, thank you so much for having me over! It has been a blast!

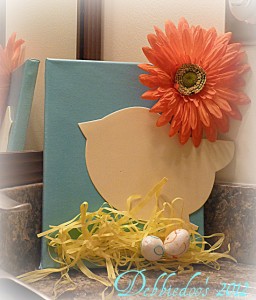
{Guest Post} Easter Cards With Fabric

Easter Crafts DIY

Today, I am thrilled to bring you this adorable Easter craft from Paula at Sweet Pea.  I love the gingham fabric she chose, and using cookie cutters to create templates is brilliant.  Check out her fun projects and tutorials, fitness tips, and her current series on Glogging (I learned a ton from the first lesson).  Thank you for being here, Paula, and for sharing with us!
Hello, I’m Paula from Sweet Pea. I enjoy blogging about crafting, cooking, gardening, decorating, travel, and exercise. I’m excited to guest post today for Johnnie at her wonderful blog, Saved By Love Creations.

Easter is coming up quickly and I thought it would be fun to make cards to send to friends and relatives.

EasterCollage1

Aren’t these cute?  They are easy to make and require materials that you probably already have around your house.

Supplies:

Easter themed cookie cutters, fabric, felt, scrap cardboard, pen, pencil, scissors, spray adhesive, craft glue, Easter stamp and stamp pad, and cards with envelopes.

Step 1:

Trace the cookie cutter onto a scrap piece of cardboard.  I used a piece that was part of the packaging for a dress shirt.

CookieCutterCard1

Cut out the pieces and decide on a fabric choice for each piece.

CookieCutterCard2

Step 2:

Trace each design onto fabric using a pencil and cut out.  Be sure to cut inside the pencil line if you are using light colored fabric.

CookieCutterCard3

Step 3:

Cut out felt embellishments to add character to each design.

CookieCutterCard5

I didn’t have a sheep cookie cutter but wanted a sheep card so a drew a pattern onto the cardboard to make one.

CookieCutterCard4

Step 4:

Spray the back of each fabric piece with spray adhesive.  Wait a minute or two until it is tacky before applying to your cards.

CookieCutterCard6

Step 5:

Apply to cards.  Press down firmly.

CookieCutterCard7

Step 6:

Add felt and ribbon embellishments.  Let dry.

CookieCutterCard8

My little chick had pencil marks showing on his sides.

CookieCutterCard9

To cover this, I edged with orange glitter glue.

CookieCutterCard10

Step 7:

Stamp “Happy Easter” in each card.

CookieCutterCard11CookieCutterCard12

That’s it!  Enjoy your new cards.

I know I’d rather receive a handmade card any day over a store bought one.

CookieCutterCard13CookieCutterCard14CookieCutterCard15CookieCutterCard16

I’m not sure which is my favorite and it’s going to be hard to decide the recipient of each card.

Thanks so much to Johnnie for having me today.  I’d love it if you’d stop by my blog, Sweet Pea, for a visit.&nbsp

St. Patrick’s Day Sucker Bouquet

St. Patrick's Day Crafts

Continuing with our week of guest posters here at SBLC, today I am thrilled to bring you Cheri from It’s So Very Cheri.

She is going to take you through a fun St. Patrick’s Day kids craft.  Thank you for being here, Cheri!

Hey It’s Cheri from Its So Very Cheri.

I am honored to be here today. I think the world of Johnnie and consider her to be a wonderful blog friend.

Although we have never meet–at least not yet–in person–there are just some people that you develop a wonderful bond with and Johnnie is one of those gals.

  • I love to create things and decorate.
  • I have 4 kiddos and home school them.
  • My hubby is in school.
  • I share lots of craft projects and love beach themed projects.
  • My birthday is on Christmas Day and I love everything about Christmas.
  • I love typography projects.

I wanted to created a fun

St. Patrick’s Day

craft for the kids.

They get excited about every holiday. I thought something SPRINGY would be fun.


FOR THIS PROJECT I USED:

2 sheets of card stock paper

striped green paper

polka dot green paper

scissors

glue gun

a 4 leaf clover image

pencil

styrofoam

ribbon

clothes pins

DIRECTIONS:

I took my 2 sheets of paper and folded the paper so I could create a box. This requires you to fold it into thirds on all sides.

{Using 2 pieces gives the finished box extra durability.}

You need to cut the 4 corner pieces so you can fold them in.

St. Patrick's Day Kids Craft

I used some clothes pins to hold my folded in pieces while I glued them in place.

{If you do not own a glue gun you could carefully tape your piece or staple them.}

St. Patrick's Day Kids Craft

I cut 4 rectangle pieces that were the length of each side of the box and then used my scissors to snip up part way so I could create “grass”.

St. Patrick's Day Kids Craft

I did not have a cube of styrofoam so I used some of my sheets and broke them and stacked them in my paper box. I did not glue it in place–just set them in there.

St. Patrick's Day Kids Craft

I then cut out 4 leaf clovers out of my polka dot paper. I only cut 4 leaf clovers for my bigger suckers.

St. Patrick's Day Kids Craft

I used Blow pops. I filled in with smaller suckers-I got a bag of AIR HEAD suckers. They had light green and a dark green sucker so I used both. I poked the suckers through the middle of the 4 leaf clover and pushed the paper up around it a little. Then I pushed them into the styrofoam.

St. Patrick's Day Kids Craft

I finished it off with a piece of bright green gross grain ribbon around the top of my box.

Do your kids have a St. Patrick’s Day party coming up?

Thank you so much for having me today.

I hope you will come over and check out my other projects and recipes and if you like what you see I hope you will follow along.

~~~~~~~~~~~~~


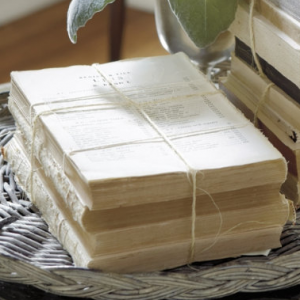
{Guest Post} Dollar Tree Spring Decor Project


spring

TODAY LAUNCHES A WEEK OF GUEST POSTS HERE AT SBLC! 

I am so excited to introduce

to you Debbie from Debbiedoos’s.  Check out her great projects, her Monday Newbie Party,

blogging tutorials and more.  Today she is sharing a dollar store spring decor project.

Take it away Debbie!

Happy Spring! I know not officially here yet, but it is in my house.
Thought I would share a Spring craft, that I whipped up in a few minutes.
All from dollar tree items,and of course a can of spray paint.
I used my new favorite color Blue ocean breeze.
I spray painted my white canvas.
What you will need:
Easter grass
Spring Easter Foam cut outs  {dollar tree}
Foam eggs {dollar tree}
Faux Spring flower {dollar tree}
First I glued my grass on the board, both with craft glue, and my handy dandy glue gun.
I added my foam eggs with a dab of hot glue.
Then I glued my foam chickie..
Topped it off with my fun faux orange flower..
How C A Y U T E!
{ I say that often don’t I?}
I am all about budget friendly cute crafts.
If you are looking for Candace Olson designs…oops sorry you made a wrong turn.
HOWEVER, if HGTV would like to give me my own show, and a pocket full of money…
I will give Candace a run!
My cutsie did not stop there.  I filled the apothocary jar up with some grass, another faux flower and some foam eggs…
Tied the top with some dollar tree ribbon!
Say it again with me… C A Y U T E!
I also bought the pretty fun paper napkins for the bathroom at the dollar tree.  They are not really for the bathroom, but hey why not?
For the record my painted Giani counter top is holding up great! You may see that project here, if you missed it.
Today I am guest posting over at Johnnie, from Saved by love creations.
I thank you Johnnie for this opportunity to share with your wonderful friends and readers.
Photobucket

As Seen on Mod Podge Rocks

SONY DSC

I would tell you what it is, but nah.  Go see.  Ok, a hint… missoni… chevron… now go on, why don’t you?!  SBLC At Mod Podge Rocks

Make Crepe Paper Garland – {A Girl and Her Scout}

 Paper Crepe

I have developed quite the crush on garland lately, just cannot get enough.  The wide array of supplies used to make it never ceases to amaze me.  This project is perfect for you DIYers who love decorating with things you have on hand to create simple beauty from the everyday.  Please welcome Allison!

Hello All!  My name is Allison.  I am the one-woman show behind hoop~da~loop (www.hoopdaloop.etsy.com), my Etsy shop of whimsical party decorations and unique gifts, and my little blog A Girl and Her Scout (www.agirlandherscout.blogspot.com).  I am passionate about creating handmade party supplies and creating fun events that ooze personality with a dash of crazy!  I am so pleased to share a little DIY with you guys today that is EXTREMELY customizable for your needs and really affordable and simple!  See how to make these Crepe Paper Tassel Garlands in four easy steps below.


Materials:


  • Crepe paper in any colors of your choice
  • Scissors
  • String of any kind (I am using natural jute, but yarn, thread, hemp… it all works just as well.)


Step one:  Cute a few strips of crepe paper (in a square or rectangle shape).  Depending on how large you want to make your tassels, you can cut them at whatever length.  I suggest starting with five inches.  You can also make your tassels thicker and thinner.  I like to mix it up, but start with using three rectangles to get the hang of it and play with it from there.

Paper Crafts - Crepe Garland

Paper Crafts - Crepe Garland


Step two: Cut the crepe paper longwise almost to the middle on both sides.  (be sure to snip the ends if they are connected like mine!)  See photo below.

Paper Crafts - Crepe Garland

Paper Crafts - Crepe Garland

Step Three.  Twist the crepe paper in the middle tightly, gradually bending it into a loop and twist that a couple of times to make sure it stays in place.

Paper Crafts - Crepe Garland

Step Four:  String them on your string of choice!

Paper garland

Paper Garland

You can make these as long and as short as you want.  Hang your garlands in a nursery, at a wedding, or even attach them to lollipop sticks to create a cake topping.  The possibilities are endless!  And don’t forget- you don’t have to attach the tassels to the string.  You can put them on lots of things like this pail I have in my shop (http://www.etsy.com/listing/82681548/custom-wedding-favor-tin-wedding-favor).  This would look really cute with some saltwater taffy for a wedding favor.

Paper crepe garland


What will you use your tassel garland for?

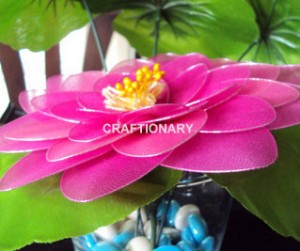
Guest Post With Hani; Nylon Lotus Flower Tutorial

Hello Readers of Saved By Love Creations


I am Hani from Craftionary
I am so excited to be here. Today, I am sharing the tutorial on nylon lotus
or water lily to welcome Spring


pantyhose_lotus_nylon_purple_flower_craft


Use your old stockings and make beautiful flowers this spring.These are very simple to make and trust me they lookbeautiful. I used to see them and think that they might be difficult to make. But seriously when I tried my hand on it; it was so easy and fast.
You will need:
Wire, floral tape, thread, stem wire, stamens and your choice of nylon


A complete guide can be found at Materialand Basic Nylon Flower


To make the petals simply wound the wire around a round cap or lid and twist the end


Now cover it with nylon and thread it at the end. Then cut of the excess of nylon


You will need the material listed below. Note: If you don’t have the rings you can use caps, lids etc of the mentioned diameter. For example: size (4) means diameter 4.


Wind the thread around any circle. Make a hook at one end of the wire, hook in the thread and twist the wire to close. Then twist the wire around the stem wire firmly. Thread 8 double-sided yellow stamens to the stem wire as well.


Thread the petals. Starting from the smallest petals moving on to the largest petals. Once all the petals are threaded, wrap floral tape to hide the wires. See the picture below to get my point:


Open the petals and your done. Don’t you just love the wideness and openness
of the lotus. It’s a beautiful flower I can’t adore it more.


You can keep it over the leaves and let it float over water in a bowl
or decorate with stones or glasses in a vase.


“This season be glad for the beauty around you and instead of picking flowers make artificial flowers to welcome the spring. Still if you love the real thing, please pot a flower and don’t decorateit in a vase. We should care for what we love. After all it’s our world. “


A few of my favorite projects lately:


Thanks for having me Johnnie. I enjoyed being here.


Love
 
Hani


Privacy Policy