I haven’t posted in two days. I have been in learn and create mode, delving into the world of mixed media altered art. You should see my workspace – yikes. I like to wait until I have a finished piece to share with you, but this kind of work entails a lot of letting the canvas dry overnight before moving on to the next layer. Yeah, I am kinda glad I didn’t realize this fact beforehand. It probably would have deterred me, and I am learning much for this creative frenzy. Today I will share what I have learned about transferring images to canvas, as well as some AMAZING resources that I can’t believe I have lived this long without! Here is the image transfer part of my current altered canvas project…
 This whole thing started because I wanted fresh art to hang above the fireplace mantle. I had some 12×12 blank canvases I picked up on sale that I decided to use. After googling “altered canvas”, I landed on this tutorial over at Art-e-Zine, the ridiculously awesome resource I found for everything mixed media. I have been exploring this site for days on end. So inspiring and informative. They have tons of vintage images and photoshop brushes available for free download, as well as tutorials on what to do with them. LOVE it.
 I wanted my piece to incorporate one of the very few wedding photos I have. Here is the original photo…
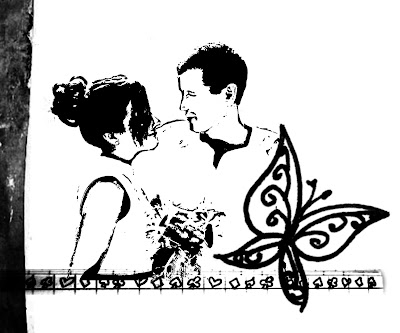
I opened it in photoshop and made it into a stencil through a series of steps I won’t go into here, but you’ll find tons of tutorials if you google. Here is the final black and white I came up with…
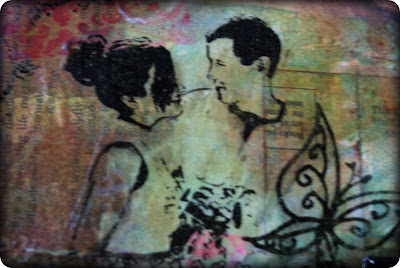
Now for the transfer process. The idea is to get the outline onto the substrate, in this case the canvas. I could just trim around the image and collage it onto the project, but this wouldn’t allow the canvas background to show through. After much research, I decided to go with this approach, shared by Lisa Cook. The problem I ran into is that I was working on a framed canvas, so I couldn’t really get in there with a rolling pin since there wasn’t a solid surface backing the targeted area. In the end, none of my image transferred using this process. Frustrating. From what I have read, failing several times before figuring out what works for you is inherent in image transfers. I found a simple solution… clear contact paper. Yep. Check it…
I skipped over tutorials that used contact paper because it just didn’t sound legit to me for some reason. A few cracks at other methods humbled me and I became open to anything. I turns out, contact paper is my current favorite method (i.e. the only one I have gotten to work).
Here is a tutorial describing this easy process. I did a few things differently than Karen did. Namely, I didn’t wait a couple of hours like she describes in step 6. I was way to impatient by this point. After burnishing the image to the contact paper with a bone folder, I lightly sanded the back of my image to break up the paper of my photocopy, then moistened the paper backing with a water spray bottle. Using my fingers, I rubbed off the wet paper with my fingers. The ink pretty well stayed on the contact paper. I did smudge it a bit in my eagerness to get this done, but you can’t tell in the end. It goes along with the distress look just fine. Easy. Some people don’t like this option because of the cloudiness in the transfer cause by the contact paper, but I am fine with it. I will be playing around with other techniques for the fun of it. Obsessed with altered canvases at the moment!


That is beautiful Johnnie. Will you be doing anything similar like that for sale or is this a personal piece for you alone?
beautiful!!!
I am a new follower. I hope you will follow me back.
Nancy
http://www.findingblessingsineverydaylife.blogspot.com
Thanks for stopping by and following me! I am already following you!
Shanee @ Adventures of a Thrifty Mommy
following you back from Monday blog hops. 🙂
Wow! I just read quite a few posts here and all of your other blog! I love you! Your art is beautiful and so is your soul! I ran for 6 years through jr. high and high school but got out of the habit while in college. I miss it but have some early back problems that worry me. Anyway, look forward to reading more!
Wow, I love it! I am your newest follower.
🙂
I have the same opinion with most of your points, but a few need to be discussed further, I will hold a small conversation with my partners and perhaps I will ask you some advice shortly.
– Henry
SO amazing!! I've got to learn this stuff. Great winter project. I bought PhotoShop Elements 7 a while ago and need to start learning how to use it! Thanks for the inspiration. 🙂
[…] have made these before, but this time I utilized the contact paper transfer technique I detailed here. What do you think of these? I am planning to make one for my niece with her name since she can […]