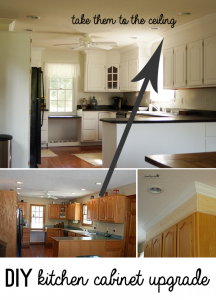
DIY Kitchen Cabinet Upgrade With Paint and Crown Molding

[pinit]Upgrade Cabinet Makeover with DIY crown moulding and chalky finish @DecoArt_Inc @savedbyloves[pinit]

I am thrilled to be sharing our kitchen cabinet upgrade with you today, mainly because that means it is finished!  We moved into a house with, as you can see, outdated oak kitchen cabinets.  Maybe you were here before and saw our DIY countertop transformation with Rustoleum.  To continue the kitchen renovation, we took the cabinets up to the ceiling by boxing them in and adding crown molding to close the 12 inch gap between the ceiling and the tops of the cabinets.  We tied together the new wood and cabinets by painting them with Chalky Finish Americana Decor Paint.  It would have been fairly difficult to stain wood and crown moulding to match the current cabinets perfectly.  This is a great way to add a high end look to your kitchen for cheap, especially if you are going to paint your cabinets anyway.

DIY Kitchen upgrades

Here is what the cabinets looked like to start.  This was after revamping the countertops to cover that country blue laminate.

diy kitchen cabinets

To close the gap between the cabinet tops and the ceiling, we removed the trim on the cabinet tops with a pry bar.  We measured the dimensions of the cabinet tops and built 3 sided boxes from 1×12 boards to fit.  This was perfect for the 12 inch gap.  It left about a half inch (since 1×12 lumber is actually 0.75×11.5 inches… I know).  This was no problem since we knew we would be covering the gap with crown moulding later.  We used construction adhesive to adhere the boxes to the top of the cabinets.  We planned to nail trim to cover the seam where the cabinets met the box, which we would nail into both, adding extra security.

take cabinets to ceiling with crown moulding

Here you see the trim (we used pine mullion) and the crown moulding.  This was my first time cutting crown molding.  Save yourself a ton of wasted materials and heartache by visiting Sawdust Girl’s How to Cut Crown Molding Tutorial.  My little brain thought it would be as easy as cutting trim… ha!  Not the case.  Sandra didn’t touch on how to cut angles molding for angles that aren’t 90°…

tips for installing crown moulding

We ran into that fun conundrum as you see in the above photo.  There are charts on how to do this for every angle and every position on your saw.  We finally ended up using this Bench Dog Polymer Crown-Cut Crown Molding Cutting Jig I picked up from Amazon.  It was pretty helpful.  We the 2 odd angles above the glass window containing cabinet were 135°, so we set up our molding on the saw exactly like it would siton the cabinet, which was only possible to maintain for cutting with the use of the jig.  This is a process you are just going to have to go through in order to get to the good stuff!  Sandra points out that she has to go back to her templates every time, even though she does this often.  I found that to be the case everyday during this project!

DecoArt Americana Chalkyfinish Paint

Big thanks to DecoArt for providing the paint and wax for this project!  We used Americana Decor Chalky Finish in “Everlasting” to paint everything from the bottom of the cabinets up to and including the crown molding.  The best thing about using this paint was not having to sand or prime the cabinets!

kitchen makeover DIY

We started by taping over the hinges with painter’s tape and painting the cabinets without removing the doors.  This ended up in paint on the hardware anyway, so we decided to remove the doors for the rest of the cabinets.

How to Paint Kitchen Cabinets

All in all, we used 17 8 oz jars of the paint.  If you are going to go this route, make sure you have plenty of paint for your project before you start.  Waiting on more to come while you have no cabinet doors is less than fun.  Ask me how I know.

DIY Farmhouse Kitchen

Remember when I built the DIY Dog Feeding Station from Shipping Pallets?  It fits under the window in our new house like a glove!

Painting the cabinets took 4 coats.  We applied the clear wax and that was it.  We were without cabinet doors for 2 weeks while we continued moving into the house and painting cabinets as time would allow.

What do you think?  I love the high end look we achieved with little cost!

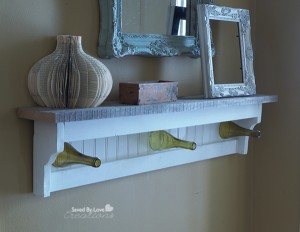
DIY Wine Bottle Craft Coat Rack

[pinit]

WIne Bottle Shelf Rack3


[pinit]
WIne Bottle Shelf Rack1


Scrap Wood Shelf With Wine Bottle Hooks

This project involves building a simple shelf from scrap wood and adding cut wine bottle tops to act as “hooks”.  It is perfect for the entryway or mudroom, as the ultimate upcycle and conversation piece.

MATERIALS

– Scrap wood in lengths and widths you want for your shelf

-One of the following; Table Saw, chop saw, miter saw, circular saw

-Jig saw

-Hammer

-Pencil

-Tape Measurer

-Wood Glue

-1 ½ inch finishing nails

-Medium grit sandpaper

 -Glass Cutting Supplies (see techniques page )

-Rubbing Alcohol

-Lint Free Cloth

-3 Wine Bottles

-E6000

-2 Sawtooth hangers

-Chalky finish paint or paint of your choice

-Sealant such as wax or polyurethane

DIRECTIONS

WIne Bottle Shelf Rack6

This was a project I made up as I went along, based on the scrap wood I had on hand.  You can adjust the plan according to your materials. For most of the cuts I used a table mount chop saw but a handheld circular saw would be fine to.

The only cut that isn’t a straight cut is the one used to cut the shelf brackets. For this I used a scroll saw:  I drew a shelf bracket shape sized to fit my shelf onto a piece of wood, cut out the bracket and traced it onto another piece of wood as a template for cutting out the second bracket.  This is covered in step 2.

1.  Cut board for shelf surface.  For this I used an old piece of barn wood I had that measured 1 X 6.5 by 55 inches. I cut it to one 46 inch long piece and one 9 inch long piece. The 46 inch piece will be for the top and the 9 inch piece will later be used to cut the two shelf brackets.

WIne Bottle Shelf Rack9

2.  Cut shelf rails. There are three of them (see pic). They are 1 x 3 inch boards cut to 40 inches in length.

WIne Bottle Shelf Rack7 

3.  Cut shelf brackets.  Taking the 9 inch long piece of the old barn wood from above ( 1 X 6.5 X 9 inch ) I free handed a pattern onto the board that looked somewhat decorative but had fairly simple curves. I included the drawing I used as a template.  Using the scroll saw I cut out the two identical shelf bracket pieces. Tracing one line for two pieces was easier than trying to make two identical individual pieces.

Sand all rough edges.  Medium grit sanding by hand or with an orbital sander will do.

*Clamping the two shelf brackets together while sanding them ensures that they will remain identical to one another.

WIne Bottle Shelf Rack8

5.  Using wood glue and 1 ½  inch finishing nails attach the shelf rails to the shelf bracket on the inside face (see pic). This made the over-all length of the shelf support unit 42 inches. (40 inch rails plus the thickness of the two 1 inch brackets).

6.  Mount the shelf support unit on the 46 inch top board, centering it along the length dimension ( 4 inch overhang on each end) and flush at the back edge of the top board.  Use 1.5 inch wood screws and wood glue to attach the top to the support rails.  Make sure to square the support unit as best you can before you attach to the top( a quick check to make sure the long diagonal measurements are equal will tell you).

7.  The last addition to the unit is for the back board. I used 1/8 inch hard board that has one side grooved. You can purchase a 4 x 4 ft piece that will be much easier to handle than a full 4 x 8.  I laid the shelf unit onto the board and traced the outline. I positioned the unit on the board so that the grooves run vertically.  Cut the back out using a jig saw, table saw or circular saw. The cut is hidden so just be sure to cut a little inside the line so that you don’t have any over-lap and you don’t see the back hanging over the edges. I attached using 1/2 brads and wood glue. Make another quick check of the diagonals to verify the square of the unit before you attach the back.

8.  Allow the glue to set for 24 hours and then caulk all the seams using standard white caulk.

9.  Sand any rough spots and paint.  I went with chalk paint in antique white for the entire shelf except for the top surface board.  I like the weathered wood with the chalk finish.

10.  Seal with Wax or desired sealant.  I applied clear wax with a lint free cloth.  Let cure per instructions before handling.

11.  Measure your shelf and mark with a pencil where your bottles will go so that they are evenly spaced.

WIne Bottle Shelf Rack10

12.  Attach cut wine bottles tops (see How to Cut Wine Bottles) by placing a generous amount of industrial strength glue such as E6000 around the cut rim where it will contact the shelf

13.  Attach a sawtooth hanger on the back with hammer, a couple of inches in from the edge of the shelf top.

WIne Bottle Shelf Rack2

Make a shelf from reclaimed wood and recycled wine bottles @savedbyloves

EXTRA TIPS

○ Power tools can be intimidating.  They don’t need to be though!  I started at ana-white.com and found everything I needed to know to be successful and safe.  You can too!

Check out craigslist for used tools, or see if your town has a makerspace where you can pay a small membership fee and have access to the tools you want to try.


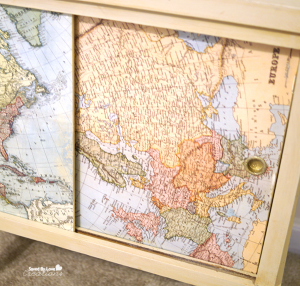
Chalk Paint Map Decoupaged Table Revamp

[pinit]Furniture Flip Chalk Paint Table Old Map Decor @savedbyloves[pinit]

Today I am sharing another furniture flip! We will be taking a retro 50’s side table to a chalk painted, old map bearing, stylish addition to the master bedroom.  A little decoupaging and glitter blast add a special touch.  Let’s do it!

SUPPLIES:

Table Before Furniture Revamp

Old table

Mod Podge Satin Finish

Decoupage Map Paper from Martha Stewart or actual old maps

Foam Paint Brush

Pen or pencil

 Scissors

Chalky Finish Paint in desired color

Americana Clear Creme Wax

Krylon Gold Glitter Blast

Krylon Glitter Blast Clear Sealer

TUTORIAL:

Americana Chalky Finish Paint Projects

I lightly painted 2 coats of Americana Chalky Finish in Timeless, allowing 20 minutes to dry between each coat.

How to Decoupage Furniture

I removed the doors/hardware and outlined them onto my decoupage paper, then cut out the paper to size.

Decoupage a Table With Mod Podge and Map Paper

How to Decoupage a Table

Next I added a layer of Mod Podge to the door surface with a foam brush.

Decoupage Table Tutorial

I smoothed wrinkles out from the center with the palm of my hands.  A brayer would work too.  Then I added a uniform layer of Mod Podge to the top of the map paper to seal everything.

Krylon Glitter Blast

I sprayed the pulls on the door, and the shoes on the table legs with Krylon Gold Glitter Blast.

DIY Old Map Table

I applied a coat of Americana Decor Creme Wax in clear to the whole piece and replaced the glittery hardware once everything dried.

DIY Map Craft

I love our new side table.  Just the perfect colors and style for our decor.

I hope you are inspired to get chalky and decoupagey!

Side Table Flip Distressed With Chalk Paint

[pinit]Furniture Flip Chalk Paint Distressed Table DIY[pinit]

My mom gave me an outdated oak table that she was ready to let go.  I saw curves that would look fantastic with some chalk paint distressing, so that is what I did.  See how some paint, crackle medium, antiquing medium and a change in hardware went into this fun furniture flip.  As an aside, mom wants her table back now.  Should I charge her?!

How to paint furniture

I removed the hardware and painted a layer of Chalky Finish in “Vintage” as the base layer.

DecoArt Chalky Finish Paint

Once that dried, I painted a thick layer of crackle medium from the Chalky Finish line.  When that dried I painted a layer of Chalky Finish “Treasure”..

How to Distress Furniture

I rubbed away the top layer of paint on the edges in random places to show the base layer in a chippy paint kinda way.  For the drawer, I followed the same steps, using the Treasure as my base paint and Vintage as the top paint layer.

How to create an antique effect

I sealed the entire piece by brushing on Clear Creme Wax, followed by Aging wax.

Table Flip @DecoArt_Inc Distressing with Chalk Paint @savedbyloves #chalkyfinish

I am loving the transformation!  What do you think?  Have you used this paint?

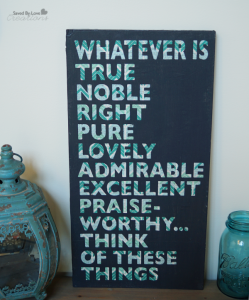
DIY Tissue Paper Scripture Chalky Finish Wall Art

[pinit]DIY Chalk Paint Reclaimed Wood Scripture Art @savedbyloves[pinit]

On a recent trip to Michaels, I found Hazel and Ruby tissue paper that just had to come home with me.  It is big, comes in super cool prints and is perfect for decoupage projects.  I used it to make this scripture word art on reclaimed wood, with a stencil mask technique.  Today I will show you how to create your very own.  You can use the text provided in a downloadable file below, or bring your own verse to the game.  Let’s do this, want to?!

SUPPLIES:

Decoupage Home Decor

Hazel & Ruby Tissue Paper

Mod Podge

Paint Brush

Wood Surface

Chalky Finish Paint (I used color “Relic”)

Vinyl Sheets and Cricut or Adhesive Word Stencils

TUTORIAL:

Tissue Paper Decoupage Wall Art DIY

Apply a generous layer of Mod Podge to your wood surface.  I am using the back of the art I showed you several years ago here:

DIY Cheap Wall Art Faux Oil Painting

It was time to change this art to fit my new decor!

https://savedbylovecreations.com/2011/03/bird-faux-oil-painting-frugal-wall-art.html

Apply the tissue, smoothing out wrinkles with the palm of your hand.  This tissue didn’t really wrinkle, so that was pretty awesome! Apply another layer of Mod Podge to seal the tissue and cut or tear the excess paper from the edges.  I actually cut mine to fit the board before applying, so there wasn’t excess.  Either way is fine.  The edges don’t have to be perfect since you are painting over them in a future step!

Phillipians Bold

I used the jpg file to cut the text out of adhesive vinyl using my cricut and Sure Cuts Alot.  You are free to use this file as well.  Just right click the thumbnail to pull up the full resolution version and save to your computer.

DIY wall Decor

I applied the stencil to the tissue paper after letting the Mod Podge cure overnight.  I used Cricut transfer tape to transfer the vinyl words.  You can do this by hand, but the transfer tape makes the process way easier, faster and neater.

DIY Wood Sign

Next I painted over the entire surface with Chalky Finish Paint in “Relic”.

Cricut Home Decor Project Tutorial

I used tweezers to remove the letters before the paint dried completely.

DIY Scripture Sign

I sealed the piece with Clear Creme Wax to finish.

DIY Budget Friendly Wall Art

I am super happy with how it turned out!!

If you like this project, be sure to check out 50+ Scripture Art DIY Tutorials:

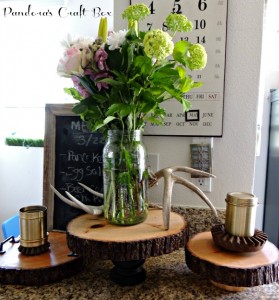
DIY Rustic Home Decor Wooden Cake Stand

wooden-cake-stand-tutorialThe look of wood in the home is something I enjoy having in my home. Especially since I live in an apartment it’s hard to do any change physically to the apartment but adding wood accents help make it homier. I’ve seen wooden cake / cupcake stand in magazines and I just needed to give it a try myself. I decided to go to my favorite place Home Depot and pick up a couple of things to make my rustic cupcake stands.

wooden-slice

I first got the wooden slice of wood from my local craft store. They always have different size woods at the craft store and I always like visiting time to time to find that once piece that is bigger than the rest.

wood-cupcake-stand-sealer (1)

I used sealer to make sure the wood will not dry out or get molding if food or water get on it. Also the sealer will darkened the wood just a little which I really liked.  I used the sealer all around wood slice.

wooden-stand-leg

I got a wooden leg from home depot and sealed it too. They have different varieties but do keep in mind to have something that will keep it balanced.

cupcake-wooden-stand

I attached the wooden leg with wood glue and let it set over night. And now you have your ever own rustic cake stand for you home. I used my cake stand to show off my mother’s day flowers which my little man got for me, he does have good taste.


Stay Crafty!

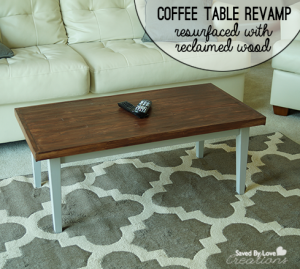
Make Wood Shims From Reclaimed Wood and Resurface a Coffee Table


[pinit]
Reclaimed Wood Coffee Table Revamp

[pinit]

What is better than revamping a garage sale find?  Revamping a $5 garage sale find that you got in 2006 a second time, that is what!  Today I am sharing how I did just that to create this reclaimed wood resurfaced, chalk painted coffee table.  I am super proud of this bad boy.  With some old deck wood I inherited when my mom demolished her deck and my table saw, I created wood shims, attached them to the table top, framed them in with the same deck wood, and stained them with Minwax Wood Finishing Cloths.  The result is exactly what I was going for, and I am loving it with the decor where it landed.  Wanna see how you can make your own?  Let’s do this!

Make a Coffee Table

TUTORIAL:

Paint your table base as desired.  I used gray chalk paint.

Rip thin “wood shims” from reclaimed wood with your table saw, or buy wood shims!

Resurface a table

Place your shims with excess stick over both edges.

Attach Wood Shims with Air Nailer

Use wood glue and Air Nailer to secure wood shims into place.

Mark straight edge and cut with Jigsaw

Draw straight edge and cut off excess wood with jigsaw.

Frame in and fill in gaps with wood putty

Frame in by measuring length and width of table and cutting wood at 45° with short edge the same length and width as your table.  Attach with glue and nail gun.  Fill in gaps and holes from nailer with stainable wood putty.

How to use orbital sander

When wood putty dries, sand with orbital sander to smooth out surface.

Minwax wood finishing cloths

If you have been around here long, you know I am a huge fan of Minwax Wood Finishing ClothsMinwax 30820 Wood Finishing Cloths, Natural Oak.  They are super awesome.  Stain and seal with just a swipe.  Here I used Natural Oak and went over that while still wet with Dark Mahogany for a custom color.

Reclaimed wood table tutorial

That is it!

The inspiration for this project came from the recent 50+ Wood Shim DIY Projects we shared:

Check it out for tons more inspiration!  Enjoy.

DIY Welcome Sign From Reclaimed Wood

[pinit]DIY Reclaimed Wood Sign tutorial @savedbyloves[pinit]

Today’s project is a DIY reclaimed wood sign, perfect for the front porch or entryway!  I was looking at my pile of scraps and before I knew it, I had this sign.  It works up quickly and gives the look of chalkboard, using Chalky Finish Paint from DecoArt.

DIY Wood SIgn From Pallet Wood

I won’t bore you with the details of how to make one of these signs, since I have covered that thoroughly in this DIY Rustic Reclaimed Wood Sign.

Welcome Cut File

I used the font “Always in my Heart”.  You can click the thumbnail for the full resolution version and print it for transferring the image to wood like in the tutorial linked above, or use it to make a stencil on your Cricut or other die cut machine.  I used Cricut and SCAL software.

DIY Wooden Sign Tutorial

To finish the frame, I went with Natural Oak Wood Finishing Cloths from Minwax.  These things are so awesome.  One step finishes and seals.  Yay!

How to Make a Sign

This color is subtle and natural.  I generally run from the word oak when it comes to stain color, but I like this one.

How to make a reclaimed wood chalkbaord sign

When the stain dried, I sealed with Clear Creme Wax from DecoArt.  You see the darker wax in this picture, but I ended up not using it because I was satisfied with the look after applying the clear wax.  The sign looked aged enough on its own!

Make a sign from pallet wood

Not bad for scraps I had on hand and under 2 hours of my time!  What do you think?  Have you created anything from reclaimed wood lately?

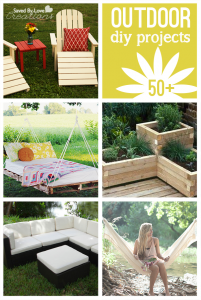
50 Plus DIY Outdoor Project Tutorials to Make

[pinit]50 Best DIY Outdoor Projects @savedbyloves #outdoorliving[pinit]

Don’t you just love the arrival of spring and summer?!  It is especially welcome after a long harsh winter like the one we have endured, and decorating outdoors is a privilege!  Today I am sharing over 50 of the best DIY Outdoor LIving Projects from around the creative globe.  You will find DIY outdoor furniture, lighting, upcycle projects, decor and more.  If you have a stellar project that we missed, send us a link so we can include you.  Happy outdoor decorating!


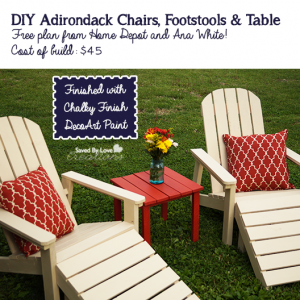
DIY $45 Five Piece Outdoor Adirondack Furniture Set

[pinit]DIY Adirondack Outdoor Furniture Plan @savedbyloves Chalk Paint[pinit]

There is nothing quite like relaxing in a nice adirondack chair on a gorgeous day.  That is why I decided to tackle this DIY Adirondack Chair Woodworking Plan from Ana White for Home Depot.  Once we finished the chairs, we had to have the DIY Footstools to go with them!  For the table, I loosely based the design on this DIY side table I shared with you in the fall.  I had to wing it some to make the scrap wood I had on hand work for the project and I love its rustic look.  Read on to see how I finished my 5 piece set using my new paint line obsession; Chalky Finish Paint From DecoArt Americana Home Decor.

DIY Outdoor Furniture Woodworking plan

Let’s talk about the table first.  Check out the above link for the plan details.  This wood was super rustic and scrappy, so I wanted the paint to be as well.  I went for “Cameo” color from DecoArt Chalky Finish line.  LOVE.  It looks kinda coral, kinda barn red, 100% lovely.

DecoArt Cameo Chalky Finish Paint Project

I love that you have to do zero prep with this paint.  Even if you are painting an already finished surface, no sanding, no priming… just go for it, and have a gorgeous outcome.

How to use Chalk Paint

I recommend painting the individual table to slats before attaching them.  It is easier to get to the sides and bottom when they are individual.  You can still countersink your screws, fill the holes in with wood putty, sand away the excess and paint over just that area to touch it up after attaching.How to seal outdoor furniture

Since this project will live outdoors, my first choice of finish (Clear Creme Wax and Aging Wax) isn’t recommended since it won’t stand up to the harsh elements over time.  That’s why we sealed the entire set of furniture with Americana Decor Soft-Touch Varnish, two coats!  It is approved for outdoor use, and we want our pieces to last a long time.

How to finish outdoor furniture

At first we were going to do the whole set using Cameo, but decided to do the chairs and foot stools in “Timeless.  Before I get into that, I want to save you some headache…

Adirondack Chair Woodworking Plan

On page 5 of the Adirondack chair plan from Ana and Home Depot (linked in the first paragraph), the red circled area says 1/2 inch, which is totally not what it means to say.  That measurement should be 1 1/2 inch, like it says in the text below the diagram.  If you are a visual kinda builder, and don’t read the text (like me), you will be super frustrated.  Let’s just say that these chairs almost didn’t happen!  Finally dear husband realized the typo and the rest of the build went smoothly.

DecoArt Chalky Finish Paint Timeless

I had already painted Cameo on the chairs before deciding to go with Timeless.  We just went over the red with the cream and one coat did it!

The other point I want to make sure I share is that using scrap cuts from your local hardware store cuts the price of this project way down, like more than in half.  We went to Menards where they had 1×4 and 2×4 in various lengths from 12-36 inches from cuts they had made in store, for just $0.49 each!!  This is less than half of what it would have cost to buy full length boards and cut them at home.  Just take a tape measurer with you, your cut list and be ready to inspect and dig through the scrap stock.  It is totally worth it!

I found the outdoor pillows at Menards, and don’t they look like they were made for this set?!?!  I was planning to make my own, but come on.

DIY Adirondack Outdoor Furniture Plan @savedbyloves

Big thank you to DecoArt for providing the paint for this project.  I am so in love with this line, and my new outdoor furniture!

What are you working on for your outdoor space?  Have you tried Chalky Finish Paint yet?

Privacy Policy