Chevron Give Thanks Printable Decor

free printable

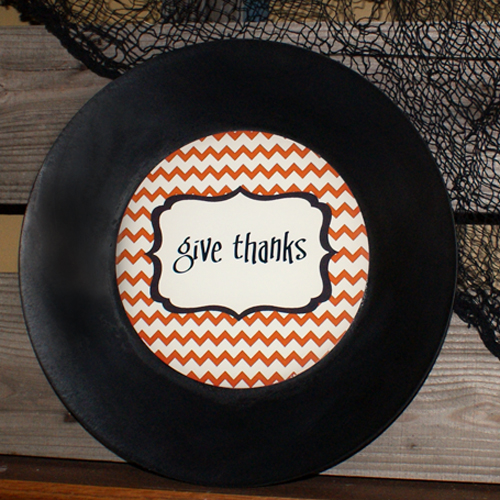
How are those fall mantels coming along?  There are so many options for decor this time of year, that I have been overwhelmed with choices and unable to decide on anything.  Today, I share with you the chevron “give thanks” printable, as well as a step by step for how I created the plate that is bring all of this together… Finally.

Supplies:

  • Click here for printable…
  • Chevron Free PrintablePlate or MDF candle holder (I got mine at Michaels recently for $3

How to decorate plates

  • Super 77 or your choice of adhesive
  • Wire or jute and staple gun (glue gun if you are using glass or plastic plate)  if you want to hang your plate
  • Medium grit sand paper (150)
  • Lint free cloth

Instructions:

  • Lightly sand your plate and wipe away debris with a damp, lint free cloth
  • Measure the inner circle diameter of your plate, and size the free printable accordingly.  Mine was exactly 7.5 inches.  Print image on glossy photo paper and let dry 10 minutes before moving to the next step
  • Cut out using black circle outline as your guide (which you should have sized to match the diameter of the inner circle)

Fall Free Printable

  • Spray Super 77 or other mounting spray on surface of plate and back of image, BOTH.
  • Press image down onto center of plate, making sure you get placement right before making contact.  This stuff really sticks.
  • Use palm of hand to smooth image down from the center out.
  • To hang, I stapled jute to the back with my staple gun.

Free Printable

You may want to seal with a layer of mod podge for protecting the image.  I was too eager to hang it up, so I skipped this part, but should do it for when I change my mantel and store this for next year.

Super easy project and I love how it looks.  What do you think?

Free Fall Printable

Free Printable

Fall Pennant Bunting DIY


Paper BuntingPaper pennant bunting is super easy to make, and adds instant festivity to your decor, whatever the season or occasion.  This holds true for Halloween and harvest accessorizing too.  I used scrapbook paper in fall colors that will go with both Halloween and Thanksgiving so that I could leave it up until time for Christmas decorating.  Read on for this no sew, no glue paper bunting tutorial, complete with cut file template for Cricut!

Paper Bunting


Supplies:

  • Scrapbook paper
  • Die Cut machine, or scissors to cut freehand
  • circle hole punch
  • jute

Instructions:

  • Download template jpg for use with 12×12 inch paper and die cut machine, here.

Paper Bunting Template

  • Pull the image up in SCAL and cut triangles out of coordinating patterned papers.
  • Punch holes with hole punch near top 2 corners of each triangle and insert jute string from front back in left side hole, then bring it through right side hole back to front.  Continue this until all your triangle are strung…
  • How to Make BuntingHang and enjoy.  You can stencil word on there if you want, or otherwise embellish.

Paper Bunting

Halloween Mantel


Plaid Painted Pumpkin

How to Decorate For Halloween

Are you as obsessed with decorating pumpkins as we are here at SBLC?  What a fun time of year for creative festivity.  There are some amazing painted pumpkins circulating out there.  I was inspired by some of the plaid painted designs to create my own.  Grab some painters tape and join me!

Supplies:

Painters tape, pumpkin, acrylic paint in colors of your choice

Instructions:

Tape off stripes and paint!  I just randomly placed my stripes as I went.  No plan.  You may want to have a plaid pattern in front of you for inspiration, or just wing it.  When you switch colors, make sure the paint is dry before applying tape over it.  I used my handy heat tool to speed along the drying process.  Simple as that!

No Carve Pumpkin ideas

What do you think.  How are you decorating your pumpkins this year?

Dimensional Polka Dot Pumpkins and Fall Porch

No Carve Pumpkin Decorating

Not all unintentional crafting outcomes are craft fails.  Sometimes they are happy accidents.  Here, I had planned on using vinyl paper punched circles as stencils to create black pumpkins with orange polka dots.  However, my circle paper punch kept snagging on the vinyl, cutting choppy and irregular circles.  This led to my unplanned,  but loved,  dimensional dot pumpkins.   Tutorial below!

Supplies:

  • Pumpkins (I used craft pumpkins from Michaels)
  • Oil Rubbed Bronze spray paint by Rustoleum, or color of your choice
  • How to Paint PumpkinsCircle dimensional stickers – I think I got mine at Michaels, but I am sure they have them anywhere there are stickers.  They don’t have to be cute, just puffy.  You are spray painting over them.

Instructions:

  • Apply dimensional stickers in desired patter onto clean, dry pumpkin.
  • Spray paint entire pumkin and enjoy!

No Carve Pumpkin Decorating

The orange crackle pumpkin I made using the technique I showed you here.  The urns are plastic and came from Lowes for $6 each.  I spray painted them with the same black I used on the dimensional dot pumpkins.

Halloween Decorating

Some window bunting from Halloween patterned cardstock, and harvest bomb is now complete.  The girls love their front porch, and aside from a brief unpleasant encounter with the parking police, I had a blast.  Before and after…

Fall Porch

Halloween Decorating

Martha Stewart Pumpkin Transfers

How to decorate for fall

Last minute pumpkin decorating is a cinch with Martha Stewart Pumpkin Transfers.  If you are looking for a quick, no carve way to create festive Halloween decor, this is a great option.  Several designs are available, from spiders to witches to traditional pumpkin faces.  A $4 package will adorn several pumpkins with crisp, clean lined transfers in no time.

Supplies:

  • Pumpkins
  • Martha Stewart Pumpkin Transfers
  • Damp Paper Towel

Halloween Martha Stewart

Instructions:

  • Remove the desired transfer from perforated sheet

Halloween Martha Stewart

  • Peel away clear protective sheet

Halloween Martha Stewart

  • Place image side down on clean, dry pumpkin

Halloween Martha Stewart

  • Pat white backing paper with damp paper towel, making sure to wet entire surface of backing

How to Pumpkin Decorating

  • Slide backing away carefully, leaving transfer

Halloween Martha Stewart

That is it.  Way simple.  I used these pumkins for part 2 of Harvest Bomb.  SO fun!!  Stay tuned this week to learn about the $12 urns, and dimensional polka dot pumkpins…

Halloween Martha Stewart

Halloween Martha Stewart Decorating


Drop a Harvest Bomb

Fall Wreaths

Have a college student, or friend/relative in a situation that prevents them from decorating for fall, even thought they would love to boast a festive porch?  I say harvest bomb them.  Go ahead.  You must have seen the yarn bombers by now?  Apply that philosophy to autumn decor and surprise your loved one.

This all came about when my stepdaughter, admiring our fall porch, expressed how nice it would be if her house were festive on the outside.  As soon as she left, I pulled out the glue gun and wreath form and went to work.  Here is a step by step photo montage of  Harvest Bomb day one.  Stay tuned for more.  I plan to add things daily over the next week, and will update this post with a final picture.

Fall Porch


Fall Front Porch Reveal

Paint Pumpkins

I have shown you a pumpkin and wreath here and there.  Now for the full reveal.  This porch was DIY frugal all the way.  Using supplies you probably have on hand, some fall foliage from your yard, and some creativity, you will be well on your way to a cozy, welcoming autumn porch.


Fall porch

Fall porch

Save old paint cans and paint them in fall colors.  Here I used masking tape to create the stripes on the black can.  I gathered the husk from the ground at a local park to put in the can.  The pumpkin I spray painted black, painted acrylic blue over that, then rubbed off in most places with a dry towel.  I love the distressed look that came out of it.  I wrapped some orange cotton yarn around the stem and threw a hand stamped tag on there.

Fall porch

Here are the blue crackle pumpkins from the post linked above.  Easy and quick, you check it out if you like the look.  The spray painted white gourd is adorned with self adhesive scrapbooking border.  What I love about this part is that I actually grew the squash.  Can’t say I have ever grown my own home decor until now!

Fall crafts

Here is another paint can with white stripe painted on, as well as a white pumpkin with black crackle stamp like the blue above.  The give thanks pumpkin came from last year’s fall decor.  I spray painted over the white pumpkin with its vinyl lettering, then removed the vinyl, leaving white words on black pumpkin.

Fall crafts

There you have it.  Frugal fall decor possibilities are endless.  What are some of your favorite ideas?

Easy Blue Crackle Pumpkins

Pumpkin Paint Designs

This time of year brings a parade of creatively embellished pumpkin decor to fit any style out there.  I have posted on SBLC’s facebook fan page some of my favorites over the past week, eluding to my recent pumpkin painting marathon.  This project was inspired by Beth at Home Stories.  Here is her version, using crackle medium.  Today I will share with you an alternative way to create this faux crackle effect with using stamps.  The result is beautiful with fewer steps involved, and greater control over the amount and placement of the cracks.

Painting pumkings

Supplies:

  • Fake or real pumpkins, gourds; I got my pumpkins at dollar tree and the gourds from my garden
  • Spray primer
  • light blue acrylic paint for the pumpkin, black for the stem
  • Staz on jet black ink pad
  • Flexible crackle texture stamp

Painting pumpkins

Instructions:

  • Remove the stems from the plastic pumpkins and spray on white primer.  When that is dry, paint over primer with light blue acrylic paint.  I used Martha Stewart craft paint in Sky Blue.
  • While that is drying, paint the stems you black.
  • When pumpkins are dry (I used a heat tool to speed this along), ink up your texture sheet and randomly apply crackle stamp to surface.  You can go for just a little crackle, to a heavy effect.  If you go overboard, you can always paint over the stamp with blue.  The flexible stamp allows you to get into the curves and depressions.

Fall DecoratingThat is it!  I thought up this technique after a botched attempt using crackle medium, and I am thrilled with its simplicity and effectiveness.  What do you think?  What are you doing with pumpkin decor this year?

How to decorate pumkins

No carve pumpkin decorating

Fall Burlap Wreath DIY

How to Make a Wreath

Who can get enough of burlap these days?  There are so many fabulous fall wreaths out there incorporating the versatile fabric.  I snatched up a roll of burlap garland at a garage sale awhile back, and used it to make this quick and easy fall wreath.  Grab a wire hanger and craft your very own.

Supplies:

  • Roll of “burlap garland”.  Not sure exact yardage on this one.  Also not sure where you can buy it since I got it at a yard sale.
  • Wire hanger
  • Flower embellishments of your choice
  • Ribbon to hang wreath

How to Make a Wreath

Instructions:

  • Clip the coils and hook of the hanger and shape the remaining wire into a circle, as best you can.  Mine was far from perfect, and my wreath looks good.

How to Make a Wreath

How to Make a Wreath

  • Next, fold the burlap every couple of inches to make a ruffle, and stick the hanger through the stack of ruffles.
  • How to Make a WreathWhen it is as full as you want, twist the wire ends around one another and tuck them behind the ruffles to hide them.
  • Hot glue flowers of your choice.  I used some scrapbook embellishment paper flowers and a felt flower.  Tie your ribbon at the top and that is that!

How to Make a Wreath

Six on Sunday: Fall Decor DIY Round-Up

I am so behind this fall!  There are tons of beautiful projects piling up in my bookmarks.  Maybe sharing with you six of my favorites will inspire me to get going.  A little bit of my procrastination has to do with the fact that I don’t want pool days to be over just yet, and marathon training is wearing me out.  That will all be over soon, and my fall decor will be in full swing.  Here are some great ideas I want to share.

  • Adri at Dream Book Design shared this lovely burlap harvest banner.  This is from last year, and guess what… It is a fave.  Go over and check out the detailed tutorial!

Fall DIY Home Decor

  • Over at Love of Family and Home, I spied this burlap framed monogram.  There are certain things that always catch my eye.  Monograms and burlap are 2 of them.  The pumpkin is a great touch.

Fall DIY home decor

  • Kristin at Write it Down made a precious yarn ball wreath in fall colors.  I have so much yarn, and am obsessed with unique wreaths.

Fall DIY home Decor

  • Look at these adorable glittered pumpkin place holders by Beckie at Infarrantly Creative.  I had the privilege of watching her showcase this project on Indianapolis’s Indy Style show.  Visit IC for the full tutorial.

fall diy home decor

  • I pinned these as soon as I saw them at Honey and Maple Syrup.   Precious rustic twine pumpkins, and easy to whip up!  Awesome job, Ali!

DIY fall home decor

  • Desiree at 36th Avenue shared these gorgeous pumpkins at Tatertots and Jello, here.  Check out the detailed tutorial.  I am amazed at these.  Can’t wait to give this a shot!

Fall DIY home decor

Privacy Policy