50+ Awesome Things To Make From Wire

[pinit]

50+ Wire Crafts to Make @savedbyloves

[pinit]

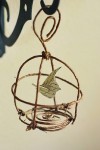
Calling all creatives out there, today’s 50+ roundup is going to feed your inspiration banks. We gathered over 50 super awesome things to make from wire. You can get craft wire for pretty cheap, and as you will see, you can even use wire hangers! From Christmas, Halloween and Valentine’s Day projects, to jewelry to home decor and gifts, you can find a wire project for about any occasion. If you have a wire project we didn’t find, send it to us. Enjoy!


Hand Stamped Leather Bracelet Love

[pinit]DIY leather cuff bracelet[pinit]

Creative bloggers are pretty much just rad, if I do say so myself.  In August, I had the opportunity to gather with my people in Atlanta at  a blogging conference (not  a clogging conference, as my friend Rick misunderstood, although that could be interesting too).  That is where I met Daune from Cottage in the Oaks.  I was admiring a beautiful leather cuff bracelet she was rockin’, and I found out, not surprisingly, that she had made it herself.  How cool would it be to have one with my blog name on it, I expressed.  Guess what came in the mail!!

Custom hand stamped leather bracelet

DIY Hand Stamped Leather Cuff Bracelet

I love that it came with lavender in the package!  My favorite scent.  The bracelet is gorgeous.  You can order your own custom text bracelet from Daune, or pick one that speaks to you in her Etsy Shop.

What.  You are a DIYer and you wanna make your own?  Little Blue Boo has a great DIY hand stamped leather cuff bracelet tutorial:

stamped leather bracelets

For more DIY bracelet tutorials, visit our 50+ Bracelets to Make:

DIY Jewelry Display from Repurposed Vintage Grater

[pinit]How to make a jewelry display copy[pinit]

I am always on the look out for interesting jewelry display ideas.  While out junking with the ladies, I spied this cheese grater, all rusty like I like it.  Immediately “earring holder” came to mind.  Not because I am a creative genius, but because in my Pinterest browsing I have seen just that – a cheese grater earring holder.  This is the easiest project I have ever done.


DIY repurposed jewelry display

Vintage Cheese Grater to Jewelry Display

I bought the thing for $3, brought it home and removed the tag with Goo Gone Sticker Lifter.  You just apply the liquid, wait 2 minutes and scrape away the sticky.

DIY Jewelry Display from Vintage Grater
Unique DIY Jewelry Display Idea


Make a Butterfly Necklace with Vintaj

Hi there SBLC friends!  Amy from Plucking Daisies here to share a Butterfly Necklace tutorial with you.  I created this Necklace using art metals and patinas from Vintaj.  This was my first time playing with Vintaj Patinas and I’m so excited to share what I discovered along the way!
how to make jewelry with vintaj
Generally I am not much of a Jewelry maker.  If I have to open more than a few jump rings I get squeamish so fear not this jewelry tutorial will be relatively easy.  I completed this project in about an hour and had a lot of fun doing it and I think you will too.
There were a lot of good sales in the jewelry section of my local craft store this week and I wanted to try something new.  I grabbed a few pieces from the Vintaj collection and this multi-strand chain from Industrial Chic to use as the base of my necklace design.
Make a Butterfly Necklace with Vintaj
I fell in love with this Vintaj butterfly and decided to try the Vintaj Patinas out to add some color to it.
Make a Butterfly Necklace with Vintaj
Start by adding Vintaj Patinas with a paint brush.  Allow Patina to dry between coats.  You can experiment by layering different colors on top of one another or mixing them together on a craft sheet.
Make a Butterfly Necklace with Vintaj
After coloring my butterfly with Vintaj Patinas I added highlights to the wings with Snow Cap Alcohol Ink using a q-tip.   I layered on several other colors of Alcohol Ink (with q-tips ) to the outer edges of the wings as well.
Make a Butterfly Necklace with Vintaj
Once the Alcohol inks were dry I tore a small piece of cotton from the end of a clean q-tip and wrapped it around the end of a toothpick.  By squeezing a few drops of Pitch Black Alcohol Ink on my craft sheet I was able to use the tooth pick to add bold details to the butterfly.
Make a Butterfly Necklace with Vintaj
When the detailing was finished I gave the butterfly the once over and touched up areas that needed more Alcohol Ink.
Make a Butterfly Necklace with Vintaj
Using a soft file I removed some of the ink from the raised areas and edges of the butterfly to bring out a lovely metallic sheen.
Make a Butterfly Necklace with Vintaj
This was my Inspiration photo.  Pretty close eh?  You can find this inspiring photo and more on my Doodle Diva Pinboard.
Make a Butterfly Necklace with Vintaj
To create the necklace I used a bead board to measure the Industrial Chic chain.  It was just a touch short so I added some chain from my stash and attached it with Vintaj Jump rings.  So far Vintaj Jump rings are the best I’ve ever seen!  So sturdy and easy to work with!
Make a Butterfly Necklace with Vintaj
Here I have attached toggle clasps to the end of the chain with Vintaj jump rings.  When it comes to clasps for jewelry I’m a huge fan of the toggle clasp.  I always struggle with lobster clasps and have found that toggles make putting on jewelry a breeze.
Make a Butterfly Necklace with Vintaj
Now all that’s left to do is attach that freshly Patina-d Vintaj butterfly with…you guessed it…Vintaj jumprings.
I hope you get a chance to play with Vintaj Patinas and create some fun jewelry pieces of your own.
Wear your art with pride 🙂
Amy*

Easy 10 Minute Chain Bracelet Tutorial

Make Easy Chain Bracelets in 10 minutes #jewelrymaking @savedbyloves

These trendy mixed metal chain bracelets are a cinch to make, and are a great way to use up those links left over from other jewelry projects.  Mix and match as you please.  Scoop up costume jewelry and vintage pieces to dismantle and incorporate into your own custom, stylish bracelet.  Make some for yourself and give them as gifts.  Embellish with charms and fibers for unlimited design options!  I will show you how.

DIY Bracelet Tutorial

SUPPLIES:

Jewelry Making Supplies


2 pairs of jewelry pliers, flat or needle nose

Several lengths of chain about an inch shorter than you want your final bracelet to be

2 8-10mm jumprings and a length of chain to make bracelet adjustable

TUTORIAL:

Opening and closing jump rings

Open jump ring with both pairs of pliers and add one end of each chain to the jump ring.  Add clasp then close jump ring with both pairs of pliers.  Pic above shows jump ring still open.

DIY Mixed Metal Braclets

Repeat on the other end with the 2nd jump ring, attaching a 1.5 inch length of chain for the adjustable length connector.  That is what the clasp will grab when fastening the bracelet.

Use jump rings to attach charms.  Tie coordinating fiber scraps to large jump ring where all the chains meet.

Check out more of our Bracelet Tutorials and Features

Powered by CGView

Repurposed Cart to DIY Jewelry Storage

[pinit]How to make a DIY Jewlery Holder from a repurposed cart @savedbyloves[pinit]

There are tons of cool ways to make your own jewelry holders using the most random of objects.  I shared a roundup with you not long ago – 50+ DIY Jewelry Display Ideas – with some of my favorite ways to store your bling.  Today I am excited to share my jewelry storage solution using a cool rusty cart given to me by a friend.  I saw it in her barn and lit up, immediately picturing bracelets and earrings dangling from the  naturally aged, patina wire grid.  She was happy to part with it, and I am equally thrilled with my awesome antique display.  This project took a whopping 5 minutes.

DIY Jewlery DIsplay Tutorial at Saved By Love Creations

How to make a jewlery display

I sprayed the cart with the water hose to removed the cobwebs and other debris.  Then I wiped it down with a lint free, soapy, wet cloth.  This was mainly to get rid of loose stuff.  I love the rust, and wasn’t trying to get rid of that!

Krylon Crystal Clear Flat Finish

I spray 3 coats of Krylon Crystal Clear, which I had on hand for sealing polymer clay pieces.  This was to protect my jewelry from the rust on the cart.  I let that dry and it was good to go!

How to Make DIY Jewelry Storage

Need some jewelry to put on your new display?  Got you covered:

Powered by CGView

Check out 50+ Other Creative DIY Jewelry Display Projects:

Ice Resin Bezel Pendant Tutorial

Making Jewelry With ICE Resin and Susan Lenart Kazmer Iced Enamels @savedbyloves

I have shared several resin tutorials with you, trying out the various types available.  ICE resin is quickly becoming my favorite.  It is easy to use, and hardens to a strong, clear, glass-like finish.  Today’s project is a fun bezel resin pendant using Susan Lenart Kazmer’s papers, Iced Enamels and ICE Resin.  You can find everything I used for this piece at your local Hobby Lobby.

Resin Jewelry Tutorial

SUPPLIES:

Iced Enamels:  Shattered Fire Opal

ICE Resin

Spellbinders Bezel

Tim Holtz Word Stickers

Chain

Charm

Image

Pen

Scissors

Popsicle stick and cup for mixing resin

Sealant such as Mod Podge or Embossing medium

TUTORIAL:

How to make a Bezel Pendant

Place your bezel over the part of the image you want and trace with permanent marker.

ICE Resin Tutorial

Place word stickers where you want.

Susan Lenart Kazmer Iced Enamels

Seal image and word stickers with embossing medium or Mod Podge and dry with heat tool.  This protects the image from the resin, which can darken it if not sealed.

Iced Enamels Shattered Fire Opal

Sprinkle in Shattered Fire Opal Iced Enamels, or glitter or other mica powder.  Anything sparkly will do!

ICE Resin Projects

 Drip resin into bezel using popsicle stick until it domes.  Be careful not to overfill!

How to Make a Resin Pendant

Let dry 6-12 hours, attach chain and charm.  Enjoy your awesome, custom resin jewelry.

Resin Pendant Jewelry Tutorial

Check out more SBLC Resin Projects:


Video Tutorial – DIY Gorgeous Soldered Pendants + GIVEAWAY

[pinit}

how to make a vintage soldered pendant

[pinit]

UPDATE:  WE HAVE A WINNER!  Do you love the look of soldered jewelry, but feel totally intimidated by that hot freaking iron and molten metal?  My creative friend Hope is here to break it down for us in a detailed How to Solder Jewelry video that demystifies the process and will have you making jaw dropping pieces lickity split!  As if that isn’t enough, Hope has teamed up with Saved By Love Creations to give you lovely readers a chance to win your choice of 3 gorgeous pendants!

Soldering Tips for Jewelry

Hope invited me in to record her process!  Before jumping into the video, I want to let you know the supplies you see will being used are from GlassSupplies on Etsy, a shop owned by Robin Ramsden.

Foil Tape For Soldering

This tape used in the video is 3/8 inch wide copper backed foil tape, which you can get at the linked store and probably elsewhere.  Hope recommends black backed foil tape for most simple projects since it holds the pieces together better and is just strong/less frustrating for us newbies!  She was out of it or we would have been using it for sure.  It is available in the linked shop above (GlassSupplies on Etsy).

Obviously if you are using thicker glass pieces than we did, you may need wider tape.  You will have to experiment.

More info on supplies is found below and in the video tutorial.

I did a soldered pendant experiment and shared it with you here:

I took my pendants to Hope’s with me and she helped me figure out how to make them more what I was going for.  I learned so much from hanging out with her that I haven’t seen elsewhere.  It turns out I wasn’t using near enough solder, and oh yeah, my soldering iron tip is disintegrating.   There is a solution for that, and many soldering woes.  This woman solders A LOT and is a wonderful resource!  She is also super sweet, so if something isn’t covered that you want to know about, you can find her on Facebook:  Hope Ellington.  She even takes custom orders, although she is pretty swamped with them right now from what I have seen so hurry if you are interested.

There were so many tips and tricks that I had to break the video up into 2 parts, and they are still long.  You will learn a ton, and if you are like me, your soldering will be vastly improved.  I made a pendant this morning and love it!  Don’t worry, you will see it soon.

SUPPLIES (the video goes over specific brands Hope loves):

Supplies for Soldering Jewelry

Jewelry Soldering Techniques

VIDEO TUTORIAL Parts 1 & 2:

GIVEAWAY

Now for the best part.  You get a chance to win a free handmade soldered pendant from Hope’s Bloomington Indiana Shop, Girlfriends on the Farm!

Pendant 1 – A fancy pants, blinged out vintage ephemeral piece

how to make a vintage soldered pendant

Pendant 2 – A message in a bottle “LOVE”

Jewelry Soldering Techniques

Pendant 3 – Vintage Lace under beveled glass

Soldered Doily Pendant

a Rafflecopter giveaway

How to Make Fabric & Wooden Bead Jewelry

[pinit]

Easy, Quick Fabric Bracelet Tutorial @savedloves
[pinit]

Make a fabric Necklace and Bracelet

I had the pleasure of attending a DIY blogger conference, Haven, in Atlanta over this past weekend.  I could write for days about the awesomeness of that whole experience, but that is not what this post is about.  While there, my friend Jessica from Mom4Real was sporting a cool necklace that I photographed and knocked off.  This is a super fast and easy project.  I used a sewing machine, but I will tell you how to make it the no sew way.

SUPPLIES:

How to make Upcycled jewelry

Fabric Scraps

Fabric Scissors

Wooden Beads 2 Sizes

Beacon Fabri-Tac

TUTORIAL:

Make a dollar store bracelet

You can use old t-shirts, old sheets, any fabric piece you can think of, really.  I used fat quarters and the above picture shows a headband I found at Dollar Tree.  The cool thing about using that is it is already a tube, so I didn’t have to sew or use liquid stitch.  If you use fabric not already in a tube, just cut a rectangle about 14-16 inches (depending on how long you want your necklace or bracelet).  Sew into a tube inside out, then flip right side out.

how to make a knotted bracelet


 Tie a knot like above, put bead, tie another knot and continue until it is as long as you like.  I use an odd number of beads so there is a central one.

Jewelry Making Supplies

Pick out coordinating ribbon and cut to length you want.

Jewelry Tutorial

Sew on ribbon to each end or adhere with Fabri-tac.  I use clothespins to apply pressure.  Fabri-Tac dries super fast and is basically hot glue in a bottle, but not hot 🙂

SONY DSC

For some of the bracelets, I just used the end fabric to tie them instead of adding ribbon.

SUPER EASY, and adorable, I must say.

Fabric Scrap Bracelet Tutorial

Make Mixed Media Mod Podge Necklaces

[pinit]
DIY Mixed Media Mod Podge Necklaces from Michael's, featured by @savedbyloves[pinit]

I found these cool new pendant blanks by Mod Podge at Michael’s a couple of weeks ago, and have been waiting for some inspiration (and time) to create with them.  This Mod Podge® Antique Urban Pendant Necklace Tutorial at Michaels.com is just the nudge I needed.

Have you created with these pendant blanks and papers?  If so, do share.

For more jewelry ideas, visit our Paper Jewlery Projects Roundup:

Privacy Policy