Paper Bead Bracelets and Amazon $75 Winner

Upcycled Jewelry
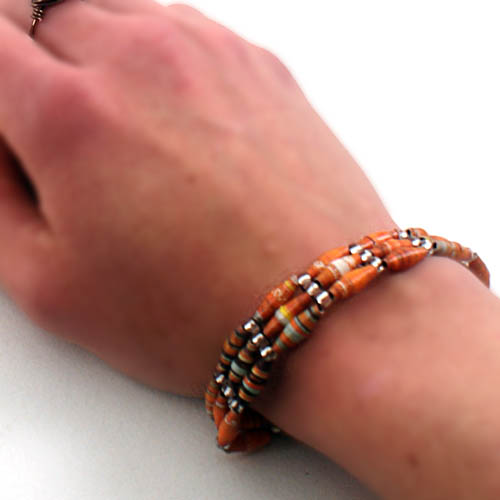
Here are some new paper bead bracelets like I shared with you in this post.  If you are new to recycled paper jewelry, you will find a great video link there.  These simple woven bracelets are a big hit.

Recycled Paper Bead Bracelets
Tune in tomorrow to see how I made a matching paper bead wire wrap ring!

And now, for the $75 Amazon winner from this week’s Thrifty Thursday

Amazon Gift Card GiveawayABBIE!  Entry #64, comment #9, you are the winner.  I have emailed your voucher.  Congrats!

Sizzix Flattened Bottle Cap Earrings

Bottlecap earrings

Did you know you can use you Sizzix machine to flatten bottlecaps?  Pretty cool, huh.  Here, I flattened orange bottlecaps, glued 2 back to back, punched a hole and added ear wire for each double sided earring.  This project is very simple and quick.  Think of all the possibilities with the wide variety of available bottlecap colors and designs.  Orange is my favorite color, so these babies are staying with me, but they would make great gifts or items for your handmade store.

Bottlecap earrings

Here is the video that taught me the bottlecap flattening technique using Sizzix.


Sizzix Embossed Poly Clay Pendants

Sizzix embossed clay pendants

Today, I thought I would share some more polymer clay + Sizzix creations.  For this piece, I baked a very thin (6 on my pasta machine)  sheet of polymer clay (white fimo) for 45 min at 275°.    I let it cool, then embossed with Sizzix using  a Tim Holtz clock embossing folder.  Then I colored it with alcohol inks.  I cut a piece to fit the bezel, used Crafter’s Pick glue to adhere it into the bezel, and layered watch parts and the word on a transparency in resin (Lisa Pavelka Magic Glos).

Polymer Clay and Resin Jewelry

Here is another pendant I made using the same technique.

Polymer clay and resin jewelry

Much more to come with clay and Sizzix.

Polymer Clay & Resin Word Bracelet

Have you seen the polymer clay/Sizzix kick going on here at SBLC?  Well, I didn’t have a die to cut the exact circle I needed for these bracelet blanks, so I used a paper punch for a circle that fit perfectly.

You can easily make this beautiful custom word bracelet at home.  Here is how…

For this project you will need:

  • Polymer clay sheet at thickness of  7 (9 being thinnest), white, baked 45 min at 275
  • Alcohol inks in desired colors
  • Crafter’s pick glue
  • Circle punch to fit bracelet bezels (Epiphany Crafts 14 circle used here)
  • Letter stickers or rub ons
  • Magic glos resin

Instructions:

Polymer Clay Bracelet Tutorial

Polymer Clay Jewelry TutorialThat is it!


Stamped Polymer Clay Word Pendant

Stamped Polymer Clay Pendant

Today, I thought I would share with you another stamped polymer clay pendant.  I recently signed up with Cindy Lietz’s polymer clay library, and was reminded about how fun it is to make bezel pendants with clay.  The Polymer Clay Tutor video on stamped bezels inspired me to dive into these word pendants. If you are interested in developing your polymer clay skills, I cannot stress enough how wonderful, and under-priced, Cindy’s membership videos are.  I am not being compensated in anyway for saying so, I am just that excited about the tips, tricks and inspiration jam packed into each video I have watched so far.  Seriously, she is a fantastic teacher!!

Back to the pendants, I love how simple they are to create, and how each one comes out a little differently.

For this particular piece, I used the bezel from a pendant I scored for cents at a garage sale.  I took a hammer to it and rid it of its glass covered image so I was left with just the bezel.

Polymer Clay Word Pendant

Since the bezel was antiqued silver, I wanted to give the pendant an antique feel.  I mixed scrap clay to get the aqua you see in the final piece.  With my fingers, I mashed the clay into the bezel, and smoothed it out into its cabochon shape.  Once I was happy with the shape, I used metal stamps for the word “JOY”, and a clear cling butterfly stamp for the butterfly.  I used a stylus to add a little more texture randomly, then baked for 45 min at 275°.

TIPS:

  • Remove fingerprints in raw clay before baking by smoothing armor-all lightly over the area until prints are gone
  • Spritz stamp with armor-all or water before pressing into clay to prevent it from sticking

To finish, I used a mixture of glaze and black acrylic paint; painted the entire piece, then wiped away the glaze/paint mixture, leaving the black in the depressed areas.  When this dried, I sealed with 2 coats of sculpey satin glaze.  I love this stuff.  It is easy to apply, dries to a lovely finish, and is inexpensive.

Polymer Clay Pendant Tutorial

What do you think?  Don’t worry, I am still on my Sizzix kick.  Stay tuned!!

Find it, Cut it, Wear it

Die cut flower pendant
My recent acquisition of the Sizzix Big Kick die cut machine has created a cut monster.  I had no interest in getting one of these since I have a Cricut, until I began dabbing with metal work in my jewelry.  Cricut will not even think about cutting metal.  Sizzix has dies that cut right through metal up to 24 mm thick (according to them), with tons of shapes to choose from, and I finally caved.

Since getting it, I have cut through several different materials (the popsicle stick pendant from the Scribble Challenge is a good example), and will be sharing my experiences and results with you as I go along.

This project was born out of my morning run.  I spied some random scraps of metal and plastic on the ground.  Immediately I pictured running them through my Big Kick, so I snatched them up and brought them home.

Make Jewelry With Sizzix

Die cut jewelry

You can make this necklace so easily with Sizzix.  All I did was die cut the shapes using the Sizzix Flower Layers #2 stack them, secure them with Crafter’s Pick, embellish with pearl in the center, and attach to chain with jump ring.  The bottom 2 layers are grungeboard with scrapbook paper glued to the top.  I had to hole punched a petal in the metal flower for the jump ring attachment.
Found Objects JewelryHere I made a flower embellishment for a pendant I had already created.  I simply cut a flower from the metal and the plastic I found in the road & adhered them with Crafter’s pick right on the front of my pendant.  The plastic layer (bottom) is colored with a pink copic marker.  What an easy way to completely makeover a pendant in a snap!

I am in love with this machine.  I don’t know what took me so long.  Wait until you see what you can do with polymer clay and the Sizzix!

Polymer Clay Pendants {Inspired}

Polymer Clay Pendants

A recent beach vacation left me inspired to break out the polymer clay again, after a

long hiatus!  It happened when I walked upon a vendor on the pier, with beautiful

handmade polymer clay pendants, unlike any I had seen.  I asked her what

she used to color her pieces so vibrantly… acrylic paint!  Who knew?

I had actually never done that.  It is so obvious.  I have used mica

powders, pigment inks, copic markers, chalk… pretty much everything but

good ol’ acrylic paint.  The artist recommended

using toothpicks to apply the paint, so I came home and

gave it a shot…

All I did for these was condition white clay into a sheet, stamp on it, cut out

into various shapes with craft knife, then bake.  I painted them

after they cured.  For some of the lettering I ended up using

PITT artist pens.

Polymer Clay Pendants

These were fun and simple to make.  Etching in raw clay makes the artist in me all smiles.

Try it.  You will love it!

Polymer Clay Pendant Tutorial

Resin Rings With Plaid Ring Bling

Resin jewelry tutorialMake your own customized ring using Plaid Ring Bling bezels and ring forms.  These are simple, quick and inexpensive, and the possibilities are endless.  Follow along and you will have your own image immortalized in bling form in no time.

Supplies:

  • Plaid Ring Bling forms and bezels (I got mine a Joanne’s)
  • Magic Glos resin (shown in this tutorial), or Diamond Glaze, or Dimensional Magic
  • Glossy Accents
  • Image to place in bezel (I used a sheet of paper I stamped for the colorful background and ran through my inkjet printer for the words
  • Sunlight or UV curing lamp if using Magic Glos resinusing resin with inkjet images

Instructions:

  • Cut out your images to fit the bezels, and glue them into place using Glossy Accents inside the bezel.  Glossy accents by Inksentials
    making photo jewelry


  • Burnish image to make sure in is secure using a popsicle stick or toothpick.  Use your finger to spread the excess Glossy Accents over the top of the image.  If you need to add more to completely cover the top, do so.  This seals the paper and prevents the resin from discoloring it.  how to make your own photo jewelry
  • Let this dry completely before applying Magic Glos, otherwise the Glossy Accents will interfere with curing.  I use a heat tool to speed this up.  If you do not use a heat tool, about 20 minutes dry time will do.
  • Apply Magic Glos and cure under your UV lamp or in direct sunlight.  Magic glos jewelry
    Lisa Pavelka UV curing lamp

I use Lisa Pavelka’s 9 watt curing lamp, which works great for Magic Gloss.  My pieces cure in 10 minutes or less.

  • Now just glue the bezel with image and cured resin onto the ring form using E6000.  Let that dry and you are finished.  I love the bezel and ring form being separate so that the bezel is easier to set completely flat while the resin is curing.  It makes using the UV lamp way easier for making these rings. 
    Resin jewery


I am planning to make a ring using the Valentine’s Day sprinkles and resin I showed you a couple of weeks ago…

Valentine's day sprinkles jewelry


What have you submerged in resin lately?

Wire Wrap a Pendant With Video

how to wire wrapTo continue with our recent jewelry making obsession, today’s post will cover this gorgeous wire wrapping technique.   You do not need wire wrapping experience to be able to pull this off.  The example shown here is a rectangular glass tile, but you can apply the lesson to virtually any pendant or stone you want to set.

wire wrapping

Supplies:

  • Pendant for setting
  • Beadalon square wire
  • Beadalon half round wire
  • Beadalon 22 gauge round wire
  • Flush cutter

NOTE:  The video from BeadsDirectTV uses half round and square for the technique.  I only had round wire, which is what I used, and it worked great.  Something to keep in mind if you need to work with what you have.  Mine was 22 guage round;  Beadalon 22 gauge round wire

Make sure you check out their other awesome jewelry making videos.

Make Charms With Resin and Paper

how to make resin charm
No need for a bezel or pendant blank.  You can make charms with a simple paper shape and resin.  Here, I used my paper punch to get the shape of this orange courage charm, decorated it with word label and rub-ons, and layered Magic Glos resin.

How to make resin charmsTo hang, I just puched a hole in the top and added a jump ring.  I placed it on top of a paper tag wrapped in lace, with a burlap strip on top.  Add a key fob and some dangly pearl charms, and you have a gorgeous mixed media keychain.

mixed media resin jewelry

Privacy Policy