Washi Tape Coasters

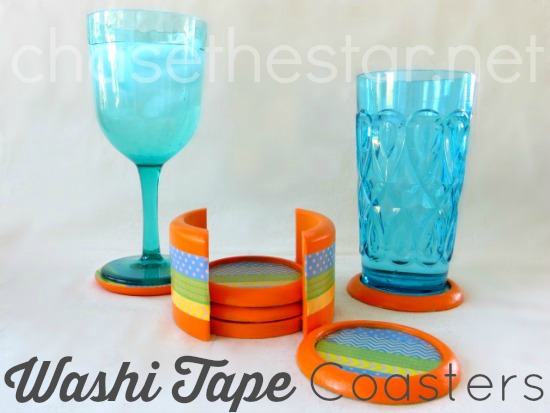
Hello everyone! It’s Barbara from Chase the Star! In the warmer months I like to decorate in fun vibrant shades especially when entertaining, so I dug up an old set of inexpensive coasters and updated them with paint and washi tape to give them a new look for summer!

Washi Tape Coasters

[pinit]

https://savedbylovecreations.com/wp-content/uploads/2014/05/Washi-Tape-Coasters-via-Chase-the-Star-for-Saved-By-Love-Creations.jpg

[pinit]

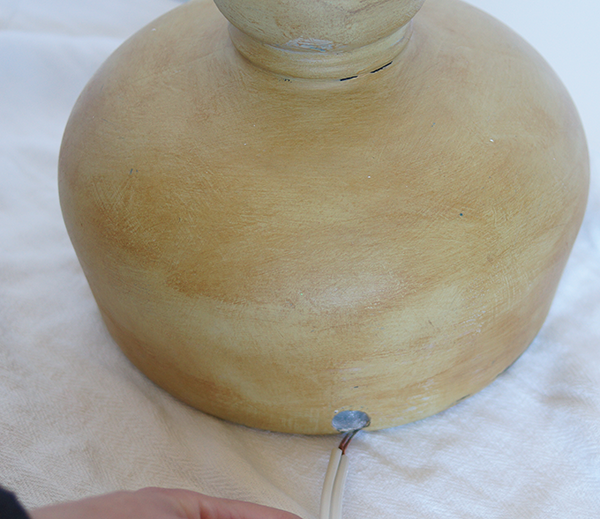
This basic set of coasters have been with us for a few years, they’ve worked very well!

In order to give them a new look I gathered my materials:

Washi Tape (I used 4 rolls)

Acrylic paint

2 Foam applicator brushes

Exacto knife

Mod Podge (I used the “Dishwasher Safe” formula)

Paint, Mod Podge and Washi Tape to update coasters via Chase the Star for Saved By Love Creations

Step 1:

First things first, always start with a clean surface! I wiped the coasters and holder clean. Using one of the applicator brushes I gave the coasters a few coats of the paint. I went with ‘Vivid Orange’ by Folkart, it’s so bright–I love it!

Painting Coasters via Chase the Star for Saved By Love Creations

Step 2:

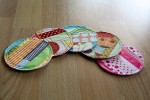
Next, I applied the washi tape in a repetetive pattern to the top and bottom of each coaster, and trimmed the excess off with the exacto knife.

Washi Tape Coasters for a new look via Chase the Star for Saved By Love Creations

Use paint and washi tape to update old coasters via Chase the Star for Saved By Love Creations

Step 3:

Lastly I added a couple of coats of Mod Podge to seal the Washi Tape in. I chose the ‘Dishwasher Safe’ formula because although I doubt I’ll run the coasters through the dishwasher, I’m sure they will get their fair share of moisture, after all, that’s their job!

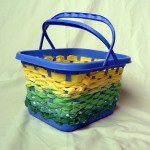
I used the same process for the coaster holder.

Old Coaster set gets a new look via Chase the Star for Savved By Love Creations

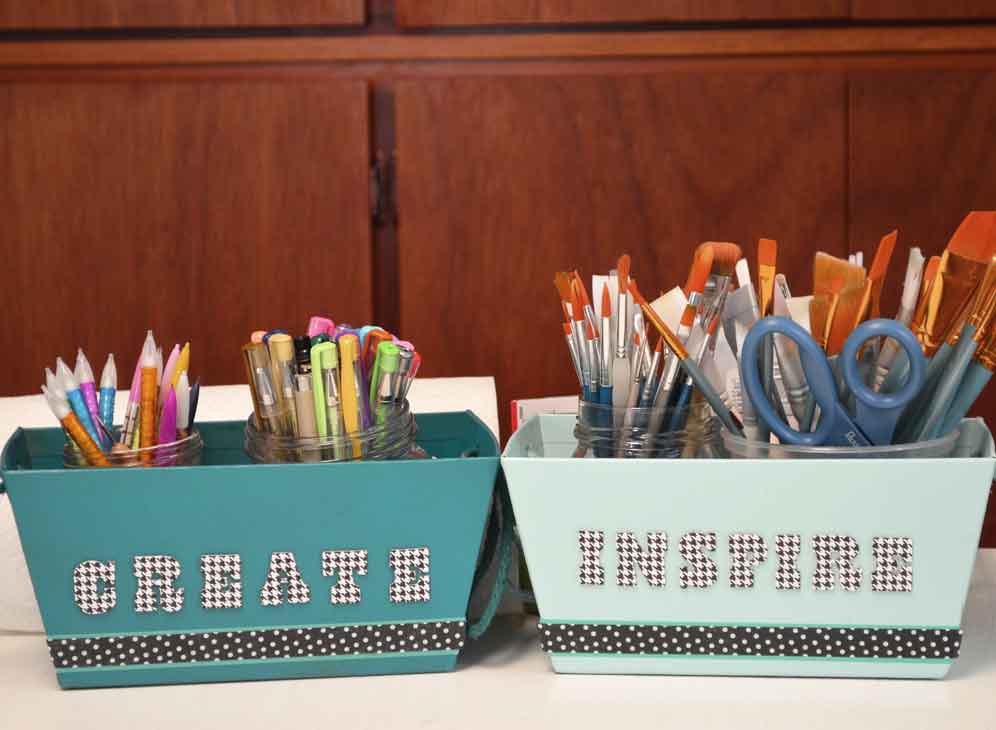
I think this will make a great addition to my outdoor parties this summer!

Do you have an old set of coasters that can use a little love? If you don’t, you can pick some up at the thrift store, or any other discount store!

For more craft and DIY ideas stop by Chase the Star, and follow me on Facebook, Google+, Pinterest, and Instagram!

Have a great summer!

For more washi tape ideas, visit our 50+ Washi Tape Crafts to Make

New Signature

50 Plus Awesome Wood Shim DIY Projects


[pinit]

50 DIY Wood Shim Projects to Make

[pinit]

Wood shims are inexpensive and can be used to create gorgeous DIY home decor.  Make faux pallet art, cover an ugly thrift store dresser, create a designer starburst mirror on a shoe string budget.  Here are 50+ of the best DIY wood shim project tutorials from creatives everywhere.  If we missed your project, send us a link so we can include you!  Enjoy.


Dollar Store Craft Make $3 Wall Art Trio

 [pinit]

Dollar Store Craft Three Dollar Wall Art DIY

 [pinit]


I am so excited to share with you this great Dollar Tree wall art project that you can make for $3!  I found some adorable spring/summer print gift bags on my most recent trip there and decided to bring them home and make barn wood frames from scrap wood for them. While there, I also grabbed the coordinating navy blue planter, knowing I would put the DIY Paper Daisies I showed you last spring in there to go with the daisy on one of the cute gift bags.  Once I got the three bags framed, I decided there needed to be text on the chevron backgrounds, so I cut out “Oh Glorious Day” using my Cricut.  You can get the cut file too!

How to Make Wall Art

DIY Barnwood Frame Tutorial Reclaimed Wood


Here are the three bags.  I loved the daisy and the chevron prints in coordinating colors on the other bag.

TUTORIAL:

I measured the bags to see how big to make my frames.  I decided I wanted the opening to be 9×10 inches.


How to Cut Wood With Table Saw

I shared an Ana White Barnwood Frame Plan in this DIY Barnwood Frame Tutorial with Free Printables.  For this project, I wanted different dimensions and learned a couple of tricks I want to share along the way.  I wanted to use 1×2 inch boards, but didn’t have enough of that dimension on hand, so I ripped 1×4 scraps with my table saw by setting the guide arm at 1.5 inches (which is the actual width of a 1×2 board).  I

How to cut with Miter Saw

Next I set my miter saw to 45º and cut one end of my homemade 1×2.

How to cut Mitered Corners for frame

I measured from the short inner point of the angle 9 inches over and cut the other side going the opposite direction (so I moved my miter saw 45º to the left).

How to Make a Barnwood Frame

I lined the inner frame up with 1×2 flipped up on its side to know where to make the 45º cuts for the outer frame.  This was easier and quicker than measuring!  I used 2 paint stirrers to give me the thickness for attaching the inner frame to the outer so that the back of the frame would be recessed for my foam mounted gift bags (foam mounting happens after the frames are made, see below).

Ryobi Air Strike Nailer For Joining Inner and Outter Frame

Use wood glue at the join and clamp the inner and outer frame together.  Nail in place with 2 inch nails.  Did I ever tell you I love this Ryobi AirStrike cordless nailer?  I do.  It is a go to tool for me.  So easy to use, CORDLESS, goodbye hammer and nails.

Mount Picture on Foam Board

Cut foam board to fit in the back of the recessed frame.  Cut the desired image area off of the gift bag and adhere it to the foam board with Super 77 or other mounting adhesive.

Smooth out Wrinkles with Hand

Smooth wrinkles from the center out with your hand.

Paint Frame With Chalk Paint

Paint frame with color of choice.  I used white chalk paint and antiqued the edges with  FolkArt Antiquing Medium .  I sealed with Krylon Clear Coat Matte Finish because it was nice outside and I was excited that I could use spray sealer after such a long winter!  Wax or varnish would be fine too.

Put Image in Barnwood Frame

Since the foam board is cut to the same dimensions as the recess in the back of the frame, the picture pretty much fits and stays.  I used clear packing tape to secure it in place.

I used Coordinations adhesive cardstock in yellow and my Cricut with SCAL software to cut out the text, which I created in Photoshop (“oh” is “Always in My Heart” font and “GLORIOUS DAY” is Ostrich Sans Black).  Since the paper was adhesive I just peeled off the letters and put them on the chevron patterned framed backgrounds like you see in the photo.  You could use the cut file to make a stencil and paint the letters on, or print them in your favorite color and cut them out by hand too.

Download “oh”

Download “GLORIOUS DAY!!!”

Attach sawtooth hanger or wire to the back to hang!

How to Make a Gorgeous French Typography Lamp from a Liquor Bottle

[pinit]

How to Make an amazing french typography lamp from a recycled glass bottle; Distressed with @decoart Chalky Finish Paint @homedepot @michaelsstores @savedbyloves @graphicsfairy

Make a French Typography Lamp[pinit]

This is a sponsored post written by me on behalf of DecoArt.  All opinions are mine and honest.  This paint rocks!

We are getting ready for a big move, and I am busy with DIY home decor on a shoestring budget!  Today I am sharing a super sweet french typography Chalky Finish Paint lamp that I made from a discarded liquor bottle.  You will see how to drill a hole in the bottle for the cord, how to chalk paint and distress the lamp, as well as how to transfer an image to the painted surface.  This project is easy and cheap.  The biggest expenditure is the $6 bottle lamp kit and the $15 lamp shade I just had to have for it!   The new Americana Decor Chalky Finish paint is now available in Home Depot and Michaels stores. It is also available for purchase online at homedepot.com.

Make a chalk paint lamp from upcycled bottle

SUPPLIES:

Really cool liquor bottle

Drill and 1/2 inch Diamond hole drill bit

Small container of water

Towel or paper towels

Rubbing Alcohol or glass cleaner

Lamp Shade

Light Bulb

 DecoArt Americana Chalky finish paint In Treasure, Inheritance, Everlasting and Primitive

DecoArt Americana Crème Wax in clear and Golden Brown

Medium grit sand paper

Paint brush and wax brush

Bottle Lamp Kit (I got mine at Wal-Mart for $6.47

White Tissue Paper

Cardstock

Masking Tape

Printer

Image to transfer (I used this French Typography Graphic from the fabulous Graphics Fairy)

TUTORIAL:

Begin by drilling a hole in the back at the base of your bottle where you want the cord to exit.  I showed you how to do that HERE:

 Upcycle a Glass Bottle into a Lamp

how to chalk paint on glass

Once your hole is drilled, clean your bottle surface all over with glass cleaner or rubbing alcohol.

Distress painting tutorial

Use a soft, flat brush to paint on a layer of Treasure.  When that is dry, paint on a layer of Primitive.

Upcycle a wine bottle craft

I sanded the gray, revealing the blue base layer.  I decided I wanted a soft yellow top coat, so I mixed Everlasting with Inheritance to lighten and soften the mustard like color.  Then I painted that in a cross hatch, random and messy fashion so that the final piece will have texture and depth.

How to Print on Tissue Paper

To get my image for transfer, I printed some of my favorites from the Graphics Fairy.  There are thousands of free images there to fit any style.  The one I went with is a French Typography file which you can find linked in the supplies section.

Just cut a piece of white tissue paper to fit your card stock and tape it on with masking tape.  Place in printer and print!

How to Image Transfer on Paint

Cut or tear your image from the tissue paper.  I like to tear it so the edges are feathered and not such a straight edge like you get with scissors.  It blends in better.

Apply Clear Creme Wax where you will place the tissue.  Carefully place the tissue and smooth out wrinkles with your finger.

How to Image Transfer


Paint more Clear Creme Wax over that and let dry.

Wine Bottle Craft lamp from upcycled bottle

When the tissue transfer dries, sand entire bottle in areas where you want to bring out the underlying paint colors.  Then apply clear wax over the entire bottle.  Let that dry for at least 30 minutes.

How to Antique Chalk Distress Paint

How to Use Antiquing Wax

Apply Golden Brown Creme Wax as desired and wipe back with soft cloth.  If you use too much brown, you can wipe it away even further using Clear Creme Wax on a rag.

GE Bottle Lamp Kit

Now it is time to use the Bottle Lamp Kit!

How to make a lamp

Follow the included instructions, except for where it says to thread the cord.  It has the cord coming out of the fixture just under the light bulb, but we drilled a hole in our bottle to avoid having an ugly cord running down the lamp from top to bottom!

How to make a lamp from a recycled liquor bottle

I found the burlap lampshade at Wal-Mart for $15.

I love my new lamp!  More than that, I love this line of paint.  You will be seeing it in so many more projects coming up here at SBLC.

Remember this DIY Hand-Painted Sign?  Yep, same paint line.  It goes on beautifully, is easy to distress, and comes in an amazing color palate.  LOVE!

Visit the DecoArt Chalky Finish website for more information.


How to Make Your Craft Storage Beautiful

[pinit]

DIY Beautiful Craft storage in 15 minutes @savedbyloves

[pinit]

Hello there, SBLC readers! This month I have a fun and really quick project for you. I just finished repainting an old desk that took me nearly a week. While I love how it turned out, I was ready to create something cute that only takes a few minutes.

Decorate-Craft-Tubs

I found these cardboard tubs at Target in their Dollar Spot. That place is dangerous! I snagged two, resisting the temptation to buy them all. I thought they’d be the perfect size to corral my paintbrushes, pencils and pens that are always everywhere but where I need them to be when I want them.

Decorate-Craft-Tubs

I had these pretty aqua and turquoise spray paints on hand and gave the tubs a couple of quick coats. The Krylon is Ocean Breeze and the Rust-oleum is Satin Lagoon, if you’re a turquoise-lover like I am.

Decorate-Craft-Tubs

I picked these houndstooth sticky letters up at TJ Maxx a while back, without any idea what I’d use them for. Perfect for labeling some craft tubs.

Decorate-Craft-Tubs-5

To get them to line them up straight, place the bottoms of the letters on one edge of a ruler, or any straight edge.

Decorate-Craft-Tubs

Gently press the tops of the letters onto the tub, give the ruler a little twist, and the letters will pop right off, staying in perfect alignment.

Decorate-Craft-Tubs

Only one problem though . . . with the letters too close together, the houndstooth pattern made it hard to read the word. So I just popped them off, lined them up on the ruler again, farther apart this time, and pressed them back down. Much better.

Decorate-Craft-Tubs

Some other goodies I found in my craft stash were these rolls of washi tape.

Have you used washi tape yet? Oh wow, is it fun! It dresses nearly anything up in a snap!

Decorate-Craft-Tubs

My first attempt was a little too . . . busy, what with the houndstooth already. But you can play around with the letters and washi tape for quite a while without losing too much adhesive and eventually you’ll find a design that works just for you.

Decorate-Craft-Tubs

I wound up layering two tapes, first a plain turquoise and then the polka dots on top of that. So there’s color and just a little extra pattern, without making your eyes go too buggy.

Decorate-Craft-Tubs

Then I loaded them up. The turquoise tub says “Draw” on one side and “Create” on the other and holds my pencils, gel pens, and pigma markers.

The aqua tub says “Paint” and “Inspire” and holds some of my paintbrushes. The brushes I use the most often. Yes, I have quite a collection having painted for nearly 20 years. I actually have more markers too but I don’t use them as often so they’re tucked away on a shelf.

Of course, if Target still has some of these tubs, the markers might just wind up on my worktable with the rest of the group.

Decorate-Craft-Tubs

Yeah, I have a huge worktable. It’s actually a door, set on top of two bookshelves, so it measures 30″ wide by 80″ long.

And that’s why I need these craft tubs . . . because my worktable never really looks like this pic above.

Decorate-Craft-Tubs

No, this is more like it, with four or five projects going at once.

Decorate-Craft-Tubs

So if I’m doing some sketching, I grab my tub of pencils and pens and have everything I need. I usually have two to three paint projects in progress so it’s really helpful to grab all of my brushes at once, wherever I’m working in the studio.

Decorate-Craft-Tubs

I also love the subliminal reminders. I love to draw and paint and I create to inspire others to do the same.

Of course, if you don’t have little tubs like these, you could decorate a shoebox or any other box with a little spray paint, some stick-on letters and washi tape in a matter of minutes. And choose some words that have a special meaning just for you! It’s a great project when you need to get those creative juices flowing but you don’t have a ton of time.

When you do have a little more time, stop by Just Paint It and say hi. I’m getting ready to do some PIY Spring Flowers. (PIY = Paint It Yourself) You can always find me on Facebook, Google+, Pinterest and Instagram too.

Happy Crafting!

signature

More SBLC Storage ideas:

Wanna see how to store your markers for next to nothing?  Click the following image…

How about some free, stylish book storage?  Click the image below…

And here is a quick and easy dollar store 3 tiered organizer DIY:

Finally, for some more fun ideas to use those pallets, check out my 50+ pallet project roundup;

I hope you got some good ideas here today.  Thanks for reading!

xoxo,


The 50 Plus Best Scrap Fabric Project Tutorials

[pinit]

The 50+ Best Scrap Fabric Crafts @savedbyloves[pinit]

If you are anything like me, you have fabric scraps that are so beautiful and you just can part with them.  Well, what to do?  Today I am sharing the 50 best scrap fabric project tutorials my search revealed.  You can make anything from fabric scrap home decor to jewelry, shoes and more.  Many of these are great last minute gift ideas as well.  Happy scrap busting!


DIY Wood Slice Chalkboard Art

Hello friends, it’s Barbara from Chase the Star, and I’m so excited to be back here to share some more crafty goodness!

Chalkboard paint is one of my favorite crafting mediums, it’s so versatile, and works with just about every decor style. I have it all over my house; on walls, furniture, everywhere! Most recently I used chalkboard paint on a wood slice for a new and fun art piece..

Chalkboard Wood Slice Art

Wood Slice Chalkboard Art via #ChaseTheStar for Saved By Love Creations #chalkboard #valentinesgift #diy #craft

Talk about easy DIY art! This would make a great gift; here’s how you can make one:

Materials:

7-9″ Wood slice

Chalkboard craft paint (I used Americana)

Chalk

White painter’s pen

Stencil of your choice (I used a set by American Crafts)

Brush (foam or bristle)

Chalkboard Paint on a Wood Slice! Easy Wall Art! Wood Slice Chalkboard Art via #ChaseTheStar for Saved By Love Creations #chalkboard #valentinesgift #diy #craft

Directions:

Step 1:

Make sure your wood slice is free of dust and add a coat of the chalkboard paint to one side. Allow it to dry a few minutes.

Handmade art Wood Slice Chalkboard Art via #ChaseTheStar for Saved By Love Creations #chalkboard #valentinesgift #diy #craft

Step 2:

Go over the chalkboard paint with a light coat of chalk. Then wipe it off.

Chalkboard Art Wood Slice Chalkboard Art via #ChaseTheStar for Saved By Love Creations #chalkboard #valentinesgift #diy #craft

I just wiped it down dry so that the wood grain stands out but you can choose to remove the chalk with a damp cloth if you rather the grain not show.

Step 3:

Using the painting pen and your stencil add the message you like! I went with the phrase “U & Me” but you can put your family’s initial, or other cute and fun wording!

Easy Wall Art! Wood Slice Chalkboard Art via #ChaseTheStar for Saved By Love Creations #chalkboard #valentinesgift #diy #craft

You can add a sawtooth hanger on the back to put it up on a wall. Or just lean it on a mantel, or even lay it flat on a nightstand or entry table!

DIY Gift Easy Wall Art! Wood Slice Chalkboard Art via #ChaseTheStar for Saved By Love Creations #chalkboard #valentinesgift #diy #craft 550x

I can’t wait to put this up on my bedroom wall!

Do you love chalkboard paint as much as I do? How do you use it to decorate or craft?

For more creative DIY ideas stop by Chase the Star, and follow me on Facebook, Google+, Pinterest, and Instagram!

See you next time!

signature

Valetine’s Day DIY Projects from Plucking Daisies

[pinit]

DIY Handmade Valentine's Day Decor @savedbyloves[pinit]

My friend Amy at Plucking Daisies has some fun DIY  Valentine’s Day projects that I want to share with you today.  I have always loved her style.  It all started over Sizzix and paper flowers.  She is my flower hero! The two of us have only spent time together in real life twice but it seems like we’ve know one another since childhood.  She brings me such joy, both through her art and her friendship.  Check out her mad skills and be inspired!


Recycled Cardboard Heart Banner | @PluckingDaisy #AliceInWonderland #Sizzix #RangerInk #DIY

 Recycled Packaging Heart Banner

Cupid's Arrow Valentines | @PluckingDaisy #ValentinesDay #KidsCraft

DIY  Cupid’s Arrow Valentines 

Faux Barn Wood Chalkboard Frame | Pluckingdaisies.com

Faux Barnwood Chalkboard Frame

Printable Chalkboard Valentines with Duck Brand Prism Stickers | Pluckingdaisies.com #DuckBrand

Printable Chalkboard Valentines

Bitter Conversation Hearts Valentine's Day Centerpiece | Pluckingdaisies.com

Bitter Coversation Heart Centerpiece

Find over 50 ways to decorate for Valentine’s Day:

50+Valentine’s Gifts to Make

Easy Gift Wrap Image Transfer Valentine’s Day Frame

[pinit]

Valentines Day Gift diy

[pinit]

Today Cyn from Creative Cynchronicity is here to share a super cool image transfer technique using gift wrap and Mod Podge.  I can’t wait to try it out and I think you will feel the same way.  Enjoy!

My daughter is getting married this spring so when it comes to Valentine’s Day, I’m thinking of things that will also work in relation to the upcoming nuptials. Since we have some lovely engagement photos around here in need of framing, I decided that the perfect Valentine gift for my daughter and her fiance would be a pretty heart shaped frame. Not only that, but I’m currently planning the bridal shower and it’s going to be all vintage-y and pink and romantic so this works perfectly for that too.

Easy Image Transfer Using Mod Podge and Giftwrap for a Valentines Day Frame @savedbyloves

SUPPLIES:

Mod Podge

Gift Wrap

Newspaper

Frame or other surface to transfer onto

Foam brush

Acrylic or Chalky finish paint

Sandpaper

Brayer, rolling pin or credit card

 photo valframe6pic_zps3c07250d.jpgI started with one of these simple, inexpensive wooden frames from Michaels and some leftover wrapping paper. You want the paper to be pretty bright because once we transfer it onto the frame, it will come out much duller and lighter. The other supplies you’ll need are: Mod Podge, a foam brush (confession: I prefer to use my fingers!), scissors, scraps of newspaper or book pages, some paint (I’m using Deco Art Chalky Paint because I feel it has just the perfect finish for this vintage feel I’m going for) and a small scrap of sandpaper. A brayer or a rolling pin is great to have on hand too but if you don’t have one handy, you can just use the Mod Podge bottle.

TUTORIAL:

 photo valframe7pic_zps2c6bb7dc.jpgNow, check your frame before you get started to see if there are any little rough edges that could use a bit of a sanding. Spread some Mod Podge all over the front of the frame. Here’s a little hint: If you want to try to get more even coverage, spread a medium layer of Mod Podge on the frame ensuring that you get it all over, including right in the corners and all around the heart shaped opening. I put mine on somewhat sporadically because I really wanted to get a “shabby chic kind of effect” with it. Even if you do get complete coverage, just remember that this is not a perfect transfer process and it will still come out looking somewhat distressed.

 photo valframe8pic_zpsad13d204.jpgLay your paper face down onto the Mod Podged frame and here’s where your brayer or rolling pin can come in handy for getting good adhesion to the frame. Leave the paper on the frame for about a minute or so. You want to be able to remove the paper from the frame – you don’t want it permanently adhered! – but you also want some of the design to be left behind. You can take a peek by carefully lifting up a corner of the paper – as you start to peel it away from the wood, there should be a bit of tension and you should see some of the paper’s design on the wood.

 photo valframe10pic_zps06ee3403.jpgYou’ll have some bits of the white backing of the paper left behind as well as the printed part that you want there. Dampen your fingers and rub gently to take away some of that backing. I left a bit behind, once again to add to that aged quality of the project.

 photo valframe11pic_zps97588b29.jpgTo add to the interest of the design, I used some bits of newspaper in some of the areas where the wrapping paper didn’t really adhere. I followed the same Mod Podge procedure that I did with the wrapping paper.

 photo valframe13pic_zps6e85f25c.jpgOnce I was finished with putting on any of the papers I wanted, I went on to the paint. Now, even if you were using the foam brush for the Mod Podge application, I strongly suggest you use your fingers here. I found I had better control of the paint which is important because I didn’t want it all over the frame. I was strategic in applying small amounts of the paint very lightly to small sections of the frame and then using my finger to spread and blend it out so that it had a lovely transparent quality to it.This was also when I painted the edges of the frame. Once the paint was dry, I used a bit of sandpaper then to go over the whole frame, roughing up and distressing the paint and paper to finish off the aged, vintage look of it.

 photo valframe3pic_zps162c7b86.jpgSeal your project with a top coat of Mod Podge and let it dry. You could write a poem or message in the center of the frame or add a special photograph and you’re all set with a gift for your favourite Valentine!

Easily Screen Print Custom Designs with Lumi Inkodye; Video Tutorial

[pinit]How to Make a Custom Print Tshirt with @lumi inkodye @savedbyloves[pinit]

How to Screenprint

This year at CHA, I saw so many amazing new products that I am busting at the seams to tell you about, and this is one of my favorites!  Watch the video to see how you can use Lumi Inkodye to make prints on natural materials.  I found this white cotton t-shirt at Walmart for $4.88 and came knew it would be perfect to try out this cool product.

Inkodye Lumi Screenprint

I made this negative in Photoshop and printed it on Lumi’s transparency film.

Lumi

Using the DIY Printing Kit in Blue, I followed the steps in the video below to make my custom logo tshirt!

Lumi Inkodye Tutorial

I used a baking pan as my flat surface and pinned my negative on top of the area coated with the solution.

Lumi Inkodye Tshirt

After 10 minutes in the sun, I had a great print. Make sure you wash in the detergent after bringing inside, so the developing stops!

This was so easy.  Look at the detail in the text!  Super impressive.  I am doing more prints as we speak.

Now for the video DIY straight from the Lumi Booth at CHA 2014…

How to Make a Custom Print Tshirt

Privacy Policy