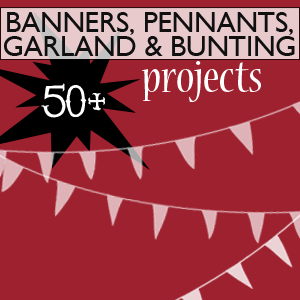
How to Make Bunting, Banners, Pennants & Garland

50 plus Banner, Garland, Pennant and Bunting Projects to make by @savedbyloves
This week’s roundup will give you plenty of holiday decor inspiration, with over 50 of the best garland, bunting, pennant, banner projects out there.  I remember when I first started making this kind of decor, and how confused I was about what to call my final piece.  Now I am not much more educated on the terminology, and I just use the words interchangeably!  Whether you use garland or bunting or pennant or banner, you will find some great ideas here.


Valentine’s Day Kisses Bag Topper

Valentine's Day gift printable

Here is a great last minute Valentine’s Day gift you can put together in minutes, with a sandwich bag, some kisses, tape and a printer.  Who doesn’t love chocolate kisses?  There is a sweet poem too accompany the chocolate on this 2 sided bag topper.  Here is the free printable, sized to fit a ziploc sandwich bag.

Just print it on 8.5×11 inch white cardstock or photo paper, fold in half and adhere to kiss filled baggie using double sided tape.

Valentine's Day gift printable

Valentine's Day gift printable

Valentine's Day gift printable

Easy Red Rose Valentines Wreath

Easy Valentine's Day Wreath DIY

Need a g0rgeous Valentine’s Day wreath you can make in no time?  Hot glue some roses onto a heart shaped wreath form, or a cardboard heart shape, and embellish with ribbon and sparkly fibers.  Top it off with a pink glittery heart and a piece of ribbon to hang.  You are finished!

Easy Valentine's Day Wreath DIY

How to make a wreath

How to make a wreath

Quatrefoil “Love is” Printable

Love free printableWe made this free printable in the spirit of Valentine’s Day, but isn’t it a great reminder to keep up all year long?  The print is 8×10.  To download,  just click the thumbnail above and the full resolution version will appear.  Save to your computer and print or use as wallpaper.

50+ Friday: Handmade Valentine’s Day Gift Tutorials

Over 50 handmade Valentine's Day gifts to make @savedbyloves[pinit]

Need some inspiration for that perfect “I Love You” project?  We have scoured the creative blog land to bring you over 50 Valentine’s Day handmade gift tutorials. Enjoy!


Dry Erase Love Note DIY With Printable

Love note DIY

I have wanted to do this project since I first saw this framed “p.s. I love you” on Pinterest.  It is uploaded by user, so I don’t know who made it.  If it was you, let me know so I can send you some link love.  Anyway… my guy and I are big note writers, and I thought making a dry erase love not would be a greener way to carry out our lovey dovey correspondence.

Valentine's Day Crafts
Here is the printable I used, which you are free to download…

Free love note printable

I printed out the 8×10, stuck it in the frame, used a paper punch to make little hearts, glued them to twine, placed the garland and that was that.  If you don’t want to use the printable above, you could just use an actual piece of notebook paper, doodle a cute message, and frame it.

Now we have a cute way to leave notes that doesn’t take up precious paper that I could otherwise roll into a lovely bead.  Win win.

DiY framed Dry erase love note

Valentine's Day free printable

Valentine's Day free printable

Coiled Magazine Page Heart Tutorial

Recycled Paper Heart from magazine pages by @savedbyloves

[pinit]

You saw this coming, right?  Valentine’s Day is approaching, and a coiled newsprint heart tutorial is all but mandatory here at SBLC.  This would be a great craft for Valentine’s Day decor or gifts.  The technique is pretty much the same I have shown you in other coiled projects, with the addition of the best paste option I have found so far.  I will share with you the step by step, including the glue recipe that is key in strengthening the strips and neatly coiling/shaping them.

Recycled paper crafts

Supplies:

  • Magazines pages in colors you love
  • Paper cutter or scissors
  • Toothpicks
  • Paper mache paste (recipe below)
  • Wax paper
  • Heart shaped cookie cutter
  • Craft glue (I prefer Crafter’s Pick for these projects because it sticks to the wet strips, grabs fast and dries clear)

Instructions:

  • Fold strips as shown in this magazine page coiling tutorial.  I use a 1/4 magazine page for each strip.  Some tutorials show 1/2 page or full page.  I like 1/4 because I think the end projects look much nicer (less bends and crinkles in the strips).
  • Make your paste as follows:
    4 tbsp. flour
    1 c. cold water
    1 c. boiling water
    1 1/2 tbsp. sugar
    Mix flour + cold water then add boiling water and bring to boil. Add sugar, stir constantly until thick. Makes 2 cups.
  • Dip each strip in the paste as shown, then lay on wax paper to dry.

    Removing excess glue
    Lay strips on wax paper


  • Let strips dry; I usually prepare a bunch of strips and make the piece the next day. I am sure a couple of hours would suffice.
  • When you are ready to being shaping your strips, wet each one, one at a time as you are using it.  The paper mache paste makes the strips stronger and wetting them makes them easier to shape,  The paste becomes a little sticky again, helping the strip to stay where you place it.  Wet the strips before use
  • To get the heart shape outline; wrap strip around cookie cutter.  If you are using a larger cutter, you may need more than one strip to go around.  No problem.  Just overlap the strips about 1/4 end to beginning and continue wrapping.  When you come to the beginning of your first strip, overlap the current strip with it about 1/4 inch and trim off any remainder of the end strip.  When that dries, slide heart shape off of cookie cutter.  Making heart from magazine page.Magazine page crafts
  • To make the inside coils, I just start coiling (using strips i have re-wet) and use the outline as a guide to help me figure out what size and how many coils I need.  Place the coils inside the outline, and using a toothpick, place a dab of glue at each contact point (where the coils touch one another and where the touch the outline).  Let your piece dry completely and cover with a couple of coats of mod podge or sealant of choice for durabilityRecycled paper art
    Recycled paper crafts.

The possibilities are endless.  I would love to see what you come up with, and am happy to answer questions!

50+ Valentine’s Day Decorating Ideas

50+ Valentine Day Decor Ideas from @savedbyloves

[pinit]

Get ready for a lot of red, and hearts galore.  This week’s 50+ topic is Valentine’s Day decor.  I tried to give you mainly tutorials, but there were some fantastic Etsy finds I had to throw in for inspiration’s sake.  I hope you enjoy these projects as much as I do.


Valetine’s Day Wreath From Coffee Stained Flowers

How to make a wreathI had a gift certificate for Joann’s and wanted to make a Valentine’s Day wreath, so off I went to see what inspired me from the store.  I found white flowers in the bridal section, and a heart shaped wreath form in floral.  I also spotted this adorable vintage graphics heart decor piece that I had to snatch up for under $3.  I got them all home, and decided the white was too white.  I needed an aged look, so I put the flowers in a shallow pan and poured coffee over them.  I let that sit for a few, then spread them out on wax paper to dry.

Valentine's Day decorations

Once they were dry, I just stuck them to the wreath form with my hot glue gun.  I arranged my new wreath and the decorative vintage image heart from Joann’s with a wide red ribbon, and that is that!

Valentine's Day decorations

I love it!  It is a nice change from the t-shirt wreath I had up before.  I think cupid is smiling.

Valentine's Day decorations

DIY Wreath

Valentine's Day decorations

Valentine's Day decorations

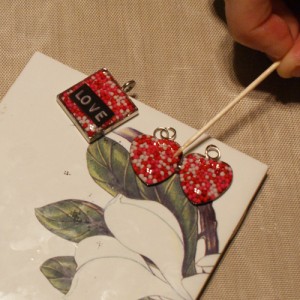
Valentine’s Sprinkles and Resin Jewelry

Resin jewelry tutorial Love text & candy sprinkles from @savedbyloves

[pinit]

Looking for a quick and easy gift for Valentine’s Day?  This project fits the bill.  Remember this post on patriotic resin jewelry?  The process is the same, except I used Valentine’s Day sprinkles instead of red, white and blue.  I also used heart shape bezels which I found with the polymer clay at Hobby Lobby.   Follow along for the step by step, and you will be on your way to your very own LOVE jewelry.

Supplies:

  • Magic Glos
  • Pendant and earring bezels and desired jewelry findings
  • A sunny day, or UV curing lamp; I use Lisa Pavelka’s and it works like a charm
  • Toothpicks
  • Tile small enough to fit into lamp to cure your pieces on
  • Sprinkles
  • small mixing  cupResin jewelry supplies

Instructions:

  • Pour some sprinkles into the cup, along with a few drops of Magic Glos and using toothpick, mix resin and sprinkles so that sprinkles are coated.

resin jewelry

Valentine's Day crafts

  • Use toothpick to pick up a clump of sprinkles/resin and spread into bezel.  You don’t want the sprinkles to go higher than the lip of the bezel.  When you are happy with the coverage, put a drop or two of Magic Glos in the middle and expose to UV to cure (either outside on a sunny day, or under a UV lamp.  Valentine's Day crafts
  • Once cured, add another layer of resin to get the dome effect and cure again. You can add embellishments, stickers or whatever you can think of at this point too. I used my label maker to make this love sticker. I put it on top of the cured layer, then put resin over it, then cured.

Valentine's Day crafts

TIP:  Use toothpick to “pull” resin from middle of piece out to the edges

Valentine's Day crafts

I just love this UV resin.  There is another, way less expensive brand called UltraDome, which is being shipped to me soon.  I hope I love it as much as I love Magic Glos.  I will keep you posted!

How to Make Resin jewelry


Privacy Policy