Holiday Topiary from Thrift Store Finds

#holiday centerpiece topiary from thrift store finds

[pinit]

#holiday centerpiece topiary from thrift store finds

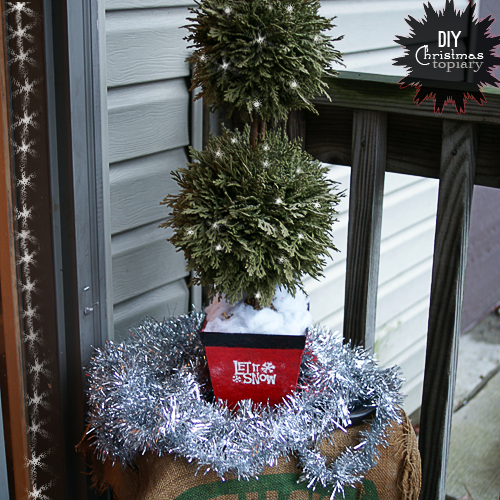
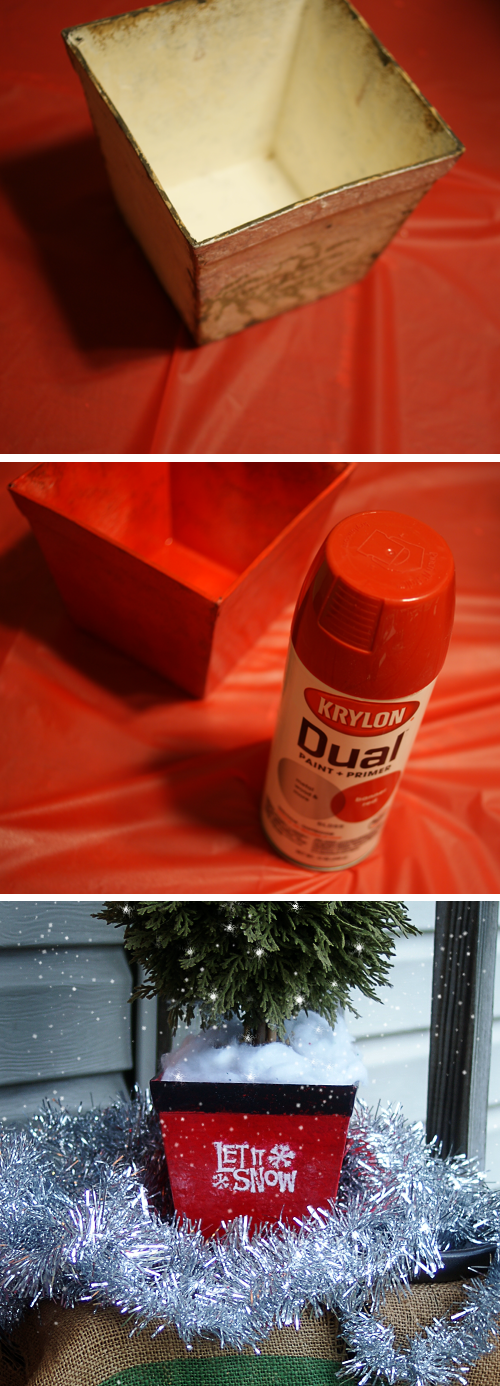
Today I want to share with you this festive “Let it Snow” topiary that I created in a few simple steps with some thrift store finds.  I love how it turned out, and for under $4 at that.  There is so much potential at garage sales and Goodwill with some spray paint and creativity.  I rarely buy anything new because of it.  It feels good to reuse what has already had a life, and to transform the discarded into the beautiful!

TUTORIAL:

How to make a centerpiece

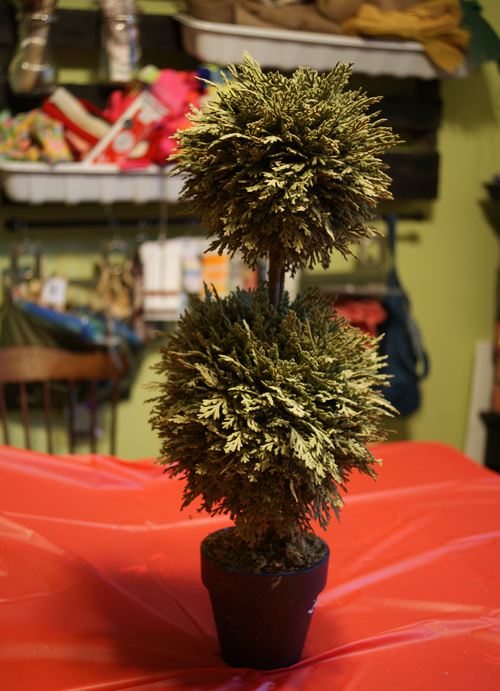
I found this topiary for $1, and some nested planters (5 for $2).  One of the planters was the perfect size for the topiary, so I spray painted it red with Krylon Dual, painted the rim with black acrylic paint and stamped “Let in Snow” on the front.  That was it.  Topiary placed in updated planter and adorned with lights.  Magic.

Christmas Decor DIY

Holiday Mason Jar Chandelier

Holiday Mason Jar Decor Chandelier

[pinit]

Mason jar crafts have stolen hearts everywhere.  It is an epidemic.   That is why when I saw this wrought iron chandelier at a garage sale for $2, I immediately pictured mason jars where the hurricane glass would be.  I  showed you how I attached the removable jars in this mason jar repurpose chandelier tutorial.   The fact that the jars are easily unscrewed from the base makes it simple for me to change the color theme with the seasons.  I went at them with red glitter glass paint from DecoArt, and I loves loves loves them.

Remember the fall and rainbow versions?


MasonJarChandelierPin


Speaking of Mason Jar Decor Ideas, here are over 60 more!

Have the merriest of Christmases, my awesome readers!

Make an Easy Photo or Placeholder

[pinit]

I have a great placeholder DIY tutorial for you today using just a few supplies.  These can be created in no time, and are perfect for holiday and party table settings, as well as photo or holiday greeting card display.  Change the add-ons to accommodate any occasion!  Add a meaningful photo and give as a gift that will be cherished. The base wire holder is super easy to make, and embellishing possibilities are limitless.

Creating the Basic Stand

SUPPLIES:

Wax or UTEE (ultra thick embossing enamel)

Ranger melting pot if using UTEE, double broiler if using candle wax (see this how to melt candle wax)

Silicone Cube Tray

18 guage craft wire

Wire cutters

Round mandrel or other object to form circle wire holder

    TUTORIAL:

The Wire

 Cut 10 inch segments of wire and wrap around mandrel or other round tube at one end.  Wrap wire twice to create the double circle that the card or photo slips into.

photo(16)

Bend wire at base of circle with your fingers as shown in photo .  Now it is ready to be inserted into the cube.

photo(6)

The Base

Melt your candle wax or UTEE per instructions, carefully pour into silicone square cubes and let harden.  UTEE sets up pretty quickly (just a couple of minutes), wax takes 15-20 minutes.

For this reason, if using UTEE, pour only 2-3 cubes at a time and insert the wire while base is still in tray.  You could also let it harden all the way, then pop it out and drill a hole in the center for you wire.  I prefer the in tray option (sorry no photo) since UTEE acts as a strong adhesive and will secure the wire without glue if placed before hardening.  Just make sure the wire doesn’t shift.  You may have to hold it in place for 1 minute.  If drilling, dip tip of wire in adhesive before inserting into drilled hole.

Here are UTEE cubes after hardening…

DIY place holder or photo display tutorial using wax and wire @savedbyloves

If using wax insert wire when wax is almost completely set.  This will be about 20 minutes.  Just insert the wire and make sure the wax is hard enough to hold it up.  Let harden fully, then remove your ready to embellish stand.

Thanksgiving Placeholders

The idea for these stands came to me when thinking of our Thanksgiving table.  I wanted everyone to have leaves to write gratitude/blessings on, to add to a “thankful tree” centerpiece I threw together.

To make the tree:  I grabbed a mason jar I had painted red, removed the ornaments from my Halloween paper ornament tree and put the tree in a hole I cut in the jar lid, added some stones to hold the tree in place, and topped it off with a fall bow.

Placecard2

Thanksgiving Placeholders; I embellished my stands with leaves I die cut from paint swatches with my Sizzix.  I hole punched them at the base and tied them to the wire with leftover hemp cord from a prior project.  For the name cards, I stamped cardstock circles with monogram letters and mounted them on scalloped circles.

photo(2)

photo(4)

 For Christmas placeholders, I attached a foil poinsettia (tutorial here) to the base, and a shiny silver bow.  I used the interference blue UTEE to create the cube because it looks like snow.

UTEE Ultra thick embossing enamel project tutorial

How to Make Place Cards


Guest Post: Paper Ball Ornament

Make a #DIY paper ball #Christmas ornament @savedbyloves

Irina from Irina’s Cute Box is back today to share another great project.  Paper ornaments like this are so fun to make and super inexpensive.  I love the festivity and uniqueness they bring to holiday decor.  Irina made hers large, for a table accent instead of Christmas tree ornament size.  The silver holographic paper she chose is just my kind of glitzy, sparkly awesomeness.

How to make a Christmas paper ball ornament

Hello SBLC readers!  I am excited to share this paper ball ornaments from my childhood with you today.  It was a fun project in kindergarten when we made them out of old post cards.  I don’t have any post cards to recycle, so I simply got in Michaels scrapbooking heavy paper with holographic finish.
This ball actually not a Christmas tree ornament, unless you have a really tall Christmas tree.   I simply used it as a home decoration.

Supplies:

First, you need flower templates. You can download them there in JPG file. Print the page and cut off one or all flowers. This particular home decoration ball was made using template 1 (the big one).

How to make a paper ball ornament

You’ll need 12 flowers. Make slots along the dashed lines.

How to make a paper ball ornament

Use the slits to join flower petals together. Keep adding more flowers. So all petals will be connected tho the neighbors.

How to make a paper ball ornament

First six flowers connected will look like a bowl 🙂

How to make a paper ball ornament

Keep adding flowers until the ornament will be a ball shaped.

How to make a paper ball ornament

And… your Christmas home decoration is ready!  Place it on a table or book shelf… or any other place. Add a garland or other decorations.

Happy Holidays to everyone!

50+ DIY Stocking Stuffers for Girls & Women

[pinit]

50+ #StockingStuffers to make #DIY for Girls and Women #Christmas @savedbyloves

[pinit]

There are so many unique stocking stuffers to make for girls and women.  From treats to jewelry to hair accessories and photo gifts, this round-up will give you plenty of inspiration resulting in Christmas morning cheer.  The stockings were always my favorite part of Christmas growing up, because my momma gave it her all.  Those things were busting at the seams come time to raid what seemed like magical, bottomless socks.

Some of my favorites in the collection:

50+ #StockingStuffers to make #DIY for Girls and Women #Christmas @savedbyloves

I am loving this Family Photo Go Fish gift idea from Brooke of The Crafting Chicks.  How cool for the kiddos to be characters in the game.  This is a winner.

50+ #StockingStuffers to make #DIY for Girls and Women #Christmas @savedbyloves

Make a box of princess dolls for the girls on your list, with tutorial and free printable backdrop at Lil Blue Boo.  She can even color in the scenery herself.  So cute.

50+ #StockingStuffers to make #DIY for Girls and Women #Christmas @savedbyloves

What girl (or woman still into hair flair reminiscent of her younger days) wouldn’t love these sweet snowflake hair clips from Torie Jayne.  Best part… they are super easy and inexpensive, oh yeah, and fast!

50+ #StockingStuffers to make #DIY for Girls and Women #Christmas @savedbyloves

If knitting and/or crochet are not your thing, you can still make this repurposed sweater to lovely hat and mitten set.  Mental note:  must raid sweater section at thrift store!  Even if you do knit, you can make this set using the detailed tutorial at One Pearl Button in a fraction of the time, not to mention it is eco-friendly.  Bonus!

50+ #StockingStuffers to make #DIY for Girls and Women #Christmas @savedbyloves

When I saw this snowman poop stocking stuffer (words I never thought I would type) at Phar-Ma, I couldn’t take it.  Now that is creative.  See how to whip this lump of coal type gift using tic tacs and the free printable provided.

THE LIST CONTINUES:


Duct Tape Poinsettia Gift Topper

[pinit]

Duct Tape Poinsettia Gift Topper #Christmas #Repurpose #Christmas #DIY @savedbyloves

Duct Tape Poinsettia Gift Topper #Christmas #Repurpose #Christmas #DIY @savedbyloves

What can’t you do with duct tape, really?  Today, I have a great gift topper idea for your Christmas wrapping, using duct tape and a foil lid.  Make several and create a wreath, or garland.  This is a unique, inexpensive way to add a handmade touch to your presents this year.

I used my poinsettia Sizzix die, but I showed you in this DIY poinsettia wreath tutorial a great template for creating poinsettias by hand from Eri Doodle.  This can be done easily by hand.

SUPPLIES:

Poinsettia die or template

Foil lid (available at Sam’s Club in 15 packs for $13)

Red and/or white Duct tape

Scissors

Green Acrylic paint and primer or green Duct tape

Hole punch

Brad

Gold or yellow beads for center

Clear, tacky glue

Duct Tape Poinsettia Gift Topper #Christmas #Repurpose #Christmas #DIY @savedbyloves

TUTORIAL:

Apply strips of duct tape over the foil lid, making sure to smooth out any air bubbles as you go.  I use the flat inner section of the lid only.

Duct Tape Poinsettia Gift Topper #Christmas #Repurpose #Christmas #DIY @savedbyloves

Continue until entire flat part of lid is covered if you want to make several flowers, or just do 2 strips of duct for a single flower.

Cut out the duct tape covered area with scissors and either die cut or trace template with a pen and cut out petals by hand.  You will need 2 green petals for each flower for the leaves.  For this, primer the lid and paint with green acrylic paint (I used Martha Stewart Glitter paint in green) or just use green duct tape.  I wanted the glitter look, and wasn’t too thrilled with the shade of green duct tape in the store.

The purpose of the foil is so that you can shape your leaves by creasing them down the center and curling the tip under for a greater 3D effect.  This foil holds the shape great, but you still get the color and gloss of the duct tape.

For flower assembly – Refer to the pic below for petal arrangement.  You can use glue like I did in the paper example pictured, but I prefer to punch a hole at the bottom of each petal (stack several petals and punch them at once to save time), and at the center of the central start, then put a brad through all the holes to connect the parts.

That is it.

Duct Tape Poinsettia Gift Topper #Christmas #Repurpose #Christmas #DIY @savedbyloves Duct Tape Poinsettia Gift Topper #Christmas #Repurpose #Christmas #DIY @savedbyloves

Wine Cork Christmas Decor

Wine Bottle Cork #Christmas Decor from Drink Nectar, featured @savedbyloves

Many will be enjoying wine over the holiday celebrations.  Don’t get rid of those corks just yet.  At DrinkNectar.com, you will find this cute Christmas tree wine cork decoration, as well as 11 other Christmas projects to make from these little gems.

Want more wine cork project ideas?  There is a 50+ for that:

DIY Dollar Store Custom Stenciled Gift Mugs

@DollarTree Mug Stenciled Mustache; Great #DIY #GiftIdea @savedbyloves

Today I have a great guy gift idea for you.  This project only cost $1 and took just 5 minutes.  Attention procrastinators:  easy, cheap last minute guy gift here.  You can actually make these for anyone on you list.  It doesn’t have to be a mustache that you paint on here.  Remember when I showed you these Martha Stewart stenciled mugs?

@DollarTree Mug Stenciled Mustache; Great #DIY #GiftIdea @savedbyloves

This project is similar, but I found these clear, big glass mugs at Dollar Tree.  I made my own stencil but printing the mustache below on cardstock, cutting it out and tracing it onto contact paper.  I cut that out and used the space left behind as the stencil on the mug.  No die cut machine necessary.

@DollarTree Mug Stenciled Mustache; Great #DIY #GiftIdea @savedbyloves

I made one of these for everyone that is going to be at my family’s traditional egg nog New Year’s Eve get together.  For some I used adhesive stencils, and others I used hand cut stencils I made from contact paper.  I used Martha Stewart glass paint and her daubers to apply it.  The stuff is great because you can bake it and it becomes permanent and dishwasher safe.  Not to mention it applies beautifully.  You can create professional looking gifts with no experience.

@DollarTree Mug Stenciled Mustache; Great #DIY #GiftIdea @savedbyloves

@DollarTree Mug Stenciled Mustache; Great #DIY #GiftIdea @savedbyloves

If you need some more handmade gift ideas, check out our 50+ roundups:

DIY Felt Wreath for $1

Make a Felt Poinsettia wreath from @DollarTree stocking and cardboard @savedbyloves

[pinit]

When I saw the huge red and green felt stockings at the Dollar Tree, I just knew I had to make another poinsettia wreath.   This wreath was made with one stocking and a wreath form which I cut from a leftover box.  So yes, it cost $1!  Felt can be expensive, and this is a fantastic way to get a lot of it, in Christmas colors, for next to nothing.  This particular felt makes a gorgeous flower.  I bought three of the stockings and am busy making more of these gorgeous wreaths for Christmas gifts.

SUPPLIES:

Dollar Tree Stocking

Sizzix and Poinsettia Die

-OR-

Poinsettia template to cut felt by hand, like this free one from Eri Doodle

Straight pins

Wire Cutter

Cardboard box

2 circular items to trace onto cardboard to cut out a donut for your wreath form

Scissors

Pen or marker for tracing onto cardboard

Tape

TUTORIAL:

Trace plate or whatever circular items you have onto cardboard and cut out wreath form like I showed you previously:

Wrap your cardboard donut with tape to reinforce and protect.

Cut your poinsettia petals and leaves with your die or template.  Assemble flower and use straight pin to stick onto wreath form.  For detailed flower assembly, see my paper poinsettia wreath post.  The process for felt is the same, but you don’t fold and shape the leaves like you do with paper.

Make a Felt Poinsettia wreath from @DollarTree stocking and cardboard @savedbyloves

You will likely have excess straight pin sticking through the back of your wreath.  Carefully trim flush with wreath form using wire cutters.  Wear eye protection for this part!

Make a Felt Poinsettia wreath from @DollarTree stocking and cardboard @savedbyloves

Make a Felt Poinsettia wreath from @DollarTree stocking and cardboard @savedbyloves


DIY Holly Jolly Christmas Decor

Make a Holly Jolly #ChristmasDecor Sign #repurpose #Upcycle #papercraft @savedbyloves

[pinit]

This fun project only cost a few dollars, and is the perfect piece to top off our Christmas mantel.  I have been wanting to do something with a sign I grabbed from a garage sale for $1 over the summer.  With some spray paint, a stencil I made in Photoshop, and a holly/berry paper die cut, I was able to make this festive Christmas sign.

Supplies:

Krylon Banner Red

Krylon White

Gesso or primer

Paint Brush

Holly Jolly Stencil

Make a Holly Jolly #ChristmasDecor Sign #repurpose #Upcycle #papercraft @savedbyloves

Holly Berry die cut – I used this holly berry file from Eri Doodle Designs to cut the holly berry from card stock using cricut

Photo source: Eri Doodle Designs

 3D Foam mounting adhesive

Medium Grit sandpaper

Towel for cleaning and for drying

Newspaper

Masking tape

Make a Holly Jolly #ChristmasDecor Sign #repurpose #Upcycle #papercraft @savedbyloves

TUTORIAL:

Make a Holly Jolly #ChristmasDecor Sign #repurpose #Upcycle #papercraft @savedbyloves

Lightly sand your sign and wipe away debris with soapy water.  Dry with towel.

Make a Holly Jolly #ChristmasDecor Sign #repurpose #Upcycle #papercraft @savedbyloves

Apply gesso or primer.  I did 2 coats of gesso, drying completely between.  Let dry.

Make a Holly Jolly #ChristmasDecor Sign #repurpose #Upcycle #papercraft @savedbyloves

Spray with red paint and let dry.  While that is drying, cut out your stencil from clear contact paper or vinyl.  Contact paper is way cheaper.  It doesn’t have to be clear, I just prefer that so I can see where I am placing it better.  Any contact paper will do.  I used my cricut to cut out the letters, but you can print the text (file available for free download under supplies, above) and trace the letters onto your contact paper.

Place your stencil on the dry red sign and spray white.  Make sure the area you don’t want white is all blocked off with newspaper or tape.

Adhere your holly berry die cut cardstock and you are all done!

Make a Holly Jolly #ChristmasDecor Sign #repurpose #Upcycle #papercraft @savedbyloves

Make a Holly Jolly #ChristmasDecor Sign #repurpose #Upcycle #papercraft @savedbyloves

Make sure you check out our Christmas gift and decor 50+ roundups for more inspiriation:

Privacy Policy