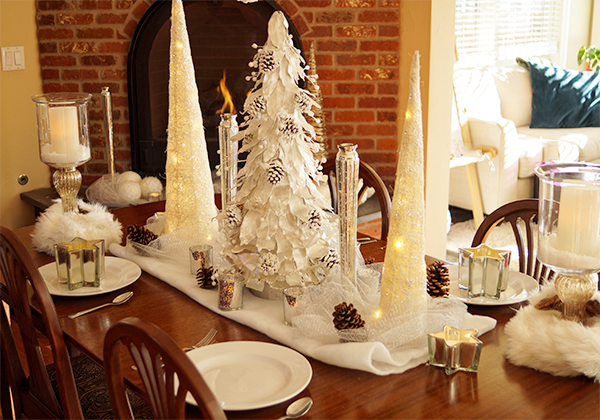
Easy DIY Graphic Christmas Ornaments


Make Gorgeous Holiday Ornaments with @plaidcrafts @savedbyloves

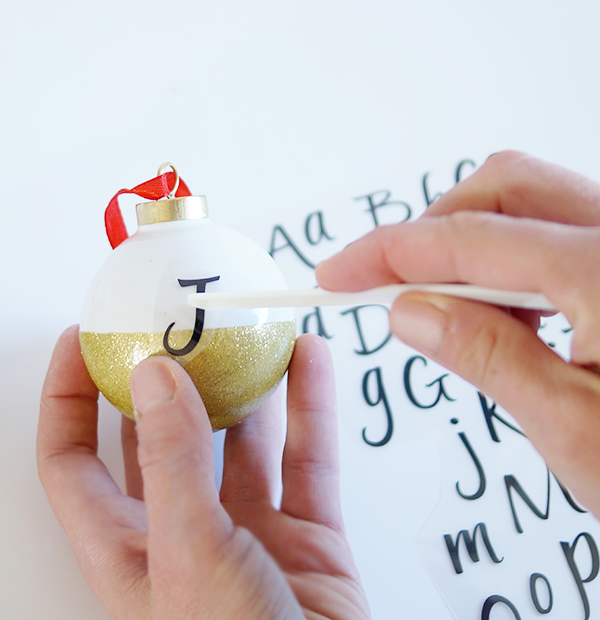
This post is brought to you by Plaid and Blueprint Social. All opinions are my own.

It is the most wonderful time of the year, and that means hands everywhere are covered in glitter and Mod Podge. Mine are no different. Yours shouldn’t be either. I am here to help you out with that by sharing how to make these beautiful graphic holiday ornaments in just a few simple steps. Personalize them as great gifts and keepsake ornaments for your friends and loved ones that will be cherished for years to come. But wait, there is more…other awesome things about this project are the fact that it is super inexpensive to create, and features Plaid’s new Mod Podge Pearl formula!

DIY Vintage Christmas Ornament

SUPPLIES

Plaid Holiday Ornament Challenge Supplies

Mod Podge Pearl

Folk Art Multi-Surface Paint in your favorite holiday colors

Foam Brushes

White Christmas Ball Ornaments to decorate

White Tissue Paper

Alphabet or word stamps of your choice &/0r rub-on transfer letters

Empty bottle with small mouth to hold ball while drying

Masking Tape

Staz-On Black Ink Pad

TUTORIAL

Dip ornament in paintClean ornament with rubbing alcohol and lint free cloth and let dry. Tape off ornament top third or so and dip in multi-surface paint.

Color Block OrnamentsShake and tape ornament to move paint around to cover entire surface of untaped portion of ball.

Is it just me, or does this look like dijon mustard?

Dry Ornament on Bottle

Place ball as shown in empty bottle and let dry overnight or for several hours.

How to Apply Rub on Transfer

Apply rub-on transfer with craft stick. It is helpful to cut out the letter or word before applying so you aren’t trying to maneuver a bulky sheet.

Easy DIY Christmas Decor

That is that for the color block ornaments. Now for the pearlized monogram ball…

Stamp on White Tissue Paper

Stamp desired letter onto white tissue with StazOn ink or other solvent based ink.

Stamped image transferTear letter out by hand to leave feathered borders (as opposed to cutting with scissors).

How to Image TransferPaint entire ornament with a layer of pearl Mod Podge, place letter, then paint a layer of Mod Podge over the top of the tissue paper. Take care not to rip the monogram.Mod Podge Pearl Christmas Ornament TutorialHang ornament to air dry. Add another coat of pearl finish Mod Podge and let dry.
DIY handmade Christmas Ornaments

That’s it! Do you love the pearl finish? Of course you do. It is elegant with an aged feel. It looks great with the glittery gold and silver metallic finishes too.

DIY Christmas Ornaments

 Find more ideas and inspiration by visiting Plaid:

Pinterest

Facebook

Instagram

Plaid Website

Budget Decor for the Holidays With At Home

This is a sponsored post written by me on behalf of At Home for IZEA. All opinions are 100% mine.

I know it seems early, but let’s face it friends, Christmas is rapidly approaching. With ever growing Christmas gift lists, nobody wants to spend a ton on decorating for the holidays That is why I am excited to introduce you to At Home Christmas Decor! This is the perfect stop for all of your decorating needs.

​With all of their indoor and outdoor decorations offered in 15 style themes and over 101 artificial Christmas Trees available in the Tree for Me area, At Home has something for every taste and style.

This store is huge, with an impressive array of affordable Christmas décor and everyday low prices. I was a bit overwhelmed upon walking in, but luckily the staff were eager to breakdown the layout and point me towards the style I was seeking!

I will be the first to admit that styling is not a gift of mine. I can create individual pieces, no problem, but arranging them in an aesthetically pleasing fashion does not come easily. That said, I love this sweet vignette I created with pillows, a blanket and side table accents!

It came together super quickly, easily, and inexpensively – just how I like it! I had a little help from the inspiration page on the At Home website. Check it out to explore the 15 decorative themes and get ideas for decorating your space this holiday season with At Home!

Christmas Pillows

Which decorative theme is your favorite? Comment below and we will see if our tastes are similar! Hint: I like a combo of three!

Visit Sponsors Site

Make Easy Earrings From Upcycled Fabric

How to make earrings

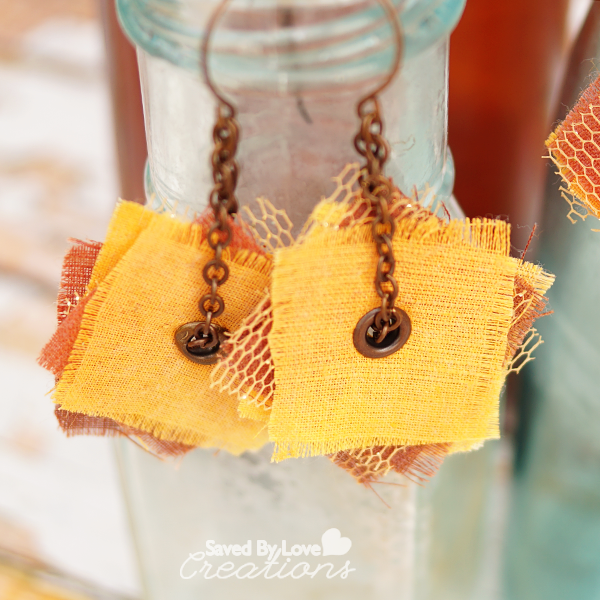
Not only are these earrings easy to make and cute, they are upcycled from some super meaningful fabric.  I created them from one of my beloved grandpa’s many handkerchiefs, soon after his passing. Whipping the cloth out of his pocket, he gently wiped away the tears from his loved ones eyes, and eliminated runny noses with joy. A single hanky is big enough to fashion several pairs, so the women in our family all have a wearable reminder of the best man to ever live (yes, I am biased, but also, he was the best)! Today I am going to show you how to make your own version in just a few simple steps. They would be cute fashioned from old jeans, your favorite shirt, your grandpa’s hanky, or just about any fabric you want. Let’s do this!!

How to Make Easy Upcycled Hanky Earrings @savedbyloves

SUPPLIES:

How to Make Memory Earrings

White handkerchief or fabric of your choice

Organza or Tulle

Metal Eyelets

Crop-a-Dile

Metal chain small enough to fit through eyelet

Metal washer from hardware store that eyelet will fit in and not slide through when set

Ear Wire from Vintaj

Tonic Scissors

Jewelry pliers (2 pairs)

-side note: I gave my grandpa the book Between Me and You GRANDPA, he filled it out completely, and it is a blessing beyond words. My most valued possession, for sure.

INSTRUCTIONS:

Use Spray Inks to Color Hanky

Spray fabric if desired. I went with a fall color palate using the spray inks shown. Let air dry for a couple of hours, then set by drying in machine on high heat for 5 minutes.

Make a Square Template From Cardstock

Make a square template from card stock about 1.5 inches wide and long (yeah, a square).

Cut Squares from fabric and organza

Cut several squares from your fabric of choice using the template as a guide. I cut some from tulle in addition to the hanky.

Hole Punch Center of Template

Hole punch center of template with Crop-a-Dile

Hole Punch Center of Fabric

Hole punch center of fabric using template as a guide. You can hole punch several squares at the same time, depending on the thickness of your fabric.
Make a Sandwich from Fabric Squares with Washer in the MiddleMake a sandwich from fabric squares with washer in the middle. I used 3-4 squares on each side of the washer. The purpose of the washer is stability and weight.
Use Crop a Dile to Set EyeletUse Crop-a-Dile to set eyelet.

https://savedbylovecreations.com/wp-content/uploads/2015/07/Insert-Metal-Chain-Through-Eyelet.png

Insert chain about 3 inches long through eyelet.

Use Jewelry Pliers to Add Ear Wire

Make a loop from the chain, using ear wire to join both the chain loops on each end. You are finished!

DIY Upcycled Fabric Earrings

DIY Upcycled Fabric Earrings from Hanky @savedbyloves

I love having something so reminiscient of my grandfather to wear, not that I need it to remember him. He is everywhere and I am blessed! I love you, Pa. And now the flood gates are open.

Here is to grandfathers everywhere! May you cherish every moment with yours.


DIY Polymer Clay Grunge Heart Earrings

Easy DIY Polymer Clay Grunge Heart Earrings @savedbyloves

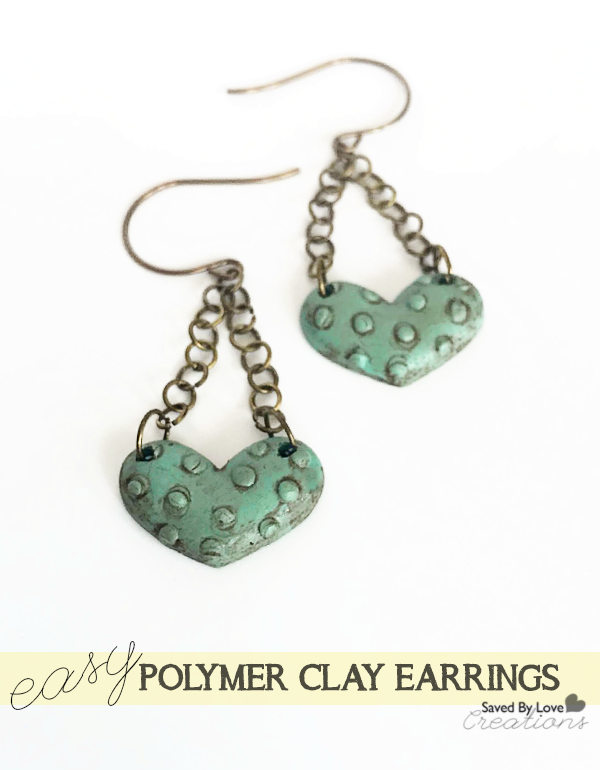
The thing that is awesome about polymer clay, or one of the many things I should say, is that it doesn’t require many tools or supplies. I decided to quench my desire to create with this simple polymer clay earring project that I could pull off with a quick trip to the craft store. Simple is an essential until I get my studio unpacked and set up, and this project fit the bill. These cuties were so easy to make, and I get tons of compliments and requests for a pair every time I wear them. They compliment many outfits and styles, are lightweight and would make great christmas and birthday gifts. Let’s get started!

SUPPLIES:

Polymer Clay in color of your choice

Mod Melts Mold Trinkets

Hand drill or toothpicks or bead reamer

Vintaj Ear Wire

brown acrylic paint

paper towels

oven

ruler

ink pen or sharpie

4mm and 6mm jump rings in antique brass finish

INSTRUCTIONS:

Condition clay by hand or in clay roller machine.

I highly recommend using the Sculpey machine over the Amaco craft roller machine. I started with the latter and was super frustrated. I found it at Michaels and grabbed it since I didn’t have my materials with me on my trip back to Indiana for my sister’s wedding. The handle kept flying out as I was rolling the clay, landing on my feet a few times (ouch)! Not only that, but it broke less than 24 hours after I bought it and wouldn’t roll. I am an experienced polymer clay enthusiast, and this machine was a huge disappointment. Luckily Joanns had a Sculpey machine and it rocks!! It is so smooth, and the handle hasn’t popped out once. Phew!

Mod Melts Trinket Mold

Roll a ball in your hand and press into mold. Play around to find out how much clay you need to fill the mold flush with the top. You don’t want to much or too little clay. Also, roll the clay into a smooth ball so there aren’t creases on the front of your finished piece.

*Tip: You can use Armor-All or baby powder as a cheap alternative to mold release.

With this project I didn’t use anything and it popped out pretty easily by turning the mold upside down and pushing it out. Be careful not to distort the piece since the clay will still be soft! Waiting for a half hour before removing it will make it easier since the clay won’t be as warm from just being worked.

Polymer Clay Tutorial

Next, Bake in oven per instrucions. I like to bake before piercing so that the piece doesn’t distort. If you want to pierce while soft, use a tooth pick or bead reamer to poke a hole. If you bake first, you can measure and mark as shown.

How to make earrings
Using a hand drill instead of a bead reamer makes it less likely your piece will chip at the hole site.

Pics are of a different heart, but the process is exactly the same.
Drill hole in polymer clay

Work from front of piece to back as shown so if it does chip when it comes through, the defect will be on the back of the piece.

How to antique polymer clay jewlery

Antique the piece by applying dark brown acrylic paint and immediately wiping away with a paper towel. You can do this before or after drill the holes.

DIY jewelry Tutorial

Next, use jewelry pliers to open jump rings and insert 6mm rings into holes.

DIY Polymer Clay Grunge Heart Earrings @savedbyloves

Make a chain with 15 of the 4mm jump rings and attach each end of the chain to each of the 6mm rings and close them. Attach ear wires to the 8th jump ring in the chain and go show off your awesome creation!

Thanks for reading!

If you like to make jewelry, you are going to need a place to store it. Make that too! Here are 50+ DIY Jewelry Storage Projects you can rock…

50+ DIY Jewelry Storage Projects

25 DIY Mountain Crafts and Decor Tutorials

DIY Mountain Craft Roundup @savedbylovesIt’s been way too long since I created and shared with you, my lovies! The reason for that is a move across the country from Indiana to the Colorado Rocky Mountains. I’ve wanted to take this leap for years, and now that I have, my only regret is that I waited as long as I did!

Sky Pond Rocky Mountain National Park Estes Park Colorado

Mountain National Park Estes Park Colorado

In honor of the new residence, I bring you 25 DIY mountain themed craft and decor tutorials from my fellow creatives!  You’ll find everything from advent calendars, to wall art to printable coloring pages and more. As soon as we find a permanent home, we will be able to bring the tools and supplies out of storage to begin creating again. While I am looking forward the unleashing my inner maker, exploring the new surroundings has been a gift! If you can’t get to the mountains where you are, you can bring them to you with this fun round-up! Enjoy and as always, if I left out your project, email me the link!


Instagram DIY Project Tutorials 50 Plus

Over 50 DIY Instagram Projects to Make Updated Square @savedbyloves

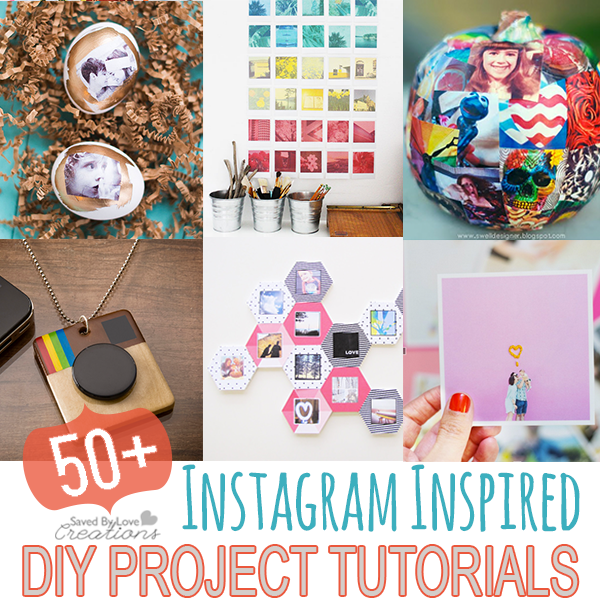
It has been awhile since we shared our favorite 50+ Instagram crafts. We decided to update it with the latest projects to make with your favorite photos. Click the photo above or the link below for the collection. Enjoy!

Instagram Crafts

Easily Make Gorgeous Epoxy Clay Crystal Jewelry

How to Make Gorgeous Epoxy Clay Crystal Jewelry Square @savedbyloves

I went to CHA 2014 in Anaheim California, where epoxy clay jewelry was all the rage. I didn’t see what was so great about it, or why I would use it instead of polymer clay. It took me almost two years to get on board. Now I am a full fledge fanatic. The stuff is wonderful for embedding crystals and other small embellishments, since it is a strong adhesive. No glue is necessary, nor does it need to go in the oven. Once you mix the two parts, it starts to set and cures on its own without heat. Today I am sharing these gorgeous, blingy earring and pendant sets! My friend created hers and has zero experience with jewelry making or clay of any kind.  They came out beautifully, proving no prior knowledge is necessary!

DIY Easy Epoxy Clay Crystal Jewelry

SUPPLIES:

Supplies for Epoxy Clay Earrings

Epoxy Jewelry Clay (we used Silver Crystal Clay)

Beeswax coated toothpick (comes with Crystal Clay Kit) or my favorite tool for picking up small beads and embellishments, Crystal Katana

Crystal Chatons or flat backed Swarovski

Round Pendant Bezels

Ear wire or 20-22 gauge jewelry wire to create your own ear wire

Two pair flat nose jewelry pliers

Jump rings

Rattan cord or other necklace chain

Vinyl or latex protective gloves

INSTRUCTIONS:

Supplies for Epoxy Clay Jewelry

Mix clay according to instructions, equal parts of the two components and wearing gloves.

Embed Crystal Chatons into Epoxy Clay copy

Fill bezel flush with top.

Embed Crystals into Epoxy Clay

Add crystals in desired design with tool.

DIY Copper Crystal Epoxy Clay Earrings

Once cured (overnight) add ear wires with jewelry pliers and add chain or cord to pendant.

DIY Epoxy Clay Crystal Jewelry

Don’t they look so complicated, fancy and expensive?! Well, they aren’t. Your dog could probably make them.

DIY Easy Epoxy Clay Crystal Jewelry

I have gotten so many compliments already!

How to Make Gorgeous Epoxy Clay Crystal Jewelry @savedbyloves

Check out our other jewelry projects here:

Saved By Love Creations Jewelry Tutorials

Epoxy Clay DIY Patriotic Filigree Earrings

DIY Epoxy Resin Filigree Patriotic Earrings

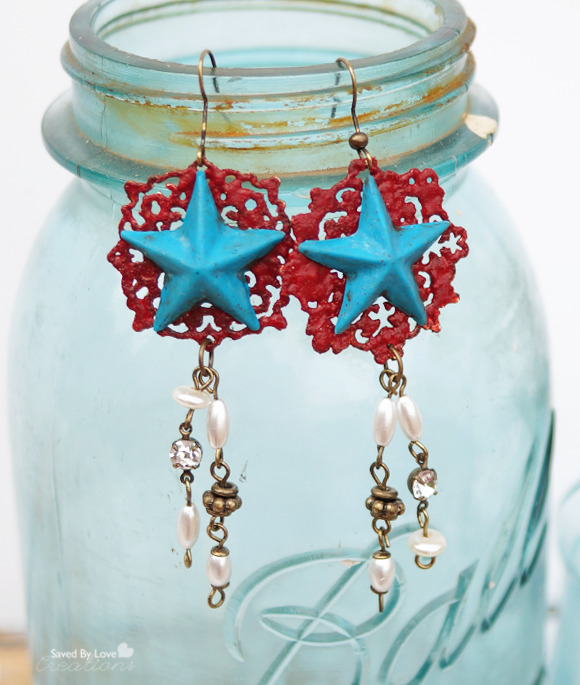
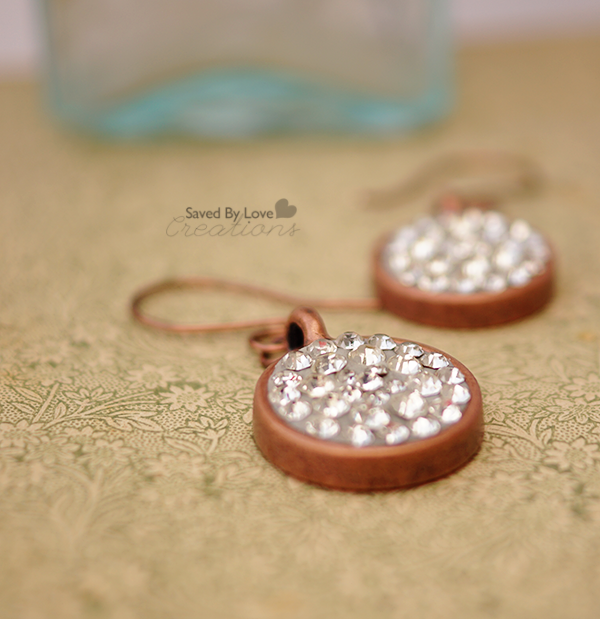
DIY patriotic jewelry is a tradition here at Saved By Love Creations! For this pair I combined my newest obsession – epoxy clay – with metal filigree, to create these lovely, star spangled pieces. This project is super easy, so lets get started.

DIY Patriotic Earrings @savedbyloves

Supplies:

Epoxy Resin Mold

Martha Stewart Silicone Star Mold

Epoxy Clay (Martha Stewart shown here)

Metal Filigree

Ear wires

Metal Chain

Jump rings

Charms

Tim Holtz Distress Embossing Powder

White Embossing Powder

Heat tool or Melting Pot

Red Acrylic Paint (I used Vintaj Patina)

Antiquing Glaze

Small Paint Brush

Paper Towel

Latex gloves

Two pairs of jewelry pliers (flat or needle nose)

Instructions:

Silicone Resin Mold

Make the Stars

Mix equal parts of the epoxy clay per instructions, with gloved hands. Here I used Martha Stewart’s clay. I also like Crystal Clay and Envirotex Epoxy Clay.

Press Clay into silicone mold, making sure to push it down into the corners of the stars. Smooth out back of star with wet fingertip to avoid fingerprints.

Let the stars cure overnight, and paint as desired with acrylic paint. I left the blue stars as is, and for the red, I used the Vintaj Patina in red. I antiqued all of the stars with antiquing medium, applying it with a paintbrush and wiping it away with a paper towel while still wet.

Color the Filigree

Use red and white embossing powder to coat the filigree as shown in this Vintaj video:

Epoxy Resin Jewelry Tutorial

Adhere stars to colored filigree with a small amount of epoxy clay or strong jewelry glue.

Easy Epoxy Clay Jewelry DIY Patriotic Earrings @savedbyloves

Attach ear wires and charms and you are set!

Easy Epoxy Clay Jewelry DIY Patriotic Earrings @savedbyloves Pin

Remember Patriotic Earrings from prior years:

50 Plus DIY Ways to Go Coastal

Over 50 Easy DIY Coastal Decor Beach Inspired DIY projects @savedbyloves copy
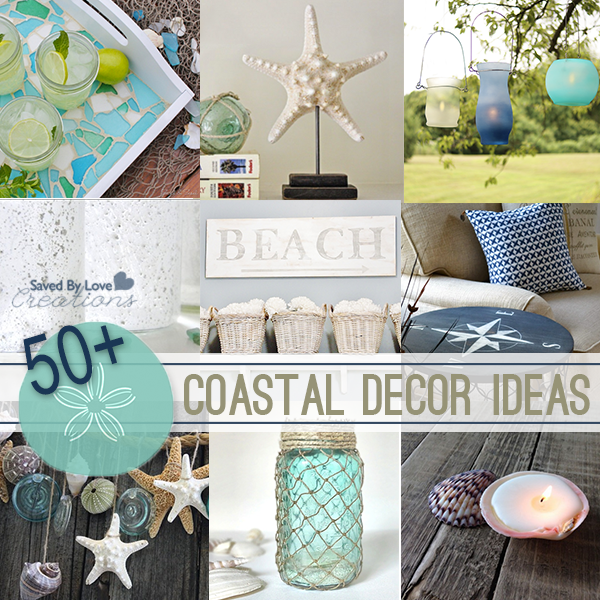
I am in summer project mode, and am sharing with you my favorite beach inspired decor and craft ideas from my creative cohorts. Ahhh, the beach! When you can’t get there for real, going coastal with your home decor is the next best thing. If we missed your project, leave a link in the comments. Enjoy!


Over 50 DIY Coastal Decor Beach Inspired DIY projects @savedbyloves

Pottery Barn Knock Off $3 Sea Glass Votives

Pottery Barn Knock Off With Dollar Store Supplies @savedbylovesI have been out of the creative groove, dealing with some life stuff, and I can’t tell you how happy I am to be sharing with you again! Punctuating the blog break is a super cheap, easy sea glass hanging votive holder tutorial. Why do you care? I will give you three reasons. First, they are awesome… duh. Second, they are a full blown dollar store craft, yay! Finally, I knocked them off from Pottery Barn’s Sea Glass Hanging Votives for a fraction of their cost. Mine… $3 plus stuff I had on hand. Theirs… $60 and no bragging rights. You can put that $57 you saved towards a backyard soiree, complete with stylish ambiance handmade by you!

Supplies:

Dollar Store Glasses

Grab glass holders like these. I got them at Dollar Tree.

Martha Stewart Glass Paint Frost:in sea glass colors (blues, aquas, white)

Rubbing Alcohol

Vinyl or latex gloves

Lint Free Towel

Cosmetics sponges

Votives

Mason Jar Hanging Lantern Wire

Jar Wire Hangers (I got mine at Joann’s, but here are some on Amazon)

*If your containers are spherical without a neck like one of mine pictured, you will need to drill holes in the glass, which I showed you here: How to Drill Holes in Glass

*In this case, or if your glass holders are too large for the wire hangers you can purchase, or if you want to save $, you will need to make your own wire hangers (I cover that below). For that you will need:

DIY Hanging Lanterns

Pliers

Wire Cutters or Metal Snips if your hanger is to hard to cut with wire cutters

Wire clothes hanger or craft wire 16 gauge

Instructions:

PAINTING THE GLASS

How to Make Hanging Votive Lanterns9

Clean the surface of the glass with rubbing alcohol and a lint free towel or paper towel. Make sure to wear gloves. You want to get rid of fingerprints and refrain from touching the glass with your bear hands after cleaning it. The glass paint needs a clean, oil free surface for maximum adherence.

How to Make Hanging Votive Lanterns11

For this lantern, I mixed frosty white and glossy aqua. Apply several thin layers with a soft brush or cosmetic sponge, allowing 30 minutes of dry time between layers. I did two coats with the above mixture, then I used frosty “Surf” on the bottom third for layer three. I went over the entire piece with frosty white to blend and create the ombre effect.

*With glass paint, the key is patience and faith. It will look like crap until it dries…

martha stewart glass paint

I told you. Here I used a soft brush, then remembered why I prefer cosmetic sponges with glass paint. I switched to the sponge for the rest of the layers. It looks awful regardless of what you use, until it dries and evens.

*For more tips and details on glass paint technique:

 Recycled Wine Bottle Address Lantern DIY

Once you have painted your glass holders, let them dry overnight before moving on to the next step:

ADDING THE WIRE HANGER

How to Make Hanging Votive Lanterns8

For all of my hanging votive holders except for the spherical one and the white one, I used these purchased wire jar hangers. They are super handy and I had them in my stash.

As I said in the supplies section, you can make your own version to save cash, if your holder is too big for the mason jar version, or if you have a container with no “lip” to rest on the wire.

DIY Hanging Lanterns

This holder was to large in diameter for the mason jar sized wire hanger. To start, I cut the top off the hanger with metal snips. You can use craft wire and wire cutters just as well. The hanger wire was super hard and difficult to cut and shape, but I couldn’t resist the repurpose. Next time I will go with a thicker gauge craft wire.

How to Make Hanging Votive Lanterns

Begin at one of the two “V” angles.

How to Make Hanging Votive Lanterns2

Form a loop by pulling the right wire under the left wire as pictured.

How to Make Hanging Votive Lanterns3

Bend the left wire just under the loop, and pull the under and back over it above the bend you made (see photo).

How to Make Hanging Votive Lanterns4

Use your glass to shape the wire. When you get to the side opposite your loop, trim the tails of your wire leaving 1.5 inches extra on one tail and about 0.5 inches on the other.

In retrospect, I should have made the wire for this before painting it, as I nicked it in a couple of places. Don’t make my same mistake. It’s easily avoidable.

How to Make Hanging Votive Lanterns5

One the longer tail, bend the wire and wrap the end around a pen or dowel to create a loop as shown.

Bend the other tail so that it sticks up, perpendicular to the wire as shown.

How to Make Hanging Votive Lanterns8

This diagram may help. The perpendicular tail you just made slides over the wire just under the loop from the previous step to secure the hanger around the neck of the container.

How to Make Hanging Votive Lanterns6
Make a handle with a piece of wire by forming a “U” shape with a loop at each end. Leave the handle loops open enough to slide into the neck piece loops.

How to Make Hanging Votive Lanterns7
Assemble as pictured and hang!

Make Dollar Store Sea Glass Votives

I love them! These are perfect for wedding receptions and festivities of all kinds. Best of all, they are charming and cheap.

Pottery Barn Knock Off Sea Glass Votives DIY

This is the Pottery Barn version. I went a little frostier because I like that look. You could use transparent gloss to achieve the look of the blue PB version pictured.

DIY Dollar Tree Sea Glass Votives

You may want to check out our 50+ DIY Lanterns for more fun lighting ideas:


Privacy Policy