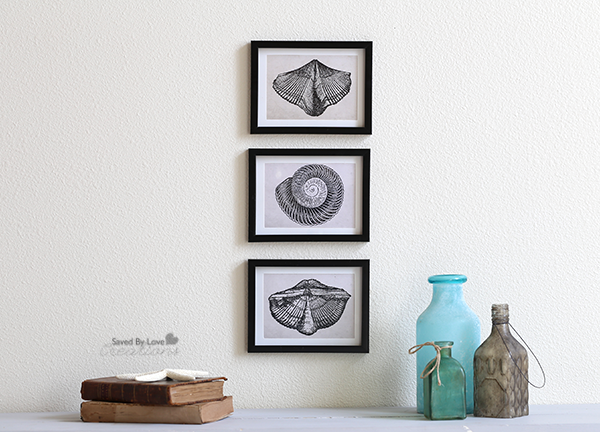
Over 50 Things to Make Using Upcycled Dishes

55 Things to make from Recycled Dishes
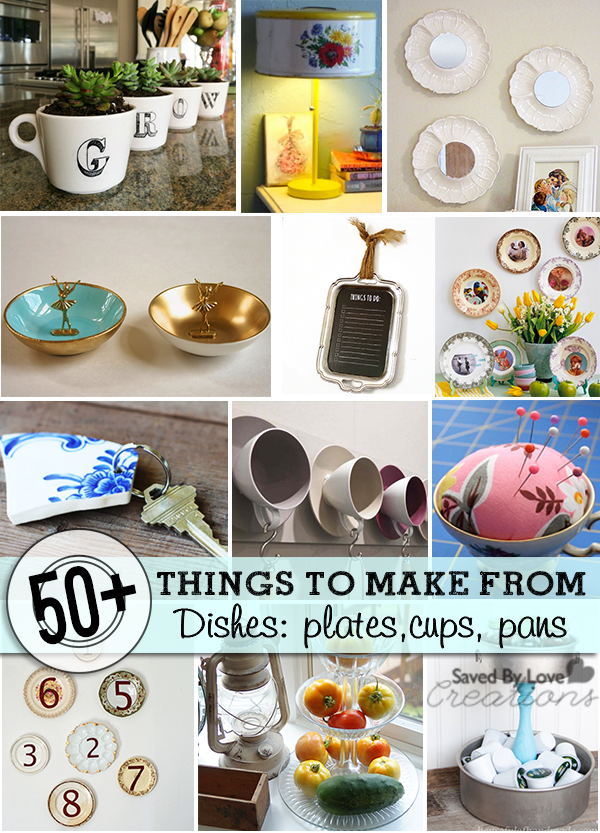
Are you purging your belongings in the spirit of spring cleaning, or decluttering in general? Well, don’t throw those old mismatched, outdated dishes in the “donate pile just yet! Plates, cups, bowls and pans of all sorts can be repurposed into one-of-a-kind DIY home decor pieces that you can cherish, or give away for unique handmade gifts! Enjoy our updated collection of 55 projects you can make with your old dishes…


55 FB Things to make from Recycled Dishes

DIY Repurposed Shelf to Jewelry Display

DIY Jewelry Display

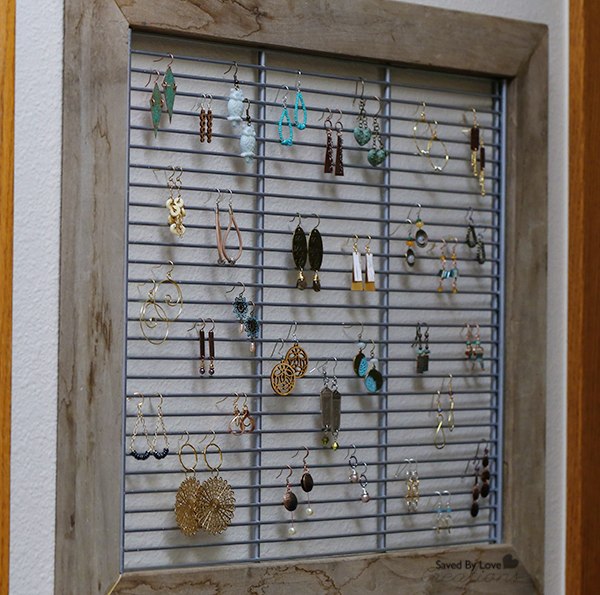
I don’t know what your earring situation is like, but mine was pretty sad until I took action. Today, I am sharing how I turned a piece of metal shelving from Habitat Restore into a cool earring display, with a little spray paint and some reclaimed wood.

Shelf

Here is the wire shelving section I used. Pictured is black chalkboard spray paint I used initially. I decided I didn’t love it, and went with metallic silver Krylon spray paint instead. Just spray evenly over a protected surface, in a space with good ventilation (preferably outdoors). Let dry completely. I let mine sit overnight.

How to Make a Repurposed Jewelry Display

Next it was time to build the frame. I used old wood that I found in the free section on Craiglist. This is by far my favorite source for free wood. My second favorite way to acquire free wood is to drive around alleyways near businesses or behind strip malls, looking for piles of pallets. I always make sure I ask, and most people are happy to have help getting rid of them. I have only been told “no” once.

Mark the wood with a pencil, using the shelf for measuring. Cut to 45° angles on each end of the wood, going in opposite directions. Cut two for the sides and two for the top and bottom. I used Kreg Jig pocket holes to connect the pieces at each corner to form a frame. For more details, see my post on How to Use a Kreg Jig and DIY Barnwood Frames.

DIY Shelving to Jewelry Display @savedbyloves

If you like this project, you will love our round-up of 50+ Creative DIY Jewelry Organizers:

Over 50 Creative DIY Jewelry Organizers to Make

DIY Reclaimed Wood Headboard Under $25

How to make a headboard from reclaimed fence boardsWant a beautiful rustic headboard that’s easy to build and easy on the wallet? Stick with this plan and you can have one in about 4 hours (if you have already prepared the “aging solution”… more on that later). The one we built was made to fit a queen size bed frame but this can easily be modified to fit your particular bed size. Let’s do this!


Step 1.

Decide on the size. As I said earlier we made ours to fit a standard queen size frame. The distance between the attachment points on a frame that size is about 60 inches. So we made the over- all width to be about 3 inches wider than that. This allows the two main upright legs to fall right on the frame so it can be attached with a couple screws.

The height of the headboard is also a personal preference. We chose to make ours about 56 tall. I wouldn’t go any shorter than 40 and not too much taller unless you have an unusually tall mattress and box springs. Otherwise it looks a little overwhelming.

Step 2.

Obtain the lumber. We found some old weathered barn and scrap wood on the free craigslist site. The following boards were used for this particular size head board. The dimensions are approximate because reclaimed stuff comes in various sizes. So long as you keep the main leg rails and the back boards straight and the same thickness, you can use whatever you like.

For ours:

Main leg rails: (2) 2×4 x 56 inches

Back boards: (5) 5/8” x 5.5 “ x 6 ‘ and (3) 5/8” x 3” x 6 ‘ rough sawn cedar or pine dogged eared fencing boards.

Top mantel board: (1) ¾” x 3” x 6’ rough pine or cedar board. (cut to length after assembly)

Trim Board: (1) 5/8 x 1” x 6’ board (cut to length after assembly)

If you end up buying these form a big box place pick out the gnarly, rough looking ones that nobody else wants. They are super cheap (less than a buck and a half a board) and the take up the “aging solution” very well.


How to Weather Wood

Aging solution: To put a darker, weathered look on any new wood that you may have to use in the construction of your piece, here is a kind of a neat and cheap way to do it.

In a plastic bucket mix 1 part water and 1 part white vinegar. Place three or four steel wool pads that you have teased apart a little bit into wispy strands. Make sure the steel wool is submerged in the solution. Put the lid on the bucket and allow it to stand for about 4 days.

Distress wood with vinegar

When its ready to go, use a brush or a cheap roller to apply it to the boards that you want or age or darken. When you first put it on it will want to “bead” up on the wood. After a few seconds the grain opens and it pulls in to the wood and it evens out to a nice “wet” look. The only tip I have is to make sure you don’t leave a big drop or a splash on the surface. Make sure you roll or brush it out so that it the entire surface is evenly wet. It’s a fooler because it’s like painting with water. You don’t think it’s doing anything at first except wetting the surface…but in about an hour you will see what happens. Try some on a practice piece to get comfortable with how to apply it and how many coats. The more you do it the darker it gets. Less is more. Do this to all of your boards before you cut and assemble.

Rip the 2x4

Saw Cuts: The only cut that you have to make that is just a little out of the ordinary cross-cut style is the rabbit cut on the leg rails. Don’t worry they are simple too, but it does require a table saw or a radial arm saw if you want to do it right. I used our table saw so that’s what I’ll explain.

How to Rip wood with table saw

After you have cross cut the 2×4 leg rails to the right length of 56 inches, you are going to perform a rip –cut down the center of the 2×4 with the blade depth set such that it will only go half way through the thickness of the board. So that means the fence is set to 1.75 inches from the blade and the depth of the blade is set to ¾ inches. Rip the entire length of the board. Then do the other leg the same way. Now reset the fence to ¾ inch from blade and the blade depth to 1.75 inches. Fli the board 90 degrees and rip the length of the board. Repeat with other board.

What you should have now is two boards that have a rabbit or lap that runs the entire length. This is where the back boards will sit and what creates the finished hidden edge when you look from the front of the headboard.

Back of the headboard

Next cut your back boards to exactly the same length. They can be whatever length your bed frame demands, and they don’t have to be exactly 60 inches for example, but it is critical that they are all the same. So cut the 5 wide backboards and the three narrower backboards all the same.

Assembly:

Determine layout of boards

Lay the leg rails down on a flat surface ( garage floor?) and then lay the back boards face down between them so they span from one rail horizontally to the other. We decided to run a couple of the narrower ones in between the wider ones to give it a little less uniform look . You can do whatever. If you actually prepared 5 wide and three narrow boards for this you have plenty run down below where a typical mattress and box spring will sit. The idea is that you don’t see a huge gap above the mattress for the pillow to fall down in and that just looks silly. So measure your bed from floor to top of mattress and make sure you attach enough back boards to go all the way down past where the top of the mattress will be.

Kreg jig pocket holes

After you have laid the boards out and checked them for length and fit , you can actually fasten them into the leg rails. There are a number of ways to do this, we like to use Kreg jig screws. They provide secure, quick fastening. We put two holes in the end of each of the back boards to keep the board from cupping. We also used glue under the edge for added measure. For the top board, we used the Kreg jig to drill pocket holes facing up for the attachment of the top “shelf” board.

After you have secured all of the back boards the headboard assembly is pretty much complete. It should be strong enough to stand it up and measure the final length of the top finish piece and the trim piece. We like to run the top “mantel” all the way from the outside leg rail edge to the other. Flush. The width of this top board will dictate the over hang you achieve. You can let it hang over the back and the front if you like. We allowed ¾ inch over hang in the back.

DIY Reclaimed wood headboard

Secure it to the top board using the kreg pocket holes you drilled along the top edge.

The ¾ inch over hang of the top mantel board in the back allowed us to run a ¾ inch board down the back (perpendicular) to each of the horizontal back boards. We then screwed it into each of the back boards from the back so none of it shows (see photo above). This kept all of the horizontal boards even when viewed from the front and will tie them together as on unit so they don’t warp or bend apart from one another and create an unsightly gap over time.

Reclaimed wood furniture

The last piece to put on is the trim board that goes between the legrails and right up under the top mantel piece. This just finished the look of the whole thing in my opinion. Attach with small finish nails and glue.

DIY Headboard

Final finish

Touch up anything you need to with some more aging solution and then seal with your favorite wax or varnish!

35 DIY 2×4 Project Tutorials

35 DIY woodworking plans for 2x4 projects at @savedbyloves
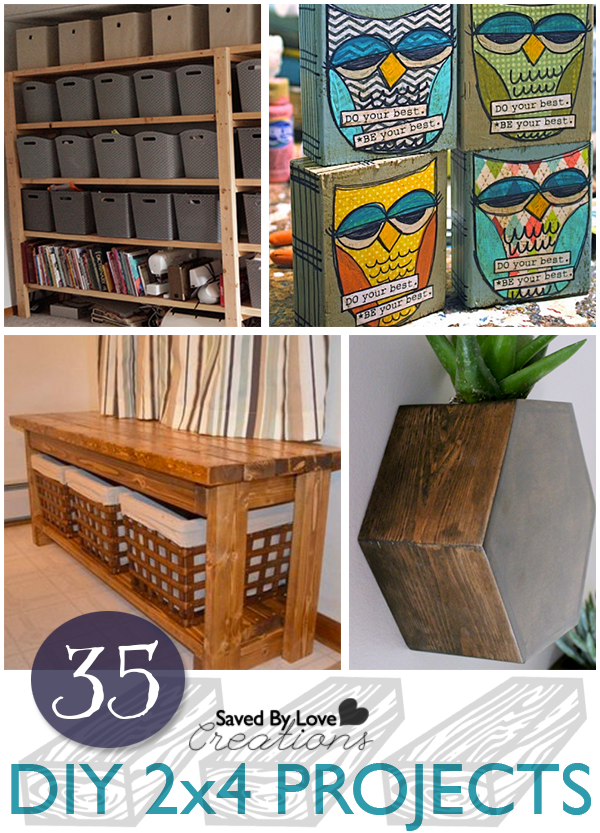
A lot more can be done with a 2×4 than you probably think! Today we have collected our 35 favorite 2×4 projects to share with you, each complete with a DIY tutorial. You will see everything from mixed media art, to picture displays, furniture and more. We hope you enjoy, and find inspiration to raid your scrap wood pile!


The 50 Plus Best Free Easter Printables

50 plus amazing free Easter Printables @savedbyloves
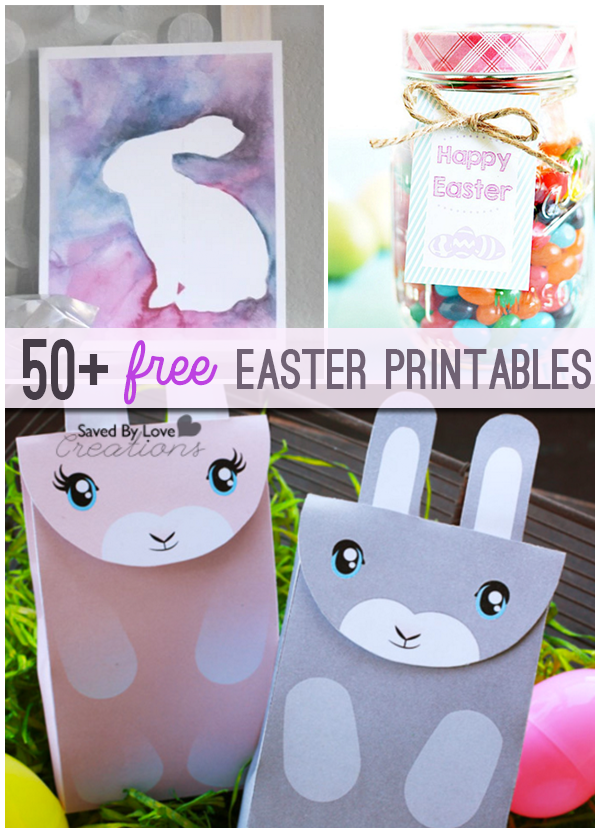
Valentine’s Day is behind us, and Easter is rapidly approaching. Today, we are excited to share our favorite free printables with an Easter theme. You will find bunnies, scripture, flowers, eggs and crosses galore. Refresh those ink cartridges and get ready to spring-ify your crafts and decor, without hurting your pocketbook! As always, if you have a great Easter printable that we missed, leave us a link in the comments so we can include you!


DIY Wood Shelf Craft Storage

Woodworking Craft Room Shelving from 2x4s @savedbyloves

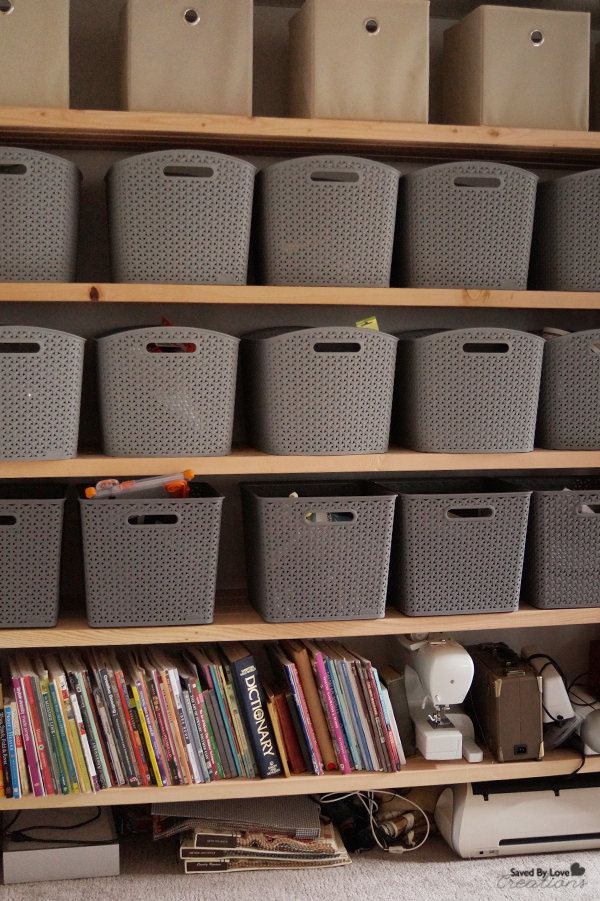
We needing some shelving in our new craft room. The space we had to work with was 81 inches floor to ceiling and about 15 ft. wide. We wanted something sturdy and easy to throw together. We decided to go with 2×4 shelving. It is relatively cheap, easy to work with, super strong and if you don’t go crazy with the screw fasteners it can be disassembled pretty simply if you need to move it.

Storage Ideas

The other dimensions we landed on were the depth of the shelves at 14” and the distance between the shelves of 13”. Once we had these picked it was just a matter of drawing up the simple design to maximize the space and minimize the number of cuts. This way I could buy standard 2×4 lengths.

Overall the shelving unit measures 68 inches (H) x 14 inches (W) x 12 ft (L). It has five levels of shelves spaced 13 inches apart and allowing a nice clearance to the ceiling on the top shelf. We were able to get all of the pieces we needed out of (23) 2x4x12’ and (2) 2x4x10’. The unit is held together with 2” and 2.5” # 8 phillips deck screws and wood glue.

Build Craft Room Shelving from 2x4s @savedbyloves

Purchase list:

(23) 2x4x12’                          2” #8 phillips deck screw

(2) 2x4x10’                             2.5” #8 phillips deck screws        Wood glue

Cut List:

(15) 2x4x 14 inch rungs

(6) 2x4x68’ ladder legs

Tools:

Circular saw or chop saw

Milwaukee cordless Hex impact with phillips bit

Milwaukee Cordless drill for pilot holes

Hammer

Measuring tape

Pencil

DIY Craft Room Shelving from 2x4s @savedbyloves

Ladder supports

The first thing to do is to build what I call the ladder supports. It’s obvious why I call them this, they look like ladders with the rungs providing the support for the shelf boards. This length of unit needs three of these identical ladder supports. So first using 3 of the 2x4x12’ boards cut (6) 2x4x68” pieces which will be the legs of the ladder and using the (2) 2x4x10’ cut 15 pieces 14” long which will be the rungs of the ladder. After you have all the pieces cut lay out one of the ladders on the floor and mark the legs at the point where you want the rungs to attach. Remember that you will be placing a 2×4 on top of these that will become the actual shelf surface. So adjust the position of the rungs so they are evenly spaced with the top rung allowing the shelf to be flush with the top of the leg and the remaining shelves to be 13 inches below the next shelf as you go down. (see picture). Secure the 14 inch rungs in place between the two legs using the 2.5” deck screws and glue on the joints. Use 4 screws per rung. We drilled pilot holes in the leg to make it easier to hold the rung and get it square on the leg as you screw it in. We used a really awesome Milwaukee power impact driver that made life really easy. It had tons of power and the torque settings were perfect to keep the phillips drill bit in the screw without twisting out, and not countersinking so rapidly that it splits the wood. At the end of this section you will have three identical ladder supports.

Shelf stringer boards

Now take the rest of the 2x4x12’ boards and place them between the ladder supports. Four boards will fit snugly within the 14 inch space in the rung. When you have a ladder section on each end and one centered in the middle at the 6 foot mark. Use the 2 inch deck screws to secure the shelf boards to the rungs. I find it wise to have a helper and to fix one shelf board top front and back and bottom front and back first. This will hold the whole thing together and upright while you set the rest of the shelf boards. Finish setting and screwing in the shelf boards and you are done !!

Craft Room Storage Ideas

We also threw together a paint storage unit with our extra 2×4 from this project.  It is super simple. Another ladder unit as you can see. We just measured the space and cut our shelves  to fit.

Remeber our DIY Custom Built-ins from Bookshelves

https://savedbylovecreations.com/2014/11/diy-custom-built-ins-from-bookshelves.html

It was hard to leave this awesome set up, but we are finally getting settled into a new studio that we love!

Easy Game Night Salsa Recipe

Easy Game Night Salsa Recipe @savedbyloves


Johnnie and I met about two months ago, both having recently moved to Fort Collins, CO from out of state. We both work from home, have a beagle(s, in her case), love outdoor adventures, and are positive and active people. Needless to say we hit it off well. Our first meeting was at the dog park, then we carpooled to a snowshoeing event the following weekend, and went to float in isolation tanks, too!


I just love food made from whole, fresh ingredients. I originally came up with this recipe when I was living in Maryland and getting fresh organic veggies weekly through a CSA subscription. Salsa is amazing because you can eat it so many ways- with corn chips, on top of a baked chicken breast, with scrambled eggs, and on top of a turkey burger just to name a few. Who doesn’t love a tasty way to get some extra veggies on their plate?

Salsa Recipe

Ingredients:

6-8 large tomatoes

2 lemons

1/2 large bunch cilantro

couple pinches of sea salt and pepper

1 green pepper

1 onion

2 cloves garlic

Optional: jalapeno pepper(s), if you like spicy salsa


  1. Juice lemons (remove seeds).
  2. Remove seeds and stem from pepper. Cut into quarters. If using jalapenos, dice and remove top.
  3. Peel onion and garlic. Quarter onion. Mince garlic
  4. Throw all ingredients along with the stuff from steps 1-3 into the food processor. Pulse until desired consistency, stopping to scrape/mix as needed.
  5. Serve with chips or over burgers or as desired. Refrigerate leftovers.


Note: We didn’t have a food processor at our disposal, so instead, we chopped the tomatoes into quarters, cut the cilantro with scissors into small bits (just the leaves), diced the onion into small bits, and diced the garlic and peppers. Then we followed the recipe above using a blender. The food processor just saved some time dicing, but the end product is equally tasty.


My love for the Spanish language and Hispanic culture goes farther than just making tasty salsa! After majoring in Spanish in college and studying abroad in Spain, I started my own virtual business teaching practical conversational Spanish and English to break down language barriers. I offer personalized one on one language lessons, appropriate for all levels, including those with no prior language experience. Payment plans available. I also offer group language lessons at a great rate, virtual workshops, and trips to Spanish speaking countries. Want to chat more with me about learning Spanish (or English) conversation virtually? Check out my website at www.rompiendolasbarreras.com or email me at hannahrompiendolasbarreras@gmail.com.

Guest post by Hannah Pinkerton, Rompiendo Las Barreras- Virtual Spanish & English Conversation Lessons

Thank you so much, Johnnie for allowing me to do a guest post on your blog this week. You are the best!


Easy Bubble Gum and Cotton Candy Fudge Recipes

Fudge Recipes


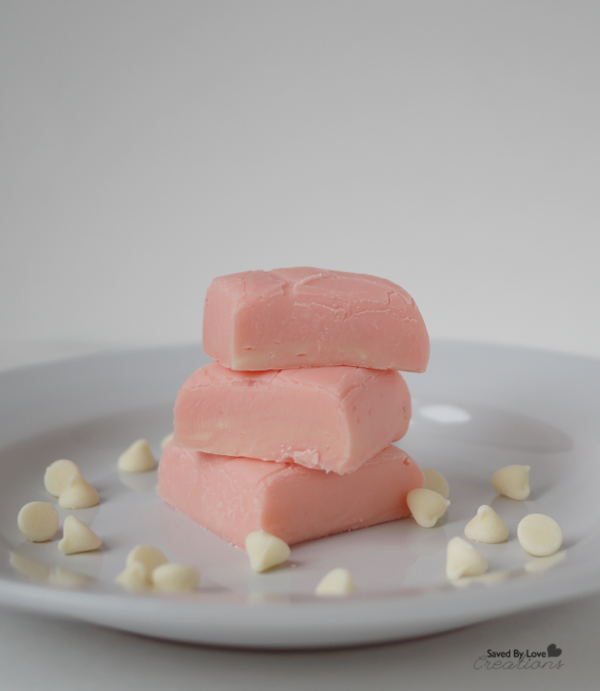
I recently had the craving for some bubble gum fudge and decided to give making some a go! The seven year old inside was coming out. Bubblegum and cotton candy have always been favorite flavors of mine. While I was hunting down the bubble gum flavor I used, I was pleasantly surprised to find cotton candy as well. Yay! It’s the little things. The fudge was ridiculously easy to make, and it was a huge hit as a game night recipe a couple of days later. It would be the perfect baby shower dessert, don’t you think? Whip some up for the kiddos, or for the inner kid!

Bubblegum Fudge Recipe

INGREDIENTS
20 Wilton Candy Melts Pink or Wilton Candy Melts Blue for the cotton candy version
1 can (14 oz.) sweetened condensed milk
1 teaspoon LorAnn Bubble Gum Liquid Flavoring or LorAnn Cotton Candy Liquid Flavoring

DIRECTIONS

Easy DIY Bubblegum Fudge Recipe
In a large microwave safe bowl, combine sweetened condensed milk with Wilton Candy Melts. Microwave on high for 1-1/2 minutes to melt candy. Remove from microwave and stir until smooth.

Add bubble gum flavoring and stir thoroughly.

Pour mixture into wax paper-lined 9-inch square pan and spread evenly. Chill for 4 hours or until fudge sets.

How to Make FudgeDump fudge out onto cutting board, peel away wax paper and cut into squares. Keep in an airtight container and enjoy!

This recipe is adaptable to any flavor and color. Make your favorite for game night snacks. Find Wilton Candy Melts in your favorite team’s colors for a Superbowl Party recipe that will surely be a hit!

How to Make Fudge @savedbyloves

Easy Budget Christmas Decor Ideas

This is a sponsored post written by me on behalf of At Home for IZEA. All opinions are 100% mine.

It is already December! Are you ready for holiday entertaining? I have to admit, we are not. We just got the keys to our new Colorado home on Tuesday. We’ve spent the last 6 months in corporate housing, which was basically like a hotel. Bring your clothes and toiletries and get comfy. Moving from Indiana, we got rid of 80% of our belongings, so we are starting fresh! There is a lot to be done in the way of home furnishings and decor around here, which is why I am so grateful to have discovered At Home Christmas Decor and more. Today I am focusing on holiday decor specifically, but that store has it all, and the prices are unbeatable. 

When we first looked at this house before landing on a decision, this little nook caught my eye as a place I knew I’d have fun decorating! Think of the potential. It will be my go to spot for showcasing each season and holiday with a themed vignette. 

My only complaint about At Home is that I seriously have a hard time narrowing things down with the 15 decorative themes of Christmas Decor. 

Snowcapped Scene is my favorite. That is the reindeer I chose for my winter vignette, as well as the candle holder. I love the owls and St. Nicholas figures too. They are a matte, chalky distressed finish with metallic underneath. So pretty!

I couldn’t resist these aged gold bells either. You will find them in the Heaven on Earth themed section, along with other beautiful, gilded gold decor.

Now we get to talk about my favorite finds from this At Home trip! This wreath is so beautiful, and you won’t believe the price! I found mercury glass monogram ornaments for under $3 and displayed one in the center of the wreath, as you can see. The wood background is also from At Home, in their ridiculously huge and wonderful wall decor section. The barrel display table, you ask? Got it there too! I found a small one, seen here, and a larger one which I bought for a side table in our new living room. So cool! I love the combo of wood and rusty, galvanized metal.

I also found the distressed white medallion pictured here, knowing it would complete the scene perfectly!

My next stop? The Tree for Me area, where there are Christmas Trees to fit every style! We are entertaining here soon, and what holiday party is worthwhile absent a Christmas tree? We will be all decorated for the holidays, indoors and out, with the help of At Home. We may not have shower curtains or a coffee table before that happens, but we can get those there too!

Thanks for visiting. Be sure to stop by At Home’s inspiration gallery and let us know your favorite style or piece!

Visit Sponsors Site

Christmas Dining Room Table Scape with At Home

This is a sponsored post written by me on behalf of At Home for IZEA. All opinions are 100% mine.

I recently shared with you At Home Christmas Decor, the one-stop-shop for you to decorate you whole house this Christmas– every single room! At Home offers a total holiday solution for every home, with their unmatched assortment of both indoor and outdoor décor items for Christmas.

As I shared previously, the Christmas and holiday decor is featured in fifteen decorative themes, to fit every style and taste.

In addition, At Home offers 101 Varieties of artificial Christmas Trees in the Tree for Me section!

We decided to snatch up their everyday low priced decor to create a Christmas wonderland table scape! 

Using a combination of the Crystal Chateau and Snowcapped Scene decor themes, as well as candles and candle holders from At Home, we created a lovely, wintery holiday vignette for a super low price!

We can’t wait to have company for the holidays this year! With all the money we saved on decor, dinner will be quite the spread. Not only that, but we are in a new space, which will be hitting up At Home to decorate in general. The great prices and stylish decor are not just for the holidays at this store. If you haven’t been there, you are in for a treat!

Visit the At Home inspiration page and check out the decorative themes, which include Seas & Greetings, Holiday Hoedown, Lavish and Luxe, Peppermint Jazz, Berry Platinum, Forest Fairy Tales, Crystal Chateau, Cherished Memories, Heaven and Earth, Midnight Plume, Regal Renaissance, Snowcapped Scene, Handcrafted from Around the World, Dem Darlings and Handcrafted.

Which is your favorite? We love our combo of Snowcapped Scene and Lavish and Luxe!

Visit Sponsors Site

Privacy Policy